
Crockpot Birria Tacos Delicious and Flavorful Meal
. This recipe is friendly for all cooks. The steps are simple and clear. Even beginners can make great tacos. Preparing the ingredients takes a short time. The slow cooker does most of the work. You don't need to worry about constant stirring or checking. It’s an easy way to impress friends and family. - Prep Time: 20 minutes - Cook Time: 8 hours (low) or 4 hours (high) - Servings: 8-10 tacos With a bit of time, you will have a tasty meal ready to enjoy! This blog post guides you through making delicious birria tacos. You learned the key ingredients, like beef, chilies, and spices. I provided step-by-step instructions, including how to prepare chilies and cook the beef. You also discovered tips for storing leftovers and variations to try. Now, you can enjoy tasty birria tacos at home. With practice, you'll create the perfect meal for friends and family. Dive in and savor each bite!](https://fastmealmate.com/wp-content/uploads/2025/07/26480268-fadb-491b-986e-82dbbe9ddeca.webp)
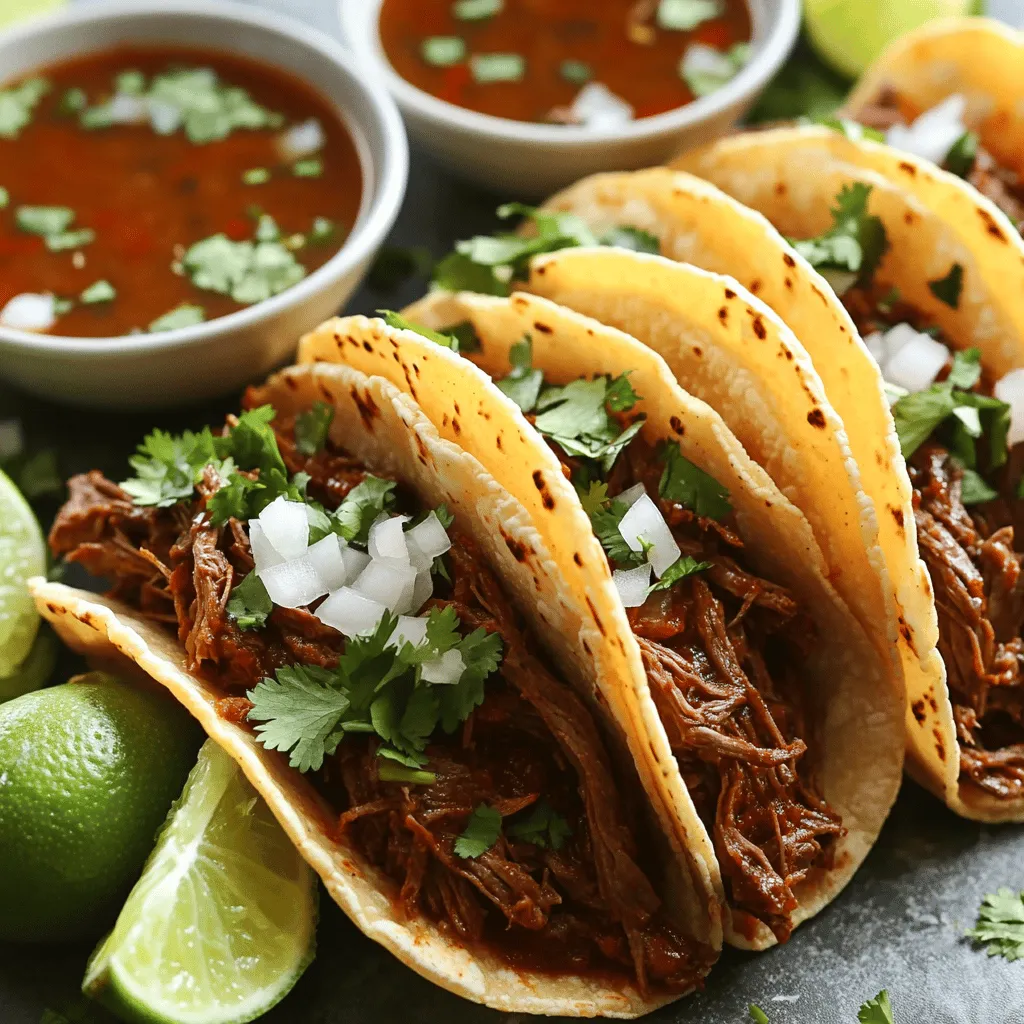
Are you ready to elevate your taco game? These Crockpot Birria Tacos are not just delicious; they are a rich blend of flavors that will have your taste buds dancing. With tender beef chuck, spicy chilies, and fresh toppings, this meal is easy to make and worthy of any gathering. Join me as we dive into the simple steps to create this mouthwatering dish that everyone will love!
Ingredients
Cooking great Crockpot Birria Tacos starts with fresh and simple ingredients. Here’s what you need:
– Beef chuck roast (2 lbs)
– Beef broth (4 cups, low sodium recommended)
– Dried guajillo chilies (3, stems and seeds removed)
– Dried ancho chilies (2, stems and seeds removed)
– Onion (1 medium, quartered)
– Garlic (4 cloves, minced)
– Ground cumin (2 teaspoons)
– Dried oregano (1 teaspoon)
– Apple cider vinegar (1 tablespoon)
– Salt and pepper to taste
– Corn tortillas (about 16 for serving)
– Fresh cilantro and diced onions (for garnish)
– Lime wedges (for serving)
Each ingredient plays a key role in making your tacos flavorful and rich. The beef chuck roast gives the dish a hearty base. The dried chilies add warmth and depth. Don’t forget the fresh cilantro and lime wedges for that final touch!
Step-by-Step Instructions
Preparing the Dried Chilies
– Toast the guajillo and ancho chilies: In a skillet, set over medium heat, toast the chilies. Do this for about 2-3 minutes. You want the chilies to smell good but not burn.
– Soak the chilies in hot water: After toasting, put the chilies in a bowl and cover them with hot water. Let them soak for 15-20 minutes until they are soft.
Blending the Sauce
– Combine ingredients in the blender: Drain the chilies and toss them into a blender. Add the quartered onion, minced garlic, ground cumin, dried oregano, apple cider vinegar, and a pinch of salt. Pour in about 1 cup of beef broth.
– Adjust seasoning as needed: Blend everything on high until it is smooth. Taste the sauce and add more salt if needed.
Preparing the Crockpot
– Layer beef chuck roast in the crockpot: Place the beef chunks at the bottom of the crockpot.
– Pour blended chili sauce and remaining broth: Then, pour the chili sauce over the beef. Add the rest of the beef broth and stir it gently to mix.
Cooking the Beef
– Set slow cooker and cooking times: Cover the crockpot with its lid. Cook on low for 8 hours or high for 4 hours.
– Check for tenderness: The beef should be very tender and easy to shred when done.
Shredding the Beef
– Remove beef and shred it: Use tongs to take the beef out of the crockpot. Place it in a bowl and shred it with two forks.
– Reserve the liquid for dipping broth: Strain the leftover liquid from the crockpot into another bowl. You will use this as a tasty dipping broth.
Assembling Tacos
– Warm and dip tortillas: In a skillet, warm the corn tortillas until soft. For extra flavor, dip each tortilla in the reserved broth first.
– Fill tortillas and add garnishes: Place a generous amount of shredded beef in each tortilla. Top with fresh cilantro and diced onions.
This recipe is not just about cooking; it’s about creating a meal that brings joy.
Tips & Tricks
Best Practices for Perfect Birria Tacos
– Selecting the right cut of meat: I recommend using beef chuck roast. It’s tender and flavorful. You can also use short ribs for more richness. Ensure you cut the meat into 1-2 inch chunks for even cooking.
– Adjusting spice levels: Spice is key to birria. If you like it mild, use fewer chilies. For more heat, add extra guajillo or ancho chilies. Taste the sauce before cooking to find your perfect balance.
Cooking Time Variations
– Cooking on low vs. high settings: For the best results, I prefer cooking on low. This allows the meat to become very tender. If you’re short on time, high can work too, but the meat may not shred as easily.
– Optimal time for tender beef: Generally, cook on low for about 8 hours. If on high, aim for 4 hours. The meat should easily fall apart when ready.
Serving Suggestions
– Presentation ideas for taco platters: Serve tacos on a colorful platter. Arrange them tightly together for a stunning display. Garnish with fresh cilantro and diced onions for added color.
– Accompaniments for a complete meal: Pair your tacos with lime wedges and a bowl of dipping broth. You can also serve rice and beans on the side for a hearty meal. Enjoy with your favorite salsa for an extra kick!
Variations
Alternative Meats
You can switch things up by using different meats for your Birria tacos. Chicken or pork also works great. The cooking time may change. Chicken cooks faster than beef, so check it after three hours. Pork can be just as tender and flavorful as beef. For a meatless version, use jackfruit or mushrooms. These options absorb flavors well and give you a tasty dish.
Flavor Enhancements
Want to elevate your tacos even more? Try adding spices like cinnamon or cloves. These spices add warmth and depth. You can also mix in vegetables like bell peppers or carrots. This adds color and nutrition, making your dish even better.
Taco Styles
When it comes to taco styles, you have choices! Soft tacos are classic and easy to handle. They are made with corn tortillas. If you prefer crunch, go for crispy tacos. Just fry the tortillas in a bit of oil. You can also choose between flour and corn tortillas. Each brings its own flavor and texture to the meal. Explore both to find your favorite!
Storage Info
Storing Leftovers
After enjoying your delicious tacos, you may have some beef left. To store shredded beef, let it cool down first. Place it in an airtight container. You can keep it in the fridge for up to three days. For the tortillas, keep them in a separate bag. Store them at room temperature in a cool, dry place. This helps keep them soft and ready for your next meal.
Freezing Tips
If you want to save the cooked Birria for later, freezing is a great option. First, let the shredded beef cool. Then, place it in a freezer-safe bag. Make sure to squeeze out all the air before sealing. You can freeze it for up to three months. When you are ready to enjoy it, thaw the beef in the fridge overnight. To reheat, warm it in a pot on low heat. You can add a little broth to help keep it moist.
Shelf Life
Stored beef in the refrigerator should be used within three days. After this time, it may spoil. Look for signs of spoilage like a sour smell or discoloration. If you notice these signs, it’s best to throw it away. Keeping an eye on your food helps ensure safety and taste.
FAQs
What is Birria?
Birria is a traditional Mexican dish. It originated in the state of Jalisco. People first made it with goat meat. Now, beef is the most common choice. It features a rich, spicy broth. You can find it in tacos or served as a stew. This dish has deep roots in Mexican culture. It is often served at special events and holidays. The flavors come from dried chilies, spices, and herbs.
Can I make this recipe in an Instant Pot?
Yes, you can use an Instant Pot. To modify the recipe, follow these steps:
– Sauté mode: Start by sautéing the beef in the pot.
– Cooking time: Cook on high pressure for 60 minutes.
– Natural release: Let the pressure release naturally for 10-15 minutes.
These changes help cook the beef quickly while keeping it tender and flavorful.
What are the best toppings for Birria tacos?
Toppings add fun flavors to your tacos. Here are some great choices:
– Chopped fresh cilantro
– Diced onions
– Crumbled queso fresco
– Sliced radishes
– Avocado or guacamole
– Lime wedges for squeezing
Feel free to mix and match these toppings for your perfect bite!
Is Birria spicy?
Birria can be spicy, but you control the heat. The dried guajillo and ancho chilies add warmth. If you want less heat, you can use fewer chilies. Adding sour cream or cheese can help cool it down. Customize the spice level to fit your taste.
How do I serve Birria tacos?
Serving Birria tacos is simple and fun. Follow these tips:
– Serve with broth: Use the reserved liquid as a dipping sauce.
– Accompaniments: Offer lime wedges and your favorite toppings.
– Taco presentation: Arrange tacos on a colorful platter for a festive look.
These details make your meal more inviting and enjoyable.You start by toasting dried chilies. After that, you soak them in hot water. Blend the chilies with onion, garlic, and spices to make a rich sauce. Then, coat chunks of beef with this sauce in the crockpot. Cook on low for eight hours or high for four hours until the meat is tender. Shred the beef and serve in corn tortillas with fresh toppings.
Difficulty Level
This recipe is friendly for all cooks. The steps are simple and clear. Even beginners can make great tacos. Preparing the ingredients takes a short time. The slow cooker does most of the work. You don’t need to worry about constant stirring or checking. It’s an easy way to impress friends and family.
Prep & Cook Times
– Prep Time: 20 minutes
– Cook Time: 8 hours (low) or 4 hours (high)
– Servings: 8-10 tacos
With a bit of time, you will have a tasty meal ready to enjoy!
This blog post guides you through making delicious birria tacos. You learned the key ingredients, like beef, chilies, and spices. I provided step-by-step instructions, including how to prepare chilies and cook the beef. You also discovered tips for storing leftovers and variations to try.
Now, you can enjoy tasty birria tacos at home. With practice, you’ll create the perfect meal for friends and family. Dive in and savor each bite!
. This recipe is friendly for all cooks. The steps are simple and clear. Even beginners can make great tacos. Preparing the ingredients takes a short time. The slow cooker does most of the work. You don't need to worry about constant stirring or checking. It’s an easy way to impress friends and family. - Prep Time: 20 minutes - Cook Time: 8 hours (low) or 4 hours (high) - Servings: 8-10 tacos With a bit of time, you will have a tasty meal ready to enjoy! This blog post guides you through making delicious birria tacos. You learned the key ingredients, like beef, chilies, and spices. I provided step-by-step instructions, including how to prepare chilies and cook the beef. You also discovered tips for storing leftovers and variations to try. Now, you can enjoy tasty birria tacos at home. With practice, you'll create the perfect meal for friends and family. Dive in and savor each bite!](https://fastmealmate.com/wp-content/uploads/2025/07/26480268-fadb-491b-986e-82dbbe9ddeca-300x300.webp)
![- ripe tomatoes - onion - garlic - extra virgin olive oil - salt and pepper - vegetable broth - granulated sugar - fresh basil leaves - balsamic vinegar - heavy cream (optional) When I make roasted tomato basil soup, I gather the freshest ingredients. Ripe tomatoes are the star. They give the soup its rich flavor. I love using juicy, in-season tomatoes for the best taste. Next, I chop a large onion. It adds sweetness and depth. I also use garlic, which gives the soup a warm, inviting aroma. Extra virgin olive oil is a must. It helps to roast the veggies and adds healthy fats. Salt and pepper season the soup perfectly. I then choose low-sodium vegetable broth. It keeps the soup light but flavorful. A teaspoon of granulated sugar balances the acidity of the tomatoes. Fresh basil leaves add a fragrant touch. I use them generously for that classic flavor. A splash of balsamic vinegar brightens the taste. Finally, I consider adding heavy cream. It makes the soup creamy and rich, but it's optional. This combination of ingredients creates a delightful soup that warms the soul. For the complete recipe, check out the [Full Recipe]. Tomatoes are full of vitamins. They have vitamin C, potassium, and antioxidants. Eating tomatoes can support heart health and skin. Basil is more than just a herb. It has anti-inflammatory properties and is rich in vitamins A and K. It can help boost your immune system too. Olive oil is known for its health benefits. It contains healthy fats that can lower bad cholesterol. It also has antioxidants that help fight disease. These ingredients not only taste great but are good for you too! First, preheat your oven to 425°F (220°C). This helps the tomatoes roast perfectly. While the oven heats, prepare your fresh ingredients. Take 2 pounds of ripe tomatoes and cut them into quarters. Next, chop 1 large onion into bite-sized pieces. Finally, peel 4 cloves of garlic and leave them whole. Now, it's time to roast. On a large baking sheet, arrange the quartered tomatoes, chopped onion, and whole garlic cloves. Drizzle ¼ cup of extra virgin olive oil over the veggies. Season with salt and freshly ground black pepper to taste. Toss everything together to coat evenly. Roast the vegetables in the oven for about 25-30 minutes. You're looking for caramelized edges and soft onions. The aroma should be sweet and inviting. Once roasted, take the baking sheet out and let the veggies cool for a few minutes. In a large pot, combine the roasted vegetables with 2 cups of vegetable broth. Add 1 teaspoon of granulated sugar and 1 cup of fresh basil leaves. Heat the mixture over medium until it simmers. This helps all the flavors blend nicely. Next, you’ll blend the soup. Use an immersion blender for a smooth consistency. If you don’t have one, carefully pour the soup into a blender in batches. Return the blended soup to the pot. Add 1 teaspoon of balsamic vinegar for a hint of tang. For a creamy texture, stir in ½ cup of heavy cream if you like. Taste your soup and adjust the seasoning with salt and pepper as needed. Serve hot in bowls, garnishing with fresh basil leaves or a swirl of olive oil for a nice touch. For the full recipe, check out the detailed instructions. Seasoning is key to great soup. Use salt and pepper to enhance the taste. Adding a sprinkle of sugar balances the acidity of tomatoes. Always taste as you go. This lets you adjust flavors to your liking. Roasting is also vital. Roast your veggies for 25 to 30 minutes. This helps develop a deep, sweet flavor. The edges should caramelize nicely. You want that lovely aroma wafting from your oven. To make a rich soup, you can add heavy cream. This gives a smooth, creamy texture. If you want a lighter option, use blended beans or pureed potatoes. Both will add body without extra fat. When blending, make sure to mix well. This helps create a uniform texture. If you prefer a chunkier soup, blend only half. This way, you get a mix of smooth and textured soup. A beautiful presentation makes your dish shine. Garnish with fresh basil leaves for color. A swirl of olive oil adds a nice touch, too. Serve your soup in deep bowls. Pair it with crusty artisan bread or grilled cheese. This gives a nice crunch and complements the soup. You can also add some croutons on top for extra texture. Enjoying the soup is about the experience, so make it look good! {{image_4}} You can change this soup by adding more vegetables. Carrots add sweetness. Bell peppers bring a nice crunch. Chopping them into small pieces helps them cook well. You might also try adding zucchini for a fresh twist. Using fresh herbs like thyme or oregano can boost the flavor. These herbs add a new layer of taste to your dish. If you want a vegan soup, you can skip the heavy cream. Use coconut milk instead for a creamy texture. Almond milk is another good choice. For broth, make sure to use vegetable broth. This keeps the soup vegan. Adjust the seasoning to fit your taste. You can change the soup's taste with spices. Adding cumin or smoked paprika gives a warm depth. A pinch of chili flakes can add heat. You can also explore cultural variations. For example, Italian versions may include a dash of pesto. Some Mexican versions use lime juice and cilantro. These spices and ingredients make your soup unique and exciting. For the full recipe, check out the [Full Recipe]. After you enjoy your roasted tomato basil soup, you may have some left. Here’s how to keep it fresh: - Refrigeration tips: Store the soup in an airtight container. It lasts for about 4 to 5 days in the fridge. Let it cool before sealing to prevent moisture buildup. - Freezing the soup: If you want to save it longer, freezing works well. Use freezer-safe bags or containers. Leave some space at the top as the soup expands when frozen. It can last up to 3 months in the freezer. When you're ready to enjoy your soup again, here’s how to reheat it without losing flavor: - Methods to reheat without losing flavor: The best way is to use the stovetop. Pour the soup into a pot and heat it over medium heat. Stir often until it's warm. You can also use a microwave. Heat in short bursts, about 1 to 2 minutes, stirring in between. - Tips for maintaining texture: If the soup seems too thick, add a splash of broth or water. This helps restore its creamy texture. Always taste before serving to adjust the seasoning if needed. Roasted Tomato Basil Soup lasts about 5 days in the fridge. Store it in an airtight container. Make sure it cools down before sealing. If you see any mold, toss it right away. For best taste, heat and enjoy it within those days. Yes, you can use canned tomatoes. They are convenient and often more consistent in flavor. Canned tomatoes save time, but fresh tomatoes add a brighter taste. When using canned, choose whole or crushed tomatoes without added sugars. Drain excess liquid to avoid a watery soup. You can pair the soup with a variety of dishes. Some great options include: - Grilled cheese sandwiches - Crusty artisan bread - Fresh basil pesto pasta - A simple mixed green salad These dishes complement the soup's rich flavors and add texture to your meal. For a complete experience, consider adding a dollop of sour cream or a sprinkle of Parmesan cheese on top. Want to explore more? Check the Full Recipe for more serving ideas! This article explored how to make a tasty Roasted Tomato Basil Soup. We covered the ingredients you need, their benefits, and the steps to create this dish. You learned about helpful tips and how to customize the recipe to suit your taste. Storing and reheating the soup was also discussed for your convenience. Now, you have all the tools to make this simple and delicious soup. Enjoy cooking and sharing it with friends and family. Your kitchen can be a place of joy and flavor!](https://fastmealmate.com/wp-content/uploads/2025/07/2e40192c-dd82-4486-9582-e1e9c28fcf57-768x768.webp)

![- 1 lb lobster tails, halved lengthwise - 1 lb fresh sea scallops - 4 tablespoons unsalted butter, divided - 4 cloves garlic, finely minced - 1 lemon, juiced (about 2 tablespoons) - 2 tablespoons fresh parsley, finely chopped - Salt and freshly ground black pepper, to taste - Lemon wedges, for serving When I prepare Easy Garlic Butter Lobster Scallops, I love how fresh ingredients shine. The lobster tails and scallops are the stars of this dish. Using fresh seafood makes all the difference. Each bite bursts with flavor. Butter brings richness to the dish. I use unsalted butter to control the saltiness. Garlic adds a lovely aroma and taste. It’s important to finely mince the garlic. This helps to spread its flavor evenly. I always squeeze fresh lemon juice for brightness. The juice balances the rich butter. Chopped parsley adds a nice touch. It gives the dish a pop of color and freshness. Don’t forget about seasoning! Salt and black pepper enhance the seafood’s natural flavor. I like to season both the lobster and scallops well before cooking. Lastly, lemon wedges are a must. They add a fresh hit of citrus when served. I find that a squeeze of lemon elevates the whole meal. For the full recipe, check out the details above. Enjoy creating this flavorful delight! First, take the lobster tails and scallops out of the package. Gently pat them dry with a paper towel. This step is key for a nice sear later. Next, season them with salt and black pepper. Make sure to cover all sides for even flavor. Now, let’s get cooking! In a large skillet, melt 2 tablespoons of unsalted butter over medium heat. Once the butter is melted and bubbly, add the minced garlic. Sauté the garlic for about one minute until it is fragrant. Be careful not to let it burn. Next, add the lobster tails to the skillet. Place them cut-side down first. Sear the tails for about 3-4 minutes until they turn golden brown. Then, carefully flip them over and cook for another 2-3 minutes. They should look opaque and fully cooked. Remove them and set aside. Now, it’s time for the scallops. Add them to the same skillet, making sure not to overcrowd them. Sear each side for about 2-3 minutes until they get a beautiful golden crust. Once done, remove the scallops and place them with the lobster. Return the cooked lobster to the skillet. Squeeze in the fresh lemon juice and sprinkle the chopped parsley over everything. Gently toss the lobster and scallops in the garlic butter sauce. This will help all the flavors blend nicely. Finally, serve the lobster and scallops on a large platter. Drizzle any remaining garlic butter sauce over the seafood. Garnish with more parsley and add lemon wedges on the side. For the full recipe, check the detailed instructions above. Enjoy your tasty dish! To make your lobster and scallops shine, start with good searing. Searing gives seafood a nice crust. Heat your skillet until it's hot. Add butter and let it melt before placing the seafood in. This helps lock in flavors and moisture. Drying your seafood before cooking is very important. Use paper towels to pat the lobster tails and scallops dry. Removing excess moisture helps achieve that perfect golden sear. Wet seafood will steam instead of sear. Adding herbs and spices can elevate your dish. Fresh thyme or basil can add great flavor. A pinch of red pepper flakes can give it a nice kick. Don't be afraid to experiment with flavors you love. For sauces, consider making a light citrus sauce. A mix of lemon juice and olive oil works well. You can also add a splash of white wine for depth. These additions can enhance the overall taste of your seafood. Presentation matters when serving seafood. Arrange the lobster tails and scallops on a large platter. Place them in a way that looks inviting. You can stack the scallops for a layered look. Garnishing makes your dish pop. Use chopped parsley for a fresh touch. Lemon wedges add color and a burst of flavor. A well-presented dish makes a great impression, so take your time with this step. Want to try this delicious dish? Check out the [Full Recipe]. {{image_4}} If you cannot find lobster or scallops, you have options. You can use shrimp instead of lobster. Shrimp cooks fast and adds great flavor. For scallops, try using firm fish like cod or halibut. Both will work well in this dish. For dairy-free butter, consider using olive oil or coconut oil. Both options will give a nice taste. You can also find plant-based butter in stores. Just make sure it melts well for your sauce. You can cook your seafood in different ways. Grilling is a fun option. It gives a smoky flavor that pairs well with garlic. Just brush the lobster and scallops with butter before grilling. Sautéing is great for a quick meal. It lets the garlic and butter shine through. Broiling is another method to try. It cooks the seafood from above. This method creates a crispy top while keeping the inside juicy. You will get a different flavor profile that is equally delicious. For side dishes, consider a fresh salad or garlic bread. A light pasta with lemon pairs well, too. These sides will balance the rich flavors of the seafood. As for drinks, a crisp white wine like Sauvignon Blanc is perfect. It cuts through the richness of the butter. If you prefer non-alcoholic drinks, try sparkling water with lemon. It refreshes the palate nicely. For the full recipe, check the Easy Garlic Butter Lobster Scallops 🦞🧄 section. To keep your Easy Garlic Butter Lobster Scallops fresh, place them in an airtight container. This helps avoid any unwanted smells in your fridge. Make sure to refrigerate them within two hours of cooking. They can last up to three days in the fridge. If you notice any off smell or discoloration, it's best to toss them out. When you want to enjoy your leftovers, the best way to reheat is on the stove. Use low heat to warm them gently. This keeps the seafood tender. You can also use the microwave, but do it in short bursts to avoid overcooking. Cover the dish with a damp paper towel to keep moisture in. Remember, seafood can dry out quickly. Yes, you can freeze lobster scallops! However, freezing may change their texture. To freeze, place them in a freezer-safe bag or container. Remove as much air as possible before sealing. They can stay frozen for up to three months. When you're ready to use them, thaw in the fridge overnight. Avoid thawing at room temperature to keep them safe. If you're looking for the full recipe, check out the Easy Garlic Butter Lobster Scallops recipe above! You can tell when scallops are done by their color and texture. They should be opaque and firm. A golden crust on the outside shows they are well-seared. Avoid cooking them too long. Overcooked scallops become rubbery and tough. Common mistakes include overcrowding the pan and not drying them well. Always dry scallops with paper towels. This helps them sear nicely and not steam. Yes, you can use frozen lobster tails and scallops. Just make sure to choose high-quality seafood. Look for ones that are flash-frozen for best taste. To thaw, place them in the fridge overnight. If you're in a hurry, seal them in a bag and submerge in cold water for about 30 minutes. Cook them right after thawing for the best flavor. Pair your dish with light sides. A fresh salad with lemon vinaigrette works well. Roasted asparagus or green beans add great color and flavor. For a complete meal, serve with garlic bread and a glass of white wine. This combination enhances the rich flavors of the lobster and scallops. You can find the full recipe for Easy Garlic Butter Lobster Scallops and create a delightful feast! This blog post highlighted key ingredients for an easy garlic butter lobster and scallops dish. I walked you through preparation, cooking, tips for perfect seafood, and variations to keep meals exciting. You now have practical storage info and answers to common questions. No matter how you serve this dish, it promises flavor. Enjoy crafting a meal that impresses everyone at your table. Happy cooking!](https://fastmealmate.com/wp-content/uploads/2025/06/dfec37c8-f7d2-4a99-9114-2c33cea5f0b3-768x768.webp)