Golden Beet Salad with Walnuts and Goat Cheese Delight
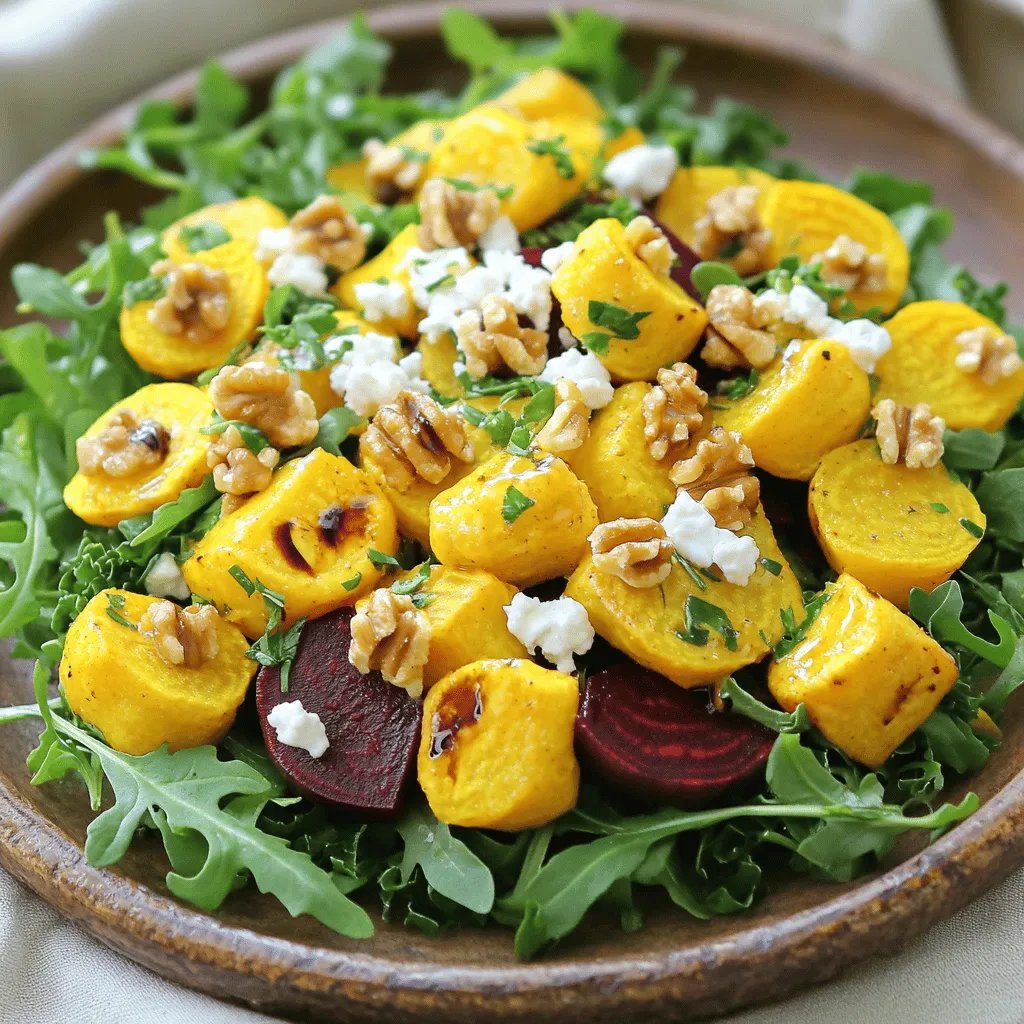
Are you ready to elevate your salad game? The Golden Beet Salad with Walnuts and Goat Cheese Delight combines sweet golden beets, crunchy walnuts, and creamy goat cheese for a fresh, vibrant dish. Perfect for any meal or occasion, this salad offers a stunning pop of color and flavor. Join me as I guide you through simple steps to create your delicious masterpiece that everyone will love!
Ingredients
List of Ingredients
To make this delightful golden beet salad, you’ll need these simple ingredients:
– 4 medium golden beets
– 1 cup walnuts, toasted
– 4 oz goat cheese, crumbled
– 3 cups mixed greens (a delightful blend of arugula, spinach, and baby kale)
– 1/4 cup extra virgin olive oil
– 2 tablespoons balsamic vinegar
– 1 tablespoon honey
– Salt and pepper to taste
– Fresh herbs (such as dill or parsley) for garnish
Nutritional Information
This salad is not only tasty but also good for you. It provides:
– Calories: About 250 per serving
– Protein: 6 grams
– Fat: 20 grams (mostly healthy fats from walnuts and olive oil)
– Carbohydrates: 16 grams
– Fiber: 4 grams
– Vitamins: A, C, and K from greens and beets
– Minerals: Magnesium and potassium from walnuts
Quality Tips for Ingredients
Using fresh and high-quality ingredients makes a big difference. Here are some tips:
– Golden Beets: Choose firm beets with smooth skin. Avoid any with soft spots.
– Walnuts: Look for raw or lightly toasted walnuts. Fresh nuts have a better taste.
– Goat Cheese: Opt for creamy, fresh goat cheese. It adds a nice tang and creaminess.
– Mixed Greens: Buy organic greens when possible. They are fresher and taste better.
– Olive Oil: Use high-quality extra virgin olive oil for the dressing. It enhances flavor.
– Balsamic Vinegar: A good balsamic vinegar adds depth to your dressing.
With these ingredients and tips, you’re ready to create a stunning golden beet salad.
Step-by-Step Instructions
Preparation of Golden Beets
To start, preheat your oven to 400°F (200°C). Rinse the golden beets well under cold water. Scrub them gently to remove any dirt. Wrap each beet in aluminum foil and place them on a baking sheet. Roast the beets for 45-60 minutes. They are done when a fork easily pierces them. Once they cool for a bit, peel off the skin. It comes off easily. Cut the beets into bite-sized cubes for your salad.
Toasting the Walnuts
While the beets roast, let’s toast the walnuts. Use a dry skillet over medium heat. Add the walnuts to the skillet. Stir them often for 5-7 minutes. Watch them closely! You want them golden brown and fragrant, not burnt. This step makes the walnuts crunchy and flavorful.
Making the Dressing
Now, let’s make the dressing. In a small bowl, mix together extra virgin olive oil, balsamic vinegar, honey, a pinch of salt, and pepper. Whisk these ingredients until they blend well. Taste it and adjust the seasoning if needed. This dressing adds a lovely tang to your salad.
Tips & Tricks
How to Ensure Perfectly Roasted Beets
Roasting golden beets is simple, but a few tips help. First, choose firm, fresh beets. Look for smooth skin without blemishes. When you roast them, wrap each beet in foil. This keeps moisture in and helps them cook evenly. Roast at 400°F for about 45-60 minutes. You know they are done when a fork easily pierces them. Once cool, the skin peels off easily. This method locks in flavor and gives a nice texture.
Presentation Suggestions
To make your salad look great, use a large, shallow bowl. Place the mixed greens as a base. Scatter the golden beet cubes on top. Add the toasted walnuts and crumbled goat cheese in a pleasing way. For a pop of color, garnish with fresh herbs. A drizzle of dressing around the edges adds flair. You want it to look as good as it tastes.
Pairing Recommendations
Golden beet salad pairs well with many dishes. It complements grilled meats like chicken or steak. The sweetness of the beets works with rich flavors. You can also serve it alongside fish, especially salmon. For a vegetarian option, add quinoa or chickpeas for extra protein. A light white wine or sparkling water enhances the meal. Enjoy experimenting to find your favorite combinations!

Variations
Adding Seasonal Fruits
You can brighten your salad by adding seasonal fruits. Fresh fruits like peaches or apples work well. Their sweetness contrasts nicely with the earthy beets. You can also try berries for a pop of color and flavor. Simply slice or chop them and mix them in with the greens. This adds freshness and makes the dish more vibrant.
Alternative Cheese Options
While goat cheese is a star in this salad, feel free to switch it up. Feta cheese can add a salty kick. If you’re looking for a creamier texture, try burrata. For a vegan option, use cashew cheese or avocado slices. Each cheese brings its own flavor, enhancing the overall taste of the salad. Choose what you love most!
Dressings and Flavor Enhancements
Experimenting with dressings can take your salad to new heights. A lemon vinaigrette adds a zesty touch. You can mix lemon juice, olive oil, and a pinch of salt. For a spicy twist, try adding a dash of chili flakes to the dressing. You can also sprinkle nuts or seeds on top for added crunch. These small changes keep the dish exciting every time you make it.
Storage Info
How to Store Leftovers
To keep your salad fresh, store leftovers in a sealed container. Place it in the fridge. This helps keep the ingredients crunchy and tasty. If you have dressing left, store it separately. This prevents the greens from getting soggy.
Duration of Freshness
When stored correctly, the salad lasts about three days in the fridge. The golden beets, walnuts, and goat cheese maintain their flavor and texture during this time. After three days, the quality may drop. I recommend enjoying it fresh for the best taste.
Reheating Guidelines
Most salads, including this one, should not be reheated. The greens can wilt, and the cheese may lose its creaminess. If you want to warm it up, try removing the beets and reheating them gently. Use a microwave for about 30 seconds. Then, mix them back into the salad when ready to eat.
FAQs
Can I make this salad ahead of time?
Yes, you can prepare this salad ahead of time. To do this, roast the golden beets and store them in the fridge. You can make the dressing too. Just keep it in a separate container. Toss the salad together when you are ready to serve. This keeps the greens fresh and crisp.
What are the health benefits of golden beets?
Golden beets are full of good stuff. They are low in calories and high in nutrients. Golden beets contain fiber, which helps digestion. They are also rich in vitamins A and C, which are great for your skin and immune system. Plus, they have antioxidants that help fight free radicals in your body. Eating them may lower blood pressure and improve heart health too.
How can I adjust the recipe for dietary restrictions?
You can easily modify this salad. If you need it vegan, skip the goat cheese and use a vegan cheese option. For nut allergies, leave out the walnuts or replace them with seeds like sunflower or pumpkin. If you want to cut calories, use less olive oil in the dressing or skip the honey.
This blog post covered how to create a tasty salad with golden beets and walnuts. I explained the ingredients you need, including their nutrition and quality tips. You learned step-by-step how to prepare and toast your beets and walnuts, plus how to make a delicious dressing.
Remember, you can make this dish your own with seasonal fruits or different cheeses. Store leftovers properly, and enjoy your salad even days later. With these tips, you can make a fresh, colorful dish anytime. Enjoy experimenting and sharing your results!


. To store leftover stuffed shells, let them cool first. Place them in an airtight container. Make sure to separate layers with parchment paper to avoid sticking. You can keep them in the fridge for up to three days. You can freeze these stuffed shells for later enjoyment. Follow these steps: - Cool Completely: Allow the cooked shells to cool fully. - Wrap Well: Use plastic wrap or aluminum foil to wrap the shells tightly. - Use a Freezer Bag: Place the wrapped shells in a freezer-safe bag. Remove as much air as possible. - Label and Date: Write the date on the bag. This helps you track how long they’ve been frozen. To thaw, move the shells from the freezer to the fridge. Let them thaw overnight. For quicker thawing, place them in cold water for about two hours. Reheating stuffed shells is easy. Here are a few methods: - Oven: Preheat your oven to 350°F (175°C). Place the shells in a baking dish, cover with foil, and heat for 20 minutes. Remove the foil for the last five minutes to crisp the cheese. - Microwave: Place a few shells on a microwave-safe plate. Cover them with a damp paper towel. Heat in short bursts of 30 seconds until warm. - Skillet: Heat a skillet over medium heat. Add a splash of water and place the shells in the skillet. Cover with a lid and steam for about 5 minutes. These methods keep the flavors strong and the cheese melty. Enjoy your tasty leftovers! You can serve Philly Cheesesteak Stuffed Shells with a crisp salad. A simple green salad works well. You can also add a side of garlic bread. Garlic bread pairs nicely with the rich flavors of the shells. Marinara sauce makes a tasty dip for the shells too. Try adding pickles or roasted vegetables for a crunchy side. Yes, you can make these stuffed shells ahead of time. Prepare them fully and store in the fridge. Cover the baking dish tightly with plastic wrap. You can also freeze them before baking. Just thaw them in the fridge overnight before baking. This saves time and is great for busy days. The stuffed shells are done when the cheese is bubbly. You should see a golden brown color on top. Use a food thermometer; the center should reach 165°F. If you want to be sure, cut one open. The filling should be hot and melted. Keep an eye on them during the last 10 minutes of baking. In this blog post, I shared how to make Philly Cheesesteak Stuffed Shells. We covered the ingredients, cooking steps, and tips for perfect results. I also included storage info and answered common questions. Making these stuffed shells is easy and fun. You can tweak the recipe to fit your taste. Don’t be afraid to try new flavors. Enjoy your delicious creation and share it with others!](https://fastmealmate.com/wp-content/uploads/2025/06/11767e89-6c0f-469f-be11-885f6dce3423-768x768.webp)
![- 1 cup pumpkin puree - 1 cup water - 1 cup brown sugar - 1 tablespoon pure vanilla extract - 1 teaspoon ground cinnamon - 1 teaspoon ground nutmeg - 1/2 teaspoon ground ginger - 1/4 teaspoon ground cloves Substitutes for pumpkin puree If you cannot find pumpkin puree, you can use butternut squash puree. This option works well and gives a similar flavor. You can roast and blend the squash until smooth for best results. The importance of using pure vanilla extract Using pure vanilla extract is key for the best flavor. I avoid imitation vanilla as it lacks the depth you need for this syrup. The pure extract enhances the sweetness and adds warmth to the spice mix. How to adjust serving sizes You can easily scale the recipe up or down. If you want more syrup, just double the ingredients. For a smaller batch, cut everything in half. Alternative ways to use pumpkin spice syrup This syrup is not just for coffee. Drizzle it on pancakes and waffles or mix it into yogurt. You can even stir it into oatmeal or smoothies for a fall twist. - Blending pumpkin puree and water Start by adding 1 cup of pumpkin puree and 1 cup of water to a medium saucepan. Use a whisk to blend these together. Make sure there are no lumps. A smooth mixture is essential for a nice syrup. - Heating the mixture Place the saucepan on medium heat. Keep a close eye on it as you heat. You want the mixture to reach a gentle simmer, not a boil. This helps develop the flavors without burning. - Adding brown sugar Once your mixture is simmering, gradually add 1 cup of brown sugar. Stir continuously until all the sugar dissolves. This will make the mixture glossy and sweet. - Stirring in spices After the sugar dissolves, add in 1 tablespoon of pure vanilla extract, 1 teaspoon of ground cinnamon, 1 teaspoon of ground nutmeg, 1/2 teaspoon of ground ginger, and 1/4 teaspoon of ground cloves. Stir well to mix the spices evenly into the syrup. - Simmering for flavor development Let the mixture simmer gently for 10-15 minutes. Stir it occasionally. You will notice the syrup starting to thicken. This thickening shows that the flavors are blending together nicely. - The thickening process Keep an eye on the syrup as it cooks. It should thicken slightly, which is a good sign that it is ready. The longer it simmers, the richer the flavor will be. - Straining the syrup Once cooked, remove the saucepan from heat. Let the syrup cool down to room temperature. After cooling, strain it through a fine-mesh sieve into a clean container. This step removes any solids, giving you a smooth syrup. - Storing the syrup properly Pour your finished syrup into an airtight bottle or jar. Store it in the refrigerator. It will stay fresh for up to two weeks. Now, you can use it in your favorite drinks and desserts! For the full recipe, check out the complete details. - Overheating the mixture: Heating too high can burn the sugar. Keep it to medium heat and watch closely. - Not stirring enough while cooking: Stirring helps mix flavors and prevents sticking. Always keep the spoon moving. - Ensuring the right thickness: To check thickness, dip a spoon and see if syrup coats it. It should feel sticky but not too thick. - Enhancing flavors with additional spices: You can add a pinch of allspice or cardamom for extra depth. Experiment to find your favorite mix. - Creative serving ideas: Drizzle syrup over pancakes, waffles, or even ice cream. It adds a nice touch to your treats. - Pairing suggestions with recipes: Use your syrup in lattes or hot chocolate. It’s also great in oatmeal or yogurt for a fall twist. For the full recipe, check out the details! {{image_4}} You can boost the taste of pumpkin spice syrup in fun ways. Try adding a vanilla bean for a rich flavor. Slice the bean open and scrape out the seeds. Mix these seeds into the syrup for a creamy touch. Another option is caramel. Drizzle in some caramel sauce for a sweet twist. This adds depth and a unique flavor to your syrup. You can even create a spiced pumpkin version. Mix in extra spices like allspice or cardamom for a new taste. These small changes can make a big difference. As the seasons change, so can your syrup. For the holidays, add flavors like peppermint or gingerbread. This gives your syrup a festive flair. You can also use different types of pumpkin. Try butternut squash or sweet potato for a unique twist. Each type brings its own flavor and sweetness, making your syrup special. Experiment with these variations to find your favorite. Pumpkin spice syrup is not just for drinks. You can use it in many recipes. Add it to pancakes or waffles for a sweet breakfast. It also works great in desserts like cakes and pies. Drizzle it on ice cream for a fall-inspired treat. You can even stir it into your coffee or tea for a warm drink. The options are endless! Check out the [Full Recipe] for more ideas. Pumpkin spice syrup lasts about two weeks in the refrigerator. Store it in an airtight container. For best taste, use it fresh. You can freeze the syrup to extend its life. It keeps well in ice cube trays. Just thaw before use. Use glass jars or plastic bottles for storage. Ensure they are airtight to keep the syrup fresh. Label your containers with the date you made the syrup. This helps you keep track of its freshness. Look for changes in color or smell. If it smells off or looks cloudy, it’s time to toss it. If you see mold, do not use it. Always taste a small amount before using. If it tastes strange, throw it away. Pumpkin spice syrup includes simple, tasty ingredients. Here are the main ones: - 1 cup pumpkin puree - 1 cup water - 1 cup brown sugar - 1 tablespoon pure vanilla extract - 1 teaspoon ground cinnamon - 1 teaspoon ground nutmeg - 1/2 teaspoon ground ginger - 1/4 teaspoon ground cloves You can change or add some ingredients too. For example, you can use maple syrup instead of brown sugar. This gives a unique flavor twist. You can use this syrup in many ways. Here are some fun ideas: - Drizzle it over pancakes or waffles. - Stir it into coffee or lattes. - Add it to smoothies for a fall flavor. - Mix it with oatmeal or yogurt. - Use it in baking for cookies or cakes. These ideas help you enjoy that yummy pumpkin spice taste in all your meals. Yes, you can make pumpkin spice syrup vegan easily. Just swap out a few things: - Use agave syrup or maple syrup instead of brown sugar. - Ensure your vanilla extract is alcohol-free. These changes keep the flavor while making it plant-based. You can find pumpkin spice syrup in many stores. Look in these places: - Local grocery stores often have it. - Check specialty coffee shops or cafes. - Online shops like Amazon or specialty food sites. When buying, read the label. Some brands add extra flavors or sugars. Homemade pumpkin spice syrup lasts about two weeks in the fridge. To store it well: - Keep it in an airtight jar or bottle. - Always use a clean spoon to scoop out syrup. If you have more, you can freeze it. Just pour it into ice cube trays. This way, you can use it later in drinks or desserts. Pumpkin spice syrup is simple to make and adds great flavor to many dishes. We covered key ingredients, steps for cooking, and tips for serving. You can easily switch ingredients and try different flavors. Remember to store your syrup well to keep it fresh. With this guide, you can create or enjoy homemade pumpkin spice syrup all season long. Explore all the ways to use it today!](https://fastmealmate.com/wp-content/uploads/2025/07/e167359e-7abc-4f0d-8f6c-a8401fb81292-768x768.webp)