
Easy Watermelon Feta Salad Fresh and Flavorful Delight
![- Watermelon: 4 cups of seedless watermelon, cut into bite-sized cubes - Feta Cheese: 1 cup of creamy feta cheese, crumbled into small pieces - Fresh Herbs: 1/2 cup of fresh mint leaves, roughly chopped - Balsamic Glaze: 1/4 cup for drizzle - Olive Oil: 1 tablespoon of extra-virgin olive oil - Lime Juice: Juice of 1 fresh lime - Salt and Pepper: To taste I love using fresh watermelon in this salad. The juicy sweetness of watermelon pairs perfectly with the salty feta cheese. When you bite into the watermelon, it feels like summer. The mint leaves add a nice touch of freshness. For the dressing, balsamic glaze brings a rich flavor. A little olive oil adds smoothness, while lime juice gives it a bright kick. Don’t forget to add salt and pepper to bring out all the flavors. This salad is quick to make and very tasty. You can find the Full Recipe to help you create this fresh and flavorful delight. - Combine Watermelon and Feta In a large mixing bowl, add 4 cups of watermelon cubes and 1 cup of crumbled feta cheese. Mix them gently to keep the texture nice. - Add Mint Leaves and Toss Next, add 1/2 cup of chopped mint leaves. Toss everything lightly. This lets the flavors mix well without breaking the cheese or watermelon. - Whisk Together Balsamic Glaze, Olive Oil, Lime Juice, Salt, and Pepper In a small bowl, whisk together 1/4 cup of balsamic glaze, 1 tablespoon of olive oil, and the juice of 1 lime. Add a pinch of salt and some freshly ground pepper. Mix until it’s smooth and well combined. - Drizzle Dressing Over Salad Pour the dressing over the watermelon and feta mixture. Use a gentle motion to coat everything evenly. - Adjust Seasoning to Taste Taste your salad now. If it needs more flavor, add a bit more salt or pepper. - Transfer to Serving Platter Finally, move the salad to a nice serving platter. Arrange it to make it look pretty. Enjoy the fresh and vibrant colors! For the complete recipe, check out the [Full Recipe]. - Use a shallow bowl for serving. It makes the salad look lovely and inviting. - Garnish with whole mint leaves on top. This adds a nice pop of color. - Consider adding cucumber for crunch. It pairs well with the sweet watermelon. - You can also add red onion for a bit of bite. Adjust the amount based on your taste. - Feel free to tweak the dressing. If you like it sweeter, add more balsamic glaze. If you prefer it tangy, add more lime juice. - This salad goes great with grilled meats. Try it alongside chicken or steak. - It’s also perfect as a side dish for picnics or barbecues. - Serve it as a light lunch. Just add some crusty bread for a complete meal. For the full recipe, check out the [Full Recipe]. {{image_4}} You can change the feta cheese to goat cheese or ricotta. Both options add a creamy taste. Goat cheese gives a tangy flavor that pairs well with watermelon. Ricotta offers a mild and smooth touch. These swaps can keep the salad exciting. You can also switch up the herbs. Try using fresh basil or cilantro instead of mint. Basil brings a sweet and aromatic taste, while cilantro adds a bright and zesty kick. Both options elevate the salad in unique ways. If you want a vegan or dairy-free version, skip the feta cheese. Use avocado instead for creaminess. You can also try dairy-free feta made from nuts. This keeps the salad fresh and vibrant while meeting dietary needs. For gluten-free eaters, this salad is a perfect choice. All the ingredients are naturally gluten-free. You can enjoy this dish without worry while savoring its flavor. You can add seasonal fruits or vegetables for a new twist. In summer, try adding fresh berries for sweetness. In fall, diced apples can add a crisp bite. You can also mix in cucumbers for extra crunch during warm months. Each season brings new flavors to explore in your salad. After making this salad, store it in a tight container. Keep it in the fridge. The salad tastes best fresh. However, it can last for 1 to 2 days. The watermelon stays juicy, and the feta stays creamy. If you notice the mint wilting, use it up quickly. You should not freeze watermelon feta salad. Freezing changes the texture of the watermelon. It becomes mushy when thawed. Feta also does not freeze well. Enjoy this salad fresh for the best taste. You do not need to reheat this salad. If you have leftovers, just refresh it. Add a touch of olive oil and a squeeze of lime juice. This brightens the flavors again. Toss gently to combine. Enjoy the flavors as if it were fresh! You can make the salad ahead of time. However, I suggest you wait to add the dressing until just before serving. This keeps the watermelon fresh and crisp. You can prep the watermelon, feta, and mint a few hours in advance. Just store them in the fridge in separate containers. This way, everything stays fresh and delicious. This salad pairs well with many dishes. Here are some tasty ideas: - Grilled chicken or fish for a light meal. - A fresh baguette or pita bread for a fun crunch. - Quinoa or couscous salad for extra fiber. - A light soup like gazpacho for a refreshing combo. These options add flavor and balance to your meal, making it even more enjoyable. Choosing the right watermelon is key to a great salad. Here are some easy tips: - Look for a watermelon that feels heavy for its size. - Check for a uniform shape; avoid any that are flat or irregular. - Find a creamy yellow spot on the bottom. This means it ripened on the ground. - Tap the watermelon; it should sound hollow. - Lastly, avoid any bruises or soft spots. With these tips, you can find a sweet and juicy watermelon for your salad. For the full recipe, check out the details above. This blog post covered the ingredients and steps for making a delicious watermelon feta salad. You learned about choosing fresh watermelon, the best cheese, and seasoning tips. I shared ideas for easy variations and how to store the salad safely. Remember, this dish pairs well with grilled meats and can be tailored to your taste. So, feel free to experiment with different herbs and dressings. Enjoy this refreshing salad at your next meal!](https://fastmealmate.com/wp-content/uploads/2025/07/95b959a9-55ac-465b-944b-7a71b981c201.webp)
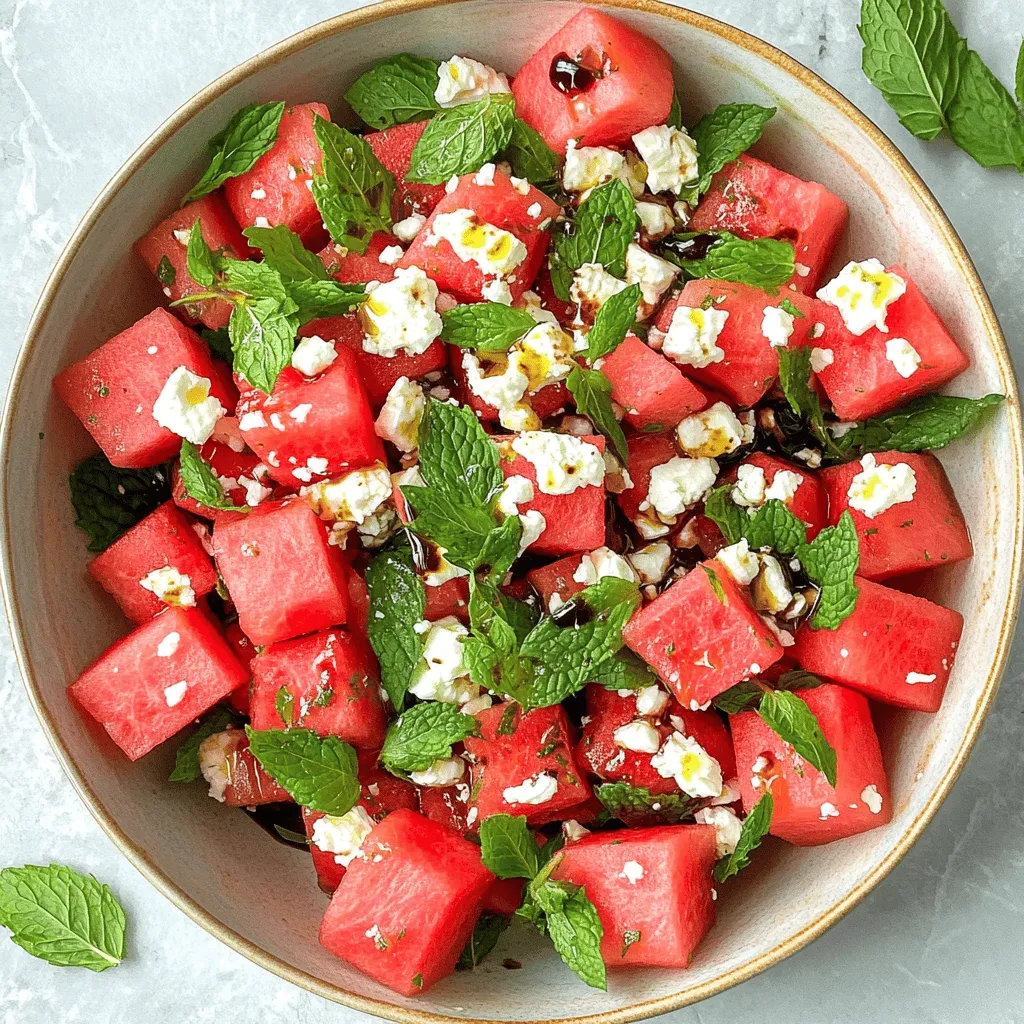
Craving a refreshing dish that bursts with flavor? Look no further. This Easy Watermelon Feta Salad is your perfect solution. With juicy watermelon, creamy feta, and fresh mint, it balances sweet and salty perfectly. I’ll guide you through simple steps and tasty tips to create a vibrant salad that shines at any gathering. Let’s dive in and discover how to whip up this delightful summer treat!
Ingredients
Main Ingredients
– Watermelon: 4 cups of seedless watermelon, cut into bite-sized cubes
– Feta Cheese: 1 cup of creamy feta cheese, crumbled into small pieces
– Fresh Herbs: 1/2 cup of fresh mint leaves, roughly chopped
Dressing Components
– Balsamic Glaze: 1/4 cup for drizzle
– Olive Oil: 1 tablespoon of extra-virgin olive oil
– Lime Juice: Juice of 1 fresh lime
Seasoning
– Salt and Pepper: To taste
I love using fresh watermelon in this salad. The juicy sweetness of watermelon pairs perfectly with the salty feta cheese. When you bite into the watermelon, it feels like summer. The mint leaves add a nice touch of freshness.
For the dressing, balsamic glaze brings a rich flavor. A little olive oil adds smoothness, while lime juice gives it a bright kick. Don’t forget to add salt and pepper to bring out all the flavors.
This salad is quick to make and very tasty.
Step-by-Step Instructions
Preparation Steps
– Combine Watermelon and Feta
In a large mixing bowl, add 4 cups of watermelon cubes and 1 cup of crumbled feta cheese. Mix them gently to keep the texture nice.
– Add Mint Leaves and Toss
Next, add 1/2 cup of chopped mint leaves. Toss everything lightly. This lets the flavors mix well without breaking the cheese or watermelon.
Dressing Preparation
– Whisk Together Balsamic Glaze, Olive Oil, Lime Juice, Salt, and Pepper
In a small bowl, whisk together 1/4 cup of balsamic glaze, 1 tablespoon of olive oil, and the juice of 1 lime. Add a pinch of salt and some freshly ground pepper. Mix until it’s smooth and well combined.
Final Assembly
– Drizzle Dressing Over Salad
Pour the dressing over the watermelon and feta mixture. Use a gentle motion to coat everything evenly.
– Adjust Seasoning to Taste
Taste your salad now. If it needs more flavor, add a bit more salt or pepper.
– Transfer to Serving Platter
Finally, move the salad to a nice serving platter. Arrange it to make it look pretty. Enjoy the fresh and vibrant colors!
Tips & Tricks
Presentation Tips
– Use a shallow bowl for serving. It makes the salad look lovely and inviting.
– Garnish with whole mint leaves on top. This adds a nice pop of color.
Flavor Enhancements
– Consider adding cucumber for crunch. It pairs well with the sweet watermelon.
– You can also add red onion for a bit of bite. Adjust the amount based on your taste.
– Feel free to tweak the dressing. If you like it sweeter, add more balsamic glaze. If you prefer it tangy, add more lime juice.
Serving Suggestions
– This salad goes great with grilled meats. Try it alongside chicken or steak.
– It’s also perfect as a side dish for picnics or barbecues.
– Serve it as a light lunch. Just add some crusty bread for a complete meal.
Variations
Ingredient Swaps
You can change the feta cheese to goat cheese or ricotta. Both options add a creamy taste. Goat cheese gives a tangy flavor that pairs well with watermelon. Ricotta offers a mild and smooth touch. These swaps can keep the salad exciting.
You can also switch up the herbs. Try using fresh basil or cilantro instead of mint. Basil brings a sweet and aromatic taste, while cilantro adds a bright and zesty kick. Both options elevate the salad in unique ways.
Dietary Adjustments
If you want a vegan or dairy-free version, skip the feta cheese. Use avocado instead for creaminess. You can also try dairy-free feta made from nuts. This keeps the salad fresh and vibrant while meeting dietary needs.
For gluten-free eaters, this salad is a perfect choice. All the ingredients are naturally gluten-free. You can enjoy this dish without worry while savoring its flavor.
Seasonal Variations
You can add seasonal fruits or vegetables for a new twist. In summer, try adding fresh berries for sweetness. In fall, diced apples can add a crisp bite. You can also mix in cucumbers for extra crunch during warm months. Each season brings new flavors to explore in your salad.
Storage Info
Short-Term Storage
After making this salad, store it in a tight container. Keep it in the fridge. The salad tastes best fresh. However, it can last for 1 to 2 days. The watermelon stays juicy, and the feta stays creamy. If you notice the mint wilting, use it up quickly.
Long-Term Storage
You should not freeze watermelon feta salad. Freezing changes the texture of the watermelon. It becomes mushy when thawed. Feta also does not freeze well. Enjoy this salad fresh for the best taste.
Reheating Tips
You do not need to reheat this salad. If you have leftovers, just refresh it. Add a touch of olive oil and a squeeze of lime juice. This brightens the flavors again. Toss gently to combine. Enjoy the flavors as if it were fresh!
FAQs
Can I make the salad in advance?
You can make the salad ahead of time. However, I suggest you wait to add the dressing until just before serving. This keeps the watermelon fresh and crisp. You can prep the watermelon, feta, and mint a few hours in advance. Just store them in the fridge in separate containers. This way, everything stays fresh and delicious.
What can I serve with Easy Watermelon Feta Salad?
This salad pairs well with many dishes. Here are some tasty ideas:
– Grilled chicken or fish for a light meal.
– A fresh baguette or pita bread for a fun crunch.
– Quinoa or couscous salad for extra fiber.
– A light soup like gazpacho for a refreshing combo.
These options add flavor and balance to your meal, making it even more enjoyable.
How do I pick the best watermelon?
Choosing the right watermelon is key to a great salad. Here are some easy tips:
– Look for a watermelon that feels heavy for its size.
– Check for a uniform shape; avoid any that are flat or irregular.
– Find a creamy yellow spot on the bottom. This means it ripened on the ground.
– Tap the watermelon; it should sound hollow.
– Lastly, avoid any bruises or soft spots.
With these tips, you can find a sweet and juicy watermelon for your salad.
This blog post covered the ingredients and steps for making a delicious watermelon feta salad. You learned about choosing fresh watermelon, the best cheese, and seasoning tips. I shared ideas for easy variations and how to store the salad safely. Remember, this dish pairs well with grilled meats and can be tailored to your taste. So, feel free to experiment with different herbs and dressings. Enjoy this refreshing salad at your next meal!
![- Watermelon: 4 cups of seedless watermelon, cut into bite-sized cubes - Feta Cheese: 1 cup of creamy feta cheese, crumbled into small pieces - Fresh Herbs: 1/2 cup of fresh mint leaves, roughly chopped - Balsamic Glaze: 1/4 cup for drizzle - Olive Oil: 1 tablespoon of extra-virgin olive oil - Lime Juice: Juice of 1 fresh lime - Salt and Pepper: To taste I love using fresh watermelon in this salad. The juicy sweetness of watermelon pairs perfectly with the salty feta cheese. When you bite into the watermelon, it feels like summer. The mint leaves add a nice touch of freshness. For the dressing, balsamic glaze brings a rich flavor. A little olive oil adds smoothness, while lime juice gives it a bright kick. Don’t forget to add salt and pepper to bring out all the flavors. This salad is quick to make and very tasty. You can find the Full Recipe to help you create this fresh and flavorful delight. - Combine Watermelon and Feta In a large mixing bowl, add 4 cups of watermelon cubes and 1 cup of crumbled feta cheese. Mix them gently to keep the texture nice. - Add Mint Leaves and Toss Next, add 1/2 cup of chopped mint leaves. Toss everything lightly. This lets the flavors mix well without breaking the cheese or watermelon. - Whisk Together Balsamic Glaze, Olive Oil, Lime Juice, Salt, and Pepper In a small bowl, whisk together 1/4 cup of balsamic glaze, 1 tablespoon of olive oil, and the juice of 1 lime. Add a pinch of salt and some freshly ground pepper. Mix until it’s smooth and well combined. - Drizzle Dressing Over Salad Pour the dressing over the watermelon and feta mixture. Use a gentle motion to coat everything evenly. - Adjust Seasoning to Taste Taste your salad now. If it needs more flavor, add a bit more salt or pepper. - Transfer to Serving Platter Finally, move the salad to a nice serving platter. Arrange it to make it look pretty. Enjoy the fresh and vibrant colors! For the complete recipe, check out the [Full Recipe]. - Use a shallow bowl for serving. It makes the salad look lovely and inviting. - Garnish with whole mint leaves on top. This adds a nice pop of color. - Consider adding cucumber for crunch. It pairs well with the sweet watermelon. - You can also add red onion for a bit of bite. Adjust the amount based on your taste. - Feel free to tweak the dressing. If you like it sweeter, add more balsamic glaze. If you prefer it tangy, add more lime juice. - This salad goes great with grilled meats. Try it alongside chicken or steak. - It’s also perfect as a side dish for picnics or barbecues. - Serve it as a light lunch. Just add some crusty bread for a complete meal. For the full recipe, check out the [Full Recipe]. {{image_4}} You can change the feta cheese to goat cheese or ricotta. Both options add a creamy taste. Goat cheese gives a tangy flavor that pairs well with watermelon. Ricotta offers a mild and smooth touch. These swaps can keep the salad exciting. You can also switch up the herbs. Try using fresh basil or cilantro instead of mint. Basil brings a sweet and aromatic taste, while cilantro adds a bright and zesty kick. Both options elevate the salad in unique ways. If you want a vegan or dairy-free version, skip the feta cheese. Use avocado instead for creaminess. You can also try dairy-free feta made from nuts. This keeps the salad fresh and vibrant while meeting dietary needs. For gluten-free eaters, this salad is a perfect choice. All the ingredients are naturally gluten-free. You can enjoy this dish without worry while savoring its flavor. You can add seasonal fruits or vegetables for a new twist. In summer, try adding fresh berries for sweetness. In fall, diced apples can add a crisp bite. You can also mix in cucumbers for extra crunch during warm months. Each season brings new flavors to explore in your salad. After making this salad, store it in a tight container. Keep it in the fridge. The salad tastes best fresh. However, it can last for 1 to 2 days. The watermelon stays juicy, and the feta stays creamy. If you notice the mint wilting, use it up quickly. You should not freeze watermelon feta salad. Freezing changes the texture of the watermelon. It becomes mushy when thawed. Feta also does not freeze well. Enjoy this salad fresh for the best taste. You do not need to reheat this salad. If you have leftovers, just refresh it. Add a touch of olive oil and a squeeze of lime juice. This brightens the flavors again. Toss gently to combine. Enjoy the flavors as if it were fresh! You can make the salad ahead of time. However, I suggest you wait to add the dressing until just before serving. This keeps the watermelon fresh and crisp. You can prep the watermelon, feta, and mint a few hours in advance. Just store them in the fridge in separate containers. This way, everything stays fresh and delicious. This salad pairs well with many dishes. Here are some tasty ideas: - Grilled chicken or fish for a light meal. - A fresh baguette or pita bread for a fun crunch. - Quinoa or couscous salad for extra fiber. - A light soup like gazpacho for a refreshing combo. These options add flavor and balance to your meal, making it even more enjoyable. Choosing the right watermelon is key to a great salad. Here are some easy tips: - Look for a watermelon that feels heavy for its size. - Check for a uniform shape; avoid any that are flat or irregular. - Find a creamy yellow spot on the bottom. This means it ripened on the ground. - Tap the watermelon; it should sound hollow. - Lastly, avoid any bruises or soft spots. With these tips, you can find a sweet and juicy watermelon for your salad. For the full recipe, check out the details above. This blog post covered the ingredients and steps for making a delicious watermelon feta salad. You learned about choosing fresh watermelon, the best cheese, and seasoning tips. I shared ideas for easy variations and how to store the salad safely. Remember, this dish pairs well with grilled meats and can be tailored to your taste. So, feel free to experiment with different herbs and dressings. Enjoy this refreshing salad at your next meal!](https://fastmealmate.com/wp-content/uploads/2025/07/95b959a9-55ac-465b-944b-7a71b981c201-300x300.webp)


![- Cheese tortellini - Flank steak - Provolone cheese The main stars of Cheesesteak Tortellini Bliss are cheese tortellini, flank steak, and provolone cheese. The cheese tortellini adds a rich, creamy texture. Flank steak gives a hearty, meaty flavor. Provolone cheese melts beautifully, making everything delightfully gooey. - Green bell pepper - Onion - Garlic Next, we have the veggies. The green bell pepper adds a nice crunch and sweetness. Onions bring out a savory note when sautéed. Garlic adds a burst of flavor that elevates the dish. Together, they create a great base for our cheesesteak twist. - Beef broth - Worcestershire sauce - Olive oil Now, let’s talk about the liquids. Beef broth adds depth and richness to the sauce. Worcestershire sauce brings umami and a hint of tang. Olive oil helps to sear the steak and sauté the veggies, making everything come together nicely. For the full recipe, check the [Full Recipe]. To start, fill a large pot with water. Add a generous pinch of salt. Bring the water to a rolling boil. Once it boils, gently add the cheese tortellini. Cook according to the package instructions, usually about 3-5 minutes. You want the tortellini to be al dente, not too soft. After cooking, drain the tortellini in a colander. Keep it warm by covering it with a kitchen towel while you prepare the rest. Next, heat a large skillet over medium-high heat. Add one tablespoon of olive oil to the hot skillet. Season the thinly sliced flank steak with salt and pepper. Make sure to coat all sides. Carefully place the steak slices in the skillet. Avoid overcrowding the pan, as this will steam the meat. Sear for about 3-4 minutes on each side. You want a golden-brown crust to form. Once cooked, remove the steak from the skillet and place it on a plate. Cover it loosely with foil to keep it warm. In the same skillet, add the sliced green bell pepper and onion. Don’t clean the skillet; this adds flavor. Sauté the vegetables over medium heat for about 5 minutes. You want them to soften and start to caramelize. Stir occasionally to prevent burning. Once they are soft, add the minced garlic. Cook for another minute, just until fragrant. Be careful not to let the garlic burn, as it can turn bitter. Now, you are ready to move on to combining all the tasty elements! For the complete recipe, check out the Full Recipe. To get the best flavor from your steak, sear it well. Here are my tips: - Heat your skillet: Use a large skillet and heat it to medium-high. This helps create a great crust on the steak. - Don’t overcrowd: Place only a few slices in the pan at once. This keeps the heat high and allows each piece to sear nicely. - Check doneness: For a medium-rare steak, aim for a temperature of 130-135°F. Use a meat thermometer for accuracy. Understanding how you like your steak cooked is key. Here’s a quick guide: - Rare: 120-125°F - Medium-rare: 130-135°F - Medium: 140-145°F - Medium-well: 150-155°F - Well-done: 160°F and above Want to take your cheesesteak tortellini to the next level? Try these flavor tips: - Add spices: A pinch of smoked paprika or crushed red pepper can give it a nice kick. - Experiment with herbs: Fresh thyme or oregano adds a lovely aroma. - Pair with sides: Serve with a fresh salad or garlic bread for a complete meal. The crunch balances the creamy tortellini. Cooking can have its hiccups. Here’s how to avoid common problems: - Overcooked tortellini: Keep an eye on the cooking time. Drain them as soon as they are al dente. This usually takes about 3-5 minutes. - Clumpy cheese: If your cheese gets clumpy, add a splash of milk or broth. This helps it melt evenly. For the full recipe of Cheesesteak Tortellini Bliss, check out the details shared above! {{image_4}} You can change this recipe with different proteins. If you want a lighter option, use chicken or turkey. Ground beef also works well in this dish. For a vegetarian twist, try mushrooms or tofu. These swaps keep the flavor rich and satisfying. Cheese is another area for creativity. Provolone is classic, but you can try cheddar for a sharper taste. Gouda adds a smoky feel, while mozzarella gives a creamy texture. Mix and match to find your favorite combo. Need gluten-free options? You can find gluten-free tortellini at many stores. Just check the package to ensure it fits your needs. Use cornstarch or arrowroot instead of regular flour to thicken the sauce. Dairy-free? Swap provolone for vegan cheese. There are many tasty brands that melt well. You can also use nutritional yeast for a cheesy flavor without the dairy. Want to switch up the presentation? Turn this dish into a baked delight. Transfer everything to a baking dish. Top it with more cheese and bake until golden and bubbly. This makes for a cozy meal perfect for sharing. Looking for a lighter option? Serve the cheesesteak tortellini as a salad. Toss it with greens, tomatoes, and a light dressing. This turns your dish into a fresh and vibrant meal option, perfect for warm days. For the full recipe, check the details above. After you enjoy your cheesesteak tortellini, store leftovers right away. Let the dish cool down for about 30 minutes. Avoid leaving it out longer, as this can cause bacteria to grow. Use airtight containers to keep your meal fresh. Store it in your fridge for up to three days. To freeze the cheesesteak tortellini, first, let it cool completely. Transfer it into freezer-safe containers or bags. Make sure to remove as much air as possible to avoid freezer burn. You can keep it frozen for up to three months. When you're ready to eat, thaw it overnight in the fridge. Reheat it gently on the stove over low heat, adding a splash of beef broth to keep it moist. Stir often to ensure even heating. Enjoy your delicious meal just like the first time! For the complete cooking instructions, check the Full Recipe. To cook tortellini, first, boil a large pot of water. Add salt to the water for flavor. When the water boils, add the cheese tortellini. Cook them according to the package instructions, usually around 3-5 minutes. Make sure they are al dente, which means they should be firm but cooked through. Drain the tortellini in a colander and keep them warm. This step ensures they stay soft and tasty for your dish. You can prepare Cheesesteak Tortellini Bliss ahead of time! Cook the tortellini and steak as directed, then let them cool. Store the dish in an airtight container in the fridge. When you're ready to eat, reheat it on the stove over medium heat. Add a splash of broth to keep it moist. Stir until everything is warm, and enjoy! This makes it easy for busy days. You can easily customize the flavors in this recipe! Try adding different vegetables like mushrooms or spinach for a twist. Swap the flank steak for chicken or shrimp if you want. For a spicier kick, add red pepper flakes or diced jalapeños. You can also mix in different cheeses like cheddar or mozzarella. Get creative and make this dish your own! This blog post covered a delicious recipe combining cheese tortellini and flank steak. You learned about essential ingredients, such as provolone cheese and beef broth. I shared steps for cooking beautiful tortellini and flavor-packed steak with sautéed veggies. Tips for perfecting your dish and creative variations ensured your meal stands out. In conclusion, enjoy the flexibility of this recipe. Please feel free to customize it to fit your tastes. Happy cooking!](https://fastmealmate.com/wp-content/uploads/2025/06/d6ee9c88-ae52-41f7-bd2d-f571c0560d46-768x768.webp)