
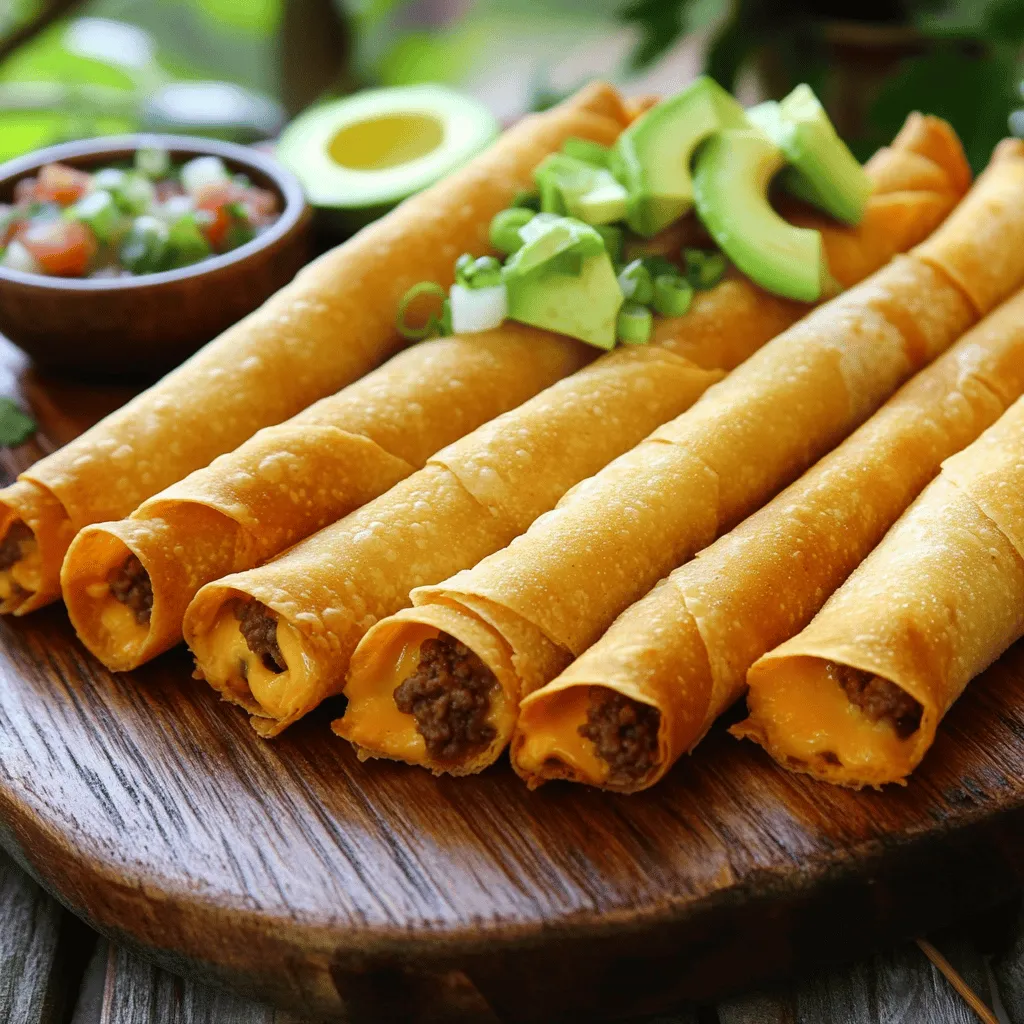
Crispy Beef Taquitos Delightful and Easy Recipe

Ready to make a delicious snack that’s fun and easy? This Crispy Beef Taquitos recipe is just what you need! With basic ingredients and simple steps, you’ll impress family and friends with your cooking skills. I’ll guide you through each part, from selecting tortillas to frying techniques, ensuring perfect results. Let’s dive in and make some tasty taquitos together that everyone will love!
Ingredients
Essential Ingredients for Crispy Beef Taquitos
For tasty crispy beef taquitos, you need these key ingredients:
– 1 lb ground beef
– 1 teaspoon cumin
– 1 teaspoon chili powder
– 1 teaspoon garlic powder
– 1/2 teaspoon onion powder
– Salt and pepper, to taste
– 1 cup shredded cheddar cheese
– 1/2 cup chopped green onions
These ingredients create a rich and savory flavor in your taquitos. The spices bring warmth, while the cheese adds creaminess.
Tortilla Selection and Preparation
Choosing the right tortillas is important. Small corn tortillas work best for rolling. They hold the filling and crisp up nicely. You can also use flour tortillas if you prefer a softer texture.
To warm the tortillas, wrap them in a damp paper towel. Microwave them for about 30 seconds. This makes them soft and easy to roll. Warm tortillas help prevent tearing, ensuring your taquitos stay intact.
Optional Toppings
Toppings can take your taquitos to the next level. Consider these options:
– Salsa: Adds freshness and a kick of flavor.
– Sour cream: Balances the spices with creaminess.
– Avocado slices: Provide a rich, buttery taste.
Feel free to mix and match your favorite toppings. They add color and texture to your dish.
Step-by-Step Instructions
Cooking the Beef Filling
Start by browning the ground beef in a large skillet over medium heat. This step is key. Make sure to break the meat into small pieces as it cooks. This helps it cook evenly. Once the beef turns brown, drain the excess fat.
Next, it’s time to add flavor. Sprinkle in cumin, chili powder, garlic powder, onion powder, and salt and pepper. Mix well. Cook for another 2 minutes. This blends the spices into the beef. It makes every bite tasty.
After that, remove the skillet from heat. Stir in the shredded cheddar cheese and chopped green onions. The cheese will melt and bind everything together. Let the mixture cool a bit before using it.
Preparing the Taquitos for Frying
Now, let’s prepare the tortillas. Wrap them in a damp paper towel. Microwave them for about 30 seconds. This makes them warm and easy to roll.
Take one tortilla and place about 2 tablespoons of the beef mixture at one end. Roll it tightly. If needed, use a toothpick to secure it. Repeat this for all the tortillas and beef filling.
While you do this, it’s time to prepare the oil for frying. Pour about 1 inch of vegetable oil into a separate pan. Heat it over medium-high heat. The oil is ready when it shimmers. You can test it by dropping in a small piece of tortilla; it should bubble.
Frying and Finishing Touches
Gently place 2-3 taquitos into the hot oil. Fry them for 2-3 minutes on each side. You want them golden brown and crispy. Use tongs to turn them carefully while they fry.
Once they are crispy, remove the taquitos from the oil. Place them on paper towels to drain excess oil. This keeps them from getting soggy. Continue frying the rest in batches.
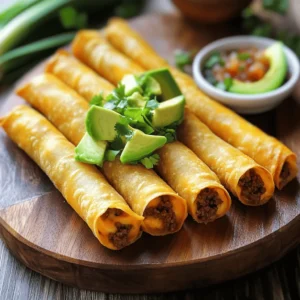
Serve the taquitos hot. You can add toppings like salsa, sour cream, and avocado slices. Enjoy your crispy beef taquitos!
Tips & Tricks
Achieving Perfectly Crispy Taquitos
To make your taquitos crispy, avoid sogginess. Here are some tips:
– Use small corn tortillas. They hold the filling well.
– Heat your oil to about 350°F. This is the sweet spot for frying.
– Fry in small batches. This helps the oil stay hot.
Frying at the right temperature is key. If the oil is too cool, the taquitos will soak up oil and become soggy.
Serving and Plating Suggestions
Presentation can make your taquitos even more delightful. Here are some ideas:
– Arrange taquitos in a circle on a colorful plate.
– Garnish with fresh chopped cilantro and lime wedges.
– Serve small bowls of salsa, sour cream, and guacamole on the side.
This setup invites everyone to create their own tasty bites.
Common Mistakes to Avoid
To ensure your taquitos turn out great, watch for these mistakes:
– Don’t overstuff the taquitos. Use about 2 tablespoons of filling.
– Warm the tortillas before rolling. This makes them flexible.
If they are too cold, they may crack during rolling. Following these tips will help you make perfect crispy beef taquitos every time.
Variations
Vegetarian Alternatives
You can easily make taquitos without beef. Use beans or veggies instead. Black beans offer great flavor and protein. Try mixing in corn, bell peppers, or spinach. Add spices like cumin and chili powder to enhance the taste. This way, you keep the fun and crunch of taquitos while making them vegetarian.
Flavor Enhancements
Want to spice things up? Add extra spices like smoked paprika or cayenne pepper. A dash of lime juice can brighten the filling too. For cheese lovers, experiment with queso fresco or pepper jack cheese. Each type of cheese brings a unique flavor. It’s a fun way to make every batch different.
Regional Variations
Taquitos come from many regions in Mexico. In some places, people use different meats like chicken or pork. Others might add unique sauces or toppings. In Baja, fish taquitos are very popular. Each region has its twist, so don’t be afraid to try new styles. This can inspire your cooking and make meals exciting.
Storage Info
Storing Leftover Taquitos
After you enjoy your crispy beef taquitos, store leftovers properly. Place them in an airtight container. This keeps them fresh and tasty. You can refrigerate them for up to three days. For longer storage, freezing is a great option. Wrap each taquito in plastic wrap, then put them in a freezer bag. They can last up to three months this way.
Reheating Tips
When it’s time to enjoy leftovers, reheating is key. To keep taquitos crispy, use the oven. Preheat it to 375°F (190°C). Place taquitos on a baking sheet and heat for about 10-15 minutes. This method keeps them crunchy. The microwave is quicker, but it may make them soft. If you use the microwave, heat them for 30-60 seconds. Flip them halfway for even warming.
Duration of Freshness
Knowing how long taquitos last helps you plan meals. In the fridge, they stay fresh for three days. If you freeze them well, they last up to three months. Always check for signs of spoilage before eating. Enjoy your delicious taquitos safely!
FAQs
What are the best tortillas for taquitos?
For taquitos, the best choice is corn tortillas. They have a natural flavor that enhances the beef. Corn tortillas are thinner and crisp up nicely when fried. Flour tortillas can also work but tend to be thicker. They may not crisp up as well. If you use flour, make sure to warm them well. This helps prevent tearing when rolling.
Can I bake instead of fry the taquitos?
Yes, you can bake taquitos if you prefer a healthier option. Preheat your oven to 400°F (200°C). Place the rolled taquitos on a baking sheet. Brush them lightly with oil to help them crisp up. Bake for about 15-20 minutes, turning halfway through. Keep an eye on them, so they don’t burn. Baking gives you a nice crunch without frying.
What can I serve with taquitos?
Taquitos pair well with many sides. Some great options include:
– Mexican rice
– Refried beans
– Fresh salsa
– Guacamole
– Corn salad
These sides add flavor and texture to your meal. You can also serve taquitos with toppings like sour cream and avocado slices. They make each bite even more delicious. For a fun twist, let everyone build their own taquito with different toppings.
In this post, I shared how to make crispy beef taquitos. We discussed the right ingredients, like ground beef and spices, and the best tortillas to use. I walked you through step-by-step cooking and frying tips to ensure that your taquitos turn out perfectly. I also covered optional toppings and common mistakes to avoid.
Taquitos are not just a meal, but a fun experience. With the right methods, you can enjoy tasty, homemade taquitos any time. Now, it’s your turn to get cooking!
 to guide you through each step. - Preheat your oven to 375°F (190°C). - Rinse and prepare the quinoa and vegetables. To start, turn on your oven and set it to 375°F (190°C). This step ensures your oven is hot and ready when it’s time to bake. While it heats, take one cup of quinoa and rinse it under cool water. This helps remove any bitterness. Next, chop your zucchinis and bell pepper. Dice the zucchini into small cubes and chop the bell pepper into bite-sized pieces. Don’t forget to finely dice one small onion and mince three cloves of garlic. - Sauté onion and garlic in olive oil until translucent. - Add zucchini and bell pepper, cooking until softened. Next, grab a medium saucepan. Add one tablespoon of olive oil and heat it over medium. Once the oil is warm, toss in your diced onion and minced garlic. Stir them for about 3-4 minutes. You want the onion to turn translucent and smell great. After that, add the diced zucchini and chopped bell pepper. Cook these veggies for around 5 minutes, stirring often. They should soften but still have a little crunch. - Mix in quinoa, cherry tomatoes, broth, and seasonings. - Transfer to a casserole dish and bake for 20-25 minutes. Now comes the fun part! Mix in your rinsed quinoa, one cup of halved cherry tomatoes, and two cups of vegetable broth into the pan. Add one teaspoon of dried oregano, one teaspoon of dried basil, and sprinkle salt and pepper to taste. Stir everything well to combine. Bring this mix to a gentle boil. Once it bubbles, reduce the heat to low, cover the pan, and let it simmer for 15 minutes. This allows the quinoa to absorb the broth. Once done, transfer the mixture into a lightly greased 9x13 inch casserole dish. If you love cheese, sprinkle one cup of shredded mozzarella on top. Place the dish in your preheated oven and bake for 20-25 minutes. You’ll know it’s ready when it bubbles and the cheese is golden brown. To make fluffy quinoa, rinse it well before cooking. This removes the bitter coating called saponin. Use two cups of vegetable broth for one cup of quinoa. Bring it to a boil, then lower the heat and cover. Let it simmer for 15 minutes. After cooking, let it rest for five minutes before fluffing with a fork. This will keep it light and airy. For the vegetables, sauté onion and garlic first in olive oil. Cook them until they are soft and fragrant. Then add zucchini and bell pepper. Stir them for about five minutes until they soften. This builds a great flavor base for your casserole. To elevate the dish, try adding a pinch of red pepper flakes for heat. Fresh herbs like thyme or parsley can add brightness. You can also swap out the dried oregano and basil for fresh herbs. Fresh herbs bring a stronger flavor. If you want to change ingredients, use brown rice instead of quinoa. You can also add cooked beans for a protein boost. For a creamier texture, mix in some ricotta cheese or yogurt before baking. Pair the casserole with a light side salad or some crusty bread. A fresh garden salad with lemon vinaigrette works well. It adds a nice contrast to the warm casserole. For gatherings, serve the casserole directly from the dish. Garnish with fresh basil leaves to make it look inviting. You can also sprinkle some extra cheese on top just before serving for a melty touch. {{image_4}} You can easily change the vegetables in this casserole. Try using bell peppers, spinach, or even eggplant. These swaps keep the dish vibrant and fresh throughout the summer. You can also mix in seasonal veggies like corn or cherry tomatoes for a burst of flavor. If you need a quinoa substitute, consider using brown rice or farro. These grains add a nice texture and flavor. Other options include couscous or even cauliflower rice for a low-carb choice. To make this casserole vegan, simply skip the cheese or use a plant-based cheese. You'll still get a creamy texture from the cooked veggies and broth. For a gluten-free option, use certified gluten-free quinoa. This way, everyone can enjoy the dish. If you're looking to cut calories, reduce the olive oil or skip the cheese. You can also use less quinoa and bulk up with more veggies. This keeps the dish light, tasty, and full of nutrients. Each of these variations allows you to enjoy this Summer Zucchini Quinoa Casserole in your own way. For the full recipe, check out the detailed instructions above. To keep your summer zucchini quinoa casserole fresh, first let it cool. Once cool, store it in an airtight container. You can refrigerate it for up to five days. If you want to save it for later, freeze it. Use a freezer-safe container or heavy-duty freezer bags. This way, it can last for up to three months. Remember to label the container with the date. This helps you track how long it has been stored. When you want to enjoy the casserole again, reheating is easy. For the best texture, use an oven. Preheat the oven to 350°F (175°C). Place the casserole in an oven-safe dish and cover it with foil. Heat for about 20 minutes or until warm. If you're in a hurry, you can use the microwave. Place a single serving in a microwave-safe dish. Heat for 1-2 minutes, checking every 30 seconds. This will keep the flavors and texture intact. Enjoy your delicious meal! Can I prepare the Summer Zucchini Quinoa Casserole in advance? Yes, you can prepare it ahead of time. Make the casserole, then cover and refrigerate it. When you're ready to eat, just bake it straight from the fridge. You may need to add a few more minutes to the cooking time. How to customize the recipe to suit my taste preferences? Feel free to swap out the veggies. For instance, you can use spinach, carrots, or even corn. You can also change the cheese or add some cooked chicken for extra protein. What are the best herbs to use for added flavor? Fresh herbs like basil and thyme work great. You can also try parsley or cilantro. These herbs add a fresh taste and brighten up your dish. Is this recipe suitable for a low-carb diet? This recipe is not low-carb due to the quinoa. Quinoa has more carbs than other grains but is also high in protein. If you want a lower carb option, you can use cauliflower rice instead of quinoa. What are the main nutritional benefits of zucchini and quinoa? Zucchini is low in calories and high in vitamins A and C. It also has a lot of water, which keeps you hydrated. Quinoa is a complete protein, meaning it has all nine essential amino acids. It’s also high in fiber, which is good for digestion. What should I do if my casserole is too watery? If your casserole is watery, try draining some liquid before baking. You can also bake it longer to help it thicken up. How can I prevent the quinoa from sticking together? To prevent sticking, rinse the quinoa well before cooking. This removes excess starch. Also, fluff the quinoa with a fork after it cooks to keep it separate. For the full recipe, check out the details above! You learned how to make a tasty Summer Zucchini Quinoa Casserole. We covered the ingredients, simple steps, and tips for perfect results. You can adjust the recipe to fit your taste and needs. Explore flavor swaps and storage tips to keep it fresh. With this dish, enjoy a healthy meal that is easy to make. I hope you try it and enjoy every bite!](https://fastmealmate.com/wp-content/uploads/2025/07/552d1654-693f-4b1b-8ee9-d91b85ff9950-768x768.webp)