
Peach Bellini Mocktail Refreshing Summer Delight

Looking for a delightful drink to cool you down this summer? Let me introduce you to the Peach Bellini Mocktail! This fun drink is light, fruity, and perfect for any occasion. I’ll share the key ingredients, easy steps to make it, and some fun tips to customize your own version. Grab your peaches, and let’s create a refreshing treat you’ll love!
Ingredients
Key Ingredients for Peach Bellini Mocktail
To make a delicious Peach Bellini Mocktail, you need a few key ingredients:
– 2 ripe peaches, peeled and diced
– 1 tablespoon honey or agave syrup
– 1 tablespoon freshly squeezed lemon juice
– 1 cup sparkling water or club soda
– Fresh mint leaves for garnish
– Ice cubes (optional)
These ingredients create a sweet and bubbly drink perfect for summer.
Optional Ingredients for Customization
You can add a few optional ingredients to make your mocktail unique. Here are some ideas:
– A splash of orange juice for citrus flavor
– A few berries like raspberries or strawberries for color
– Flavored sparkling water for extra zest
Feel free to mix and match to suit your taste.
Substitutions and Tips for Freshness
If you can’t find ripe peaches, you can use frozen peaches. Just make sure to thaw them first. For sweetening, maple syrup works well as a substitute for honey.
To keep your mocktail fresh:
– Use ripe fruits for the best flavor.
– Serve immediately after making for the best bubbles.
– Store any leftovers in the fridge and consume within a day.
This will help maintain the drink’s delicious taste and texture.Enjoy your refreshing Peach Bellini Mocktail!
Step-by-Step Instructions
Preparing the Peach Puree
To make the peach puree, start with two ripe peaches. Peel and dice them into small pieces. Place the diced peaches into a blender. Add one tablespoon of honey or agave syrup. This sweetens the puree nicely. Then, squeeze in one tablespoon of fresh lemon juice. The lemon adds a bright touch that balances the sweetness. Blend the mixture on high speed until it is smooth and creamy. If you want a silkier texture, use a fine mesh sieve. Strain the puree to remove any pulp. This step is optional but gives you a smooth drink.
Assembling the Mocktail
Now, grab a glass. If you enjoy chilled drinks, fill it halfway with ice cubes. Carefully pour the peach puree over the ice. Fill the glass until it is about two-thirds full. Next, gently pour sparkling water or club soda into the glass. Fill it to the rim for that fizzy touch. Use a spoon or straw to stir lightly. This helps mix the puree with the bubbles, creating a refreshing drink.
Final Touches and Garnishing
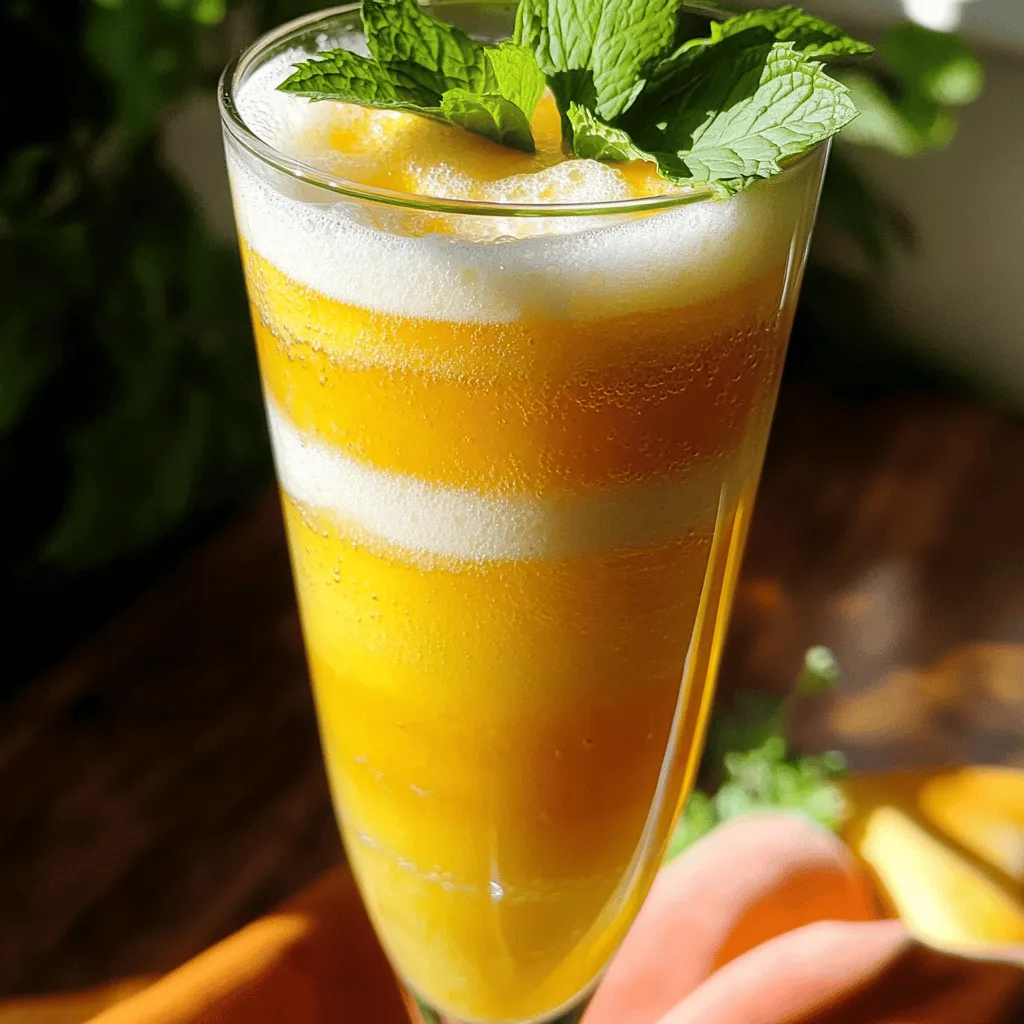
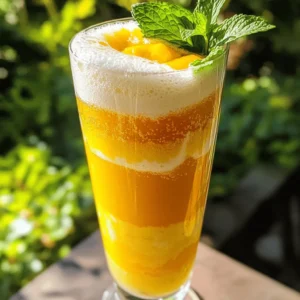
To finish, take several fresh mint leaves. Place them on top of the drink. This adds a lovely aroma and a pop of color. For presentation, serve the mocktail in chilled glasses. Pair it with a small plate of peach slices for a nice touch. Enjoy your Peach Bellini Mocktail!
Tips & Tricks
Best Practices for Blending Peaches
To get the best flavor, choose ripe peaches. They should feel soft when you gently press them. Peel and dice the peaches before blending. This makes it easy for the blender to create a smooth puree. I like to blend on high speed. This ensures all the peach bits get mixed well. If you want a silkier drink, strain the puree. Use a fine mesh sieve to remove any leftover pulp. This step is not a must, but it helps.
Chilling Techniques for Optimal Refreshment
Chilling your glasses can make a big difference. Before you serve, place your glasses in the freezer for a few minutes. This keeps the drink cold longer. You can also add ice cubes to the glass. This adds a refreshing touch, especially on hot days. If you want to chill the mocktail faster, blend the peaches with ice. It adds a nice frosty texture and keeps every sip cool.
Serving Suggestions for Presentation
Serve your Peach Bellini Mocktail in clear glasses. This lets the lovely peach color shine through. To make it special, add fresh mint leaves on top. They add a pop of color and smell great too. You can also place a slice of peach on the rim of the glass. This adds a fun touch and gives guests a hint of the flavors inside. For a fancy look, serve with a small plate of peach slices. This makes your table setting beautiful and inviting.
Variations
Fruit Alternatives for Mocktail Twist
You can switch up the fruit in your Peach Bellini mocktail. Try using ripe mangoes or juicy strawberries. Both fruits add a unique flavor and color. You might also enjoy using raspberries for a tart twist. Each choice brings a fresh taste to your drink. Blend the fruits just like you did with peaches. This way, you keep the same creamy texture.
Sparkling Water Options
When it comes to sparkling water, you have many choices. Club soda is a classic option, but flavored sparkling water works great too. Lemon or lime sparkling water adds a nice zing. For a fun twist, try ginger ale. It brings a sweet and spicy kick that pairs well with fruits. Choose a bubbly drink that you love for the best taste.
Seasonal Modifications
Seasons change, and so can your mocktail! In summer, stick with fresh peaches. In fall, you might want to use apples or pears. Winter calls for citrus fruits like oranges or grapefruits. Spring is perfect for berries like blueberries or blackberries. Each season brings new flavors, so let your choice of fruit reflect what’s fresh and in season. This keeps your drink exciting all year long.
Storage Info
How to Store Leftover Peach Puree
If you have leftover peach puree, store it in an airtight container. Make sure the container is clean and dry. You can refrigerate it for up to three days. If you want to keep it longer, freeze it. Use ice cube trays to portion the puree. Once frozen, transfer the cubes to a freezer bag. This way, you can use small amounts later.
Best Practices for Storing Sparkling Water
To keep sparkling water fresh, store it in a cool, dark place. Avoid sunlight and heat, as they can make the bubbles go flat. Keep it sealed until you are ready to use it. If you open a bottle but have leftovers, drink it within a day. You can try to reseal it with a bottle cap, but it may lose some fizz.
Shelf Life and Usage Tips
Peach puree lasts about three days in the fridge. Always check for off smells or changes in color. Frozen peach puree is good for up to six months. When using your frozen puree, let it thaw in the fridge overnight. For sparkling water, check the expiration date on the bottle. Freshness matters for the best taste in your Peach Bellini Mocktail.
FAQs
What is a Peach Bellini Mocktail?
A Peach Bellini Mocktail is a non-alcoholic drink made with fresh peaches. It blends peach puree with sparkling water for a fizzy treat. This mocktail is fruity and refreshing, perfect for summer days. You can enjoy it any time without alcohol.
Can I make this recipe ahead of time?
Yes, you can prepare the peach puree ahead of time. Store it in the fridge for up to two days. Just mix it with sparkling water when you’re ready to serve. This makes it easy for parties or gatherings.
How can I adjust the sweetness level?
To change the sweetness, you can add more or less honey or agave syrup. Taste the puree before mixing in the sparkling water. If it’s not sweet enough, just add a bit more sweetener. You can also use ripe peaches for natural sweetness.
Is there an alcoholic version of this drink?
Yes, the classic Peach Bellini contains Prosecco or champagne. To make it alcoholic, mix the peach puree with chilled Prosecco instead of sparkling water. This gives it a bubbly kick while staying true to the original.
What other fruits work well in mocktails?
Many fruits make great mocktails! You can try strawberries, mangoes, or raspberries. They blend well and add unique flavors. Citrus fruits like oranges and limes also work, giving a zesty twist. Mix and match for fun variations!
This article covers everything you need for a great Peach Bellini Mocktail. We discussed key ingredients, optional items, and tips for freshness. You learned how to prepare peach puree, assemble your drink, and add final touches. I shared tips for blending, chilling, and serving. You even explored fruit alternatives and storage info.
In summary, this mocktail is easy and fun to make. Enjoy experimenting with flavors and sharing your creations. Cheers to a tasty, refreshing drink anytime!
![- 2 salmon fillets (approximately 6 oz each) - 1 pound large shrimp, peeled and deveined - 2 tablespoons Cajun seasoning (store-bought or homemade) - 2 tablespoons olive oil - 1 red bell pepper, diced - 1 green bell pepper, diced - 1 medium onion, diced - 3 cloves garlic, minced - 1 cup cherry tomatoes, halved - 1 cup coconut milk - 2 green onions, chopped (for garnish) - Fresh parsley, chopped (for garnish) - Salt and pepper to taste The ingredients for Cajun salmon and shrimp are simple yet packed with flavor. The salmon fillets and shrimp provide a great base. You can choose fresh or frozen shrimp, but I recommend fresh for the best taste. Cajun seasoning adds that unique kick. You can buy it or make your own with spices like paprika, cayenne, and garlic powder. Next, the colorful bell peppers and onion bring a sweet crunch. Garlic adds a nice aroma and flavor. Cherry tomatoes give a juicy burst. Coconut milk adds creaminess and balance to the spice. Finally, green onions and parsley brighten the dish. This dish is healthy and filling. Each serving has around 400 calories. You get about 30 grams of protein, 20 grams of fat, and 15 grams of carbs. It also has 3 grams of fiber, which is great for digestion. Pair this dish with fluffy rice or a fresh salad. Rice soaks up the sauce nicely. A crisp green salad adds freshness. For drinks, a cold white wine or iced tea works well. Enjoying this dish with a light beverage enhances the flavors. For the full recipe, check out the detailed cooking instructions. Start by patting the salmon and shrimp dry with paper towels. This helps them sear nicely. Season the salmon on both sides with one tablespoon of Cajun seasoning. For the shrimp, toss them with the remaining seasoning in a bowl. Make sure the shrimp are covered well. Set both aside while you prepare the rest. Heat one tablespoon of olive oil in a large skillet over medium heat. Add the diced onion, red bell pepper, and green bell pepper. Sauté these vegetables for about five minutes. Stir them occasionally until they soften. Then, add the minced garlic and sauté for one more minute. This brings out a lovely flavor. Push the veggies to one side of the skillet. Place the seasoned salmon fillets skin-side down in the other side. Cook them for about four to five minutes. When they are golden brown, carefully flip the fillets. Cook for another four minutes. The salmon should flake easily when done. Remove it and set it aside on a plate. In the same skillet, add the other tablespoon of olive oil. Next, toss in the seasoned shrimp. Cook them for about two to three minutes, stirring gently. They should turn pink and opaque. This shows they are done and ready for the next step. Now, add the halved cherry tomatoes to the skillet with the shrimp. Pour in one cup of coconut milk and stir well. Bring this mixture to a gentle simmer. Let it cook for another two to three minutes. Season with salt and pepper to your liking. This sauce is rich and creamy! Carefully return the cooked salmon fillets to the skillet. Nestle them among the shrimp and sauce. Spoon some sauce over the salmon to keep it moist. Let everything cook together for an additional two minutes. This melds the flavors beautifully. For the full recipe, check out the section above. Enjoy your Cajun salmon and shrimp! To cook salmon and shrimp just right, timing is key. Salmon takes about 8-10 minutes total. Cook it for 4-5 minutes on one side, then flip. For shrimp, cook for about 2-3 minutes until they turn pink. Use a fork to test the salmon. If it flakes easily, it’s ready. Shrimp should be opaque and firm. You can make your own Cajun seasoning at home. Use these basic spices: - Paprika - Cayenne pepper - Onion powder - Garlic powder - Black pepper - Oregano - Thyme Adjust the heat by adding more cayenne for spice or less for a milder flavor. This way, you control the heat level to fit your taste. Plating is important for making your dish pop. Serve the salmon and shrimp on a large platter. Drizzle some extra coconut sauce around the edge for flair. Add bright green garnishes like chopped parsley and green onions. They bring color and freshness. You can also add a side of fluffy rice or crusty bread to soak up that delicious sauce. {{image_4}} You can switch up the proteins in this dish. Try using cod or tilapia instead of salmon. Both of these fish cook well and soak up flavors nicely. For shrimp lovers, scallops can add a sweet touch. If you're looking for vegetarian choices, consider using hearty vegetables. Zucchini and bell peppers work great when grilled. You can also use firm tofu, which absorbs flavors and adds protein. Changing the seasoning can add a new twist. If you want a milder taste, reduce the Cajun seasoning. You can also blend in herbs like thyme or basil. For more heat, add cayenne pepper or sliced jalapeños. These spices will give your dish a nice kick. Experimenting with flavors can make each meal special. Pair this dish with tasty sides to make it shine. Fluffy rice or quinoa absorbs the sauce well. A fresh salad with greens and citrus can balance the spices. For gatherings, serve it family-style on a large platter. This way, everyone can dig in and share the joy of this delicious meal. Don't forget to have some crusty bread on the side. It’s perfect for soaking up the creamy sauce from the Cajun salmon and shrimp. For the full experience, check out the Full Recipe for details. To keep your Cajun salmon and shrimp fresh, refrigerate leftovers within two hours. Place them in airtight containers. This keeps moisture in and flavors intact. You can store them for up to three days. It’s best to separate salmon from shrimp if you want to maintain their textures. When reheating, avoid drying out your seafood. The best method is to use a skillet. Heat it over low heat, adding a splash of water or broth. Cover the pan to trap steam. This keeps the seafood moist and flavorful. You can also use a microwave. Just cover it with a damp paper towel to keep it from drying out. If you want to store your dish for a longer time, freezing is a good option. Let the dish cool completely first. Then, wrap it tightly in plastic wrap and foil to prevent freezer burn. You can freeze it for up to three months. When ready to eat, thaw it in the fridge overnight. Reheat it gently on the stove. This method preserves both taste and texture. Yes, you can use frozen shrimp. Just thaw them before cooking. This helps the shrimp cook evenly. I suggest placing them in cold water for about 20 minutes. This method keeps them firm and tasty. The salmon is done when it flakes easily with a fork. Check for a light pink color inside. It should not be translucent. If you have a food thermometer, aim for 145°F. This ensures it’s safe to eat. If you don't have coconut milk, try cream or milk. You can also use almond milk for a lighter option. Each substitute changes the dish's flavor a bit, but it will still be tasty. Absolutely! This recipe is perfect for meal prep. Cook a batch and store it in airtight containers. It keeps well in the fridge for up to three days. Reheat it gently to enjoy a quick meal. Cajun seasoning has a mild to medium spice level. It adds flavor without being too hot. If you prefer less heat, you can use less seasoning. For more spice, add a pinch of cayenne pepper. Yes, feel free to add more vegetables! Zucchini, mushrooms, or spinach are great choices. Just make sure to chop them small. Add them when you sauté the onions and peppers for even cooking. For the full recipe, click [Full Recipe]. This article covered a tasty seafood dish featuring salmon and shrimp, seasoned with Cajun flair. You learned about the ingredients, cooking steps, and ways to adapt the recipe. Remember to achieve perfect doneness with both the salmon and shrimp for the best result. Don't hesitate to play with flavors or pairings to suit your taste. Making this dish can impress family or friends while keeping it simple. Enjoy your cooking journey and share this recipe with others!](https://fastmealmate.com/wp-content/uploads/2025/06/17932171-8cf4-4553-ac77-c5634fbfd80e-768x768.webp)

![To make honey garlic chicken breasts, gather these items: - 4 boneless, skinless chicken breasts - 1/3 cup honey - 1/4 cup low-sodium soy sauce - 4 cloves garlic, finely minced - 1 tablespoon fresh ginger, grated - 1 tablespoon olive oil (for cooking) - 1 teaspoon sesame oil - 1 teaspoon apple cider vinegar - Salt and freshly cracked black pepper, to taste - Chopped green onions (for garnish) - Sesame seeds (for garnish) If you want to switch things up, you can make some simple changes: - Use chicken thighs instead of breasts for more flavor and tenderness. - Swap honey for maple syrup for a different sweet taste. - Choose coconut aminos instead of soy sauce for a gluten-free option. - Replace fresh ginger with powdered ginger in a pinch. - Use canola oil instead of olive oil for frying. Measuring helps your dish taste just right. Here are some tips: - Use a liquid measuring cup for honey and soy sauce. Pour slowly for accuracy. - Use a dry measuring cup for solid ingredients like ginger and garlic. - Level off dry ingredients with a straight edge for a perfect measure. - For sticky ingredients like honey, spray the measuring cup with cooking oil first. This makes it easier to pour out. Get ready for a flavorful dinner delight with these simple ingredients! For the full recipe, check the details above. To start, gather all your ingredients. You need four boneless, skinless chicken breasts, honey, soy sauce, garlic, ginger, olive oil, sesame oil, apple cider vinegar, salt, and pepper. Chop the garlic and grate the ginger. In a medium bowl, mix the honey, soy sauce, garlic, ginger, olive oil, sesame oil, and apple cider vinegar. Whisk the mixture until it is smooth and well combined. Pat the chicken dry with paper towels. Season both sides with salt and freshly cracked black pepper. This step adds flavor to the chicken. Heat a drizzle of olive oil in a large skillet over medium-high heat. Once the oil is hot and shimmering, place the seasoned chicken breasts in the skillet. Cook each side for about 5-7 minutes. You want a rich, golden-brown crust. Use a meat thermometer to check if the chicken has reached 165°F (75°C). When the chicken is golden, pour the honey garlic sauce over the top. Reduce the heat to medium-low and cover the skillet. Let it simmer for 10-15 minutes. This allows the sauce to thicken and flavor the chicken. To check if your chicken is done, use a meat thermometer. Insert it into the thickest part of the chicken. It should read 165°F (75°C). If you don’t have a thermometer, you can cut into the chicken. The juices should run clear, not pink. Make sure to check all pieces, as they can cook unevenly. After cooking, let the chicken rest for a few minutes before serving. This helps keep it juicy. For a great presentation, drizzle extra sauce on top and garnish with green onions and sesame seeds. Enjoy this flavorful dinner delight from the Full Recipe! To make your honey garlic chicken truly shine, use fresh ingredients. Fresh garlic and ginger pack a punch and enhance the dish's flavor. If you want more depth, let the chicken marinate. A 30-minute soak in the sauce will increase flavor. You can also add a splash of lime juice to brighten the taste. Remember, balance is key! Use salt to enhance sweetness and acidity to cut through richness. Cooking chicken breasts can be tricky. To keep them juicy, avoid overcooking. Use a meat thermometer to check for an internal temperature of 165°F (75°C). Start on high heat to get a nice crust, then lower the heat. This helps the inside cook without drying out. Covering the skillet while simmering allows the chicken to absorb sauce flavors. Here are some tools that can help you cook like a pro: - Large skillet - Meat thermometer - Whisk for mixing - Cutting board - Sharp knife for slicing These tools make cooking smoother and more enjoyable. Having the right equipment allows you to focus on creating a delicious meal. For the full recipe, check out the details above! {{image_4}} You can add more colors and flavors to your honey garlic chicken. Try mixing in vegetables like bell peppers, broccoli, or snap peas. Cut them into bite-sized pieces. Add them to the skillet after the chicken has cooked for about 5 minutes. This way, the veggies soak up the sauce and stay crisp. It makes the dish healthy and fun. If you like heat, spice up your honey garlic chicken. Add red pepper flakes or chili paste to the sauce. Start with half a teaspoon and adjust to your taste. This spicy kick pairs well with the sweetness of honey. It gives you a nice balance of flavors. You can also use sriracha for a different heat profile. You don’t have to cook the chicken on the stove. Grilling gives it a smoky flavor. Marinate the chicken in the honey garlic sauce for at least one hour. Then, grill it on medium heat for about 6-8 minutes per side. If you prefer baking, preheat your oven to 400°F (200°C). Place the chicken in a baking dish, pour the sauce over it, and bake for 20-25 minutes. This keeps the chicken juicy and full of flavor. For the full recipe, check the [Full Recipe]. After your meal, let the chicken cool down. Place leftovers in an airtight container. This keeps them fresh and tasty. Store the container in the fridge. Honey garlic chicken can last for up to four days. If you plan to eat it later, consider freezing it. To reheat, you have a few options. The best way is to use the oven. Preheat it to 350°F (175°C). Place the chicken in a baking dish and cover it. Heat for about 15-20 minutes. Check that the chicken is hot all the way through. You can also use a microwave. Heat in short bursts, checking often. This keeps the chicken juicy. If you want to freeze the chicken, it’s simple. Wrap each piece tightly in plastic wrap. Then, place them in a freezer bag. Squeeze out as much air as possible. This helps prevent freezer burn. You can freeze the chicken for up to three months. When you’re ready to eat, thaw it overnight in the fridge. Then, reheat using the oven or microwave. This way, you enjoy a delicious meal later. You can serve many sides with honey garlic chicken breasts. Here are some great options: - Steamed rice: This absorbs the sauce well and adds a nice balance. - Sautéed vegetables: Try broccoli, bell peppers, or carrots for color and crunch. - Mashed potatoes: Creamy potatoes enhance the meal and add comfort. - Quinoa: A healthy grain that pairs perfectly with the sauce. - Salad: A fresh green salad can lighten up the meal. These sides complement the flavors of the chicken and make a complete meal. Yes! You can prepare honey garlic chicken breasts ahead of time. Here’s how: - Marinate: You can marinate the chicken in the sauce for up to 24 hours. This adds flavor and tenderizes the meat. - Cook and store: After cooking, let the chicken cool. Store it in an airtight container in the fridge for up to 3 days. - Reheat: When you’re ready to eat, simply reheat in a skillet or microwave. Add a splash of water if the sauce thickens too much. This method saves time and keeps dinner stress-free. You can easily change the sweetness of the honey garlic sauce. Here are some tips: - Add more honey: For a sweeter sauce, increase the honey a bit. - Use less honey: If you prefer less sweetness, reduce the honey. - Try other sweeteners: Maple syrup or agave can be good substitutes. They offer a different flavor while keeping it sweet. - Balance with acid: If it gets too sweet, add a splash of apple cider vinegar for a tangy touch. Adjusting the sweetness helps you tailor the dish to your taste. You learned about the ingredients, steps, and tips for cooking honey garlic chicken. We covered ingredient substitutions, measuring tips, and how to check doneness. I shared best practices for enhancing flavor and cooking juicy chicken. You also saw variations and how to store leftovers properly. Cooking can be simple and fun. Use these tips to make your meals taste great. Enjoy your cooking experience!](https://fastmealmate.com/wp-content/uploads/2025/06/7fed451b-ca95-459f-be21-3e50f3436304-768x768.webp)