Roasted Beet Goat Cheese Salad Healthy and Tasty Dish
![- 3 medium-sized beets, thoroughly scrubbed to remove dirt - 4 cups of mixed salad greens (a blend of arugula, spinach, and romaine for texture) - 1/2 cup goat cheese, crumbled into small pieces - 1/4 cup walnuts, toasted and roughly chopped for a crunchy contrast - 1/4 cup dried cranberries for a sweet burst of flavor - 2 tablespoons extra virgin olive oil - 1 tablespoon aged balsamic vinegar for depth - 1 teaspoon Dijon mustard to add tang - Salt and freshly ground black pepper to taste - Fresh herbs for garnish (such as chopped parsley or finely sliced chives) When measuring, use a dry measuring cup for solid ingredients like walnuts and cranberries. For liquids, a liquid measuring cup works best. Make sure to level off dry ingredients for accuracy. This helps you get the right taste and texture. Choose fresh, firm beets. Look for greens that are vibrant and crisp. For goat cheese, select a soft, creamy variety. Fresh herbs should be fragrant and bright. High-quality olive oil and balsamic vinegar make a big difference in flavor. This salad shines when you use the best ingredients. For the full recipe, check out the details above. To start, preheat your oven to 400°F (200°C). This heat helps the beets cook well. Take 3 medium-sized beets and scrub them clean to remove dirt. Wrap each beet in aluminum foil. This keeps them moist while roasting. Place the wrapped beets on a baking sheet. Roast them for 45 to 60 minutes. They are done when a fork can pierce them easily. After roasting, let them cool for a few minutes. Unwrap, peel off the skin, and cut them into wedges. In a large bowl, mix the roasted beet wedges with 4 cups of mixed salad greens. I love using arugula, spinach, and romaine for varied texture. Next, add 1/2 cup of crumbled goat cheese for creaminess. For crunch, toss in 1/4 cup of toasted walnuts. Finally, sprinkle in 1/4 cup of dried cranberries for a sweet touch. This mixture looks colorful and inviting. In a small bowl, whisk together 2 tablespoons of extra virgin olive oil and 1 tablespoon of aged balsamic vinegar. Add 1 teaspoon of Dijon mustard to give it a nice tang. Season it with salt and freshly ground black pepper to taste. Mix until all ingredients blend well. Drizzle the dressing over the salad. Toss gently so that the beets and cheese stay intact. Taste and adjust the seasoning if needed. Serve on a platter or individual plates, and garnish with fresh herbs for a beautiful finish. Enjoy this delicious and healthy dish! For the complete recipe, refer to the Full Recipe. Roasting beets is easy. Start by preheating your oven to 400°F. Wrap each beet in foil. This helps them cook evenly. Roast for 45 to 60 minutes until they’re soft. A fork should slide in with ease. Let them cool before peeling. The skin comes off easily when they are warm. This salad is great as a meal or a side. Serve it with grilled chicken or fish for protein. You can even add chickpeas for a plant-based option. Pair it with crusty bread for a complete meal. This dish shines at dinner parties or casual lunches. Presentation matters in cooking. Use a shallow bowl or a large platter for a stunning look. Start with greens, then add beet wedges. Sprinkle goat cheese and walnuts on top. Add a few dried cranberries for color. Finish with fresh herbs, like parsley or chives. This creates a bright and inviting dish that everyone will love. Check out the Full Recipe for more details on making this delightful salad! {{image_4}} To make your roasted beet goat cheese salad even more filling, you can add protein. Grilled chicken is an easy choice. It adds flavor and heartiness. You can also use chickpeas for a plant-based option. They add great texture and nutrition. If you like seafood, try adding shrimp or smoked salmon. Each protein brings a new twist to your dish. While the balsamic dressing is delicious, you can mix things up. A honey mustard dressing pairs well with the sweet beets. For a creamier option, try a yogurt-based dressing. You could even use a simple lemon vinaigrette for a fresh taste. Each dressing will change the flavor profile and keep things exciting. This salad is versatile! In spring, you might add fresh peas or asparagus. In summer, ripe tomatoes or cucumbers can brighten the dish. Fall brings apples or pears, adding sweetness and crunch. In winter, consider using roasted squash or pomegranate seeds for color and flavor. These swaps keep your salad fresh and aligned with the season. To keep your roasted beet goat cheese salad fresh, store it in an airtight container. Make sure to separate the dressing from the salad to prevent sogginess. You can keep the salad in the fridge for up to three days. If you want to enjoy it later, store the leftovers without the dressing. This way, the flavors stay bright and fresh. Understanding how long your ingredients last can help prevent waste. Here’s a quick guide: - Roasted Beets: Last about 5 days in the fridge when stored properly. - Mixed Greens: Usually stay fresh for 3 to 5 days if kept cool and dry. - Goat Cheese: Can last up to a week after opening, but check for any signs of spoilage. - Walnuts: Store in an airtight container. They stay fresh for about 1 month. - Dried Cranberries: These can last up to a year if kept in a cool, dry place. Typically, you won’t need to reheat this salad. It tastes best cold. If you do want to warm it slightly, use a microwave. Heat on low for about 10-15 seconds. Be careful not to overdo it, as it may change the texture and flavor. Enjoy your salad fresh for the best experience! For the full recipe, check out the section above. Yes, you can use canned beets. They save time and are easy to find. However, fresh roasted beets give a better taste and texture. Canned beets may be softer and less vibrant. If you choose canned beets, rinse them under cold water to remove excess brine. Slice them into wedges and add them directly to your salad. If you need a substitute for goat cheese, try feta or ricotta cheese. Feta has a similar tangy flavor. Ricotta is creamier and milder. You can also use dairy-free cheese for a different taste. Cream cheese can work too, but it is denser. Choose based on your flavor preference and dietary needs. To make this salad vegan, skip the goat cheese. Replace it with vegan cheese or avocado for creaminess. Use maple syrup or agave in the dressing instead of honey. Check that your balsamic vinegar is vegan, as some brands may add honey. This way, you keep all the flavors while making it plant-based. You can find the full recipe here: [Full Recipe]. In this post, I covered how to create a delicious beet salad. We explored the best ingredients, measuring tips, and quality recommendations. You learned step-by-step instructions for prepping beets, assembling the salad, and making the dressing. I shared tips for perfect roasting, serving, and presentation. We also discussed variations like protein options and seasonal swaps. Lastly, I provided storage info and answered common questions. Enjoy crafting your own unique beet salad, and let your creativity shine!](https://fastmealmate.com/wp-content/uploads/2025/06/466f3db8-9be5-4235-af51-29d034f8c92e.webp)
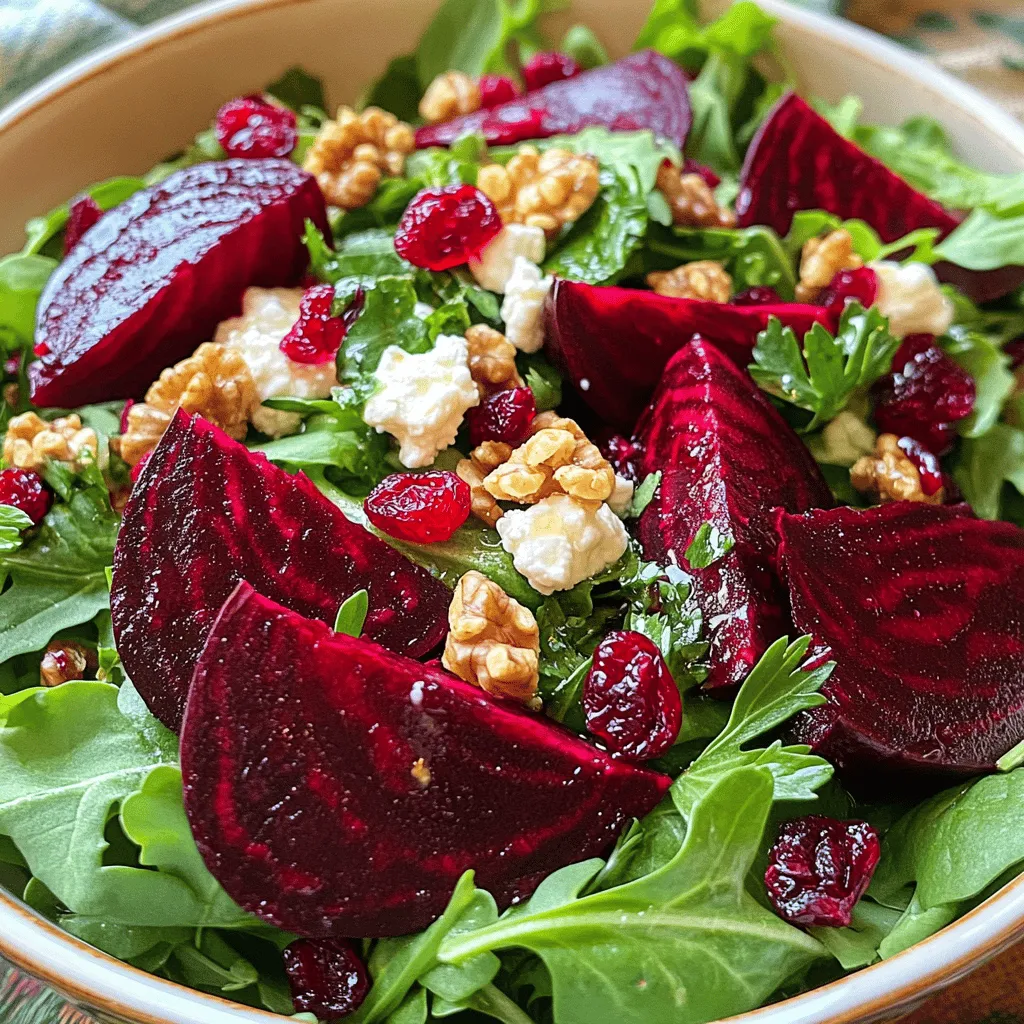
Looking for a fresh and vibrant dish that’s both healthy and delicious? Let me introduce you to the Roasted Beet Goat Cheese Salad! This colorful salad packs flavors and plenty of nutrients. Whether you want a light lunch or a fancy dinner side, you’ll love how easy it is to make. Join me as we explore the best ingredients, step-by-step instructions, and clever tips to elevate your salad game!
Ingredients
List of Ingredients
– 3 medium-sized beets, thoroughly scrubbed to remove dirt
– 4 cups of mixed salad greens (a blend of arugula, spinach, and romaine for texture)
– 1/2 cup goat cheese, crumbled into small pieces
– 1/4 cup walnuts, toasted and roughly chopped for a crunchy contrast
– 1/4 cup dried cranberries for a sweet burst of flavor
– 2 tablespoons extra virgin olive oil
– 1 tablespoon aged balsamic vinegar for depth
– 1 teaspoon Dijon mustard to add tang
– Salt and freshly ground black pepper to taste
– Fresh herbs for garnish (such as chopped parsley or finely sliced chives)
Measuring Tips
When measuring, use a dry measuring cup for solid ingredients like walnuts and cranberries. For liquids, a liquid measuring cup works best. Make sure to level off dry ingredients for accuracy. This helps you get the right taste and texture.
Quality Ingredients Recommendations
Choose fresh, firm beets. Look for greens that are vibrant and crisp. For goat cheese, select a soft, creamy variety. Fresh herbs should be fragrant and bright. High-quality olive oil and balsamic vinegar make a big difference in flavor. This salad shines when you use the best ingredients.
Step-by-Step Instructions
Prepping the Beets
To start, preheat your oven to 400°F (200°C). This heat helps the beets cook well. Take 3 medium-sized beets and scrub them clean to remove dirt. Wrap each beet in aluminum foil. This keeps them moist while roasting. Place the wrapped beets on a baking sheet. Roast them for 45 to 60 minutes. They are done when a fork can pierce them easily. After roasting, let them cool for a few minutes. Unwrap, peel off the skin, and cut them into wedges.
Assembling the Salad
In a large bowl, mix the roasted beet wedges with 4 cups of mixed salad greens. I love using arugula, spinach, and romaine for varied texture. Next, add 1/2 cup of crumbled goat cheese for creaminess. For crunch, toss in 1/4 cup of toasted walnuts. Finally, sprinkle in 1/4 cup of dried cranberries for a sweet touch. This mixture looks colorful and inviting.
Making the Dressing
In a small bowl, whisk together 2 tablespoons of extra virgin olive oil and 1 tablespoon of aged balsamic vinegar. Add 1 teaspoon of Dijon mustard to give it a nice tang. Season it with salt and freshly ground black pepper to taste. Mix until all ingredients blend well. Drizzle the dressing over the salad. Toss gently so that the beets and cheese stay intact. Taste and adjust the seasoning if needed. Serve on a platter or individual plates, and garnish with fresh herbs for a beautiful finish. Enjoy this delicious and healthy dish!
Tips & Tricks
Roasting Beets Perfectly
Roasting beets is easy. Start by preheating your oven to 400°F. Wrap each beet in foil. This helps them cook evenly. Roast for 45 to 60 minutes until they’re soft. A fork should slide in with ease. Let them cool before peeling. The skin comes off easily when they are warm.
Serving Suggestions
This salad is great as a meal or a side. Serve it with grilled chicken or fish for protein. You can even add chickpeas for a plant-based option. Pair it with crusty bread for a complete meal. This dish shines at dinner parties or casual lunches.
Presentation Tips
Presentation matters in cooking. Use a shallow bowl or a large platter for a stunning look. Start with greens, then add beet wedges. Sprinkle goat cheese and walnuts on top. Add a few dried cranberries for color. Finish with fresh herbs, like parsley or chives. This creates a bright and inviting dish that everyone will love.
Variations
Adding Protein Options
To make your roasted beet goat cheese salad even more filling, you can add protein. Grilled chicken is an easy choice. It adds flavor and heartiness. You can also use chickpeas for a plant-based option. They add great texture and nutrition. If you like seafood, try adding shrimp or smoked salmon. Each protein brings a new twist to your dish.
Alternative Dressings
While the balsamic dressing is delicious, you can mix things up. A honey mustard dressing pairs well with the sweet beets. For a creamier option, try a yogurt-based dressing. You could even use a simple lemon vinaigrette for a fresh taste. Each dressing will change the flavor profile and keep things exciting.
Seasonal Ingredient Swaps
This salad is versatile! In spring, you might add fresh peas or asparagus. In summer, ripe tomatoes or cucumbers can brighten the dish. Fall brings apples or pears, adding sweetness and crunch. In winter, consider using roasted squash or pomegranate seeds for color and flavor. These swaps keep your salad fresh and aligned with the season.
Storage Information
How to Store Leftovers
To keep your roasted beet goat cheese salad fresh, store it in an airtight container. Make sure to separate the dressing from the salad to prevent sogginess. You can keep the salad in the fridge for up to three days. If you want to enjoy it later, store the leftovers without the dressing. This way, the flavors stay bright and fresh.
Shelf Life of Salad Ingredients
Understanding how long your ingredients last can help prevent waste. Here’s a quick guide:
– Roasted Beets: Last about 5 days in the fridge when stored properly.
– Mixed Greens: Usually stay fresh for 3 to 5 days if kept cool and dry.
– Goat Cheese: Can last up to a week after opening, but check for any signs of spoilage.
– Walnuts: Store in an airtight container. They stay fresh for about 1 month.
– Dried Cranberries: These can last up to a year if kept in a cool, dry place.
Reheating Tips (if applicable)
Typically, you won’t need to reheat this salad. It tastes best cold. If you do want to warm it slightly, use a microwave. Heat on low for about 10-15 seconds. Be careful not to overdo it, as it may change the texture and flavor. Enjoy your salad fresh for the best experience!
FAQs
Can I use canned beets instead?
Yes, you can use canned beets. They save time and are easy to find. However, fresh roasted beets give a better taste and texture. Canned beets may be softer and less vibrant. If you choose canned beets, rinse them under cold water to remove excess brine. Slice them into wedges and add them directly to your salad.
What can I substitute for goat cheese?
If you need a substitute for goat cheese, try feta or ricotta cheese. Feta has a similar tangy flavor. Ricotta is creamier and milder. You can also use dairy-free cheese for a different taste. Cream cheese can work too, but it is denser. Choose based on your flavor preference and dietary needs.
How can I make this salad vegan?
To make this salad vegan, skip the goat cheese. Replace it with vegan cheese or avocado for creaminess. Use maple syrup or agave in the dressing instead of honey. Check that your balsamic vinegar is vegan, as some brands may add honey. This way, you keep all the flavors while making it plant-based.
In this post, I covered how to create a delicious beet salad. We explored the best ingredients, measuring tips, and quality recommendations. You learned step-by-step instructions for prepping beets, assembling the salad, and making the dressing. I shared tips for perfect roasting, serving, and presentation. We also discussed variations like protein options and seasonal swaps. Lastly, I provided storage info and answered common questions. Enjoy crafting your own unique beet salad, and let your creativity shine!
![- 3 medium-sized beets, thoroughly scrubbed to remove dirt - 4 cups of mixed salad greens (a blend of arugula, spinach, and romaine for texture) - 1/2 cup goat cheese, crumbled into small pieces - 1/4 cup walnuts, toasted and roughly chopped for a crunchy contrast - 1/4 cup dried cranberries for a sweet burst of flavor - 2 tablespoons extra virgin olive oil - 1 tablespoon aged balsamic vinegar for depth - 1 teaspoon Dijon mustard to add tang - Salt and freshly ground black pepper to taste - Fresh herbs for garnish (such as chopped parsley or finely sliced chives) When measuring, use a dry measuring cup for solid ingredients like walnuts and cranberries. For liquids, a liquid measuring cup works best. Make sure to level off dry ingredients for accuracy. This helps you get the right taste and texture. Choose fresh, firm beets. Look for greens that are vibrant and crisp. For goat cheese, select a soft, creamy variety. Fresh herbs should be fragrant and bright. High-quality olive oil and balsamic vinegar make a big difference in flavor. This salad shines when you use the best ingredients. For the full recipe, check out the details above. To start, preheat your oven to 400°F (200°C). This heat helps the beets cook well. Take 3 medium-sized beets and scrub them clean to remove dirt. Wrap each beet in aluminum foil. This keeps them moist while roasting. Place the wrapped beets on a baking sheet. Roast them for 45 to 60 minutes. They are done when a fork can pierce them easily. After roasting, let them cool for a few minutes. Unwrap, peel off the skin, and cut them into wedges. In a large bowl, mix the roasted beet wedges with 4 cups of mixed salad greens. I love using arugula, spinach, and romaine for varied texture. Next, add 1/2 cup of crumbled goat cheese for creaminess. For crunch, toss in 1/4 cup of toasted walnuts. Finally, sprinkle in 1/4 cup of dried cranberries for a sweet touch. This mixture looks colorful and inviting. In a small bowl, whisk together 2 tablespoons of extra virgin olive oil and 1 tablespoon of aged balsamic vinegar. Add 1 teaspoon of Dijon mustard to give it a nice tang. Season it with salt and freshly ground black pepper to taste. Mix until all ingredients blend well. Drizzle the dressing over the salad. Toss gently so that the beets and cheese stay intact. Taste and adjust the seasoning if needed. Serve on a platter or individual plates, and garnish with fresh herbs for a beautiful finish. Enjoy this delicious and healthy dish! For the complete recipe, refer to the Full Recipe. Roasting beets is easy. Start by preheating your oven to 400°F. Wrap each beet in foil. This helps them cook evenly. Roast for 45 to 60 minutes until they’re soft. A fork should slide in with ease. Let them cool before peeling. The skin comes off easily when they are warm. This salad is great as a meal or a side. Serve it with grilled chicken or fish for protein. You can even add chickpeas for a plant-based option. Pair it with crusty bread for a complete meal. This dish shines at dinner parties or casual lunches. Presentation matters in cooking. Use a shallow bowl or a large platter for a stunning look. Start with greens, then add beet wedges. Sprinkle goat cheese and walnuts on top. Add a few dried cranberries for color. Finish with fresh herbs, like parsley or chives. This creates a bright and inviting dish that everyone will love. Check out the Full Recipe for more details on making this delightful salad! {{image_4}} To make your roasted beet goat cheese salad even more filling, you can add protein. Grilled chicken is an easy choice. It adds flavor and heartiness. You can also use chickpeas for a plant-based option. They add great texture and nutrition. If you like seafood, try adding shrimp or smoked salmon. Each protein brings a new twist to your dish. While the balsamic dressing is delicious, you can mix things up. A honey mustard dressing pairs well with the sweet beets. For a creamier option, try a yogurt-based dressing. You could even use a simple lemon vinaigrette for a fresh taste. Each dressing will change the flavor profile and keep things exciting. This salad is versatile! In spring, you might add fresh peas or asparagus. In summer, ripe tomatoes or cucumbers can brighten the dish. Fall brings apples or pears, adding sweetness and crunch. In winter, consider using roasted squash or pomegranate seeds for color and flavor. These swaps keep your salad fresh and aligned with the season. To keep your roasted beet goat cheese salad fresh, store it in an airtight container. Make sure to separate the dressing from the salad to prevent sogginess. You can keep the salad in the fridge for up to three days. If you want to enjoy it later, store the leftovers without the dressing. This way, the flavors stay bright and fresh. Understanding how long your ingredients last can help prevent waste. Here’s a quick guide: - Roasted Beets: Last about 5 days in the fridge when stored properly. - Mixed Greens: Usually stay fresh for 3 to 5 days if kept cool and dry. - Goat Cheese: Can last up to a week after opening, but check for any signs of spoilage. - Walnuts: Store in an airtight container. They stay fresh for about 1 month. - Dried Cranberries: These can last up to a year if kept in a cool, dry place. Typically, you won’t need to reheat this salad. It tastes best cold. If you do want to warm it slightly, use a microwave. Heat on low for about 10-15 seconds. Be careful not to overdo it, as it may change the texture and flavor. Enjoy your salad fresh for the best experience! For the full recipe, check out the section above. Yes, you can use canned beets. They save time and are easy to find. However, fresh roasted beets give a better taste and texture. Canned beets may be softer and less vibrant. If you choose canned beets, rinse them under cold water to remove excess brine. Slice them into wedges and add them directly to your salad. If you need a substitute for goat cheese, try feta or ricotta cheese. Feta has a similar tangy flavor. Ricotta is creamier and milder. You can also use dairy-free cheese for a different taste. Cream cheese can work too, but it is denser. Choose based on your flavor preference and dietary needs. To make this salad vegan, skip the goat cheese. Replace it with vegan cheese or avocado for creaminess. Use maple syrup or agave in the dressing instead of honey. Check that your balsamic vinegar is vegan, as some brands may add honey. This way, you keep all the flavors while making it plant-based. You can find the full recipe here: [Full Recipe]. In this post, I covered how to create a delicious beet salad. We explored the best ingredients, measuring tips, and quality recommendations. You learned step-by-step instructions for prepping beets, assembling the salad, and making the dressing. I shared tips for perfect roasting, serving, and presentation. We also discussed variations like protein options and seasonal swaps. Lastly, I provided storage info and answered common questions. Enjoy crafting your own unique beet salad, and let your creativity shine!](https://fastmealmate.com/wp-content/uploads/2025/06/466f3db8-9be5-4235-af51-29d034f8c92e-300x300.webp)

![To make a hearty Instant Pot beef stew, you need fresh and tasty ingredients. Here’s what you will need: - 2 pounds beef chuck, cut into 1-inch cubes - 1 tablespoon olive oil - 1 large onion, finely chopped - 2 cloves garlic, minced - 4 medium carrots, sliced into rounds - 3 medium potatoes, peeled and diced into 1-inch cubes - 2 cups beef broth - 1 tablespoon tomato paste - 1 teaspoon dried thyme - 1 teaspoon dried rosemary - 1 bay leaf - Salt and freshly ground black pepper to taste - 2 tablespoons cornstarch (optional, for thickening) - Fresh parsley, chopped (for garnish) These ingredients bring great flavor and comfort to your dish. Each one plays a key role. For example, beef chuck gives the stew a rich taste. Onions and garlic add depth. Carrots and potatoes give it heartiness. Don’t skip the herbs; they add wonderful notes to every bite. You will find that using quality ingredients makes a big difference. Fresh veggies and good beef will elevate your stew. Remember, you can always adjust the seasonings to fit your taste. If you want to explore more, check out the Full Recipe for step-by-step instructions. - Prep time: 15 minutes - Cook time: 35 minutes - Total time: 1 hour - Servings: 6 With just an hour, you can create a warm and filling meal for your family or friends. Enjoy the process! Set your Instant Pot to “Sauté” and pour in the olive oil. Let it heat until it shimmers. Add the beef cubes in a single layer. Sear them until browned, about 5-7 minutes. This step seals in flavor. Once browned, remove the beef and set it aside on a plate. In the same pot, add the finely chopped onion and minced garlic. Cook them for 2-3 minutes until the onion is soft. You will smell a rich aroma that adds depth to your stew. Pour a splash of beef broth into the pot. Use a wooden spoon to scrape up the browned bits stuck to the bottom. This step is key for enhancing the stew’s flavor. Now, return the seared beef to the pot. Add the sliced carrots, diced potatoes, the remaining beef broth, tomato paste, dried thyme, dried rosemary, and the bay leaf. Don’t forget to add a pinch of salt and pepper. Stir everything until well mixed. Close the lid tightly on the Instant Pot. Make sure the steam release valve is set to “Sealing.” Select the “Manual” function. Adjust the cooking time to 35 minutes at high pressure. When the cooking time is up, let the Instant Pot naturally release pressure for 10 minutes. This helps make the beef tender. After that, carefully quick-release any remaining pressure by turning the valve to “Venting.” If you want a thicker stew, mix 2 tablespoons of cornstarch with cold water to make a slurry. Stir this into the warm stew. Set the Instant Pot back to “Sauté” for 5 minutes. Stir often until the stew thickens to your liking. Before serving, remember to remove the bay leaf. Garnish the stew with freshly chopped parsley for color. Ladle it into bowls while hot. Enjoy this hearty meal! Check the [Full Recipe] for more details. Browning meat is key. It builds flavor and color. When you sear beef, you create a nice crust. This adds a rich taste to your stew. Make sure to do this step well. For seasoning, use salt and pepper early. This helps to boost the flavor. Add herbs like thyme and rosemary for aroma. If you love a kick, throw in some paprika. Pair your beef stew with sides that shine. Mashed potatoes work great. They soak up all the stew's goodness. You can also serve it with green beans or a fresh salad. Bread is a must! Choose crusty bread for dipping. Sourdough or baguette are fantastic options. They bring texture and enhance the meal. Want to deepen the taste? Try adding red wine. A splash of wine gives a rich layer to your stew. If you prefer, soy sauce works too. It adds umami that makes flavors pop. Don’t forget about extra veggies! Mushrooms, peas, or bell peppers can brighten your stew. They add nutrition and color. Chop them up and toss them in before cooking. For the full recipe, check out the details above. Happy cooking! {{image_4}} You can use chicken or pork in your stew. For chicken, use boneless thighs or breasts. Cut them into bite-sized pieces. Sear them just like you do with beef. Chicken cooks faster, so reduce the cooking time to 25 minutes. For pork, use shoulder or loin. Cut into 1-inch cubes and follow the same steps as beef. Both meats will soak up the rich flavors of your stew. To make a vegetarian stew, skip the meat entirely. Use hearty vegetables like mushrooms, butternut squash, or lentils. Replace beef broth with vegetable broth for a lighter taste. You can add beans for protein and texture. Cook it just like the beef stew. This version is still rich and filling, perfect for anyone. You can change the taste by using different herbs and spices. Instead of thyme and rosemary, try basil and oregano for an Italian twist. Or, add cumin and coriander for a warm, earthy flavor. For a touch of heat, add red pepper flakes or a splash of hot sauce. Each change gives you a new dish to enjoy. To refrigerate beef stew, let it cool first. Pour the stew into a container. Seal it tightly with a lid. Store it in the fridge for up to three days. If you want to enjoy it later, use the freezer. To freeze beef stew, follow these steps. Cool the stew completely first. Then, transfer it to freezer-safe bags or containers. Remove as much air as possible to avoid freezer burn. Label the bags with the date. You can freeze it for up to three months. To reheat, let it thaw in the fridge overnight. Heat it in the microwave or on the stove until hot. In the fridge, beef stew lasts about three days. If you freeze it, it can last for three months. After that, the quality may decline. Be sure to check for any off smells or changes in texture before eating. When stored correctly, the stew stays flavorful and comforting. Yes, you can skip browning the meat. However, your stew may lack flavor. Browning adds depth and richness. It creates a lovely crust and enhances the dish. If you skip this step, consider adding more spices. If your stew is too thick, add more beef broth. Start with half a cup and stir well. You can also use water if needed. Another option is to add more veggies. They will release moisture as they cook. You can use frozen beef, but adjust the cooking time. Increase the time to 45 minutes for frozen chunks. This allows the meat to cook through properly. Make sure to add a few extra minutes if pieces are large. The beef is tender when it falls apart easily. You can check by using a fork. If it shreds easily, it's done. Aim for a melt-in-your-mouth texture for the best stew. Yes, this recipe is great for meal prep. You can make it ahead and store leftovers. It keeps well in the fridge for about three days. You can also freeze it for up to three months. Just reheat before serving. Check out the Full Recipe for more details. This blog post covered delicious Instant Pot beef stew. You learned the key ingredients, simple steps, and expert tips. I emphasized the importance of browning the beef for flavor. You can customize the recipe with different proteins or vegetables too. Stored correctly, it lasts well and is perfect for meals later. Enjoying this hearty dish brings warmth and satisfaction. I hope you try this recipe and share it with friends. Your kitchen adventures await!](https://fastmealmate.com/wp-content/uploads/2025/07/4eb70415-c4b6-43db-bf2d-31d3ec08fe2e-768x768.webp)

![To make a tasty Blueberry Peach Crostata, you’ll need a few simple ingredients. Here’s what to gather: - 1 cup fresh blueberries - 2 ripe peaches, diced (about 2 cups) - 1/4 cup granulated sugar - 1 tablespoon freshly squeezed lemon juice - 1 tablespoon cornstarch - 1 teaspoon pure vanilla extract - 1 pre-made pie crust (or homemade for an artisanal touch) - 1 egg, beaten (for gloss and color) - 1 tablespoon unsalted butter, cut into small pieces - A pinch of fine sea salt - Optional: powdered sugar for a final dusting Each ingredient plays a key role in the taste and texture of the crostata. The fresh blueberries and peaches bring sweetness and juiciness. The sugar enhances their natural flavors, while lemon juice adds a bright zing. Cornstarch helps thicken the filling, keeping it from getting too runny. Using vanilla extract adds depth to the fruit, and a pinch of sea salt balances the sweetness. For the crust, you can choose a pre-made option for ease or whip up your own for that homemade touch. The beaten egg gives the edges a lovely golden color, while unsalted butter adds richness. Don’t forget the powdered sugar for a sweet finish on top! Ready to gather these ingredients? You can find the full details in the [Full Recipe]. 1. Preheat the Oven: Start by heating your oven to 375°F (190°C). This step ensures the crostata cooks evenly. 2. Prepare the Baking Sheet: Line a baking sheet with parchment paper. This helps with easy cleanup later. 3. Prepare the Fruit Filling: In a bowl, mix fresh blueberries and diced peaches. Add granulated sugar, lemon juice, cornstarch, vanilla extract, and a pinch of sea salt. Toss gently. Let this mixture rest for about 10 minutes. This helps the flavors blend. 4. Roll Out the Pie Crust: Roll out your pie crust on a floured surface. Aim for a circle about 12 inches wide. If you use a store-bought crust, make sure it is cold for easy handling. 1. Shape the Crostata: Place the rolled crust on your baking sheet. Spoon the fruit mixture into the center, leaving a 2-inch border. 2. Fold the Edges: Carefully fold the crust edges over the filling. Create pleats to give it a rustic look. Make sure some fruit shows at the center. 3. Apply the Egg Wash: Use a pastry brush to coat the crust edges with the beaten egg. This gives it a nice golden color when baked. 4. Dot with Butter: Scatter small pieces of butter over the fruit filling. This adds extra richness during baking. 1. Bake: Place your crostata in the preheated oven. Bake for 30-35 minutes. Look for a golden-brown crust and bubbling filling. 2. Cool Before Serving: Once baked, let the crostata cool on the sheet for 10 minutes. This makes it easier to slice. Dust with powdered sugar if you like, then serve warm or at room temperature. You can find the Full Recipe for more detailed steps and tips. Enjoy your delicious Blueberry Peach Crostata! To create the best crust, start with cold ingredients. This helps the crust stay flaky. Use your fingers to mix the butter into the flour until it looks like coarse crumbs. Do not overwork the dough; handle it gently. Balancing sweetness and acidity is key. Blueberries are sweet, while peaches add a nice tang. Use lemon juice to brighten the flavors. Taste your filling before baking. If it seems too sweet, add a tiny bit of salt. This will balance the flavors better. For a beautiful display, serve slices on a rustic wooden board. Garnish with fresh mint leaves for color. You can also dust the top with powdered sugar for a nice finish. Pair your crostata with a scoop of vanilla ice cream or a dollop of whipped cream. The cold creaminess goes perfectly with the warm fruit filling. You can also try it with a drizzle of honey for an extra touch. If your crust is too soggy, it may need more time in the oven. Check the bottom of the crust to see if it is golden brown. You can also try baking it a few minutes longer. To avoid over-baking, keep an eye on the crostata as it cooks. The crust should be golden and the filling should bubble. If you notice it browning too quickly, cover it lightly with foil. This will help protect it while it finishes baking. For the full recipe, visit the link. {{image_4}} You can switch up the fruits in your crostata. For a fun twist, try using apricots or cherries. Both fruits bring a unique taste. They also pair well with blueberries and peaches. If you need a gluten-free option, use almond flour or a gluten-free pie crust. This keeps your dessert delicious and safe for gluten-sensitive friends. Want to add some extra flavor? Sprinkle in some cinnamon or nutmeg. These spices add warmth and depth to the filling. You can also try fresh herbs like basil or mint. They give a fresh twist that brightens the fruit flavors. When it comes to serving, think outside the box. A drizzle of homemade caramel sauce or a scoop of creamy vanilla ice cream works wonders. For special occasions, serve slices on a beautiful platter. Add fresh mint leaves for color and aroma. Your guests will love the visual and tasty touch! For the complete recipe, check out the Full Recipe section. To keep your blueberry peach crostata fresh, store it in the fridge. First, let it cool completely. Then, cover it with plastic wrap or place it in an airtight container. This helps keep the crust crispy and the filling juicy. You can enjoy it for up to three days. If you want to save it for longer, freezing is a great option. Wrap the crostata tightly in plastic wrap, then in aluminum foil. This method helps prevent freezer burn. You can freeze it for up to three months. When you're ready to eat it, just thaw it in the fridge overnight. To reheat the crostata, the oven is your best friend. Preheat it to 350°F (175°C). Place the crostata on a baking sheet and warm it for about 10-15 minutes. This method keeps the crust nice and flaky. If you want to refresh the flavors, brush a little melted butter on top before reheating. This adds richness and helps the fruit flavors shine. Enjoy your crostata warm for the best taste! Can I make the crostata ahead of time? Yes, you can make the crostata ahead. Prepare the filling and crust separately. Store them in the fridge for a day. When ready, assemble and bake. This keeps the crust fresh. How do I know when the crostata is done baking? Look for a golden brown crust and bubbling filling. A toothpick should slide easily through the crust. If it’s too soft, bake a few more minutes. What’s the difference between a crostata and a galette? A crostata is a rustic pie, often filled with fruit. A galette is similar but usually has a more free-form shape. Both have a flaky crust. They are delicious and easy to make. Can I use frozen fruit in the recipe? Yes, frozen fruit works well. Just thaw and drain excess liquid. This keeps the filling from being too watery. How do I keep the crust from getting soggy? To prevent a soggy crust, sprinkle cornstarch on the bottom before adding fruit. This absorbs extra juices. Bake until the crust is golden for best results. Making the crostata vegan To make a vegan crostata, replace the egg wash with a plant-based milk. Use a vegan pie crust. The filling stays the same, ensuring a tasty dessert. Tips for reducing sugar in the recipe You can cut the sugar by half. Use ripe fruits for natural sweetness. Add a touch of honey or maple syrup if needed. This keeps the flavor balanced and fresh. For the Full Recipe, check the main section. In this post, we covered how to make a delicious fruit crostata with fresh ingredients. You learned about the necessary ingredients, step-by-step instructions, and useful tips for perfecting your dessert. We also explored variations and storage options to extend its life. Now, you’re equipped to create your own stunning crostata. Experiment with flavors and enjoy the praise from family and friends! Your new dessert will impress at any gathering.](https://fastmealmate.com/wp-content/uploads/2025/06/584381ba-fe5e-4dcd-ab97-e37815fc2576-768x768.webp)