
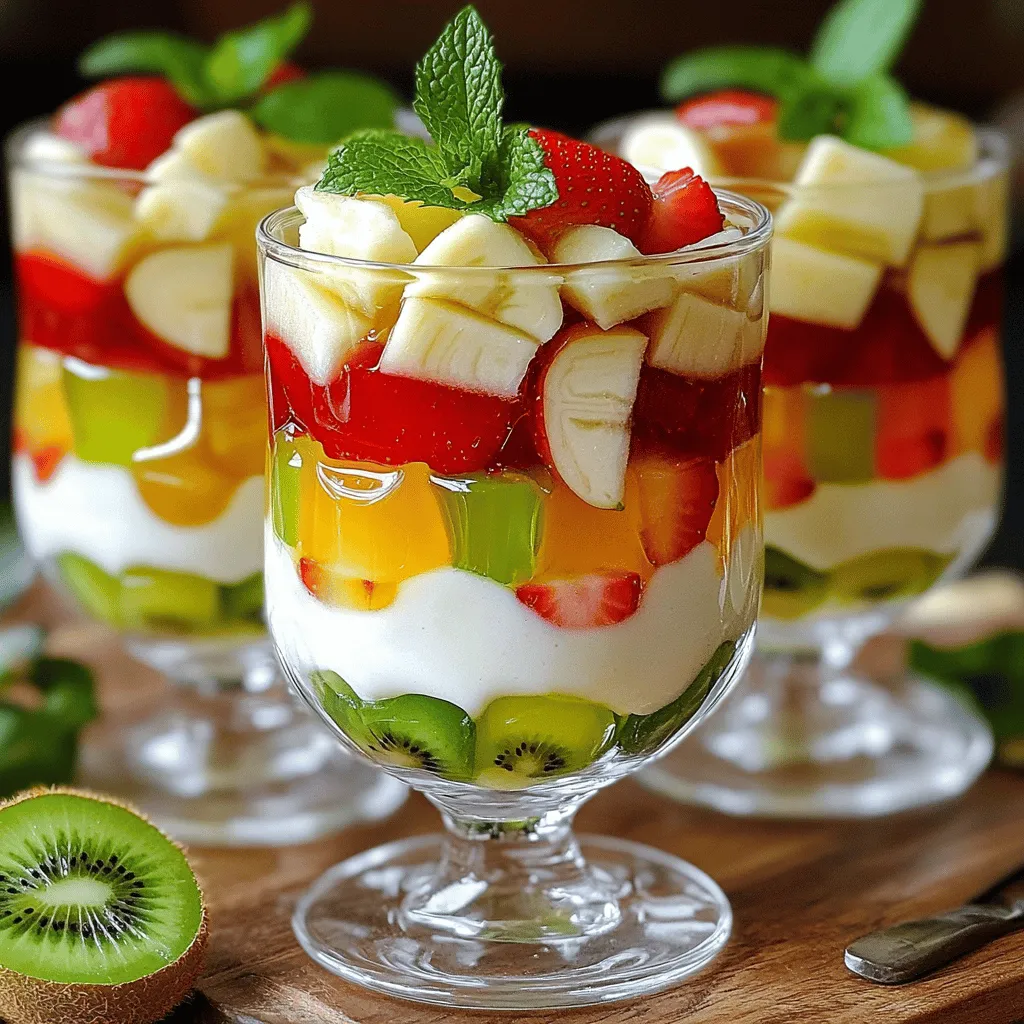
Fruit Custard and Jelly Delightful Layered Dessert

Get ready to treat your taste buds with a vibrant Fruit Custard and Jelly dessert! This delightful layered treat brings together fresh fruits, creamy custard, and flavorful jelly. It’s simple to make yet looks stunning on any table. In this post, I’ll guide you through the ingredients, step-by-step instructions, and even some creative variations. Let’s dive into this fun, colorful world of flavors and textures!
Ingredients
List of Required Ingredients
– 2 cups mixed fruits (bananas, apples, strawberries, kiwi)
– 2 cups milk (divided)
– ½ cup sugar (to taste)
– 2 tablespoons custard powder
– 1 teaspoon vanilla extract
– 1 packet (85g) flavored jelly (strawberry or mango)
– 1 ½ cups hot water
– Fresh mint leaves (for garnish)
Alternative Ingredient Options
– You can mix and match fruits. Try berries, peaches, or mango for fun.
– Use honey or agave instead of sugar for a healthier dessert.
– Explore different jelly flavors like orange, grape, or even coconut for variety.
Fruit custard and jelly can easily change to fit your taste. Get creative with what you have. The goal is to enjoy every colorful layer!
Step-by-Step Instructions
Instructions for Preparing the Jelly
To make the jelly, start by dissolving the jelly powder. Pour 1 ½ cups of hot water into a bowl. Add the jelly powder and stir for about two minutes. You want to mix it well until it is fully dissolved. Then, pour the mixture into a shallow dish. Place it in the refrigerator. Let it set for about 1-2 hours. It should be firm when ready.
Instructions for Making the Custard
Next, let’s make the custard. In a medium saucepan, combine 1 cup of milk and the sugar. Heat this mixture over medium heat. Stir occasionally until the milk is warm, but not boiling. This takes about 3-5 minutes.
In a separate small bowl, whisk together the remaining cup of milk and the custard powder. Mix until you have a smooth paste. When the milk mixture is warm, slowly add the custard mixture while whisking. This helps avoid lumps.
Now, continue to cook the custard over low to medium heat. Stir continuously as it cooks. Keep an eye on it until it thickens. It should coat the back of a spoon. Once thickened, remove it from heat and stir in the vanilla extract. Let the custard cool for about 10-15 minutes.
Assembling the Dessert Layers
Now, let’s assemble our dessert. First, take the set jelly and cut it into small cubes. Grab serving glasses and start by layering a few pieces of diced mixed fruits at the bottom. Next, add a layer of your creamy custard. Then, add a layer of the jelly cubes.
Repeat these layers until the glasses are filled. Ensure you have a final layer of jelly on top. This gives a nice look. To make it even better, place the layered desserts back in the fridge for 30 minutes. This helps them firm up. Before serving, add a few fresh mint leaves on top for a pop of color.
Tips & Tricks
Best Practices for Perfect Custard
How do you avoid lumps in custard? Start with cold milk. Whisk the custard powder into the cold milk first. This creates a smooth paste. Then, add this mixture to your warm milk and sugar. Stir constantly. This will help you avoid lumps.
What cooking temperature should you use to prevent scorching? Cook the custard over medium to low heat. Stir it often. If you notice it thickening too quickly, lower the heat. Keep an eye on it. This way, you prevent burning and achieve a silky texture.
Jelly Preparation Tips
How can you ensure the jelly sets properly? Use the right amount of hot water. Follow the instructions on the package closely. Stir the jelly powder until it fully dissolves. Pour it into a shallow dish for quicker setting. This helps it set evenly.
What tips can you use to incorporate different flavors into jelly? Experiment with fruit juices instead of water. You can also add fresh fruit pieces. This adds both taste and texture. Try different flavored jelly powders for variety. Mixing flavors keeps your dessert fun!
Serving Suggestions
What are some creative ways to present the dessert? Use clear glasses to show off the layers. You can also use mason jars for a rustic look. Layer the fruits, custard, and jelly artfully. This makes it visually appealing and fun to eat.
What are some recommended garnishes and accompaniments? Fresh mint leaves add color and flavor. You could also add a sprinkle of nuts for crunch. Serve with whipped cream on the side for extra creaminess. These touches elevate your dessert to the next level.
Variations
Mixed Fruit Custard Ideas
For a fun twist, mix different seasonal fruits. You can use:
– Bananas
– Apples
– Strawberries
– Kiwi
Each fruit adds unique flavors and colors. You can also combine crunchy fruits like apples or pears with soft ones like bananas or berries. This mix gives your dessert varied textures. It makes each spoonful exciting!
Flavored Jelly Variations
Try different flavored gels to switch things up. You can use store-bought jelly in flavors like:
– Strawberry
– Mango
If you want a fun project, try making your own jelly. Use fruit juices and gelatin to create unique flavors. You can also layer different flavors for a beautiful effect. Each layer can surprise your taste buds!
Dietary Considerations
For those with dietary needs, you can make this dessert work for you. To create a gluten-free version, ensure your custard powder is gluten-free. For vegans, you can use plant-based milk and vegan gelatin.
If you want to cut sugar, try using natural sweeteners like honey or agave syrup. You can also look for sugar-free jelly options. These changes make the dessert healthier without losing flavor.Enjoy experimenting with these variations!
Storage Info
Proper Storage Techniques
To keep your fruit custard and jelly fresh, store leftovers properly. Place any extra custard and jelly layers in airtight containers. This helps preserve their taste and prevent odors from mixing. Use glass or plastic containers with tight-fitting lids. They protect your dessert and allow easy visibility of your colorful layers.
Shelf Life Guidelines
Each component has a different shelf life. The custard can last up to three days in the fridge. The jelly stays fresh for about five days. Look for signs that they have gone bad. If the custard smells sour or has an off texture, it’s best to toss it. For jelly, check for unusual colors or an odd smell.
Freezing Instructions
You can freeze the assembled dessert, but keep in mind that the texture may change. If you choose to freeze it, wrap each serving in plastic wrap, then place it in a freezer-safe container. This helps prevent freezer burn. When ready to eat, thaw in the fridge overnight for the best results. Enjoy the fruity layers fresh!
FAQs
What fruits work best for fruit custard?
You can use many fruits in fruit custard. I love using bananas, strawberries, apples, and kiwi. Their flavors mix well. You can also try mangoes, peaches, or berries for a twist. Make sure the fruits are ripe and sweet. This adds freshness to your dessert. The mix of textures makes it more fun to eat!
Can I make a dairy-free version of fruit custard and jelly?
Yes, you can! For a dairy-free custard, use almond milk, oat milk, or coconut milk. These options work great instead of regular milk. For custard powder, look for plant-based versions or cornstarch. This will help thicken your custard. You can also find flavored jelly that is dairy-free. Always check the labels to be sure.
How long does it take for the jelly to set properly?
Jelly usually takes 1 to 2 hours to set in the fridge. The time can change based on your fridge’s temperature. For best results, use the instructions on the packet. If your jelly is thick, it may take a bit longer to set. Always remember to check if it is firm before using it in your dessert.
Can I use homemade custard and jelly?
Absolutely! Homemade custard and jelly can add even more flavor. Making your own gives you control over ingredients. You can adjust sweetness and flavor to your liking. Follow your favorite recipes for custard and jelly. Just let them cool before layering them in your dessert. Using homemade versions can make your fruit custard and jelly even more special.
This article covered how to make a delightful fruit custard dessert. You learned about required ingredients, from mixed fruits to flavored jelly. I shared step-by-step instructions for preparing both jelly and custard. We explored tips for perfect layers, serving ideas, and variations suited for different diets. Finally, I gave storage options to keep your dessert fresh.
Now, you have all the tools. Enjoy creating your own tasty fruit custard. Experiment with flavors and have fun sharing your creations!


. To make your shortcake soft and fluffy, avoid overmixing the dough. Overmixing can lead to tough shortcakes. Mix just until the dough comes together. This keeps your shortcakes light. The temperature of your ingredients matters. Use cold butter and chilled cream. Cold butter creates steam when baked. This steam helps the shortcakes rise. Chilled cream keeps the dough from getting warm. Use a good pastry cutter or your hands to mix the butter. A sturdy mixing bowl helps, too. For cutting, a round biscuit cutter works best. It gives neat edges for your shortcakes. For baking, use a parchment-lined baking sheet. This prevents sticking and makes cleanup easier. A wire rack helps cool the shortcakes evenly after baking. Whipped cream is a classic topping for your shortcake. It adds creaminess and balances the sweetness of the strawberries. You can also use ice cream for a richer dessert. For a beautiful presentation, garnish with fresh strawberries on top. A sprinkle of mint leaves adds color and freshness. Serve your shortcake with a dollop of whipped cream on the side for extra delight. For the full recipe, check the Classic Strawberry Shortcake Delight. {{image_4}} You can swap strawberries for other fruits. Berries, peaches, and rhubarb work great. For berries, use blueberries, raspberries, or blackberries. Just follow the same steps for macerating. With peaches, slice them thin and sprinkle with sugar. Let them sit for about 20 minutes to get juicy. Rhubarb needs a little cooking. Chop it and simmer with sugar until tender. Then use it just like strawberries. Whipped cream can be fun! Try adding different flavors to it. Mix in vanilla, almond, or even a bit of lemon zest. You can create a unique taste. For a twist, drizzle chocolate or caramel over the top. Melt chocolate chips for a rich sauce, or warm up caramel. Both add a nice touch to your dessert. Want a vegan version? Swap dairy for plant-based options. Use coconut cream instead of heavy cream. For the shortcake, replace butter with coconut oil. You can choose almond milk or soy milk for the liquid. If you're looking for sugar-free options, use a sugar substitute. Stevia or monk fruit can work well. Just adjust the amount to your taste. Feeling adventurous? Check the Full Recipe to see all the details! To keep your baked shortcakes fresh, store them in an airtight container. Place parchment paper between layers to avoid sticking. Store at room temperature for up to two days. If you need to keep them longer, refrigerate for up to a week. However, cold can change the texture. For best taste, eat them fresh. After macerating your strawberries, cover them tightly with plastic wrap. This keeps them juicy and tasty. Store them in the fridge for up to three days. Avoid washing them until just before use. Moisture can cause strawberries to spoil quickly. If you have leftover shortcakes, you can warm them up. Preheat your oven to 350°F (175°C). Wrap each shortcake in foil to keep them soft. Heat for about 10 minutes. You can also microwave them for about 15-20 seconds. Just be careful not to overheat. Enjoy the warmth and flavor! Strawberry shortcake has roots in England. The dessert started as a simple biscuit, served with cream and fruit. In the 19th century, it made its way to America. Here, chefs added sweetened strawberries and whipped cream. This combination made it a summer favorite. Today, it remains a beloved treat, especially during strawberry season. Yes, you can prepare some parts ahead. Make the shortcakes and store them in an airtight container. You can also prepare the strawberries and chilling cream earlier. Just keep the strawberries in the fridge. When you're ready to serve, assemble the shortcake. This way, you keep the shortcakes fresh and fluffy. Look for a golden-brown color on top. The edges should feel firm, and the center should spring back when touched. You can also insert a toothpick into the center. If it comes out clean, your shortcakes are done. Be careful not to overbake, as this can dry them out. Yes, you can freeze leftover shortcake. Wrap each piece tightly in plastic wrap, then place them in a freezer bag. They can last up to three months in the freezer. When you want to enjoy them, thaw them in the fridge overnight. Reheat in the oven for a few minutes to restore warmth and texture. In this blog post, we explored how to make great strawberry shortcake. We covered fresh ingredients, the right techniques, and tips for perfect results. Remember, the quality of your ingredients matters most. You can swap in different fruits and toppings for variety. Storing and reheating your shortcake can keep it fresh. I hope these steps inspire you to whip up this classic dessert. Enjoy the sweet rewards of your hard work!](https://fastmealmate.com/wp-content/uploads/2025/06/e92a88f0-b46a-45f1-a24e-50dd1609a02e-768x768.webp)


![- Ground beef - Flour tortillas - Cheeses: cheddar and mozzarella - Pickles, ketchup, and mustard The heart of my Cheeseburger Quesadilla Smash Sliders lies in the essential ingredients. I always choose high-quality ground beef for flavor. The flour tortillas serve as the base, holding everything together. I love using both cheddar and mozzarella cheese. They melt perfectly and add a creamy texture. Pickles, ketchup, and mustard bring that classic cheeseburger taste. - Garlic powder - Onion powder - Salt and pepper Seasonings are key to great flavor. I add garlic powder and onion powder to the beef. They enhance the taste without being overpowering. Salt and pepper are a must for balance. Adjust them to your liking for the best results. - Fresh lettuce leaves - Sliced tomatoes and onions For extra crunch and freshness, I recommend optional toppings. Fresh lettuce leaves add a nice texture. Sliced tomatoes and onions give a burst of flavor. Feel free to mix and match these toppings to suit your taste. They make the sliders even better! For the full recipe, check out the [Full Recipe]. - Start by mixing the ground beef with garlic powder, onion powder, salt, and pepper. - Use your hands or a spoon to blend the mixture well. - Divide the mixture into 8 equal parts. Shape each part into small patties. - Preheat a large skillet over medium-high heat. - Place the patties in the skillet, making sure not to crowd them. - Cook each patty for 2-3 minutes. Look for a nice golden brown crust before flipping. - Once cooked through, remove the patties and set them aside on a plate. - Lay one flour tortilla flat in the skillet. - Sprinkle half of the shredded cheddar and mozzarella cheese on the tortilla. - Place 2 cooked beef patties on top of the cheese. - Add chopped pickles and drizzle ketchup and mustard over the patties for extra flavor. - Top with the remaining cheese, then place a second tortilla over it. - Cook for about 2-3 minutes until the bottom is golden brown. Flip it carefully to cook the other side until crispy. - Once cooked, let it rest for a minute on a cutting board. Slice into wedges and enjoy. For the full recipe, check the [Full Recipe]. To ensure even cooking of patties, make them all the same size. I like to shape them about the size of a golf ball. This way, they cook evenly in the skillet. Preheat your skillet well before adding the patties. This helps develop a nice crust. For a crispy quesadilla, use medium-high heat while cooking. This allows the tortillas to become golden and crispy. Flip them carefully to keep the fillings intact. You want that delightful crunch with every bite! Adding spices can make a big difference. Try a pinch of smoked paprika or chili powder for a kick. Fresh herbs, like cilantro or parsley, can brighten the flavors too. These small changes can take your sliders to the next level. When it comes to sauces, think beyond ketchup and mustard. Barbecue sauce or spicy mayo can add a new twist. You can even mix them for extra flavor. Don’t be afraid to experiment! For the best sides, consider crispy fries or a fresh salad. Both pair nicely with these sliders. You can also serve them with a side of salsa for a fun dip! Presentation is key. Try stacking the quesadilla slices in a tower. Add fresh lettuce or tomatoes on the side for color. It makes the dish look great and appetizing. For a fun touch, use small skewers to hold the sliders together! You can find the full recipe for these delicious Cheeseburger Quesadilla Smash Sliders to explore more ways to enjoy this amazing dish! {{image_4}} You can change the protein in these sliders. Instead of ground beef, try ground chicken or turkey. Both offer great taste and a leaner option. If you want a plant-based choice, use vegan ground meat. Vegan cheese options are also available. Brands like Daiya or Violife melt well and taste good. Want some spice? Add jalapeños to your sliders for a kick. You can also mix in spices like cumin or chili powder for extra flavor. For a Southwestern twist, top your quesadilla with avocado or pico de gallo. These toppings add freshness and texture, making every bite exciting. You can cook your sliders in different ways. Grilling gives a smoky flavor. If you prefer stovetop cooking, use a skillet for a crispy finish. An air fryer is perfect for a lighter option. Set it to 375°F and cook for about 8-10 minutes. This method makes your quesadilla super crispy without excess oil. For the complete recipe, check out the Full Recipe. To keep your quesadilla sliders fresh, store them in an airtight container. Place parchment paper between layers to avoid sticking. They can last up to three days in the fridge. Make sure to cool them down before sealing. This helps keep them safe and tasty. When reheating, use a skillet over medium heat. This method warms them evenly and keeps them crispy. Add a drop of oil for extra crispness. Avoid the microwave, as it can make them soggy. Heat each slider for about 3-4 minutes per side. You can freeze either assembled or cooked sliders. Wrap each slider tightly in plastic wrap and then in foil. This helps prevent freezer burn. They can last up to two months in the freezer. To enjoy them, thaw in the fridge overnight. Reheat in the skillet as mentioned above for the best results. For the full recipe, check out the earlier sections. To make these sliders, start by mixing ground beef with garlic powder, onion powder, salt, and pepper. Shape the mix into small patties. Next, cook the patties in a skillet until they are brown. Then, place one tortilla in the skillet, add cheese, cooked patties, pickles, ketchup, and mustard. Top with another tortilla. Cook until both tortillas are crispy and the cheese melts. Cut the quesadilla into wedges, and enjoy! I recommend using a blend of cheddar and mozzarella. Cheddar gives a rich flavor, while mozzarella melts beautifully. You can also try pepper jack for a spicy kick or gouda for a smoky taste. Mixing these cheeses will create a creamy, tasty filling that pulls apart nicely. Yes, you can prepare the beef patties and chop the toppings ahead of time. Store them in the fridge for up to a day. When ready to cook, just assemble the quesadillas and grill them. This will save you time and let you enjoy your meal stress-free. For the full recipe, check out the details above. You learned how to make delicious cheeseburger quesadilla smash sliders. We covered essential ingredients, like ground beef and cheeses, and how to cook them perfectly. I shared key tips for flavor and cooking techniques. You also discovered variations and storage tips for these tasty sliders. By trying these recipes, you can impress your family or friends at your next gathering. Happy cooking!](https://fastmealmate.com/wp-content/uploads/2025/07/75d3e756-492b-48dc-99fb-d4828a25c64e-768x768.webp)