
Mini No-Bake Lemon Cheesecake Tarts Delicious Treat
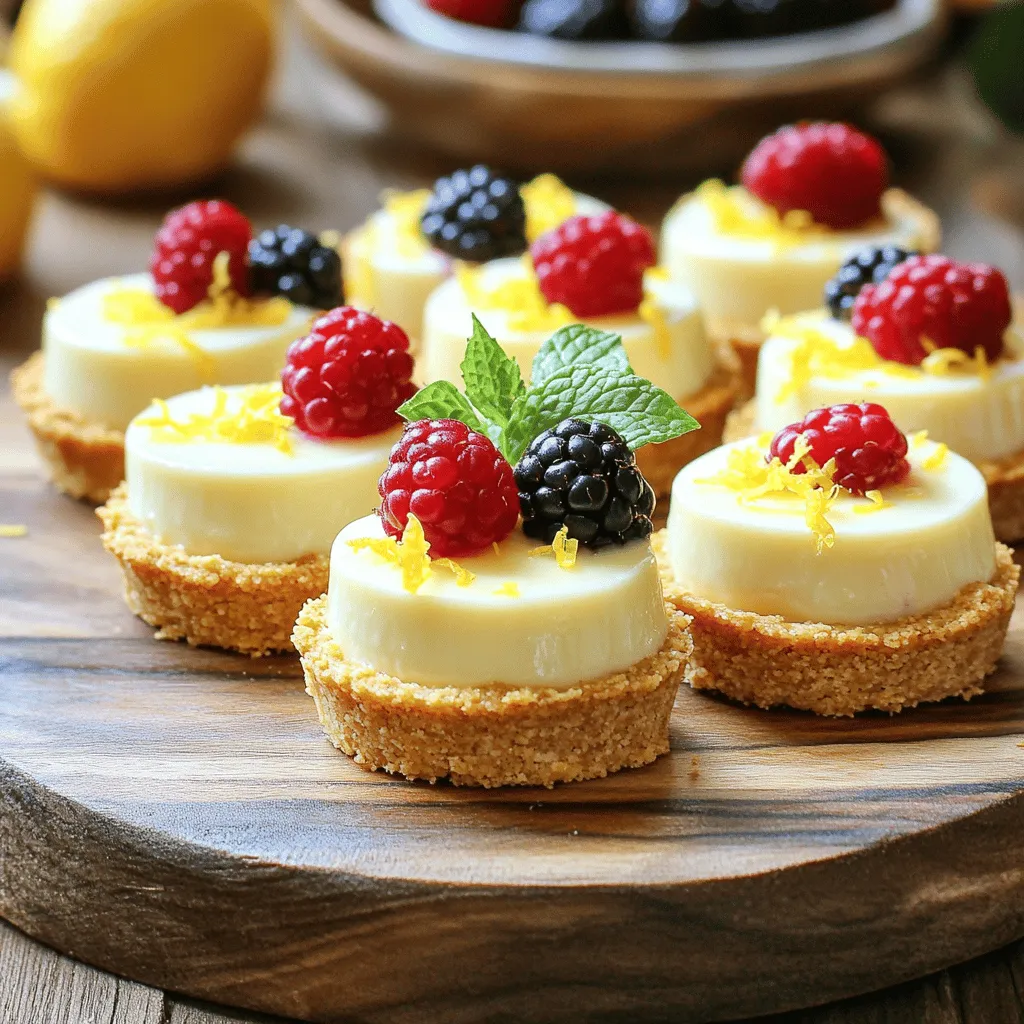
![- 1 ½ cups graham cracker crumbs - ½ cup unsalted butter, melted - 2 tablespoons granulated sugar - 8 oz cream cheese, softened - ½ cup powdered sugar - ½ cup heavy whipping cream - Zest and juice of 1 lemon - 1 teaspoon pure vanilla extract - Assorted fresh berries (for topping) - Fresh mint leaves (for garnish) Gathering the right ingredients is key. The graham cracker crumbs form a sweet and crunchy crust. Unsalted butter adds richness, while granulated sugar gives a touch of sweetness. Cream cheese provides that classic cheesecake texture. Powdered sugar balances the filling's flavor. Next, I add heavy whipping cream for lightness. The zest and juice from the lemon bring bright flavor. Pure vanilla extract adds depth. For garnishing, I use fresh berries on top for color and mint leaves for a fresh touch. These ingredients come together to create a treat that is light, creamy, and bursting with flavor. You can find the detailed steps in the Full Recipe. - Combine 1 ½ cups of graham cracker crumbs, ½ cup melted unsalted butter, and 2 tablespoons granulated sugar in a bowl. - Press this mixture firmly into mini tart molds. Ensure it is even and tight. - Chill the crusts in the refrigerator for 10-15 minutes to help them set. - In a large bowl, beat 8 oz of softened cream cheese until it is smooth. - Mix in ½ cup powdered sugar, zest and juice of 1 lemon, and 1 teaspoon vanilla extract. Blend until there are no lumps. - In a separate bowl, whip ½ cup heavy cream with an electric mixer until stiff peaks form. - Gently fold the whipped cream into the cream cheese mixture using a spatula. Be careful not to deflate the whipped cream. - Take the chilled crusts out of the refrigerator. - Fill each crust with the lemon cheesecake filling, smoothing the tops evenly. - Place the filled tarts back in the refrigerator. Chill for at least 2 hours to let the filling set. - Gently remove the tarts from their pans. - Top each tart with fresh berries and a mint leaf for a lovely touch. For the full recipe, please refer to the earlier section. Enjoy making these delightful mini no-bake lemon cheesecake tarts! To make the crust strong, pack the mixture tightly. This helps keep the shape. You can also try different cookies. For example, use chocolate cookies or gingersnaps. Each cookie gives a unique flavor. For a smooth filling, use cream cheese at room temperature. Cold cream cheese can make lumps. You can adjust the lemon juice to find your perfect tartness. If you love tart, add more lemon. For a milder taste, use less juice. To fill the tarts neatly, use a piping bag. This gives a professional look. You can also sprinkle extra lemon zest on the plate. It adds color and makes your dessert pop. For a fun touch, place fresh mint leaves around the tarts. It looks great and adds freshness! You can find the Full Recipe for these delightful tarts to explore more tips. {{image_4}} You can change up the taste of these mini tarts easily. Swap lemon for lime for a zesty twist. The tartness from lime adds a fresh kick. If you want something rich, use chocolate or fruit purees for a unique filling. Chocolate brings sweet indulgence, while fruit purees add a fruity burst. Not everyone can eat the same way. You can make a gluten-free crust with gluten-free crumbs. This way, everyone can enjoy these tarts. For those avoiding dairy, substitute with vegan cream cheese and coconut cream. These options keep the creamy texture while being dairy-free. Garnishing can elevate your dessert. Top your tarts with seasonal fruits like strawberries or raspberries. The colors and flavors will pop! You can also use edible flowers for an elegant presentation. They add a touch of beauty and whimsy to your tarts. For the full recipe, check out the [Full Recipe]. You can store the mini no-bake lemon cheesecake tarts in the refrigerator. They will last for up to three days if covered. To keep them fresh, make sure to cover them well. It’s best to keep the tarts separate from any garnishes until you are ready to serve them. This way, they stay fresh and look great. If you want to save some for later, you can freeze the unfilled crusts. This is a great option if you plan to make them ahead of time. The filled tarts can also be frozen for up to a month. Just remember to thaw them before serving. This will help keep their creamy texture. To prevent the tarts from drying out, use airtight containers. This keeps them fresh and tasty. It’s also smart to label your containers with dates. This way, you can easily track how long they have been stored. Yes, you can prepare these tarts a day in advance and chill them. This makes them great for parties or busy days. Just keep them in the fridge until you are ready to serve. Lightly grease the tart pans before filling them. You can also use silicone molds. Both methods help the tarts pop out without breaking. You can use bottled lemon juice in a pinch. However, fresh lemons give the best flavor. The zest adds a bright taste that makes these tarts stand out. Yes, Greek yogurt or vegan cream cheese works well as substitutes. These options can change the flavor slightly, but they still taste great. This recipe yields 12 mini tarts. Perfect for sharing or enjoying over a few days! Pair your mini tarts with coffee or tea. This makes for a delightful dessert experience that everyone will love. For the full recipe, check out the details above! This blog post covers how to make delicious mini lemon cheesecake tarts. We discussed each ingredient, from the crust to the creamy filling, and shared tips for a perfect dessert. You can customize flavors and garnishes to suit your taste. Remember, storage is key for keeping them fresh. Enjoy making these tarts for any occasion. Your friends and family will love them!](https://fastmealmate.com/wp-content/uploads/2025/06/a8bd9651-0c39-4151-9790-24600a8eb0ea.webp)
Are you craving a sweet treat that’s easy to make and bursting with flavor? Look no further than these Mini No-Bake Lemon Cheesecake Tarts! With a buttery graham cracker crust and a tangy cream cheese filling, these delightful bites are perfect for any occasion. Plus, they require no baking, making them a simple yet delicious option for dessert lovers. Let’s dive into this recipe and create something special together!
Ingredients
Essential Ingredients
– 1 ½ cups graham cracker crumbs
– ½ cup unsalted butter, melted
– 2 tablespoons granulated sugar
– 8 oz cream cheese, softened
– ½ cup powdered sugar
Flavorful Additions
– ½ cup heavy whipping cream
– Zest and juice of 1 lemon
– 1 teaspoon pure vanilla extract
Garnishing Elements
– Assorted fresh berries (for topping)
– Fresh mint leaves (for garnish)
Gathering the right ingredients is key. The graham cracker crumbs form a sweet and crunchy crust. Unsalted butter adds richness, while granulated sugar gives a touch of sweetness. Cream cheese provides that classic cheesecake texture. Powdered sugar balances the filling’s flavor.
Next, I add heavy whipping cream for lightness. The zest and juice from the lemon bring bright flavor. Pure vanilla extract adds depth. For garnishing, I use fresh berries on top for color and mint leaves for a fresh touch.
These ingredients come together to create a treat that is light, creamy, and bursting with flavor.
Step-by-Step Instructions
Preparing the Crust
– Combine 1 ½ cups of graham cracker crumbs, ½ cup melted unsalted butter, and 2 tablespoons granulated sugar in a bowl.
– Press this mixture firmly into mini tart molds. Ensure it is even and tight.
– Chill the crusts in the refrigerator for 10-15 minutes to help them set.
Making the Cream Cheese Filling
– In a large bowl, beat 8 oz of softened cream cheese until it is smooth.
– Mix in ½ cup powdered sugar, zest and juice of 1 lemon, and 1 teaspoon vanilla extract. Blend until there are no lumps.
Whipping and Combining
– In a separate bowl, whip ½ cup heavy cream with an electric mixer until stiff peaks form.
– Gently fold the whipped cream into the cream cheese mixture using a spatula. Be careful not to deflate the whipped cream.
Assembling the Tarts
– Take the chilled crusts out of the refrigerator.
– Fill each crust with the lemon cheesecake filling, smoothing the tops evenly.
Final Chilling
– Place the filled tarts back in the refrigerator. Chill for at least 2 hours to let the filling set.
Serving
– Gently remove the tarts from their pans.
– Top each tart with fresh berries and a mint leaf for a lovely touch.Enjoy making these delightful mini no-bake lemon cheesecake tarts!
Tips & Tricks
Perfecting the Crust
To make the crust strong, pack the mixture tightly. This helps keep the shape. You can also try different cookies. For example, use chocolate cookies or gingersnaps. Each cookie gives a unique flavor.
Achieving the Creamy Filling
For a smooth filling, use cream cheese at room temperature. Cold cream cheese can make lumps. You can adjust the lemon juice to find your perfect tartness. If you love tart, add more lemon. For a milder taste, use less juice.
Presentation Ideas
To fill the tarts neatly, use a piping bag. This gives a professional look. You can also sprinkle extra lemon zest on the plate. It adds color and makes your dessert pop. For a fun touch, place fresh mint leaves around the tarts. It looks great and adds freshness!
Variations
Different Flavors
You can change up the taste of these mini tarts easily. Swap lemon for lime for a zesty twist. The tartness from lime adds a fresh kick. If you want something rich, use chocolate or fruit purees for a unique filling. Chocolate brings sweet indulgence, while fruit purees add a fruity burst.
Dietary Modifications
Not everyone can eat the same way. You can make a gluten-free crust with gluten-free crumbs. This way, everyone can enjoy these tarts. For those avoiding dairy, substitute with vegan cream cheese and coconut cream. These options keep the creamy texture while being dairy-free.
Seasonal Garnishes
Garnishing can elevate your dessert. Top your tarts with seasonal fruits like strawberries or raspberries. The colors and flavors will pop! You can also use edible flowers for an elegant presentation. They add a touch of beauty and whimsy to your tarts.
Storage Info
Short-Term Storage
You can store the mini no-bake lemon cheesecake tarts in the refrigerator. They will last for up to three days if covered. To keep them fresh, make sure to cover them well. It’s best to keep the tarts separate from any garnishes until you are ready to serve them. This way, they stay fresh and look great.
Freezing Tips
If you want to save some for later, you can freeze the unfilled crusts. This is a great option if you plan to make them ahead of time. The filled tarts can also be frozen for up to a month. Just remember to thaw them before serving. This will help keep their creamy texture.
Best Practices
To prevent the tarts from drying out, use airtight containers. This keeps them fresh and tasty. It’s also smart to label your containers with dates. This way, you can easily track how long they have been stored.
FAQs
Can I make these tarts ahead of time?
Yes, you can prepare these tarts a day in advance and chill them. This makes them great for parties or busy days. Just keep them in the fridge until you are ready to serve.
How do I get the tarts out of the pans easily?
Lightly grease the tart pans before filling them. You can also use silicone molds. Both methods help the tarts pop out without breaking.
What if I don’t have fresh lemons?
You can use bottled lemon juice in a pinch. However, fresh lemons give the best flavor. The zest adds a bright taste that makes these tarts stand out.
Can I replace cream cheese in the recipe?
Yes, Greek yogurt or vegan cream cheese works well as substitutes. These options can change the flavor slightly, but they still taste great.
How many mini tarts does this recipe make?
This recipe yields 12 mini tarts. Perfect for sharing or enjoying over a few days!
What serving suggestions pair well with these tarts?
Pair your mini tarts with coffee or tea. This makes for a delightful dessert experience that everyone will love.
This blog post covers how to make delicious mini lemon cheesecake tarts. We discussed each ingredient, from the crust to the creamy filling, and shared tips for a perfect dessert. You can customize flavors and garnishes to suit your taste. Remember, storage is key for keeping them fresh. Enjoy making these tarts for any occasion. Your friends and family will love them!
![- 1 ½ cups graham cracker crumbs - ½ cup unsalted butter, melted - 2 tablespoons granulated sugar - 8 oz cream cheese, softened - ½ cup powdered sugar - ½ cup heavy whipping cream - Zest and juice of 1 lemon - 1 teaspoon pure vanilla extract - Assorted fresh berries (for topping) - Fresh mint leaves (for garnish) Gathering the right ingredients is key. The graham cracker crumbs form a sweet and crunchy crust. Unsalted butter adds richness, while granulated sugar gives a touch of sweetness. Cream cheese provides that classic cheesecake texture. Powdered sugar balances the filling's flavor. Next, I add heavy whipping cream for lightness. The zest and juice from the lemon bring bright flavor. Pure vanilla extract adds depth. For garnishing, I use fresh berries on top for color and mint leaves for a fresh touch. These ingredients come together to create a treat that is light, creamy, and bursting with flavor. You can find the detailed steps in the Full Recipe. - Combine 1 ½ cups of graham cracker crumbs, ½ cup melted unsalted butter, and 2 tablespoons granulated sugar in a bowl. - Press this mixture firmly into mini tart molds. Ensure it is even and tight. - Chill the crusts in the refrigerator for 10-15 minutes to help them set. - In a large bowl, beat 8 oz of softened cream cheese until it is smooth. - Mix in ½ cup powdered sugar, zest and juice of 1 lemon, and 1 teaspoon vanilla extract. Blend until there are no lumps. - In a separate bowl, whip ½ cup heavy cream with an electric mixer until stiff peaks form. - Gently fold the whipped cream into the cream cheese mixture using a spatula. Be careful not to deflate the whipped cream. - Take the chilled crusts out of the refrigerator. - Fill each crust with the lemon cheesecake filling, smoothing the tops evenly. - Place the filled tarts back in the refrigerator. Chill for at least 2 hours to let the filling set. - Gently remove the tarts from their pans. - Top each tart with fresh berries and a mint leaf for a lovely touch. For the full recipe, please refer to the earlier section. Enjoy making these delightful mini no-bake lemon cheesecake tarts! To make the crust strong, pack the mixture tightly. This helps keep the shape. You can also try different cookies. For example, use chocolate cookies or gingersnaps. Each cookie gives a unique flavor. For a smooth filling, use cream cheese at room temperature. Cold cream cheese can make lumps. You can adjust the lemon juice to find your perfect tartness. If you love tart, add more lemon. For a milder taste, use less juice. To fill the tarts neatly, use a piping bag. This gives a professional look. You can also sprinkle extra lemon zest on the plate. It adds color and makes your dessert pop. For a fun touch, place fresh mint leaves around the tarts. It looks great and adds freshness! You can find the Full Recipe for these delightful tarts to explore more tips. {{image_4}} You can change up the taste of these mini tarts easily. Swap lemon for lime for a zesty twist. The tartness from lime adds a fresh kick. If you want something rich, use chocolate or fruit purees for a unique filling. Chocolate brings sweet indulgence, while fruit purees add a fruity burst. Not everyone can eat the same way. You can make a gluten-free crust with gluten-free crumbs. This way, everyone can enjoy these tarts. For those avoiding dairy, substitute with vegan cream cheese and coconut cream. These options keep the creamy texture while being dairy-free. Garnishing can elevate your dessert. Top your tarts with seasonal fruits like strawberries or raspberries. The colors and flavors will pop! You can also use edible flowers for an elegant presentation. They add a touch of beauty and whimsy to your tarts. For the full recipe, check out the [Full Recipe]. You can store the mini no-bake lemon cheesecake tarts in the refrigerator. They will last for up to three days if covered. To keep them fresh, make sure to cover them well. It’s best to keep the tarts separate from any garnishes until you are ready to serve them. This way, they stay fresh and look great. If you want to save some for later, you can freeze the unfilled crusts. This is a great option if you plan to make them ahead of time. The filled tarts can also be frozen for up to a month. Just remember to thaw them before serving. This will help keep their creamy texture. To prevent the tarts from drying out, use airtight containers. This keeps them fresh and tasty. It’s also smart to label your containers with dates. This way, you can easily track how long they have been stored. Yes, you can prepare these tarts a day in advance and chill them. This makes them great for parties or busy days. Just keep them in the fridge until you are ready to serve. Lightly grease the tart pans before filling them. You can also use silicone molds. Both methods help the tarts pop out without breaking. You can use bottled lemon juice in a pinch. However, fresh lemons give the best flavor. The zest adds a bright taste that makes these tarts stand out. Yes, Greek yogurt or vegan cream cheese works well as substitutes. These options can change the flavor slightly, but they still taste great. This recipe yields 12 mini tarts. Perfect for sharing or enjoying over a few days! Pair your mini tarts with coffee or tea. This makes for a delightful dessert experience that everyone will love. For the full recipe, check out the details above! This blog post covers how to make delicious mini lemon cheesecake tarts. We discussed each ingredient, from the crust to the creamy filling, and shared tips for a perfect dessert. You can customize flavors and garnishes to suit your taste. Remember, storage is key for keeping them fresh. Enjoy making these tarts for any occasion. Your friends and family will love them!](https://fastmealmate.com/wp-content/uploads/2025/06/a8bd9651-0c39-4151-9790-24600a8eb0ea-300x300.webp)
![- Smooth natural peanut butter - Pure maple syrup or honey - Coconut oil (melted) - Rolled oats - Dark or semi-sweet chocolate chips - Unsweetened cocoa powder - Pure vanilla extract - Fine sea salt To make delicious chocolate peanut butter bars, you need these key ingredients. First, smooth natural peanut butter gives a creamy base. I love using peanut butter that has no added sugar or oils. It keeps the bars rich and healthy. Next, pure maple syrup or honey sweetens the bars. Both options work well, but maple syrup has a unique flavor. Coconut oil adds a silky texture. Make sure it’s melted for easy mixing. Rolled oats provide fiber and a chewy texture. They help hold everything together. Choose certified gluten-free oats if needed. Dark or semi-sweet chocolate chips add a sweet touch. They melt beautifully into the mixture. Unsweetened cocoa powder brings a rich chocolate flavor. I recommend high-quality cocoa for the best taste. Pure vanilla extract enhances the overall flavor, while fine sea salt balances the sweetness. When making these bars, accurate measurements are key. If you measure wrong, the texture may change. I suggest using a kitchen scale for best results. A scale gives exact amounts, which is very helpful. Use measuring cups for dry ingredients and liquid measuring cups for liquids. Make sure to level off dry ingredients for accuracy. This helps achieve the perfect consistency in your bars. You can customize these bars easily. For sweeteners, try agave syrup or brown rice syrup. Both options work well if you want to change things up. If you prefer a different nut butter, almond or cashew butter are great choices. Just remember that these may alter the taste a bit. For gluten-free options, use certified gluten-free oats. This way, everyone can enjoy these tasty treats without worry. You can find many useful substitutions to fit your needs. Check out the Full Recipe for detailed steps to create your own chocolate peanut butter bars! Start by lining an 8x8 inch baking dish with parchment paper. This helps with easy removal later. Leave some paper overhang on two sides. It makes lifting the bars out simple. Next, grab a large mixing bowl. Combine 1 cup of smooth peanut butter, 1/2 cup of pure maple syrup, and 1/4 cup of melted coconut oil. Use a whisk or spatula to mix until you see a smooth blend. Now it's time to add the dry ingredients. Toss in 1 cup of rolled oats, 1/2 cup of unsweetened cocoa powder, 1 teaspoon of pure vanilla extract, and 1/4 teaspoon of fine sea salt. Mix everything well until you get a thick batter. Now, gently fold in 1/2 cup of dark or semi-sweet chocolate chips. Make sure they spread evenly through the mix. Transfer this mixture into your lined baking dish. Use a spatula or your hands to press it down firmly. You want a compact, even layer. Once done, place the dish in the fridge. Chill it for at least 1 to 2 hours until the mixture feels firm. For the complete recipe, check the Full Recipe section. To make the best chocolate peanut butter bars, focus on texture. You want a smooth, firm bar that holds together well. Use natural peanut butter for creaminess. If your bars turn out dry or crumbly, it often means too many dry ingredients. Stick to the recipe and measure carefully. Mixing well helps combine all the ingredients and avoids clumps. You can boost flavor with simple add-ins. A splash of pure vanilla extract adds depth. A sprinkle of fine sea salt can enhance sweetness too. Consider adding a bit of cinnamon for warmth or even a few tablespoons of crushed nuts for crunch. Each small change can make your bars even better. Presentation matters when serving these bars. Cut them into neat squares or rectangles. Arrange them on a colorful plate for a pop. Drizzling melted chocolate over the top makes them look fancy. You can also sprinkle some crushed peanuts or a pinch of sea salt on top for a rustic touch. These small efforts make your treat feel special. For the full recipe, check out the [Full Recipe]. {{image_4}} If you want to make these bars healthier, you have options. You can use less sweetener. Try using only 1/4 cup of pure maple syrup. You can also replace coconut oil with unsweetened applesauce. This swap cuts calories and adds moisture. Another great idea is to use a sugar substitute. Look for options like stevia or monk fruit. These can help you cut sugar without losing sweetness. Want to switch up the flavor? Add fruits like mashed bananas or shredded coconut. Bananas give a creamy texture, while coconut adds a tropical twist. You can even mix in some almond extract for a nutty flavor boost. Experiment with different nut butters too! Almond butter or cashew butter can change the taste. Each nut butter brings a unique flavor. It’s fun to find your favorite blend. Toppings can make your bars even better. Try sprinkling crushed nuts on top. Walnuts or pecans add a nice crunch. You can also use coconut flakes for a chewy texture. For a sweet finish, drizzle melted chocolate over the top. You can use dark, milk, or even white chocolate. This extra layer makes the bars look fancy and taste amazing. For the full recipe, check out the detailed instructions above. To keep your chocolate peanut butter bars fresh, use an airtight container. This helps prevent moisture and keeps them from drying out. You can store them in the refrigerator or freezer, depending on how long you want to keep them. If you plan to eat them within a week, the fridge is perfect. For longer storage, the freezer is your best option. In the fridge, these bars can last about one week. If you notice any changes in color or smell, it's best to throw them away. Signs of spoilage include a dry texture or a strange odor. Always inspect your bars before enjoying them. You can freeze the bars either one by one or as a whole batch. If you freeze them individually, wrap each bar in plastic wrap or foil. This way, you can grab one whenever you want a treat. If you prefer to freeze the whole batch, just place the container in the freezer. When you're ready to eat, let them thaw in the fridge for a few hours. For the full recipe, check the earlier section. Yes, you can use crunchy peanut butter! It adds a fun texture. The bars will have a nice bite from the peanut pieces. Keep in mind, the flavor may be more intense with crunchy peanut butter. If you enjoy that nutty crunch, go for it! To check if the bars are set, gently press the top with your finger. If it feels firm and springs back, they are ready. You can also look for a slight sheen on the surface. If it’s still soft, give it more time in the fridge. Patience makes perfect bars! For clean cuts, use a sharp knife. Run the knife under hot water, then dry it off. This helps the knife glide through the bars easily. Cut them into squares or rectangles, depending on your preference. If they crumble, try chilling them longer before cutting. Absolutely! To make these bars vegan, use maple syrup instead of honey. Ensure your chocolate chips are dairy-free. Check that your peanut butter has no added ingredients. With these swaps, you can enjoy a tasty vegan treat! In summary, this guide covered how to make delicious no-bake bars. You learned about the key ingredients, measurement tips, and how to mix everything smoothly. We shared storage techniques to keep your bars fresh and variations to suit your taste. Remember, small changes can lead to big flavor. Experiment with different add-ins and toppings to make these bars your own. By following these tips, you’ll enjoy tasty treats that fit your needs. Enjoy making your no-bake bars!](https://fastmealmate.com/wp-content/uploads/2025/06/11f9b23d-ca49-49dd-b442-fa08a6216cde-768x768.webp)
![To make this tasty Parmesan Spinach Couscous, you need a few simple items. - 1 cup couscous - 2 cups vegetable broth - 2 cups fresh spinach, finely chopped - 1 cup cherry tomatoes, halved - 1/2 cup freshly grated Parmesan cheese - 2 tablespoons extra virgin olive oil - 1 tablespoon freshly squeezed lemon juice - 1 garlic clove, minced - Salt and freshly ground black pepper to taste - Fresh parsley, finely chopped, for garnish (optional) Each ingredient adds a layer of flavor. Couscous is light and fluffy. Spinach brings a fresh taste. Cherry tomatoes add sweetness and color. Parmesan cheese gives a rich, creamy finish. Olive oil smooths everything out. Lemon juice adds a bright zing. Garlic gives it a warm aroma. Salt and pepper enhance all the flavors. This recipe is easy to follow. You can find the Full Recipe above to make it at home. Enjoy cooking! - Start by boiling 2 cups of vegetable broth in a medium saucepan. - Once it boils, add 1 cup of couscous. Stir it well. - Cover the saucepan and take it off the heat. - Let it rest for 5 minutes, so the couscous soaks up the broth. - In a large skillet, heat 2 tablespoons of extra virgin olive oil over medium heat. - Add 1 minced garlic clove and sauté for about 1 minute. - Toss in 2 cups of finely chopped spinach and 1 cup of halved cherry tomatoes. - Cook for 3-4 minutes, stirring until the spinach wilts and tomatoes soften. - After the couscous rests, fluff it with a fork. - Gently mix the fluffy couscous with the sautéed vegetables. - Sprinkle in 1/2 cup of freshly grated Parmesan cheese. - Drizzle 1 tablespoon of freshly squeezed lemon juice over the mix. - Stir until the cheese melts and coats everything. - Season with salt and black pepper to your taste. - Serve warm, and if you like, garnish with fresh parsley. For the complete recipe, check out the [Full Recipe]. To avoid mushy couscous, use the right liquid-to-couscous ratio. Stick to 2 cups of broth for every 1 cup of couscous. This keeps it fluffy. When cooking, bring your broth to a boil first. Then add the couscous quickly. Cover it and let it rest for five minutes. This lets the couscous absorb the flavors without overcooking. Spices can take your dish to the next level. I like adding a pinch of red pepper flakes for heat. Fresh herbs like basil or thyme also add a nice touch. If you want to mix it up, try using feta cheese instead of Parmesan. Feta gives a tangy twist. You can also explore vegan cheese options for a dairy-free dish. Parmesan spinach couscous pairs well with grilled chicken or fish. You can also serve it alongside a fresh salad. The dish tastes best warm. Serve it right after cooking for the best flavor and texture. If you let it sit, the couscous may clump together. For the full recipe, check the earlier section. {{image_4}} You can add protein to make your Parmesan spinach couscous heartier. Grilled chicken works well. Simply slice it and mix it in just before serving. It adds a nice flavor and texture. If you want a vegetarian option, try incorporating chickpeas or beans. They boost the protein and add fiber. Just rinse and drain them, then fold them into the couscous. Feel free to swap spinach for kale. Kale adds a different bite and is very nutritious. You can also use seasonal vegetables. Try bell peppers in summer or butternut squash in fall. Each option gives a new taste to the dish and keeps it fresh. You can experiment with different cheeses too. Feta or goat cheese can be great choices. They add a tangy twist. For those who prefer vegan options, look for vegan cheese. There are many great brands that melt well and taste delicious. Each cheese brings its own flavor, making the dish unique each time. To store leftovers, let the couscous cool first. Place it in an airtight container. This keeps it fresh for later use. I recommend glass or BPA-free plastic containers. These options help keep food safe and tasty. You can freeze Parmesan Spinach Couscous if you have extra. Scoop the cooled dish into freezer-safe bags. Press out as much air as you can before sealing. This helps prevent freezer burn. When you're ready to eat, thaw it overnight in the fridge. Reheat in a skillet over low heat. Add a splash of broth to help it warm up nicely. In the fridge, the couscous lasts about 3 to 5 days. Check for any off smells or mold, which are signs of spoilage. If it looks dry or hard, it's best to toss it out. Always trust your senses when it comes to food safety. You can easily make Parmesan Spinach Couscous gluten-free. Just swap regular couscous for gluten-free couscous. Brands like Bob's Red Mill or Trader Joe's offer great options. Make sure to check the label for any hidden gluten. The cooking method stays the same, and you will still enjoy all the flavors! Yes, you can prep this dish ahead of time. Make the couscous and sauté the veggies earlier in the day. Store them separately in the fridge. When you’re ready to eat, just combine them with the cheese and heat everything gently. This keeps the dish fresh and tasty! Parmesan Spinach Couscous pairs well with many dishes. Here are some great options: - Grilled chicken for protein - Roasted vegetables like zucchini or bell peppers - A fresh garden salad with a light vinaigrette - Sautéed shrimp for a seafood twist Feel free to mix and match based on your taste! For the full recipe, check out the section above. This recipe for Parmesan Spinach Couscous is both simple and tasty. You learned the ingredient list, step-by-step cooking methods, and tips for a great dish. Plus, we explored fun variations and storage ideas. With these insights, you can make a meal that pleases everyone. Experiment with different flavors and ingredients to match your taste. Enjoy every bite and feel good about your cooking!](https://fastmealmate.com/wp-content/uploads/2025/05/f4ccb392-4fc5-4f37-838a-261a9f2c6c95-768x768.webp)
