Strawberry Matcha Latte Refreshing and Energizing Drink

Looking for a drink that’s both refreshing and energizing? The Strawberry Matcha Latte is your perfect choice! With vibrant strawberries and the earthy taste of matcha, this delightful combination not only invigorates your senses but also fuels your body. In this post, I’ll guide you through the steps to create your own delicious latte at home. Let’s dive into the vibrant world of flavors and health benefits!
Ingredients
Main Ingredients for Strawberry Matcha Latte
– 1 cup fresh strawberries, hulled and sliced
– 1 tablespoon honey or maple syrup (adjust to taste)
– 1 cup milk (or any plant-based milk you prefer)
– 1 teaspoon matcha green tea powder
– 1 tablespoon hot water
– Ice cubes (optional, for a chilled version)
Optional Ingredients
– Whipped cream
– Fresh strawberry slices, for garnish
– Mint leaves, for garnish
In this drink, fresh strawberries bring a sweet and fruity flavor. They add a bright color and fun texture. Matcha green tea powder adds a rich, earthy taste and a nice green hue. Milk or plant-based milk makes the drink creamy and smooth. You can choose any milk you like, such as almond or oat milk.
For sweetness, you can use honey or maple syrup. This lets you control how sweet you want the drink. If you want to make it extra special, top it with whipped cream. Fresh strawberry slices or mint leaves make great garnishes, too. They add a nice touch to your drink.
Step-by-Step Instructions
Preparing the Matcha
To start, mix the matcha powder with hot water. Use about one tablespoon of matcha and one tablespoon of hot water for the best flavor. I like to use a small bowl for this. Whisk the matcha well until it is smooth and free from clumps. This step is crucial. A smooth matcha makes your drink taste rich and creamy.
Making the Strawberry Puree
Next, we need to make the strawberry puree. Take one cup of fresh strawberries, hull and slice them. Place the strawberries in a blender. Add one tablespoon of honey or maple syrup to sweeten. Blend the mixture until it becomes a smooth puree. If the puree is too thick, you can add a bit of water to reach your desired consistency. This puree adds a burst of flavor and color to your drink.
Assembling the Latte
Now, let’s assemble the latte! Grab a tall glass to show off those beautiful layers. Start by adding the strawberry puree to the bottom of the glass, filling it about one-third full. Next, gently pour in one cup of warm milk over the strawberry layer. Avoid boiling the milk to keep its texture right. Finally, slowly drizzle the matcha mixture on top. This creates a lovely layered look. For a refreshing twist, you can add ice cubes. If you want to make it extra special, top with whipped cream and a fresh strawberry slice.
Tips & Tricks
Achieving the Perfect Layers
To make a beautiful layered drink, start with the strawberry puree. Pour it into the glass first. This will be the base layer. Next, warm your milk to just below boiling. If the milk is too hot, it will mix with the puree. Pour the warm milk slowly over the back of a spoon. This helps keep the layers separate. Lastly, drizzle the matcha on top gently for the best effect.
Enhancing the Flavor
You can adjust the sweetness for your taste. If it’s not sweet enough, add more honey or maple syrup. For a different twist, try adding a splash of vanilla extract. This small change can make a big difference. You can also experiment with other flavors like almond or coconut.
Presentation Ideas
Choosing the right glass makes a big impact. Clear glasses work best to show off the layers. You want your drink to look as good as it tastes. For garnishing, add a fresh strawberry slice on top. A small mint leaf can make it look fancy too. This simple touch will impress anyone you serve it to.

Variations
Iced Strawberry Matcha Latte
To make a chilled version of the Strawberry Matcha Latte, follow these simple steps:
1. Prepare the matcha as usual, but let it cool.
2. Blend the strawberries with honey or maple syrup.
3. Fill a glass with ice cubes.
4. Layer the strawberry puree, then the milk, and finally the cooled matcha.
For flavor variations, try other fruits like blueberries or raspberries. Blend them in place of strawberries for a unique twist.
Vegan and Dairy-Free Options
If you want a vegan or dairy-free option, choose plant-based milk. Some great alternatives are:
– Almond milk
– Oat milk
– Coconut milk
For sweetener substitutes, consider using:
– Agave syrup
– Stevia
– Coconut sugar
These options keep the drink delicious and plant-based.
Different Matcha Flavors
You can incorporate flavored matcha powders to enhance your drink. Available flavors include:
– Vanilla matcha
– Chocolate matcha
– Mint matcha
You can also use flavored syrups. Try adding a splash of vanilla or caramel syrup to give your latte an extra kick. The flavor possibilities are endless!
Storage Info
How to Store Leftover Ingredients
Storing strawberries and puree is simple. Keep your fresh strawberries in the fridge for up to three days. Place them in a container with a lid. Do not wash them until you are ready to use them. For the strawberry puree, transfer it to an airtight container. It will stay good in the fridge for about a week.
Keeping matcha fresh is crucial for flavor. Store matcha powder in a cool, dark place. A sealed container works best. If you use the matcha often, keep it in the fridge to extend its life.
Preparing in Advance
Meal prep ideas for busy mornings can make your life easier. You can prepare the strawberry puree ahead of time. Just blend it and store it in the fridge. You can also whisk the matcha with water and keep it in a sealed jar.
Best practices for refrigeration include using clear containers. This way, you can see what you have. Make sure to label the containers with dates to track freshness.
Shelf Life of Strawberry Matcha Latte
Tips for consuming homemade lattes include finishing them within two days. The longer they sit, the more the layers blend together. This can change the drink’s look and taste.
Signs of spoiling are easy to spot. If the strawberry puree looks off or smells sour, it’s time to toss it. Also, if the matcha begins to clump, it may have gone bad.
FAQs
What is a Strawberry Matcha Latte?
A Strawberry Matcha Latte is a layered drink featuring sweet strawberry puree and rich matcha. This drink combines the fresh taste of strawberries with the earthy flavor of matcha green tea. The result is a vibrant, tasty drink that energizes you while refreshing your palate.
Can I use frozen strawberries?
Yes, you can use frozen strawberries. They will create a thicker texture in your puree. However, fresh strawberries provide a brighter taste. If you use frozen, let them thaw a bit to blend easily.
How do I make the drink dairy-free?
To make a dairy-free Strawberry Matcha Latte, use plant-based milk. Almond milk, oat milk, or coconut milk work well. These alternatives keep the drink creamy and delicious without dairy.
Where can I buy a Strawberry Matcha Latte?
You can find Strawberry Matcha Lattes at popular cafes like Starbucks and local coffee shops. Many places offer it on their menu.
Health benefits of matcha and strawberries
Matcha is full of antioxidants and boosts your metabolism. It can help with focus too. Strawberries are rich in vitamins and fiber, promoting heart health. Together, they make a tasty drink that supports a healthy lifestyle.
You now know how to make a delicious Strawberry Matcha Latte from scratch. From the main ingredients to optional flavors, this drink is a treat. You learned the steps to prepare the matcha, make the puree, and assemble a stunning latte. Use the tips for layering and presentation to impress.
Don’t forget about variations and storage methods to enjoy your latte longer. With this guide, you can customize your drink to your tastes. Embrace creativity and have fun making your perfect cup!


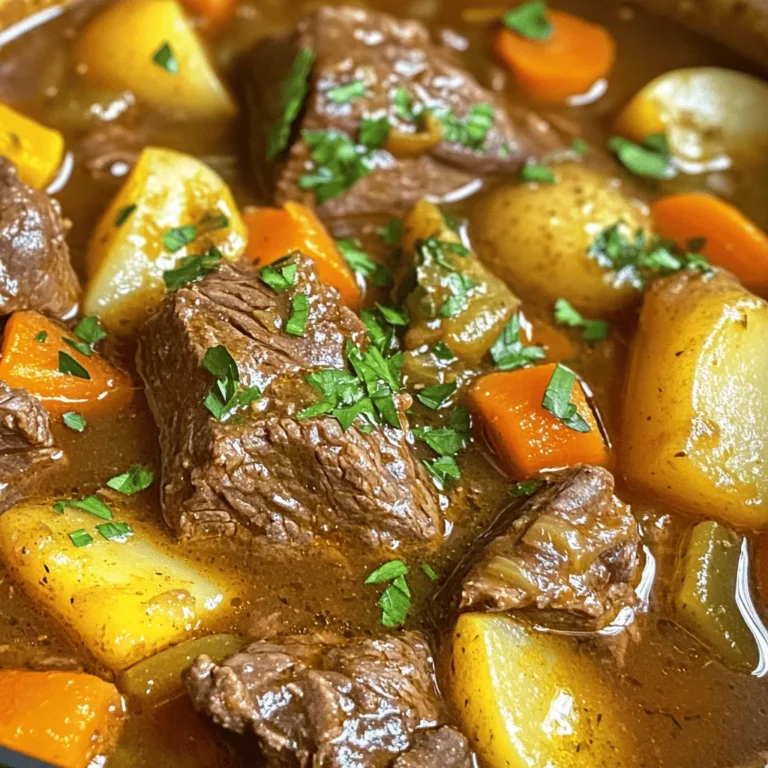
![To make a hearty Instant Pot beef stew, you need fresh and tasty ingredients. Here’s what you will need: - 2 pounds beef chuck, cut into 1-inch cubes - 1 tablespoon olive oil - 1 large onion, finely chopped - 2 cloves garlic, minced - 4 medium carrots, sliced into rounds - 3 medium potatoes, peeled and diced into 1-inch cubes - 2 cups beef broth - 1 tablespoon tomato paste - 1 teaspoon dried thyme - 1 teaspoon dried rosemary - 1 bay leaf - Salt and freshly ground black pepper to taste - 2 tablespoons cornstarch (optional, for thickening) - Fresh parsley, chopped (for garnish) These ingredients bring great flavor and comfort to your dish. Each one plays a key role. For example, beef chuck gives the stew a rich taste. Onions and garlic add depth. Carrots and potatoes give it heartiness. Don’t skip the herbs; they add wonderful notes to every bite. You will find that using quality ingredients makes a big difference. Fresh veggies and good beef will elevate your stew. Remember, you can always adjust the seasonings to fit your taste. If you want to explore more, check out the Full Recipe for step-by-step instructions. - Prep time: 15 minutes - Cook time: 35 minutes - Total time: 1 hour - Servings: 6 With just an hour, you can create a warm and filling meal for your family or friends. Enjoy the process! Set your Instant Pot to “Sauté” and pour in the olive oil. Let it heat until it shimmers. Add the beef cubes in a single layer. Sear them until browned, about 5-7 minutes. This step seals in flavor. Once browned, remove the beef and set it aside on a plate. In the same pot, add the finely chopped onion and minced garlic. Cook them for 2-3 minutes until the onion is soft. You will smell a rich aroma that adds depth to your stew. Pour a splash of beef broth into the pot. Use a wooden spoon to scrape up the browned bits stuck to the bottom. This step is key for enhancing the stew’s flavor. Now, return the seared beef to the pot. Add the sliced carrots, diced potatoes, the remaining beef broth, tomato paste, dried thyme, dried rosemary, and the bay leaf. Don’t forget to add a pinch of salt and pepper. Stir everything until well mixed. Close the lid tightly on the Instant Pot. Make sure the steam release valve is set to “Sealing.” Select the “Manual” function. Adjust the cooking time to 35 minutes at high pressure. When the cooking time is up, let the Instant Pot naturally release pressure for 10 minutes. This helps make the beef tender. After that, carefully quick-release any remaining pressure by turning the valve to “Venting.” If you want a thicker stew, mix 2 tablespoons of cornstarch with cold water to make a slurry. Stir this into the warm stew. Set the Instant Pot back to “Sauté” for 5 minutes. Stir often until the stew thickens to your liking. Before serving, remember to remove the bay leaf. Garnish the stew with freshly chopped parsley for color. Ladle it into bowls while hot. Enjoy this hearty meal! Check the [Full Recipe] for more details. Browning meat is key. It builds flavor and color. When you sear beef, you create a nice crust. This adds a rich taste to your stew. Make sure to do this step well. For seasoning, use salt and pepper early. This helps to boost the flavor. Add herbs like thyme and rosemary for aroma. If you love a kick, throw in some paprika. Pair your beef stew with sides that shine. Mashed potatoes work great. They soak up all the stew's goodness. You can also serve it with green beans or a fresh salad. Bread is a must! Choose crusty bread for dipping. Sourdough or baguette are fantastic options. They bring texture and enhance the meal. Want to deepen the taste? Try adding red wine. A splash of wine gives a rich layer to your stew. If you prefer, soy sauce works too. It adds umami that makes flavors pop. Don’t forget about extra veggies! Mushrooms, peas, or bell peppers can brighten your stew. They add nutrition and color. Chop them up and toss them in before cooking. For the full recipe, check out the details above. Happy cooking! {{image_4}} You can use chicken or pork in your stew. For chicken, use boneless thighs or breasts. Cut them into bite-sized pieces. Sear them just like you do with beef. Chicken cooks faster, so reduce the cooking time to 25 minutes. For pork, use shoulder or loin. Cut into 1-inch cubes and follow the same steps as beef. Both meats will soak up the rich flavors of your stew. To make a vegetarian stew, skip the meat entirely. Use hearty vegetables like mushrooms, butternut squash, or lentils. Replace beef broth with vegetable broth for a lighter taste. You can add beans for protein and texture. Cook it just like the beef stew. This version is still rich and filling, perfect for anyone. You can change the taste by using different herbs and spices. Instead of thyme and rosemary, try basil and oregano for an Italian twist. Or, add cumin and coriander for a warm, earthy flavor. For a touch of heat, add red pepper flakes or a splash of hot sauce. Each change gives you a new dish to enjoy. To refrigerate beef stew, let it cool first. Pour the stew into a container. Seal it tightly with a lid. Store it in the fridge for up to three days. If you want to enjoy it later, use the freezer. To freeze beef stew, follow these steps. Cool the stew completely first. Then, transfer it to freezer-safe bags or containers. Remove as much air as possible to avoid freezer burn. Label the bags with the date. You can freeze it for up to three months. To reheat, let it thaw in the fridge overnight. Heat it in the microwave or on the stove until hot. In the fridge, beef stew lasts about three days. If you freeze it, it can last for three months. After that, the quality may decline. Be sure to check for any off smells or changes in texture before eating. When stored correctly, the stew stays flavorful and comforting. Yes, you can skip browning the meat. However, your stew may lack flavor. Browning adds depth and richness. It creates a lovely crust and enhances the dish. If you skip this step, consider adding more spices. If your stew is too thick, add more beef broth. Start with half a cup and stir well. You can also use water if needed. Another option is to add more veggies. They will release moisture as they cook. You can use frozen beef, but adjust the cooking time. Increase the time to 45 minutes for frozen chunks. This allows the meat to cook through properly. Make sure to add a few extra minutes if pieces are large. The beef is tender when it falls apart easily. You can check by using a fork. If it shreds easily, it's done. Aim for a melt-in-your-mouth texture for the best stew. Yes, this recipe is great for meal prep. You can make it ahead and store leftovers. It keeps well in the fridge for about three days. You can also freeze it for up to three months. Just reheat before serving. Check out the Full Recipe for more details. This blog post covered delicious Instant Pot beef stew. You learned the key ingredients, simple steps, and expert tips. I emphasized the importance of browning the beef for flavor. You can customize the recipe with different proteins or vegetables too. Stored correctly, it lasts well and is perfect for meals later. Enjoying this hearty dish brings warmth and satisfaction. I hope you try this recipe and share it with friends. Your kitchen adventures await!](https://fastmealmate.com/wp-content/uploads/2025/07/4eb70415-c4b6-43db-bf2d-31d3ec08fe2e-768x768.webp)
![When making zucchini brownies, you need simple and quality ingredients. Here’s what you will need: - 1 cup shredded zucchini - 1/2 cup unsweetened applesauce - 1/3 cup pure maple syrup or agave nectar - 1/4 cup vegetable oil or melted coconut oil - 1 teaspoon pure vanilla extract - 1/2 cup all-purpose flour or gluten-free flour - 1/4 cup unsweetened cocoa powder - 1/2 teaspoon baking soda - 1/2 teaspoon baking powder - 1/4 teaspoon fine sea salt - 1/2 cup chocolate chips These ingredients come together to create a rich and moist brownie. The zucchini adds moisture without a strong taste. Applesauce keeps the brownies soft. The maple syrup or agave nectar sweetens them naturally. You can use vegetable oil or coconut oil, depending on your preference. Using high-quality cocoa powder makes a big difference in flavor. The baking soda and baking powder help the brownies rise. Finally, the chocolate chips give a delightful chocolate burst in every bite. For the full recipe, check out the [Full Recipe]. - Set temperature to 350°F (175°C). - Prepare your baking pan by greasing it or lining it with parchment paper. - In a large bowl, combine shredded zucchini, applesauce, maple syrup, oil, and vanilla. - Mix until the mixture is smooth and well blended. - In a separate bowl, whisk together flour, cocoa powder, baking soda, baking powder, and salt until mixed well. - Gradually add the dry ingredients to the wet mixture. - Mix gently to avoid overmixing, which can make the brownies dense. - Fold in the chocolate chips. - Make sure they are evenly spread throughout the batter for a rich flavor. - Pour the batter into the prepared pan. - Bake for 25-30 minutes. - After baking, cool in the pan for at least 15 minutes before cutting. Enjoy the delightfully unexpected zucchini boost hidden in every bite with this full recipe! To make your brownies moist, avoid overmixing the batter. Overmixing adds air, which can make them dry. Mix until just combined for a fudgy treat. Using ripe zucchini is key too. Ripe zucchini has more water, which adds moisture and flavor. Shred the zucchini and squeeze out excess water. This keeps your brownies rich and tasty. You can add nuts or spices to boost flavor. Chopped walnuts or pecans add crunch. A sprinkle of cinnamon or nutmeg makes them warm and cozy. You could also mix in chocolate chunks for extra gooeyness. For toppings, serve with ice cream or whipped cream. A scoop of vanilla ice cream on warm brownies is heavenly! Check your brownies for doneness by inserting a toothpick in the center. It should come out with a few moist crumbs. If you live at a high altitude, bake for less time. High altitude can change how baked goods rise and cook. Start checking at the lower end of baking time, around 25 minutes. Adjust as needed. {{image_4}} You can make these brownies gluten-free. Just swap the all-purpose flour for a gluten-free flour blend. Many blends work well. Look for ones that contain rice flour or almond flour. These blends give the brownies a nice texture. Make sure to check the package for the right measurements. This way, you still get that rich, fudgy taste. For a vegan version, you can replace the eggs. Use a flaxseed or chia seed mixture instead. To make this, mix one tablespoon of ground flaxseed or chia seeds with three tablespoons of water. Let it sit for five minutes until it thickens. This works great in the recipe. Your brownies will still be moist and delicious without eggs. If you want a healthier treat, try different sweeteners. You can use stevia or coconut sugar instead of maple syrup. Both options lower the sugar content. Stevia is quite sweet, so use less. Coconut sugar adds a nice caramel flavor. These substitutes keep your brownies tasty while making them a bit healthier. For the full recipe, check out the main article. To keep your zucchini brownies fresh, use an airtight container. This helps seal in moisture and flavor. You can store them at room temperature for up to two days. If you want to keep them longer, refrigerate them for up to a week. If you want to save some for later, freezing is a great option. First, cut the brownies into squares. Wrap each square in plastic wrap, and then place them in a freezer-safe bag. This way, they won’t stick together. You can freeze them for up to three months. When you’re ready to enjoy, take them out and thaw at room temperature. For the best texture, you can also warm them in the microwave for a few seconds. These tips will help you enjoy your zucchini brownies at their best! For the complete recipe, check out the [Full Recipe]. Yes, you can use yellow squash. The texture will be similar, but the flavor differs. Yellow squash has a slightly sweeter taste. Zucchini tends to have a more neutral flavor. This can change how the brownies taste. If you like sweetness, yellow squash is a great choice. To check if brownies are done, insert a toothpick into the center. If it comes out with a few moist crumbs, they are ready. If it comes out wet with batter, they need more time. Brownies should look set but still soft. These brownies can be made ahead of time. Bake them, let them cool, then store them. Wrap them in plastic wrap or place them in an airtight container. They keep well for about three days at room temperature. You can also refrigerate them for up to a week. If your brownies are dense, try a few tips. First, check your mixing. Overmixing can cause density. Mix until just combined. You can also add a bit more liquid. Adding an extra tablespoon of applesauce can help. Lastly, ensure your baking powder is fresh for proper rise. These zucchini brownies are easy to make and taste great. We covered the ingredients, step-by-step instructions, and tips to boost flavor and texture. You learned how to store them and gave answers to common questions. Experiment with different flours or sweeteners to fit your needs. Enjoy these tasty treats that offer a fun twist on the classic brownie! Happy baking!](https://fastmealmate.com/wp-content/uploads/2025/06/384a547d-f08a-42f3-b5f4-9a38b6c4e0e7-768x768.webp)