Quick Refrigerator Pickled Okra Easy Flavorful Snack
Looking for a quick and tasty snack? Try my Quick Refrigerator Pickled Okra! This easy recipe packs a zesty punch and brings a vibrant crunch to your plate. With simple ingredients like fresh okra, vinegar, and spices, you can whip up this flavorful treat in no time. Perfect for snacking, topping, or adding to your favorite dishes, this pickled okra will become a staple in your kitchen! Let’s dive in!
Ingredients
To make quick refrigerator pickled okra, you need a few simple ingredients. Here’s what you will need:
– 1 pound fresh okra, trimmed
– 1 cup distilled white vinegar
– 1 cup water
– 3 tablespoons granulated sugar
– 2 tablespoons coarse sea salt
– 4 cloves garlic, peeled and smashed
– 1 tablespoon mustard seeds
– 1 tablespoon coriander seeds
– 1 teaspoon crushed red pepper flakes
– 1 teaspoon whole black peppercorns
– Fresh dill sprigs (optional)
Each ingredient plays a key role in the flavor and texture of the pickles. The vinegar gives that tangy taste, while the sugar balances it out. Garlic adds depth, and the spices bring warmth and heat. If you like a fresh hint, toss in dill!
This mix creates a vibrant snack that’s tasty and fun to eat. You can easily find these ingredients at your local store. If you want to try different flavors, you can add your favorite herbs or spices. The creative possibilities with pickling are endless!
Step-by-Step Instructions
Prepare the Brine
First, grab a medium saucepan. In it, combine:
– 1 cup distilled white vinegar
– 1 cup water
– 3 tablespoons granulated sugar
– 2 tablespoons coarse sea salt
Stir the mixture well. Heat it over medium heat. Watch closely until the sugar and salt dissolve. This step is key for a balanced taste. Remove the saucepan from heat. Let the brine cool for about 10-15 minutes.
Prepare the Okra
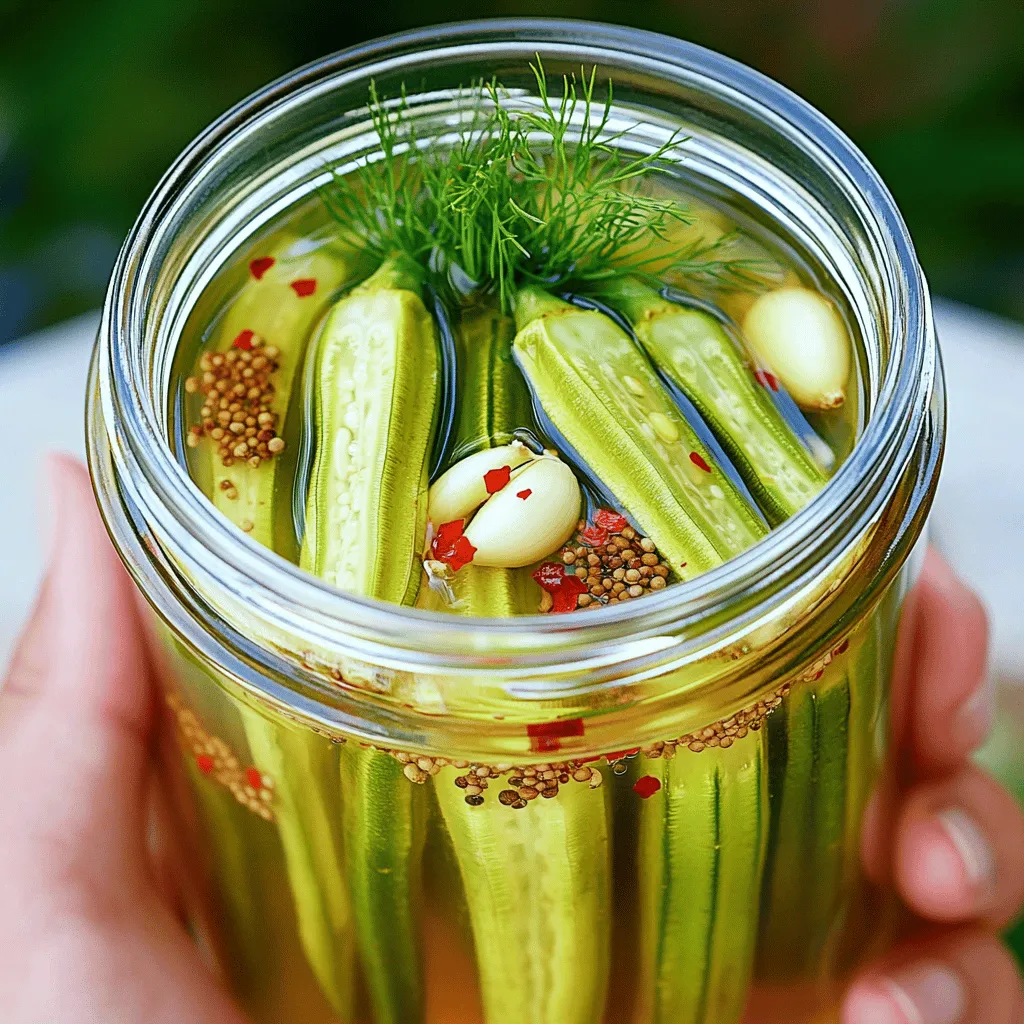
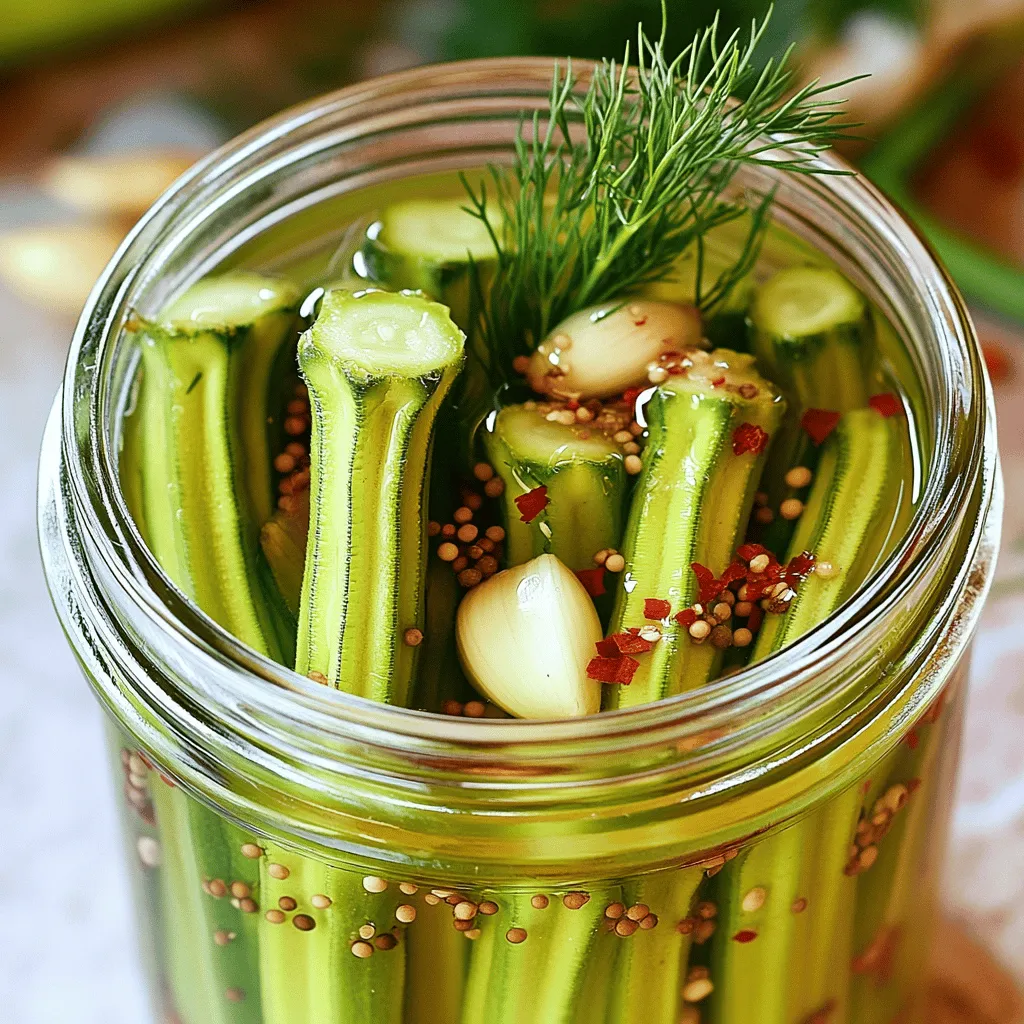
While the brine is cooling, rinse 1 pound of fresh okra under cold water. This cleans the okra and removes any dirt. Next, pack the okra tightly into a clean, sterilized quart jar. I like to stand them upright for a nice look. This also helps the brine soak in better.
Add Flavorings
Now it’s time to add flavor! Toss in:
– 4 cloves garlic, peeled and gently smashed
– 1 tablespoon mustard seeds
– 1 tablespoon coriander seeds
– 1 teaspoon crushed red pepper flakes
– 1 teaspoon whole black peppercorns
If you enjoy fresh dill, add a few sprigs for a burst of aroma. This makes the pickled okra even tastier!
Cover with Brine
Carefully pour the cooled brine over the okra in the jar. Ensure all the okra is fully submerged. This is vital for the pickling process. If the okra floats, use a clean weight or a small dish to hold it down.
Seal and Refrigerate
Screw the jar lid on tightly. Place the jar in the refrigerator. I suggest letting the pickled okra marinate for at least 24 hours. For the best flavor, allow them to sit for several days.
Serve and Enjoy
These zippy pickled okra make a great snack. You can toss them in salads or use them as a topping on sandwiches or burgers. They add a crunchy and flavorful twist to any meal!
Tips & Tricks
Selecting Fresh Okra
To pick the best okra, look for bright green pods. They should be firm and smooth, with no blemishes. Avoid okra that is too large, as it may be tough. Smaller pods, about 2 to 4 inches long, are usually more tender. When you squeeze them gently, they should feel slightly soft, but not mushy. Fresh okra has a slight sheen and should feel moist. If you find okra that is dry or shriveled, it’s best to leave it behind.
Adjusting Spice Levels
You can easily change the spice level of your pickled okra. If you want more heat, add more crushed red pepper flakes. You can also include sliced jalapeños or other hot peppers. For less heat, reduce the amount of red pepper flakes or leave them out. You can also balance the spice with sugar. A little extra sugar can tone down the heat, making it more pleasant for your taste buds.
Ensuring Proper Sealing
Proper sealing is key for storing your pickled okra. Make sure the jar is clean and dry before filling it. After adding the okra and brine, screw the lid on tightly to create a seal. This helps keep air out and prevents spoilage. Always refrigerate your pickled okra to keep it fresh. If you notice any leaks or the lid bulges, check it again. Make sure the okra stays submerged in the brine to keep it tasting great.
Variations
Different Flavor Combinations
You can mix up the flavor of your pickled okra by adding different herbs and spices. Try including fresh thyme or bay leaves for a earthy taste. You might also enjoy a hint of sweetness by adding a cinnamon stick or a few cloves. Experiment with flavors that you love. Each addition changes the pickled okra’s taste, making it unique.
Using Other Vegetables
Do not limit yourself to okra! You can pickle a variety of vegetables. Try green beans, carrots, or even cauliflower. Just cut them to fit in the jar. The brine works well with many veggies. Each provides a crunch that pairs great with the tangy taste.
Unique Vinegar Choices
Vinegar type can change the whole dish. While distilled white vinegar is classic, you can try apple cider vinegar or rice vinegar. Each brings its own flavor. Apple cider vinegar adds a fruity note, while rice vinegar offers a milder taste. Feel free to experiment with what you have on hand. Your okra will be deliciously different every time!
Storage Info
Best Storage Practices
To store your pickled okra properly, use a clean, sterilized jar. Keep the jar sealed tight to avoid air exposure. Store it in the fridge right after making it. This helps maintain the crunch and flavor. If you want to keep the okra submerged in the brine, you can use a small weight. This keeps the okra from floating and ensures even pickling.
Shelf Life and Safety
Typically, pickled okra lasts about 1 to 2 months in the fridge. The vinegar acts as a preservative, which helps with safety. To ensure the best taste, aim to eat the pickled okra within a month. Always keep it in the fridge, as warm temperatures can spoil it faster.
Signs of Spoilage
Check for signs of spoilage to ensure freshness. Look for any off smells or a change in color. If you see mold or a cloudy brine, it’s best to discard it. Also, if the okra feels slimy or mushy, throw it out. Trust your senses; if it doesn’t look or smell right, don’t eat it. Enjoy your zippy pickled okra while it’s fresh!
FAQs
How long does it take for pickled okra to be ready?
Pickled okra needs at least 24 hours to soak up the brine. For the best flavor, let it sit for three to five days. The longer it sits, the better it tastes. This time allows the spices to blend well with the okra.
Can I reuse the brine?
Yes, you can reuse the brine for another batch of pickled okra. However, it’s best not to use it more than once. The brine loses flavor and strength after each use. If you want to try it again, add fresh spices to boost the taste.
Can I can pickled okra for long-term storage?
You can can pickled okra, but follow safe canning methods. Use sterilized jars and process them in a water bath. Make sure to leave space at the top of the jar. This helps the okra stay preserved. Always check for seals and spoilage before eating.
What are the health benefits of pickled okra?
Pickled okra offers several health benefits. It is low in calories and high in fiber. This can help with digestion. Okra is also a good source of vitamins A and C. These vitamins support your immune system and skin health.
Can I eat pickled okra straight from the jar?
Absolutely! Eating pickled okra straight from the jar is a great snack. It’s crunchy and packed with flavor. You can also toss it in salads or serve it on sandwiches. The options are endless!
In this post, we explored making zippy refrigerator pickled okra. We covered the key ingredients and step-by-step instructions to ensure success. I shared tips for selecting fresh okra and adjusting spice levels. You learned about variations and storage practices to keep your pickled okra fresh.
Pickled okra makes a tasty snack or topping. With these easy steps, you can enjoy this crunchy treat at home. Happy pickling!


![To create a delightful 20-minute couscous, you need a few simple ingredients. Here’s what you will need: - 1 cup couscous - 1 ¼ cups vegetable broth (or water) - 1 cup cherry tomatoes, halved - 1 small cucumber, diced into small cubes - ½ red onion, finely chopped - ½ cup Kalamata olives, pitted and sliced into rings - 1 cup fresh spinach, roughly chopped - ¼ cup feta cheese, crumbled - 2 tablespoons extra virgin olive oil - 1 tablespoon fresh lemon juice - 1 teaspoon dried oregano - Salt and freshly ground black pepper to taste These ingredients bring a burst of flavor and color to your meal. Couscous cooks fast and absorbs the broth well, making it fluffy. The cherry tomatoes and cucumber add crunch, while olives give a salty kick. Fresh spinach provides nutrients, and feta cheese adds creaminess. Use good olive oil and fresh lemon juice for a bright taste. This mix of flavors makes your dish fresh and inviting. For the detailed recipe, check out the Full Recipe section. To start, bring 1 ¼ cups of vegetable broth or water to a rolling boil in a saucepan. This step is crucial for cooking the couscous properly. Once the liquid bubbles up, remove the pan from the heat. Stir in 1 cup of couscous and cover the pan with a lid. Let it sit for 5 minutes. This allows the couscous to absorb all the liquid, making it fluffy and light. While the couscous cooks, grab a large mixing bowl. Combine 1 cup of halved cherry tomatoes, 1 small diced cucumber, ½ finely chopped red onion, and ½ cup of sliced Kalamata olives. Toss in 1 cup of roughly chopped fresh spinach. Mixing these colorful veggies adds crunch and freshness to your meal. In a small bowl, whisk together 2 tablespoons of extra virgin olive oil, 1 tablespoon of fresh lemon juice, and 1 teaspoon of dried oregano. Add a pinch of salt and pepper to taste. This dressing brings all the flavors together and enhances the dish's brightness. Pour the dressing over the vegetable mix and toss gently. This helps each piece get coated well. Next, fluff the couscous with a fork, breaking apart any clumps. Add the fluffed couscous to the veggie mixture and stir until everything is mixed evenly. To finish, sprinkle ¼ cup of crumbled feta cheese on top. This adds a nice salty bite and creamy texture to the dish. Check the [Full Recipe] for all details. To make your couscous extra tasty, add fresh herbs like parsley or cilantro. You can also try spices like cumin or paprika for more depth. Feel free to swap feta cheese with goat cheese or even mozzarella if you prefer. Each cheese brings its own flavor and texture to the dish. For the best fluff, always use a fork to fluff your couscous. This helps break up any clumps. When cutting vegetables, try to make them uniform in size. This way, they cook evenly and look nice in your dish. Serve your couscous in colorful bowls to make it pop. You can also spread it on a large platter for a family-style meal. For a finishing touch, sprinkle extra crumbled feta and fresh herbs on top. This adds color and makes the dish more inviting. {{image_4}} You can change up the recipe in many ways. Use seasonal vegetables for a fresh twist. Think about adding bell peppers, zucchini, or even asparagus. These veggies add color and flavor to your dish. Protein is another way to mix things up. Chickpeas are great for a plant-based option. They add a nice texture and protein boost. Grilled chicken is another good choice if you want meat. It pairs well with the other flavors in couscous. The flavor can shift based on your ingredients. A Mediterranean style is bright and fresh. Use herbs like basil, parsley, or mint for a burst of taste. On the other hand, a Middle Eastern twist adds warmth. Spices like cumin or coriander can really change the game. Dressings also play a big role. You can use a tangy vinaigrette or a creamy yogurt dressing. Each option gives the dish a new taste profile. Experiment with what you like best. If you're looking for gluten-free options, consider quinoa or rice. Both work well in place of couscous. They provide a similar texture and are easy to cook. For vegan meals, swap out the cheese and broth. Use a plant-based broth and nuts or seeds instead of cheese. Nutritional yeast can give a cheesy flavor without dairy. These changes keep the dish tasty and suitable for all diets. To keep your leftover couscous fresh, use airtight containers. Glass containers work great, as they do not absorb smells. Plastic containers are also fine if they are good quality. Make sure to cool the couscous completely before sealing the container. This reduces moisture inside and keeps it from getting soggy. When refrigerating, store couscous within two hours of cooking. This helps prevent bacteria growth. Place it in the fridge right away. If you plan to eat it later, consider separating it from any dressing or veggies. This keeps the couscous from becoming mushy. Reheating couscous is easy. The best method is to use the microwave. Start by placing your couscous in a microwave-safe bowl. Add a few drops of water to keep it moist. Cover it with a damp paper towel and heat for 1-2 minutes. Stir halfway through for even heat. You can also reheat couscous on the stove. Add a splash of water to a pan over low heat. Stir often until warm. This method helps keep the couscous fluffy. Avoid high heat, as it may dry out the grains. When stored properly, couscous lasts about 3 to 5 days in the fridge. Check for any signs of spoilage before eating. If you see mold or a sour smell, it's best to throw it away. Fresh couscous should have a light, fluffy texture. If it feels hard or clumpy, it may have gone bad. Always trust your senses when deciding whether to eat leftovers. You can tell when couscous is done by its texture. Perfectly cooked couscous is light and fluffy. It should not be sticky or mushy. After letting it sit, fluff it with a fork. This helps break up clumps and adds air. Yes, you can meal prep couscous. Cook it in advance and store it in the fridge. It keeps well for three to five days. Just make sure to let it cool before storing. You can add your veggies and dressing just before eating. This keeps the flavors fresh. Couscous pairs well with many dishes. You can serve it with grilled chicken or fish. A fresh salad is a great side too. Roasted vegetables add nice flavor. You can also enjoy it with hummus or tzatziki for a dip. Check out the " Speedy Mediterranean Couscous Delight" for the detailed recipe and enjoy this quick meal! This blog post guides you to make a tasty Mediterranean couscous dish. We covered the key ingredients, step-by-step cooking instructions, and helpful tips to enhance flavor. Remember, you can mix in different veggies or proteins to make it your own. Storing and reheating couscous is easy, too, so enjoy your leftovers! This simple recipe is perfect for meal prep or a quick dinner. You’re now set to impress your family and friends with this delightful dish. Dive in, create, and enjoy every bite!](https://fastmealmate.com/wp-content/uploads/2025/06/3a323c96-3f14-4a25-b011-50d8f6184ffe-768x768.webp)