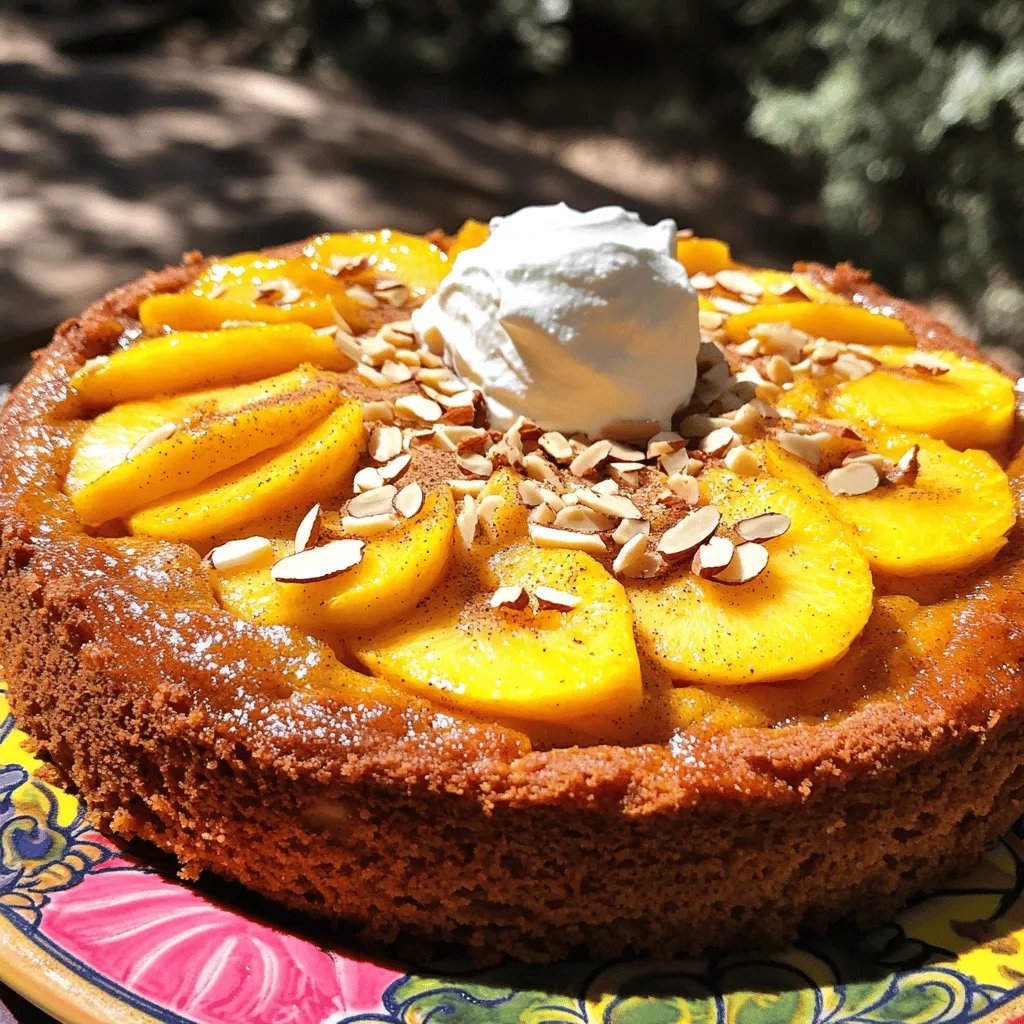
Savory Summer Peach Cake Easy and Tasty Recipe
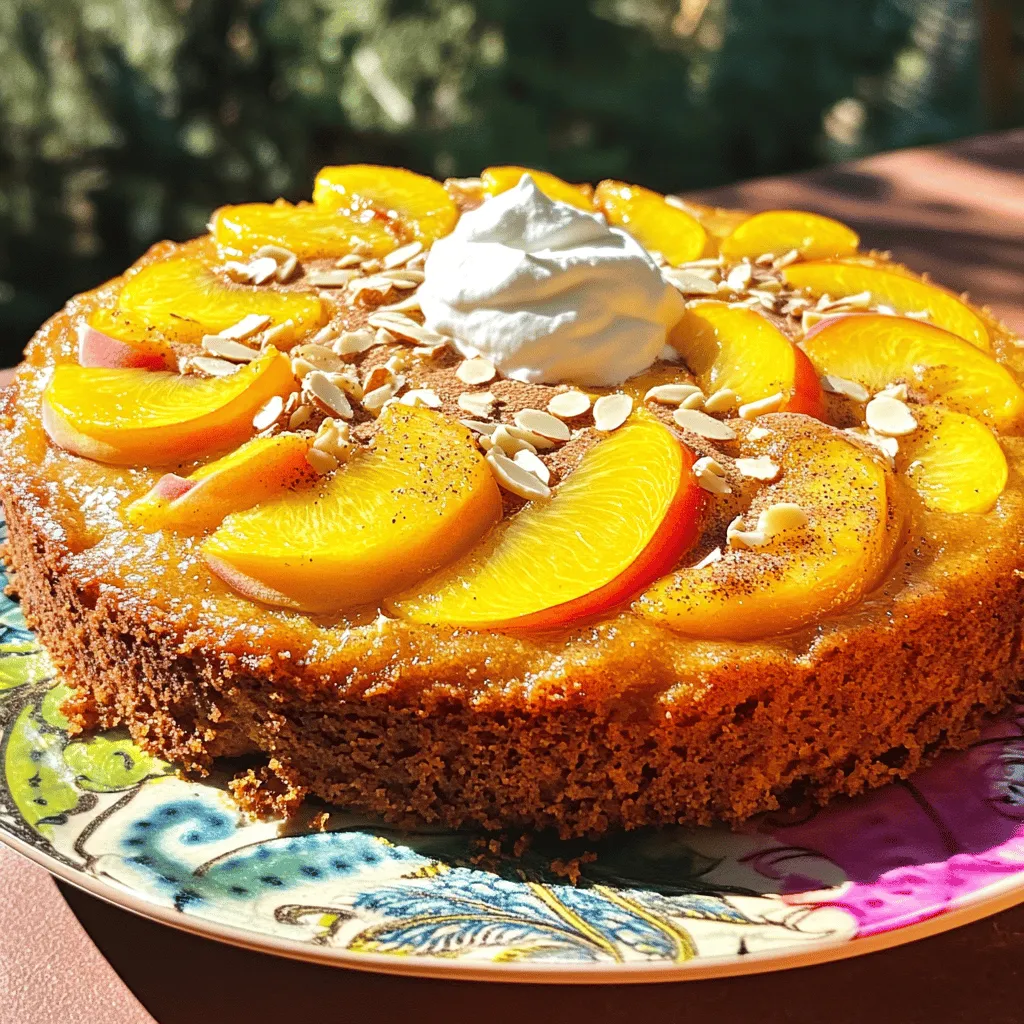
Are you ready to savor summer with a delightful peach cake? This easy and tasty recipe will make your taste buds dance. With fresh peaches, simple steps, and helpful tips, you’ll create a treat everyone will love. Whether you want to bake for a gathering or just for fun, this cake is perfect. Let’s dive into the sweet world of summer peach cake and uncover all the secrets to make it delicious!
Ingredients
Essential Ingredients for Summer Peach Cake
To make a delightful summer peach cake, you need simple and fresh ingredients. Here is the list:
– 2 cups all-purpose flour
– 1 ½ teaspoons baking powder
– ½ teaspoon baking soda
– ½ teaspoon salt
– ¾ cup unsalted butter, softened
– 1 cup granulated sugar
– ½ cup brown sugar, packed
– 3 large eggs at room temperature
– 1 teaspoon pure vanilla extract
– 1 cup buttermilk, at room temperature
– 2 cups fresh peaches, peeled and sliced
– 1 teaspoon ground cinnamon (for sprinkling)
– ¼ cup sliced almonds (for topping)
These ingredients blend well to create a moist and tasty cake. The peaches add a sweet touch, while the almonds give a nice crunch.
Optional Add-ins and Variations
You can add your favorite flavors to this cake. Here are some ideas:
– Nuts: Try walnuts or pecans for added texture.
– Spices: Add a pinch of nutmeg for warmth.
– Zest: Lemon or orange zest brightens the flavor.
– Fruits: Mix in blueberries or raspberries for a fruity twist.
Feel free to get creative! Each variation gives the cake a new charm.
Tips for Selecting the Best Peaches
Choosing ripe peaches is key to a great cake. Here are tips to find the best ones:
– Look: Choose peaches that are firm yet slightly soft when pressed.
– Smell: Ripe peaches have a sweet, fragrant aroma.
– Color: Look for a vibrant yellow or golden hue. Avoid greenish ones.
Fresh peaches make all the difference in flavor. Always select the best for your summer peach cake!
Step-by-Step Instructions
Preparation Steps Overview
Let’s make your summer peach cake shine! First, gather your ingredients. You will need flour, baking powder, baking soda, salt, butter, sugars, eggs, vanilla, buttermilk, fresh peaches, cinnamon, and almonds. Here’s how to start:
1. Preheat your oven to 350°F (175°C).
2. Prepare the cake pan by greasing it with butter and dusting it with flour. This keeps your cake from sticking.
3. Mix the dry ingredients in a medium bowl. Whisk together the flour, baking powder, baking soda, and salt. Set this mix aside.
Detailed Baking Process
Next, let’s create the cake batter.
1. Cream the butter and sugars in a large bowl. Use a hand mixer on medium speed for 3-4 minutes. The mix should look light and fluffy.
2. Add the eggs one by one. Mix well after each egg. This makes your cake airy.
3. Stir in the vanilla extract until just combined.
4. Combine wet and dry ingredients. Slowly fold the dry mix into the wet mix. Alternate with buttermilk. Start and end with the flour mix. Stop when there are no flour streaks.
5. Fold in the peaches gently. Be careful not to mash them.
6. Pour the batter into your prepared pan. Use a spatula to smooth the top.
7. Add cinnamon and almonds on top for extra flavor and crunch.
Baking Tips for Perfect Results
To bake your cake perfectly:
– Check the baking time. Bake for 35 to 40 minutes. A toothpick should come out clean.
– Cool the cake properly. Let it rest in the pan for 10 minutes. Then move it to a wire rack.
– Keep an eye on it during the last few minutes. Ovens can vary, so watch for that golden brown color.
By following these steps, you will have a delightful summer peach cake that is easy and tasty.
Tips & Tricks
Common Mistakes to Avoid
When making Summer Peach Cake, avoid common pitfalls. First, don’t skip the room temperature ingredients. Cold butter or eggs can lead to a dense cake. Also, watch your mixing time. Overmixing the batter can cause the cake to be tough. Make sure to fold in the peaches gently. If you break them too much, the cake won’t have nice peach chunks.
Storage Tips to Keep Cake Fresh
To keep your cake fresh, store it at room temperature. Use an airtight container to prevent drying out. If it’s hot outside, consider refrigerating it. Just remember to bring it back to room temperature before serving. You can also freeze the cake. Wrap it tightly in plastic wrap and then place it in a freezer bag. This will keep it fresh for up to three months.
How to Achieve a Fluffy Texture
For a fluffy cake, cream the butter and sugars well. This step adds air and creates a lighter texture. Use a hand mixer or stand mixer for best results. Make sure to alternate adding dry and wet ingredients. This helps to keep the batter light. Lastly, avoid overmixing once you add the flour. Stir until just combined for that perfect fluffy cake.
Variations
Gluten-Free Peach Cake Option
You can make a gluten-free peach cake with a few simple swaps. Use a gluten-free flour blend instead of all-purpose flour. Look for a blend that has xanthan gum. This helps the cake hold together well. Follow the same steps in the recipe for the best results. Your cake will still be soft and yummy.
Adding Other Fruits for Flavor
Feel free to mix in other fruits with your peaches. Berries like blueberries or raspberries work great. You can also add diced apples or pears for a twist. Just remember to keep the fruit pieces small. This way, they bake evenly into the cake. The extra flavors will give your cake a fun twist.
Changing the Frosting or Topping
You can change up the frosting to suit your taste. Cream cheese frosting adds a nice tang. You can also use whipped cream for a lighter touch. If you want something crunchy, try a crumb topping with oats and brown sugar. This adds texture and extra flavor to your cake. Get creative and make it your own!
Serving Suggestions
Best Pairings with Summer Peach Cake
This Summer Peach Cake shines when paired with simple sides. Fresh fruit salads work well. Try a mix of berries or citrus to balance the sweet cake. A scoop of vanilla ice cream enhances the peach flavor. You can also serve it with yogurt for a tangy twist.
Ideal Beverage Pairings
When it comes to drinks, iced tea is a great choice. The coolness complements the warmth of the cake. Lemonade adds a refreshing zing. For a special touch, serve it with sparkling water and a slice of lemon. If you prefer wine, a light rosé pairs nicely with the cake’s fruity notes.
Creative Presentation Ideas
Presentation can make your cake even more inviting. Place slices on colorful plates to catch the eye. Top each slice with a dollop of whipped cream. Add a few peach slices for a fresh look. You can also sprinkle some sliced almonds on top for crunch. Arrange the slices on a wooden board for a rustic vibe.Enjoy your summer treat!
FAQs
How to Make Peach Cake Without Buttermilk?
To make peach cake without buttermilk, use milk instead. Add one tablespoon of lemon juice or vinegar to the milk. Let it sit for five minutes. This will create a buttermilk substitute. You can then use it in the recipe just like buttermilk.
Can I Use Canned Peaches Instead of Fresh?
Yes, you can use canned peaches. Drain the peaches well to avoid excess moisture. Slice them into smaller pieces if needed. Keep in mind that fresh peaches give a better flavor and texture. If you choose canned, look for those packed in juice, not syrup.
What is the Best Way to Store Leftover Cake?
Store leftover cake in an airtight container. Place it at room temperature for two days. If you need to keep it longer, refrigerate it. Make sure to cover it well to prevent it from drying out. You can also freeze the cake. Wrap it tightly in plastic wrap and foil. It will stay fresh for up to three months. Enjoy your Summer Peach Cake later!
In this blog, we explored how to make a delicious summer peach cake. I shared the key ingredients needed, including tips for selecting the best peaches. You learned step-by-step instructions to ensure your cake bakes perfectly every time. I highlighted common mistakes and storage tips to keep your cake fresh.
Remember, variations can enhance flavors and cater to different diets. Serve your cake with great drinks and creative presentations. With these tips, you’re ready to bake a delightful peach cake that everyone will love. Enjoy your baking journey!


![To make a tasty Blueberry Peach Crostata, you’ll need a few simple ingredients. Here’s what to gather: - 1 cup fresh blueberries - 2 ripe peaches, diced (about 2 cups) - 1/4 cup granulated sugar - 1 tablespoon freshly squeezed lemon juice - 1 tablespoon cornstarch - 1 teaspoon pure vanilla extract - 1 pre-made pie crust (or homemade for an artisanal touch) - 1 egg, beaten (for gloss and color) - 1 tablespoon unsalted butter, cut into small pieces - A pinch of fine sea salt - Optional: powdered sugar for a final dusting Each ingredient plays a key role in the taste and texture of the crostata. The fresh blueberries and peaches bring sweetness and juiciness. The sugar enhances their natural flavors, while lemon juice adds a bright zing. Cornstarch helps thicken the filling, keeping it from getting too runny. Using vanilla extract adds depth to the fruit, and a pinch of sea salt balances the sweetness. For the crust, you can choose a pre-made option for ease or whip up your own for that homemade touch. The beaten egg gives the edges a lovely golden color, while unsalted butter adds richness. Don’t forget the powdered sugar for a sweet finish on top! Ready to gather these ingredients? You can find the full details in the [Full Recipe]. 1. Preheat the Oven: Start by heating your oven to 375°F (190°C). This step ensures the crostata cooks evenly. 2. Prepare the Baking Sheet: Line a baking sheet with parchment paper. This helps with easy cleanup later. 3. Prepare the Fruit Filling: In a bowl, mix fresh blueberries and diced peaches. Add granulated sugar, lemon juice, cornstarch, vanilla extract, and a pinch of sea salt. Toss gently. Let this mixture rest for about 10 minutes. This helps the flavors blend. 4. Roll Out the Pie Crust: Roll out your pie crust on a floured surface. Aim for a circle about 12 inches wide. If you use a store-bought crust, make sure it is cold for easy handling. 1. Shape the Crostata: Place the rolled crust on your baking sheet. Spoon the fruit mixture into the center, leaving a 2-inch border. 2. Fold the Edges: Carefully fold the crust edges over the filling. Create pleats to give it a rustic look. Make sure some fruit shows at the center. 3. Apply the Egg Wash: Use a pastry brush to coat the crust edges with the beaten egg. This gives it a nice golden color when baked. 4. Dot with Butter: Scatter small pieces of butter over the fruit filling. This adds extra richness during baking. 1. Bake: Place your crostata in the preheated oven. Bake for 30-35 minutes. Look for a golden-brown crust and bubbling filling. 2. Cool Before Serving: Once baked, let the crostata cool on the sheet for 10 minutes. This makes it easier to slice. Dust with powdered sugar if you like, then serve warm or at room temperature. You can find the Full Recipe for more detailed steps and tips. Enjoy your delicious Blueberry Peach Crostata! To create the best crust, start with cold ingredients. This helps the crust stay flaky. Use your fingers to mix the butter into the flour until it looks like coarse crumbs. Do not overwork the dough; handle it gently. Balancing sweetness and acidity is key. Blueberries are sweet, while peaches add a nice tang. Use lemon juice to brighten the flavors. Taste your filling before baking. If it seems too sweet, add a tiny bit of salt. This will balance the flavors better. For a beautiful display, serve slices on a rustic wooden board. Garnish with fresh mint leaves for color. You can also dust the top with powdered sugar for a nice finish. Pair your crostata with a scoop of vanilla ice cream or a dollop of whipped cream. The cold creaminess goes perfectly with the warm fruit filling. You can also try it with a drizzle of honey for an extra touch. If your crust is too soggy, it may need more time in the oven. Check the bottom of the crust to see if it is golden brown. You can also try baking it a few minutes longer. To avoid over-baking, keep an eye on the crostata as it cooks. The crust should be golden and the filling should bubble. If you notice it browning too quickly, cover it lightly with foil. This will help protect it while it finishes baking. For the full recipe, visit the link. {{image_4}} You can switch up the fruits in your crostata. For a fun twist, try using apricots or cherries. Both fruits bring a unique taste. They also pair well with blueberries and peaches. If you need a gluten-free option, use almond flour or a gluten-free pie crust. This keeps your dessert delicious and safe for gluten-sensitive friends. Want to add some extra flavor? Sprinkle in some cinnamon or nutmeg. These spices add warmth and depth to the filling. You can also try fresh herbs like basil or mint. They give a fresh twist that brightens the fruit flavors. When it comes to serving, think outside the box. A drizzle of homemade caramel sauce or a scoop of creamy vanilla ice cream works wonders. For special occasions, serve slices on a beautiful platter. Add fresh mint leaves for color and aroma. Your guests will love the visual and tasty touch! For the complete recipe, check out the Full Recipe section. To keep your blueberry peach crostata fresh, store it in the fridge. First, let it cool completely. Then, cover it with plastic wrap or place it in an airtight container. This helps keep the crust crispy and the filling juicy. You can enjoy it for up to three days. If you want to save it for longer, freezing is a great option. Wrap the crostata tightly in plastic wrap, then in aluminum foil. This method helps prevent freezer burn. You can freeze it for up to three months. When you're ready to eat it, just thaw it in the fridge overnight. To reheat the crostata, the oven is your best friend. Preheat it to 350°F (175°C). Place the crostata on a baking sheet and warm it for about 10-15 minutes. This method keeps the crust nice and flaky. If you want to refresh the flavors, brush a little melted butter on top before reheating. This adds richness and helps the fruit flavors shine. Enjoy your crostata warm for the best taste! Can I make the crostata ahead of time? Yes, you can make the crostata ahead. Prepare the filling and crust separately. Store them in the fridge for a day. When ready, assemble and bake. This keeps the crust fresh. How do I know when the crostata is done baking? Look for a golden brown crust and bubbling filling. A toothpick should slide easily through the crust. If it’s too soft, bake a few more minutes. What’s the difference between a crostata and a galette? A crostata is a rustic pie, often filled with fruit. A galette is similar but usually has a more free-form shape. Both have a flaky crust. They are delicious and easy to make. Can I use frozen fruit in the recipe? Yes, frozen fruit works well. Just thaw and drain excess liquid. This keeps the filling from being too watery. How do I keep the crust from getting soggy? To prevent a soggy crust, sprinkle cornstarch on the bottom before adding fruit. This absorbs extra juices. Bake until the crust is golden for best results. Making the crostata vegan To make a vegan crostata, replace the egg wash with a plant-based milk. Use a vegan pie crust. The filling stays the same, ensuring a tasty dessert. Tips for reducing sugar in the recipe You can cut the sugar by half. Use ripe fruits for natural sweetness. Add a touch of honey or maple syrup if needed. This keeps the flavor balanced and fresh. For the Full Recipe, check the main section. In this post, we covered how to make a delicious fruit crostata with fresh ingredients. You learned about the necessary ingredients, step-by-step instructions, and useful tips for perfecting your dessert. We also explored variations and storage options to extend its life. Now, you’re equipped to create your own stunning crostata. Experiment with flavors and enjoy the praise from family and friends! Your new dessert will impress at any gathering.](https://fastmealmate.com/wp-content/uploads/2025/06/584381ba-fe5e-4dcd-ab97-e37815fc2576-768x768.webp)
![- Salmon fillets - Sweet chili sauce - Jasmine rice - Mixed vegetables - Soy sauce - Sesame oil - Avocado - Green onions - Sesame seeds - Fresh cilantro (optional) - Baking sheet - Mixing bowl - Medium pot - Non-stick skillet In this Sweet Chili Salmon Bowl, you need fresh salmon fillets as the star. The sweet chili sauce adds a rich flavor that pairs well with the fish. Jasmine rice provides a soft base. Mixed vegetables add color and crunch to the bowl. For added flavor, include soy sauce and sesame oil. Sliced avocado gives a creamy touch. Green onions and sesame seeds serve as tasty garnishes. If you want, sprinkle fresh cilantro for a pop of freshness. To prepare this dish, you will need a few kitchen tools. Use a baking sheet to cook the salmon. A mixing bowl helps combine the marinade. Cook the rice in a medium pot. Lastly, a non-stick skillet is perfect for sautéing the vegetables. You can find the [Full Recipe] to follow these steps easily! With these ingredients and tools, you are set for a delicious meal. - Combine sweet chili sauce, soy sauce, and sesame oil in a bowl. - Place salmon fillets in the bowl and marinate for 15 minutes. Marinating the salmon gives it a rich flavor. The sweet chili sauce adds a nice sweetness. The soy sauce brings some saltiness, while sesame oil adds a nutty taste. This step is key for a tasty salmon bowl. - Bring vegetable broth or water to a boil in a pot. - Add jasmine rice and let it simmer until fluffy. Using vegetable broth adds extra flavor to the rice. Jasmine rice is fragrant and pairs well with the salmon. Once cooked, it should be light and fluffy. - Sauté mixed vegetables in a non-stick skillet. - Cook until they are tender yet crisp. I like to use bell peppers, snap peas, and carrots. These veggies add color and crunch. Sautéing keeps them bright and fresh, which balances the dish. - Preheat the oven to 400°F (200°C). - Bake marinated salmon for 12-15 minutes. Baking the salmon helps it stay moist. It should flake easily with a fork when done. This cooking method keeps the flavors intact. - Fluff the cooked rice and distribute it into bowls. - Top with vegetables, salmon, and avocado slices. Assembling the bowl is fun and creative. You can layer the ingredients however you prefer. The avocado adds creaminess, making every bite delicious. - Sprinkle green onions and sesame seeds on top. - Drizzle remaining marinade if desired. Adding garnishes makes the dish look pretty. Green onions bring a mild onion flavor, while sesame seeds add crunch. The extra marinade enhances the taste, so don’t skip this step! For the complete recipe, check out the Full Recipe. To get the best salmon, focus on the cooking temperature. Aim for 400°F (200°C) when baking. This heat cooks the fish evenly. It keeps the salmon moist and tender. Use a thermometer to check the internal temperature. It should reach 145°F (63°C) for safe eating. Next, look for flakiness to know when it is done. Gently press the salmon with a fork. If it flakes easily, it is ready. Don't overcook it, as this can make the salmon dry. To boost the taste, try different sauces. You can use teriyaki or garlic sauce instead of sweet chili. Each sauce adds a new twist to the dish. Also, add spices to the vegetables before sautéing. A pinch of garlic powder or ginger can elevate the flavor. This simple step makes your veggies pop. Pair your bowl with side salads or crispy wontons for crunch. This adds a nice texture balance. You can also serve it with extra avocado for creaminess. The creamy avocado complements the salmon well. It makes each bite even better. Feel free to explore the [Full Recipe] for more tips and ideas! {{image_4}} You can swap the salmon for chicken or tofu. Chicken works well with the sweet chili sauce. Marinate it just like you do the salmon. Tofu absorbs flavors nicely, making it a great option, too. You can also try different fish like trout or tilapia. Each fish will give your bowl a unique taste. Seasonal vegetables can really change your bowl. Think fresh corn in summer or pumpkin in fall. You can also add leafy greens like spinach or kale. Broccoli offers a nice crunch and pairs well with the sauce. Mix and match to keep it exciting! Want more kick? Try a spicy chili sauce instead of sweet chili sauce. This will give your bowl a bold flavor. You can also add citrus zest, like lime or lemon, for a fresh twist. These small changes can make a big difference in taste. For the full recipe, check out the details above! After you enjoy your Sweet Chili Salmon Bowl, store any leftovers in airtight containers. This keeps the food fresh and tasty. Place the containers in the fridge. Your meal will stay good for 2-3 days. Make sure to cool the food first before sealing it up. If you want to save your meal for longer, freezing is a great option. Freeze the cooked salmon separately to keep its quality. Salmon can lose its texture if frozen with rice and veggies. Store your rice and mixed vegetables in separate containers. This way, they stay fresh and tasty when you thaw them. When you're ready to eat, reheating is easy. You can use the microwave or stovetop for quick reheating. Just be careful not to overcook the salmon. Overcooking can make it dry and tough. Heat it gently to keep the flavor and texture intact. Enjoy your delicious meal again! Yes, you can prepare the ingredients in advance. Store each item separately in the fridge. This way, you save time when you are ready to cook. Just mix and heat everything when you want to eat. If you want a change, you can substitute jasmine rice with brown rice or quinoa. Both options are healthy and add a nice flavor. Quinoa is a great choice if you want extra protein. Absolutely! You can make this bowl spicy by adding fresh chili peppers or a dash of hot sauce. Adjust the heat to your liking. This adds a fun kick to the dish. To make the Sweet Chili Salmon Bowl healthier, reduce the amount of sauce you use. You can also add more veggies, like leafy greens or broccoli. This boosts nutrition and flavor. Yes, this bowl can be enjoyed cold too! It makes a refreshing salad dish. Just let it cool before serving. Enjoy it as a light meal on a warm day. For the full recipe, check out the detailed steps above. This guide showed how to make a tasty salmon bowl using sweet chili sauce and veggies. You learned about the key ingredients, tools, and steps. Remember, marinating the salmon and choosing the right veggies can boost flavor. Feel free to experiment with proteins and spices. Finally, you can store leftovers for quick meals later. Enjoy making this dish your own!](https://fastmealmate.com/wp-content/uploads/2025/07/c95c4cfe-a415-4c4e-8f12-f828502a92fe-768x768.webp)