
Baked Zucchini Casserole Deliciously Simple Dish
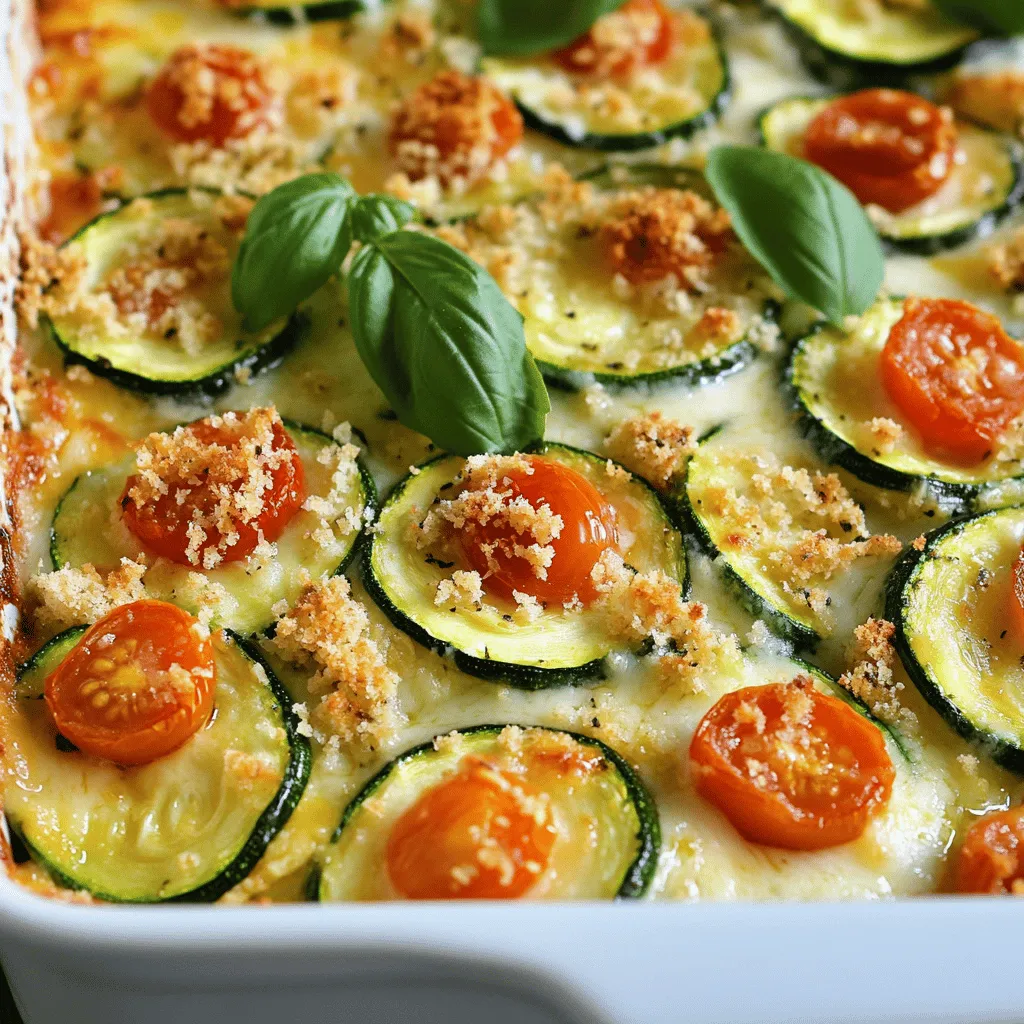
If you’re looking for a tasty and easy dinner, you’re in the right spot! This Baked Zucchini Casserole is a simple yet delicious dish that highlights fresh ingredients. With layers of cheese, vegetables, and crispy breadcrumbs, it’s sure to please everyone at your table. Let’s dive into how to make this crowd-pleaser that’s perfect for any night of the week!
Ingredients
Main Ingredients
– 4 medium zucchinis, sliced
– 1 cup cherry tomatoes, halved
– 1 large onion, finely chopped
– 3 cloves garlic, minced
Dairy and Topping Ingredients
– 1 cup shredded mozzarella cheese
– 1 cup grated Parmesan cheese
– 1/2 cup breadcrumbs
Seasonings and Oil
– 2 tablespoons olive oil
– 1 teaspoon dried oregano
– 1 teaspoon dried basil
– Salt and freshly ground black pepper to taste
– Fresh basil leaves, torn, for garnish
This recipe for baked zucchini casserole is simple and full of flavor. You can easily find all these ingredients at your local store. Fresh zucchinis are key for a great taste. They bring out the best in this dish. Cherry tomatoes add a sweet burst that pairs well with the zucchini.
Onions and garlic provide a nice base for the casserole. Their flavors deepen when you sauté them in olive oil. The cheeses create a rich and creamy texture. I love using mozzarella and Parmesan together. They melt beautifully and give a wonderful finish to the dish.
The breadcrumbs on top add a satisfying crunch. They create a nice contrast to the softness of the baked veggies. The dried herbs, oregano and basil, elevate the flavors. They bring the taste of summer right to your table.
For a bright touch, I like to garnish with fresh basil leaves. They add color and a fresh aroma. You can easily adjust the seasoning to your taste. Salt and pepper help to enhance all the flavors in the casserole.It’s a great way to enjoy a healthy meal that everyone will love.
Step-by-Step Instructions
Preparing the Oven and Ingredients
– Preheat your oven to 375°F (190°C).
– Heat olive oil in a skillet over medium heat.
Sautéing the Vegetables
– Sauté onions until translucent (3-4 minutes).
– Add minced garlic and sauté for 30 seconds.
– Introduce zucchinis and cherry tomatoes; season and cook for 5-7 minutes.
I love how the kitchen fills with scents when I sauté. The sweet smell of onions and garlic mixes perfectly. Once the onions turn a nice clear color, it’s time to add the garlic. This step takes only a moment but makes a huge difference. You will notice the aroma change as the garlic cooks. Add the zucchinis and cherry tomatoes next. Sprinkle in some salt and pepper, along with dried oregano and basil. This combo brings out the best flavors in the veggies! Cook for about 5-7 minutes. You want the zucchini to be tender yet still a little crisp.
Assembling the Casserole
– Combine sautéed mixture with half the cheese in a bowl.
– Transfer to a greased baking dish and spread evenly.
– Mix remaining breadcrumbs and cheese and sprinkle on top.
Now comes the fun part—assembly! Take your sautéed veggies and mix them with half the cheese in a bowl. This helps the cheese melt into the mixture. Next, pour everything into a greased baking dish. Make sure to spread it out evenly. In a small bowl, mix the rest of the breadcrumbs and cheese. This will top the casserole and give it a nice crispy finish. Sprinkle this mix generously over the veggie layer.
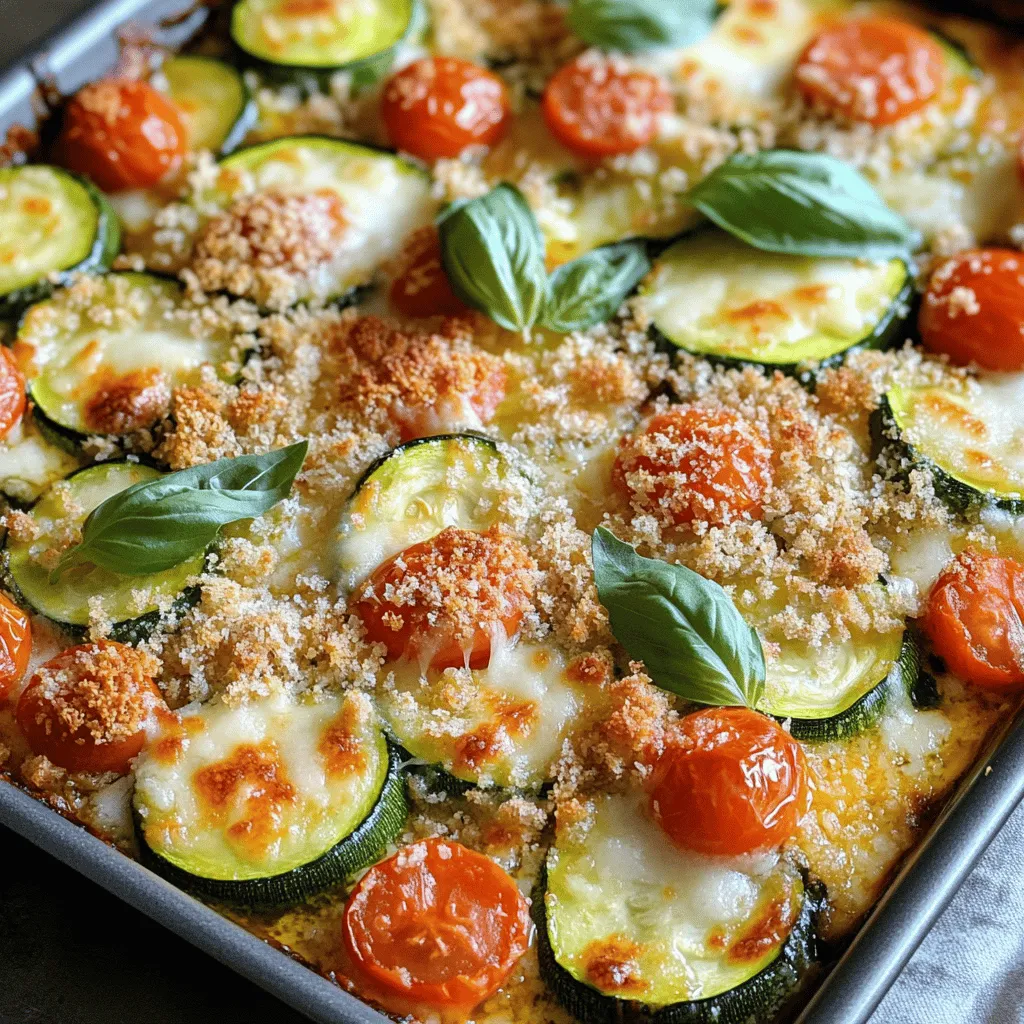
Baking the Casserole
– Bake in the preheated oven for 25-30 minutes.
– Remove from oven, let cool briefly before serving.
Your oven should be hot and ready now. Place the dish inside and bake for 25-30 minutes. You want the cheese on top to melt and turn golden brown. It’s hard to wait, but let it cool for a few minutes before you dive in. This helps the flavors settle, and it makes serving easier.Enjoy your tasty baked zucchini casserole!
Tips & Tricks
Perfecting the Texture
To prevent your casserole from being watery, make sure to remove excess moisture from the zucchini. Slice the zucchinis and sprinkle them with salt. Let them sit for 10-15 minutes, then pat them dry with a paper towel. This step helps keep the casserole nice and firm.
For flavor, cheese is key. I suggest using a mix of mozzarella and Parmesan. This combo gives a rich taste and helps achieve a gooey texture. You can also add feta for a tangy twist.
Presentation Suggestions
Garnish your casserole with fresh basil leaves. They add a pop of color and a burst of flavor. You can also sprinkle some extra Parmesan on top just before serving. This gives an appealing look and a cheesy finish.
When serving, pair the casserole with a crisp green salad. A light vinaigrette dressing complements the dish well. This balance makes it a complete meal and adds freshness.
Cooking Equipment
For even cooking, use a 9×13 inch baking dish. It allows heat to circulate well and ensures your casserole cooks evenly. If you have a glass dish, that works great too.
Use a sturdy spatula for mixing and a good knife for chopping. A large skillet for sautéing helps blend the flavors perfectly. These tools make the cooking process smoother and more enjoyable.
Variations
Dietary Modifications
You can make this dish gluten-free by using alternative breadcrumbs. Look for gluten-free options at your local store. For those who want a vegetarian or vegan dish, try using plant-based cheese. Many brands offer tasty vegan cheese that melts well. This way, everyone can enjoy the casserole without worry.
Flavor Additions
Add more color and taste by mixing in other vegetables. Bell peppers, mushrooms, or spinach all work great. They add nutrients and make the dish more exciting. If you want a kick, adjust the spices. You can add a pinch of red pepper flakes for extra heat. This will make your casserole stand out.
Serving Size Adjustments
If you plan to host a large gathering, scaling the recipe is simple. Just double the ingredients and use a bigger baking dish. This way, you’ll have enough for everyone. For meal prep, portioning is key. Use small containers to store single servings. This makes it easy to grab a healthy meal on busy days.
Storage Info
Storing Leftovers
To keep your baked zucchini casserole fresh, place it in an airtight container. This method helps prevent moisture loss. Make sure it cools completely before sealing. In the fridge, it stays good for about 3-4 days. If you notice any off smells or unusual textures, discard it.
Freezing the Casserole
Freezing is a great option for longer storage. First, let the casserole cool completely. Cut it into portions for easy thawing later. Wrap each piece tightly in plastic wrap, then place them in a freezer bag. This method helps prevent freezer burn. To thaw, move the casserole to the fridge the night before. Reheat it in the oven at 350°F (175°C) for about 20-25 minutes. This keeps the texture nice and creamy.
Quality Tips
Look for signs of spoilage. If you see mold or notice a bad smell, throw it away. To keep the flavor strong, reheat the casserole gently. Avoid high heat, as it can dry it out. Adding a little olive oil before reheating can help restore moisture. Enjoy your delicious dish anytime with these storage tips!
FAQs
Can I use other vegetables in the casserole?
Yes, you can mix in other veggies. Bell peppers, carrots, or spinach work great. Each adds a different taste and texture. You can also try mushrooms for added umami flavor. Just chop them small to cook evenly. Feel free to get creative with what you have on hand!
How do I make the casserole ahead of time?
To prepare this dish ahead, follow these steps:
– Cook the veggies as stated in the recipe.
– Combine them with the cheese.
– Place the mix in a greased baking dish.
– Cover it with foil and store it in the fridge.
When ready to bake, just remove the foil and cook as directed.
What are some side dishes to serve with baked zucchini casserole?
For a balanced meal, serve this casserole with:
– A crisp green salad with vinaigrette.
– Steamed broccoli or green beans for added nutrition.
– Garlic bread for a bit of comfort.
These options complement the casserole’s flavors well and make your meal hearty.
Is this casserole suitable for meal prep?
Yes, this casserole is perfect for meal prep. You can make a big batch and store portions. Here are some tips:
– Cool the casserole completely before storing.
– Use airtight containers to keep it fresh.
– It can last up to four days in the fridge. You can reheat it in the oven or microwave.
Can I skip the breadcrumbs?
Absolutely! If you want a lighter dish, skip the breadcrumbs. You can top it with extra cheese for a cheesy crust. Another idea is to use crushed nuts for a crunchy texture. This keeps the dish gluten-free and adds healthy fats.
This blog post guides you through making a delicious baked zucchini casserole. You learned about the key ingredients, step-by-step instructions, and helpful tips. The recipe is flexible, letting you make changes for personal taste. You can store leftovers or even freeze the casserole for future meals.
Baking should be fun and easy! Enjoy experimenting with flavors and ingredients to make this dish your own. You’ll impress your family and friends with your tasty creation.

![To make a Zesty Italian Pasta Salad, you need fresh and colorful ingredients. Here’s the complete list of ingredients you will need: - 2 cups rotini pasta - 1 cup cherry tomatoes, halved - 1 cup cucumber, diced - 1/2 cup black olives, sliced - 1/2 cup red bell pepper, chopped - 1/4 cup red onion, finely chopped - 1/2 cup mozzarella balls, halved - 1/3 cup Italian dressing - 1 tablespoon fresh basil, chopped - 1 teaspoon dried oregano - Salt and pepper to taste Each ingredient brings its own flavor and texture. The rotini pasta is fun and holds dressings well. Cherry tomatoes add sweetness, while cucumbers give a nice crunch. Black olives bring a salty bite, and bell peppers add color and freshness. Red onions add a bit of sharpness, while mozzarella balls provide creaminess. For the dressing, you can use store-bought or make your own. I love using fresh basil and oregano for a burst of flavor. Finally, season with salt and pepper to balance everything. You can find the full recipe [here]. Enjoy your cooking adventure! - Bring salted water to a boil. - Cook rotini pasta until al dente. - Drain and cool under cold water. Cooking the pasta is the first step. Use a large pot and fill it with water. Add a good amount of salt to the water. This step adds flavor to the pasta. Once the water boils, add the rotini pasta. Follow the package directions for cooking time until it is al dente. This means the pasta should be firm but cooked. After cooking, drain the pasta and rinse it under cold water. This stops the cooking process and cools the pasta quickly. - Combine cherry tomatoes, cucumber, olives, bell pepper, and onion. - Stir gently to mix. While the pasta cools, you can prepare the vegetables. Take a large bowl and add the halved cherry tomatoes, diced cucumber, sliced black olives, chopped red bell pepper, and finely chopped red onion. Each vegetable brings its own flavor and texture to the salad. Stir gently to mix them without squishing the tomatoes. This colorful mix will make your salad bright and fun! - Add cooled pasta to the vegetable mix. - Incorporate mozzarella balls. - Drizzle with dressing and seasonings. Once the pasta is cool, add it to the bowl with the mixed vegetables. Next, add halved mozzarella balls. These little cheese bites add creaminess. Now, drizzle the Italian dressing over the pasta and vegetables. Don't forget to sprinkle the fresh basil, dried oregano, salt, and pepper. These seasonings will enhance the flavors. - Toss ingredients to combine. - Refrigerate for at least 30 minutes. Now, it is time to mix everything. Toss all the ingredients together carefully. You want every part to be coated with dressing. Cover the bowl with a lid or plastic wrap. Place it in the fridge for at least 30 minutes. Chilling the salad helps the flavors blend well. Trust me, the wait is worth it! To get the best taste from your Zesty Italian Pasta Salad, choose a good Italian dressing. Brands like Annie's or Ken's work well. Don't use too much dressing at first; you can always add more later. Always taste as you go. A little salt and pepper can boost the flavor. Remember, it's easy to add, but hard to take away. Serving your pasta salad is just as fun as making it! You can use a large bowl for a family-style meal. This makes it easy for everyone to help themselves. For a more stylish look, you can serve it in small bowls. This way, each guest gets their own. A sprinkle of fresh basil on top adds a nice touch. It makes the dish look bright and tasty! One common mistake is overcooking the pasta. Make sure to cook it just until it's al dente. This keeps your pasta from getting mushy. Another mistake is not chilling the salad. Chilling helps the flavors blend well. If you skip this step, your salad may not taste as good. Aim to chill it for at least 30 minutes before serving. For the full recipe, check out the Zesty Italian Pasta Salad section. {{image_4}} You can easily adapt this salad to fit different diets. For a gluten-free option, use gluten-free rotini pasta. It cooks just like regular pasta. Many brands make great options now. For a vegan twist, swap the mozzarella cheese with vegan cheese or even avocado. Both add creaminess and flavor to your dish. Want to make this salad more filling? Add some protein! Grilled chicken works great. Just chop it into bite-sized pieces. Shrimp is another tasty choice. Cook it until pink and toss it in. For a plant-based option, chickpeas are perfect. They add a nice texture. When you add protein, taste your salad again. You may need to adjust the seasoning. Just add a pinch of salt or a dash of dressing. Using seasonal veggies can elevate your pasta salad. In summer, add fresh zucchini or bell peppers. They bring a nice crunch and color. In fall, roasted butternut squash can add sweet notes. You can also switch up the dressing. Try a balsamic vinaigrette for a tangy twist. This keeps your salad exciting and fresh year-round. To store your zesty Italian pasta salad, use airtight containers. Glass or plastic containers work well. Make sure the lid seals tightly to keep air out. This helps maintain freshness. For best results, store the salad in the fridge within two hours of serving. You can freeze pasta salad, but it might change texture. To freeze, place it in a freezer-safe container. Label the container with the date. When ready to eat, thaw it in the fridge overnight. Reheat gently on the stove or in the microwave. Be careful not to overcook it again. In the fridge, your pasta salad lasts about three to five days. Keep an eye out for signs of spoilage. If it has an off smell, or if the vegetables look mushy, it’s best to toss it. Trust your senses; they guide you well in the kitchen. You can make Zesty Italian Pasta Salad a day before serving. Cook the pasta, mix it with the veggies, and add the dressing. Store it in the fridge. Chilling helps the flavors blend well. Just give it a good toss before serving. This makes it a great option for parties. Yes, you can customize the ingredients to fit your taste. Try adding different vegetables like bell peppers or zucchini. You can also swap out mozzarella for feta or add beans for protein. Get creative! Make it your own. Italian Pasta Salad pairs well with grilled meats, like chicken or steak. It also goes nicely with crusty bread or a fresh green salad. For a fun twist, serve it with garlic bread for a complete meal. No, it's not safe to leave pasta salad out for long. The safe time is about two hours. After that, bacteria can grow, making it unsafe to eat. Keep it chilled if you are not serving it right away. Absolutely! Homemade Italian dressing adds a personal touch. You can control the flavors and ingredients. Mix olive oil, vinegar, herbs, and spices to create your blend. This makes the salad even more special. For the full recipe, check out the section above! This Zesty Italian Pasta Salad is a bright and tasty dish. It combines fresh veggies, pasta, and cheese. Each bite is full of flavor. Here’s a quick look at what you need and how to make it. - 2 cups rotini pasta - 1 cup cherry tomatoes, halved - 1 cup cucumber, diced - 1/2 cup black olives, sliced - 1/2 cup red bell pepper, chopped - 1/4 cup red onion, finely chopped - 1/2 cup mozzarella balls, halved - 1/3 cup Italian dressing (store-bought or homemade) - 1 tablespoon fresh basil, chopped - 1 teaspoon dried oregano - Salt and pepper to taste First, cook the rotini pasta in salted boiling water. Follow the package instructions for best results. Drain and cool the pasta under cold water. This stops the cooking and keeps it firm. While the pasta cools, chop the veggies. Use a large bowl for the cherry tomatoes, cucumber, black olives, red bell pepper, and red onion. Stir them gently to mix. Next, add the cooled pasta to the veggies. Toss in the mozzarella balls, making sure they spread evenly. Now, drizzle the Italian dressing over the mix. Add the chopped basil, dried oregano, and a sprinkle of salt and pepper. Toss everything together until well coated. Finally, cover the bowl and chill in the fridge for at least 30 minutes. This step helps all the flavors blend nicely. Serve the pasta salad in a large bowl. You can also use individual bowls for a fun touch. Garnish with extra basil leaves for color. Enjoy this tasty dish at picnics or family meals! This blog post detailed how to make a zesty Italian pasta salad. We reviewed all the ingredients, cooking steps, and tips for the best flavor. You learned how to store leftovers and variations to suit your diet. Remember to chill the salad and avoid overcooking the pasta. With these tips, you can impress friends and family with this easy dish. Enjoy creating your own version of this refreshing salad!](https://fastmealmate.com/wp-content/uploads/2025/06/c8b502a6-31c8-41d1-a3bc-a403a8dd39f3-768x768.webp)


![- 1 ½ cups graham cracker crumbs - ½ cup unsalted butter, melted - 2 tablespoons granulated sugar - 8 oz cream cheese, softened - ½ cup powdered sugar - ½ cup heavy whipping cream - Zest and juice of 1 lemon - 1 teaspoon pure vanilla extract - Assorted fresh berries (for topping) - Fresh mint leaves (for garnish) Gathering the right ingredients is key. The graham cracker crumbs form a sweet and crunchy crust. Unsalted butter adds richness, while granulated sugar gives a touch of sweetness. Cream cheese provides that classic cheesecake texture. Powdered sugar balances the filling's flavor. Next, I add heavy whipping cream for lightness. The zest and juice from the lemon bring bright flavor. Pure vanilla extract adds depth. For garnishing, I use fresh berries on top for color and mint leaves for a fresh touch. These ingredients come together to create a treat that is light, creamy, and bursting with flavor. You can find the detailed steps in the Full Recipe. - Combine 1 ½ cups of graham cracker crumbs, ½ cup melted unsalted butter, and 2 tablespoons granulated sugar in a bowl. - Press this mixture firmly into mini tart molds. Ensure it is even and tight. - Chill the crusts in the refrigerator for 10-15 minutes to help them set. - In a large bowl, beat 8 oz of softened cream cheese until it is smooth. - Mix in ½ cup powdered sugar, zest and juice of 1 lemon, and 1 teaspoon vanilla extract. Blend until there are no lumps. - In a separate bowl, whip ½ cup heavy cream with an electric mixer until stiff peaks form. - Gently fold the whipped cream into the cream cheese mixture using a spatula. Be careful not to deflate the whipped cream. - Take the chilled crusts out of the refrigerator. - Fill each crust with the lemon cheesecake filling, smoothing the tops evenly. - Place the filled tarts back in the refrigerator. Chill for at least 2 hours to let the filling set. - Gently remove the tarts from their pans. - Top each tart with fresh berries and a mint leaf for a lovely touch. For the full recipe, please refer to the earlier section. Enjoy making these delightful mini no-bake lemon cheesecake tarts! To make the crust strong, pack the mixture tightly. This helps keep the shape. You can also try different cookies. For example, use chocolate cookies or gingersnaps. Each cookie gives a unique flavor. For a smooth filling, use cream cheese at room temperature. Cold cream cheese can make lumps. You can adjust the lemon juice to find your perfect tartness. If you love tart, add more lemon. For a milder taste, use less juice. To fill the tarts neatly, use a piping bag. This gives a professional look. You can also sprinkle extra lemon zest on the plate. It adds color and makes your dessert pop. For a fun touch, place fresh mint leaves around the tarts. It looks great and adds freshness! You can find the Full Recipe for these delightful tarts to explore more tips. {{image_4}} You can change up the taste of these mini tarts easily. Swap lemon for lime for a zesty twist. The tartness from lime adds a fresh kick. If you want something rich, use chocolate or fruit purees for a unique filling. Chocolate brings sweet indulgence, while fruit purees add a fruity burst. Not everyone can eat the same way. You can make a gluten-free crust with gluten-free crumbs. This way, everyone can enjoy these tarts. For those avoiding dairy, substitute with vegan cream cheese and coconut cream. These options keep the creamy texture while being dairy-free. Garnishing can elevate your dessert. Top your tarts with seasonal fruits like strawberries or raspberries. The colors and flavors will pop! You can also use edible flowers for an elegant presentation. They add a touch of beauty and whimsy to your tarts. For the full recipe, check out the [Full Recipe]. You can store the mini no-bake lemon cheesecake tarts in the refrigerator. They will last for up to three days if covered. To keep them fresh, make sure to cover them well. It’s best to keep the tarts separate from any garnishes until you are ready to serve them. This way, they stay fresh and look great. If you want to save some for later, you can freeze the unfilled crusts. This is a great option if you plan to make them ahead of time. The filled tarts can also be frozen for up to a month. Just remember to thaw them before serving. This will help keep their creamy texture. To prevent the tarts from drying out, use airtight containers. This keeps them fresh and tasty. It’s also smart to label your containers with dates. This way, you can easily track how long they have been stored. Yes, you can prepare these tarts a day in advance and chill them. This makes them great for parties or busy days. Just keep them in the fridge until you are ready to serve. Lightly grease the tart pans before filling them. You can also use silicone molds. Both methods help the tarts pop out without breaking. You can use bottled lemon juice in a pinch. However, fresh lemons give the best flavor. The zest adds a bright taste that makes these tarts stand out. Yes, Greek yogurt or vegan cream cheese works well as substitutes. These options can change the flavor slightly, but they still taste great. This recipe yields 12 mini tarts. Perfect for sharing or enjoying over a few days! Pair your mini tarts with coffee or tea. This makes for a delightful dessert experience that everyone will love. For the full recipe, check out the details above! This blog post covers how to make delicious mini lemon cheesecake tarts. We discussed each ingredient, from the crust to the creamy filling, and shared tips for a perfect dessert. You can customize flavors and garnishes to suit your taste. Remember, storage is key for keeping them fresh. Enjoy making these tarts for any occasion. Your friends and family will love them!](https://fastmealmate.com/wp-content/uploads/2025/06/a8bd9651-0c39-4151-9790-24600a8eb0ea-768x768.webp)