
Best Zucchini Bread Recipe for Flavorful Delight
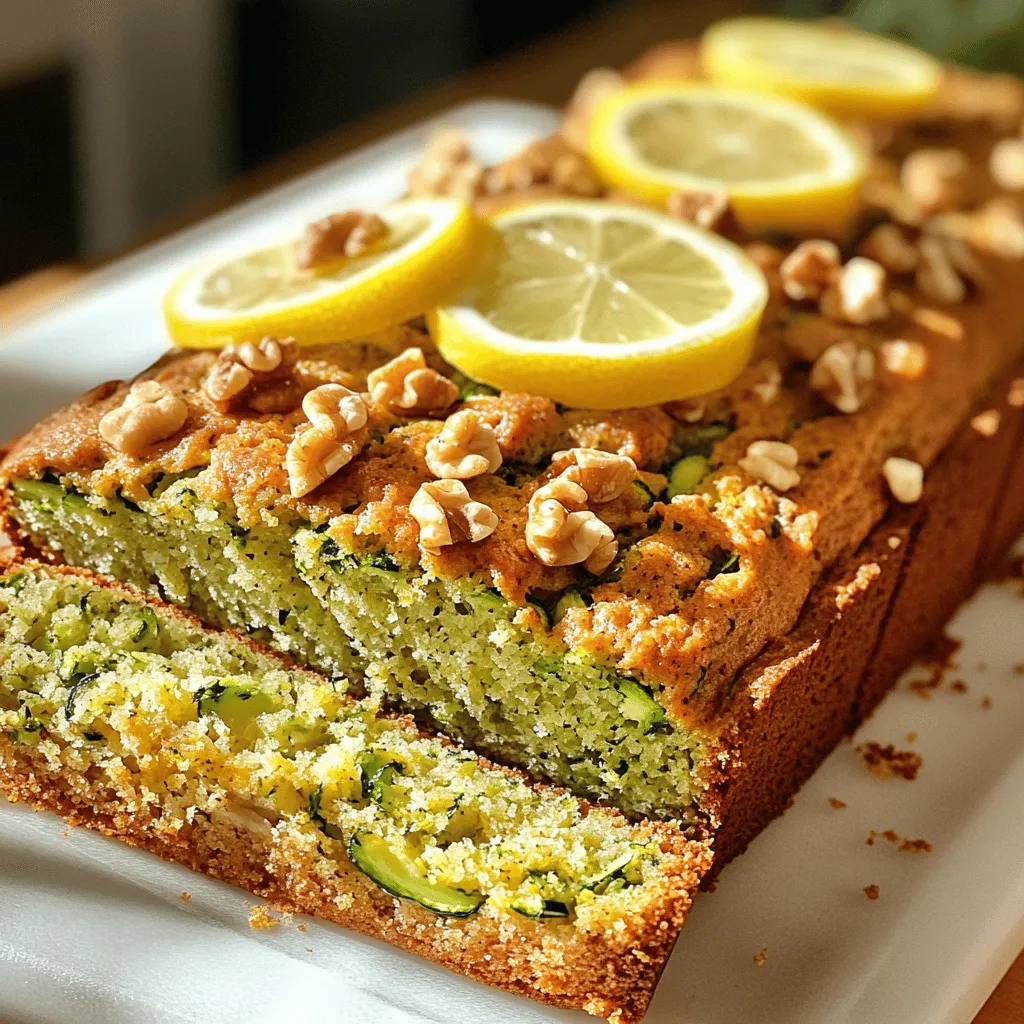
Are you ready to bake the best zucchini bread of your life? This recipe is your ticket to a moist, flavorful treat that everyone will love. I’ll guide you through simple steps, making it easy to whip up a loaf that’s perfect for breakfast or a snack. With fresh zucchini, warm spices, and fun add-ins, you’ll discover the joy of zucchini bread like never before. Let’s get started on this delicious journey!
Ingredients
To make the best zucchini bread, gather these simple and fresh ingredients:
– Grated Zucchini: Use about 2 cups, which is roughly 2 small zucchinis.
– Flours and Leavening Agents:
– 1 cup all-purpose flour
– 1 cup whole wheat flour
– 1 teaspoon baking soda
– 1 teaspoon baking powder
– 1/2 teaspoon salt
– Sugars and Flavorings:
– 1/2 cup granulated sugar
– 1/2 cup packed brown sugar
– 1 teaspoon ground cinnamon
– 1/2 teaspoon freshly grated nutmeg
– Zest of 1 lemon
– 1/4 cup freshly squeezed lemon juice
– Eggs and Oil:
– 3 large eggs
– 1/2 cup vegetable oil
– 1 teaspoon pure vanilla extract
– Optional Add-ins:
– 1/2 cup chopped walnuts (if you want a nice crunch)
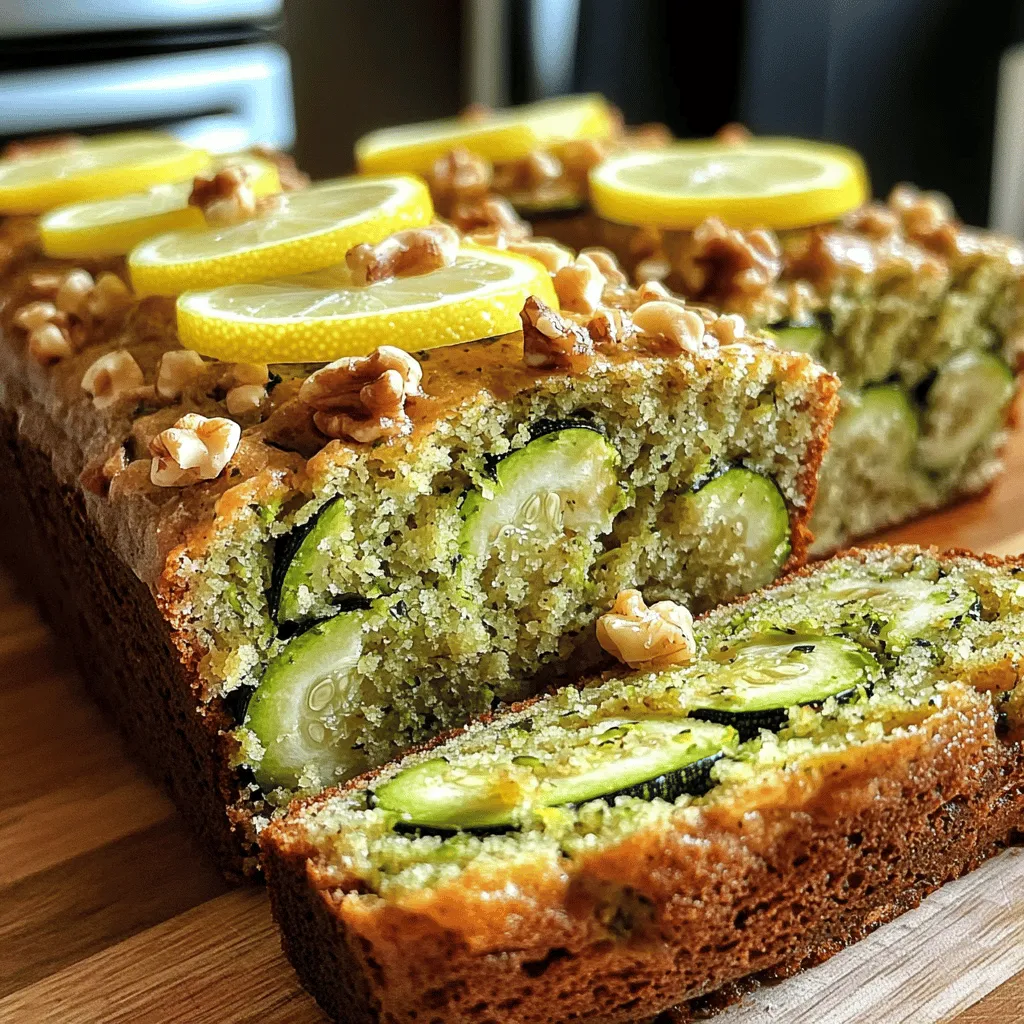
These ingredients help create a moist and flavorful zucchini bread. The lemon zest and juice add a bright taste that lifts the bread. The nuts give it a lovely texture.
Step-by-Step Instructions
Preparation Steps
Preheating the Oven
Start by preheating your oven to 350°F (175°C). This step ensures that your bread bakes evenly. While the oven heats, prepare your loaf pan. Grease a 9×5-inch pan lightly or line it with parchment paper. This will help the bread come out easily after baking.
Preparing the Zucchini
Grate two small zucchinis using a box grater or food processor. Once you have the grated zucchini, place it in a clean kitchen towel. Fold the towel around the zucchini and squeeze it firmly. This action removes excess moisture. Draining the zucchini is key to lightening the bread’s texture.
Mixing the Ingredients
Combining Dry Ingredients
In a large mixing bowl, whisk together the all-purpose flour, whole wheat flour, baking soda, baking powder, salt, cinnamon, and nutmeg. Make sure there are no clumps. Mixing these dry ingredients well is important to ensure even flavor.
Mixing Wet Ingredients
In a separate bowl, whisk the granulated sugar, brown sugar, and eggs until smooth. This step helps to blend the flavors nicely. Then, add the vegetable oil, vanilla extract, lemon zest, and lemon juice to the mixture. Whisk until everything is fully combined, forming a smooth batter.
Baking the Bread
Incorporating Zucchini and Nuts
Now, gently fold the grated zucchini into the batter. If you like, add chopped walnuts at this stage. Be careful to mix just enough so that everything is evenly distributed. Overworking the batter can lead to a dense bread.
Pouring and Baking
Pour the batter into your prepared loaf pan. Smooth the top with a spatula for an even bake. Place the pan in the oven. Bake for 50 to 60 minutes. Check for doneness by inserting a toothpick in the center. If it comes out clean, your bread is ready. The top should be golden brown.
Enjoy the delightful aroma as it bakes!
Tips & Tricks
Achieving the Best Texture
Importance of Draining Zucchini
Draining the zucchini is key. Fresh zucchini holds a lot of water. If you skip this step, your bread may become soggy. To drain, grate the zucchini, then wrap it in a towel. Squeeze out the excess water with your hands. This ensures your zucchini bread stays light and fluffy.
Preventing Overmixing
Mixing too much can ruin the texture. When combining the wet and dry ingredients, stir gently. Aim for just combined. A few flour streaks are okay. This keeps your bread tender and soft.
Enhancing Flavor
Recommended Flavor Additions
For an extra kick, think about adding nuts, spices, or citrus. Chopped walnuts add crunch and richness. You can also mix in spices like ginger or allspice for warmth. A pinch of salt boosts sweetness too.
Serving Suggestions
Serve your zucchini bread warm for the best taste. Try adding a dollop of lemon cream cheese spread. This adds a creamy touch that pairs well with the bread’s zest. You can also top slices with butter and sprinkle with nuts. Enjoy with a cup of tea or coffee for a cozy snack.
Variations
Healthier Alternatives
You can make zucchini bread healthier by changing some ingredients. One great option is to use whole wheat flour instead of all-purpose flour. Whole wheat flour adds more fiber and nutrients. You can also try almond flour for a gluten-free option. This flour gives a nice nutty flavor.
Reducing the sugar content is another way to make it healthier. You can cut the granulated sugar in half. This does not change the taste much. To sweeten it, consider using honey or maple syrup. These natural sweeteners have extra flavor and can be better for you.
Flavor Variations
Adding spices can really boost the flavor of your zucchini bread. I love adding ground ginger or allspice for a warm kick. These spices make the bread smell amazing while it bakes. You can also try mixing in chocolate chips or dried fruit. Chocolate chips create a rich, sweet treat. Dried fruit like raisins or cranberries adds a chewy texture and fruity taste.
For the best flavor, feel free to mix and match these ideas. Each variation brings a new twist to your zucchini bread.
Storage Info
Short-term Storage
Storing in the Fridge
Store your zucchini bread in the fridge for up to a week. Wrap it tightly in plastic wrap or place it in an airtight container. This helps keep it fresh. The cool air prevents mold and keeps the bread moist.
Avoiding Sogginess
To avoid sogginess, let the bread cool completely before wrapping it. If you store it while warm, moisture builds up. This can make your delicious bread mushy.
Long-term Storage
Freezing Zucchini Bread
You can freeze zucchini bread for up to three months. First, let the bread cool fully. Then, wrap it in plastic wrap and place it in a freezer bag. Be sure to remove as much air as possible. This keeps your bread tasty and prevents freezer burn.
Thawing and Reheating Tips
To thaw, move the bread from the freezer to the fridge overnight. For a quick thaw, leave it on the counter for a few hours. When ready to eat, reheat slices in the toaster or oven. This brings back the warmth and taste of fresh-baked bread.
FAQs
How to tell if Zucchini Bread is done?
You can tell if zucchini bread is done by using a toothpick. Insert it into the center. If it comes out clean, the bread is ready. The top should also look golden brown. The edges may start to pull away from the pan slightly.
Can I use frozen zucchini for this recipe?
Yes, you can use frozen zucchini. Just make sure to thaw and drain it well. Squeeze out as much water as possible. This step keeps your bread from being too wet.
How can I make zucchini bread gluten-free?
To make gluten-free zucchini bread, swap all-purpose flour with a gluten-free blend. Look for blends that include xanthan gum. This will help with texture. You can also use almond flour for a nutty flavor.
What can I pair with zucchini bread?
Zucchini bread pairs well with a few toppings. Try cream cheese or butter for a rich taste. For a fresh twist, add a bit of lemon curd. You can also enjoy it with coffee or tea for a cozy snack.
Zucchini bread is easy and fun to make. We talked about key ingredients like grated zucchini, flours, and sugars. I walked you through mixing, baking, and tips for the best results. You can try different flavors and healthier options too. Don’t forget the storage tips for keeping it fresh. With practice, you will create the perfect zucchini bread every time. Enjoy your baking journey!


![- 4 medium-sized russet potatoes - 1 small onion - 2 large eggs - 1/4 cup all-purpose flour - 1 teaspoon baking powder - 1 teaspoon garlic powder - Salt and pepper to taste - 1/4 cup fresh parsley - Vegetable oil for frying Gather these simple ingredients. They are key to making crispy potato pancakes. The russet potatoes give a nice texture. The onion adds flavor. Eggs help bind everything together. Next, we need some dry ingredients. The flour gives structure. Baking powder helps them rise a bit. Garlic powder adds a tasty kick. For seasoning, use salt and pepper to taste. Fresh parsley brings a pop of color and freshness. Finally, vegetable oil is essential for frying. It helps achieve that golden crispiness. To see the full recipe, you can refer to the [Full Recipe]. Start by peeling four medium-sized russet potatoes. Grate them finely using a box grater. Next, do the same with one small onion. After grating, you need to remove moisture. Place the grated potatoes and onions in a clean kitchen towel. Wring out the mixture gently until it is dry. This step is key for crispy pancakes. In a large bowl, combine the grated potatoes and onions. Now, add two large beaten eggs. Stir until the eggs mix well with the potatoes and onions. In a separate bowl, whisk together the dry ingredients. You need 1/4 cup of all-purpose flour, 1 teaspoon of baking powder, and 1 teaspoon of garlic powder. Add salt and pepper to taste. Once well mixed, gradually fold this dry mixture into the potato mixture. Be gentle when folding to keep the texture light. Finally, stir in 1/4 cup of freshly chopped parsley for a burst of flavor. Heat a generous amount of vegetable oil in a skillet over medium-high heat. You want the oil to shimmer. Using a tablespoon or ice cream scoop, take the potato mixture and drop it into the hot oil. Flatten each scoop slightly with a spatula. Fry the pancakes for about 3-4 minutes on each side. Look for a golden brown color to know they are ready. Avoid overcrowding the skillet; cook them in batches if needed. Once done, transfer the pancakes to a plate lined with paper towels to absorb excess oil. Enjoy the crispy potato pancakes hot! For the full recipe, check out the [Full Recipe]. To make crispy potato pancakes, moisture control is key. After grating the potatoes and onion, place the mixture in a clean kitchen towel. Wring it out to remove extra moisture. This step is vital for crispiness. Next, heat your oil properly. Aim for medium-high heat. If the oil is too cool, the pancakes will absorb it and become soggy. If it's too hot, they may burn. You want that perfect shimmer before frying. When you cook your pancakes, avoid overcrowding the skillet. If you add too many at once, the temperature drops. This can lead to soggy pancakes. Cook them in small batches for the best results. To keep the pancakes warm, place them on a plate in an oven set to low heat. This way, they stay crispy while you finish cooking the rest. For garnishes, I love serving crispy potato pancakes with sour cream or applesauce. These toppings add a nice contrast to the crispy texture. You can also sprinkle fresh parsley on top for a pop of color. As for side dishes, consider serving them with a simple salad or sautéed greens. These pair well and balance the meal. For the full recipe, check out the detailed instructions. {{image_4}} You can boost your crispy potato pancakes with cheese. Cheddar adds a sharp bite, while feta gives a tangy twist. Just mix in some crumbled cheese before frying. Herbs and spices also enhance flavor. Chives add a mild onion taste, while dill brings a fresh note. Feel free to experiment with your favorite herbs. You can use different types of potatoes for unique flavors. Yukon Gold potatoes offer a buttery taste, while sweet potatoes add sweetness. If you want gluten-free options, try almond flour or chickpea flour. These swaps keep the pancakes crispy while adding new flavors. Serving styles can change the whole vibe of your dish. Make mini pancakes for appetizers at parties. They are easy to grab and enjoy. For brunch, stack them high and serve with toppings like sour cream or applesauce. This adds a fun twist to your meal. For the full recipe, check out the Crispy Potato Pancakes section above. To keep your crispy potato pancakes fresh, store them in an airtight container. Place parchment paper between each layer to avoid sticking. They stay good in the fridge for about 3 to 5 days. Always let them cool down before storing. This helps keep them crispy for later. If you want to save some for later, freezing is a great option. Let the cooked pancakes cool first. Then, place them in a single layer on a baking sheet. Freeze until solid, then transfer them to a freezer bag. They last about 2 to 3 months in the freezer. To reheat frozen pancakes, you can use an oven or a skillet. For the oven, preheat to 400°F and bake for about 10 to 15 minutes. If using a skillet, heat a bit of oil over medium heat and cook each pancake until warm and crispy. Enjoy them again with your favorite toppings! To keep your potato pancakes crispy, the key is moisture control. Always wring out the grated potatoes and onions to remove excess water. Use a hot pan with enough oil. Fry in small batches so the pancakes don't steam. After frying, place them on a wire rack instead of paper towels. This lets air circulate and keeps them from getting soggy. Yes, you can make potato pancakes ahead of time. Cook them, then store them in an airtight container. They will last up to two days in the fridge. To reheat, place them in a hot skillet for a few minutes on each side. This brings back their crispiness. You can also bake them in the oven at 375°F for about 10 minutes. Crispy potato pancakes pair well with many sides. Sour cream and applesauce are classic choices. You can also try Greek yogurt or a spicy sauce for a twist. Fresh herbs like chives or parsley add color and flavor. For a heartier meal, serve with a side salad or smoked salmon. You can customize potato pancakes in many ways. Add cheese like cheddar or feta for a rich taste. Fresh herbs like dill or chives add a nice touch. You can even mix in grated vegetables, like carrots or zucchini, for extra nutrition. Feel free to play with spices too, like paprika or cumin. Yes, you can bake potato pancakes. Preheat your oven to 425°F. Place the pancakes on a baking sheet lined with parchment paper. Brush them lightly with oil. Bake for about 20 minutes, flipping halfway through. They will be less greasy but still tasty. You may not get the same crispiness as frying, but they will still be good. Check the [Full Recipe] for more tips. Making crispy potato pancakes is simple and fun. We covered the key ingredients, like russet potatoes and eggs, and the steps for perfecting the mixture. I shared tips for achieving that golden, crispy texture and serving suggestions to elevate your dish. Remember, you can always customize your pancakes with different flavors or serving styles. Enjoy your cooking adventure and make these delicious pancakes your own. They’re sure to impress at any meal!](https://fastmealmate.com/wp-content/uploads/2025/06/8dba9489-4fe0-451f-83c3-8d1f72bb8948-768x768.webp)
. - Set temperature to 325°F (160°C) - Prepare a 9-inch springform pan Start by preheating your oven to 325°F (160°C). This will ensure that your carrot cake cheesecake bakes evenly. Next, grab a 9-inch springform pan. Grease it well and line the bottom with parchment paper. This will help the cheesecake come out easily after baking. - Mix dry ingredients and combine with wet ingredients - Fold in grated carrots, walnuts, and crushed pineapple In a medium bowl, mix the dry ingredients. You need flour, baking powder, baking soda, cinnamon, nutmeg, and salt. In a large bowl, whisk together the sugars, vegetable oil, eggs, and vanilla extract. Once it is smooth, slowly add the dry mix to the wet mix. Stir gently until just combined. Now, fold in the grated carrots, walnuts, and crushed pineapple. This gives your cake great texture and flavor. - Pour batter into the springform pan - Bake for 25-30 minutes until a toothpick comes out clean Pour the carrot cake batter into the prepared springform pan. Bake for 25-30 minutes. To check if it's done, insert a toothpick into the center. If it comes out clean, it's ready. Let the carrot layer cool in the pan on a wire rack. - Beat the cream cheese until smooth - Gradually add sugar and eggs while mixing In a large bowl, beat the softened cream cheese with an electric mixer on medium speed. Keep mixing until it's smooth. Gradually add in the sugar. Then, add the eggs one at a time, mixing on low speed after each one. Finally, mix in the vanilla extract, lemon juice, and sour cream. Your cheesecake batter should be creamy and well blended. - Pour cheesecake batter over the cooled carrot layer - Smooth the surface with a spatula Once the carrot layer is cool, pour the cheesecake batter over it. Use a spatula to spread it out evenly. This will create a nice, smooth top for your cake. - Bake for 45-50 minutes or until center slightly jiggles - Cool gradually in the oven Put the cake back in the oven. Bake for 45-50 minutes. The center should jiggle slightly when done. After baking, turn off the oven and crack the door open. This helps the cheesecake cool slowly, reducing the chance of cracks. - Chill in the refrigerator for at least 4 hours - Top with walnuts and shredded coconut before serving After an hour, take the cheesecake out and place it in the fridge. Chill for at least 4 hours, or overnight for the best taste. Before serving, sprinkle the top with walnuts and shredded coconut for extra flavor and crunch. Enjoy your delicious creation! For the full recipe, check the details above. - Use room temperature ingredients for better mixing. This helps all the flavors blend well. - Avoid overmixing the cheesecake batter to prevent cracks. Mix until just smooth for a perfect texture. - Serve with whipped cream or a scoop of vanilla ice cream. This adds a creamy touch to each bite. - Garnish with fresh carrots or edible flowers for decoration. This makes the dish look extra special and fun. - A springform pan is great for easy removal. It helps keep your cheesecake intact when serving. - An electric mixer ensures a smooth cheesecake batter. This saves time and effort, making mixing a breeze. {{image_4}} You can change the flavor of your carrot cake cheesecake. Try adding raisins or shredded coconut to the carrot layer. Both add sweetness and texture. You can also mix in spices like cardamom for a warm, spicy kick. This makes each bite more exciting. If you want a lighter version, use whole wheat flour instead of all-purpose flour. This swap adds fiber and nutrients. You can also replace sour cream with Greek yogurt. It gives creaminess with less fat. For a gluten-free option, use a gluten-free flour blend. This way, everyone can enjoy your cheesecake. If you need a vegan version, use dairy-free cream cheese. It works just as well in the cheesecake layer. These variations allow you to make this dessert fit your taste and dietary needs. Feel free to explore and enjoy the process! For the complete recipe, check the Full Recipe section. Store your carrot cake cheesecake in the refrigerator for up to 5 days. To keep it fresh, cover it tightly with plastic wrap or foil. This will help prevent it from drying out and absorbing other fridge odors. You can freeze carrot cake cheesecake for up to 2 months. Be sure to wrap it well in plastic wrap and then place it in an airtight container. When you're ready to enjoy it, thaw it in the refrigerator overnight before serving. This cheesecake is best enjoyed chilled. However, if you like it warm, you can briefly heat it in the oven. Just a few minutes at a low temperature will do. This method can enhance its creamy texture, making it even more delightful. The center should slightly jiggle and not look wet when finished. This means it has set properly. You can also check with a toothpick. Insert it into the center; it should come out mostly clean. Yes, it can be prepared a day in advance for optimal flavor. Making it ahead allows the flavors to blend better. Just remember to chill it in the fridge until you’re ready to serve. Slice with a sharp knife and serve chilled, topped as desired. You can add whipped cream or extra nuts for fun. A nice touch is a sprinkle of cinnamon on top. Absolutely! Pecans or almonds can be great substitutes for walnuts. They will add different flavors and textures. You can also skip the nuts if you prefer a nut-free version. This post covered everything you need to make a delicious Carrot Cake Cheesecake. We discussed the ingredients for both layers, how to bake, and tips for the best results. Remember, use room-temperature items and avoid overmixing the cheesecake. Feel free to try variations to fit your taste and dietary needs. This cake is perfect for any occasion and is easy to store. Now, grab your ingredients and impress your family or friends with this treat!](https://fastmealmate.com/wp-content/uploads/2025/06/33af2c91-c02f-4d6c-a85e-840ab017cd6c-768x768.webp)


![To create a delightful 20-minute couscous, you need a few simple ingredients. Here’s what you will need: - 1 cup couscous - 1 ¼ cups vegetable broth (or water) - 1 cup cherry tomatoes, halved - 1 small cucumber, diced into small cubes - ½ red onion, finely chopped - ½ cup Kalamata olives, pitted and sliced into rings - 1 cup fresh spinach, roughly chopped - ¼ cup feta cheese, crumbled - 2 tablespoons extra virgin olive oil - 1 tablespoon fresh lemon juice - 1 teaspoon dried oregano - Salt and freshly ground black pepper to taste These ingredients bring a burst of flavor and color to your meal. Couscous cooks fast and absorbs the broth well, making it fluffy. The cherry tomatoes and cucumber add crunch, while olives give a salty kick. Fresh spinach provides nutrients, and feta cheese adds creaminess. Use good olive oil and fresh lemon juice for a bright taste. This mix of flavors makes your dish fresh and inviting. For the detailed recipe, check out the Full Recipe section. To start, bring 1 ¼ cups of vegetable broth or water to a rolling boil in a saucepan. This step is crucial for cooking the couscous properly. Once the liquid bubbles up, remove the pan from the heat. Stir in 1 cup of couscous and cover the pan with a lid. Let it sit for 5 minutes. This allows the couscous to absorb all the liquid, making it fluffy and light. While the couscous cooks, grab a large mixing bowl. Combine 1 cup of halved cherry tomatoes, 1 small diced cucumber, ½ finely chopped red onion, and ½ cup of sliced Kalamata olives. Toss in 1 cup of roughly chopped fresh spinach. Mixing these colorful veggies adds crunch and freshness to your meal. In a small bowl, whisk together 2 tablespoons of extra virgin olive oil, 1 tablespoon of fresh lemon juice, and 1 teaspoon of dried oregano. Add a pinch of salt and pepper to taste. This dressing brings all the flavors together and enhances the dish's brightness. Pour the dressing over the vegetable mix and toss gently. This helps each piece get coated well. Next, fluff the couscous with a fork, breaking apart any clumps. Add the fluffed couscous to the veggie mixture and stir until everything is mixed evenly. To finish, sprinkle ¼ cup of crumbled feta cheese on top. This adds a nice salty bite and creamy texture to the dish. Check the [Full Recipe] for all details. To make your couscous extra tasty, add fresh herbs like parsley or cilantro. You can also try spices like cumin or paprika for more depth. Feel free to swap feta cheese with goat cheese or even mozzarella if you prefer. Each cheese brings its own flavor and texture to the dish. For the best fluff, always use a fork to fluff your couscous. This helps break up any clumps. When cutting vegetables, try to make them uniform in size. This way, they cook evenly and look nice in your dish. Serve your couscous in colorful bowls to make it pop. You can also spread it on a large platter for a family-style meal. For a finishing touch, sprinkle extra crumbled feta and fresh herbs on top. This adds color and makes the dish more inviting. {{image_4}} You can change up the recipe in many ways. Use seasonal vegetables for a fresh twist. Think about adding bell peppers, zucchini, or even asparagus. These veggies add color and flavor to your dish. Protein is another way to mix things up. Chickpeas are great for a plant-based option. They add a nice texture and protein boost. Grilled chicken is another good choice if you want meat. It pairs well with the other flavors in couscous. The flavor can shift based on your ingredients. A Mediterranean style is bright and fresh. Use herbs like basil, parsley, or mint for a burst of taste. On the other hand, a Middle Eastern twist adds warmth. Spices like cumin or coriander can really change the game. Dressings also play a big role. You can use a tangy vinaigrette or a creamy yogurt dressing. Each option gives the dish a new taste profile. Experiment with what you like best. If you're looking for gluten-free options, consider quinoa or rice. Both work well in place of couscous. They provide a similar texture and are easy to cook. For vegan meals, swap out the cheese and broth. Use a plant-based broth and nuts or seeds instead of cheese. Nutritional yeast can give a cheesy flavor without dairy. These changes keep the dish tasty and suitable for all diets. To keep your leftover couscous fresh, use airtight containers. Glass containers work great, as they do not absorb smells. Plastic containers are also fine if they are good quality. Make sure to cool the couscous completely before sealing the container. This reduces moisture inside and keeps it from getting soggy. When refrigerating, store couscous within two hours of cooking. This helps prevent bacteria growth. Place it in the fridge right away. If you plan to eat it later, consider separating it from any dressing or veggies. This keeps the couscous from becoming mushy. Reheating couscous is easy. The best method is to use the microwave. Start by placing your couscous in a microwave-safe bowl. Add a few drops of water to keep it moist. Cover it with a damp paper towel and heat for 1-2 minutes. Stir halfway through for even heat. You can also reheat couscous on the stove. Add a splash of water to a pan over low heat. Stir often until warm. This method helps keep the couscous fluffy. Avoid high heat, as it may dry out the grains. When stored properly, couscous lasts about 3 to 5 days in the fridge. Check for any signs of spoilage before eating. If you see mold or a sour smell, it's best to throw it away. Fresh couscous should have a light, fluffy texture. If it feels hard or clumpy, it may have gone bad. Always trust your senses when deciding whether to eat leftovers. You can tell when couscous is done by its texture. Perfectly cooked couscous is light and fluffy. It should not be sticky or mushy. After letting it sit, fluff it with a fork. This helps break up clumps and adds air. Yes, you can meal prep couscous. Cook it in advance and store it in the fridge. It keeps well for three to five days. Just make sure to let it cool before storing. You can add your veggies and dressing just before eating. This keeps the flavors fresh. Couscous pairs well with many dishes. You can serve it with grilled chicken or fish. A fresh salad is a great side too. Roasted vegetables add nice flavor. You can also enjoy it with hummus or tzatziki for a dip. Check out the " Speedy Mediterranean Couscous Delight" for the detailed recipe and enjoy this quick meal! This blog post guides you to make a tasty Mediterranean couscous dish. We covered the key ingredients, step-by-step cooking instructions, and helpful tips to enhance flavor. Remember, you can mix in different veggies or proteins to make it your own. Storing and reheating couscous is easy, too, so enjoy your leftovers! This simple recipe is perfect for meal prep or a quick dinner. You’re now set to impress your family and friends with this delightful dish. Dive in, create, and enjoy every bite!](https://fastmealmate.com/wp-content/uploads/2025/06/3a323c96-3f14-4a25-b011-50d8f6184ffe-768x768.webp)