Peach Crisp Delightful and Simple Dessert Recipe
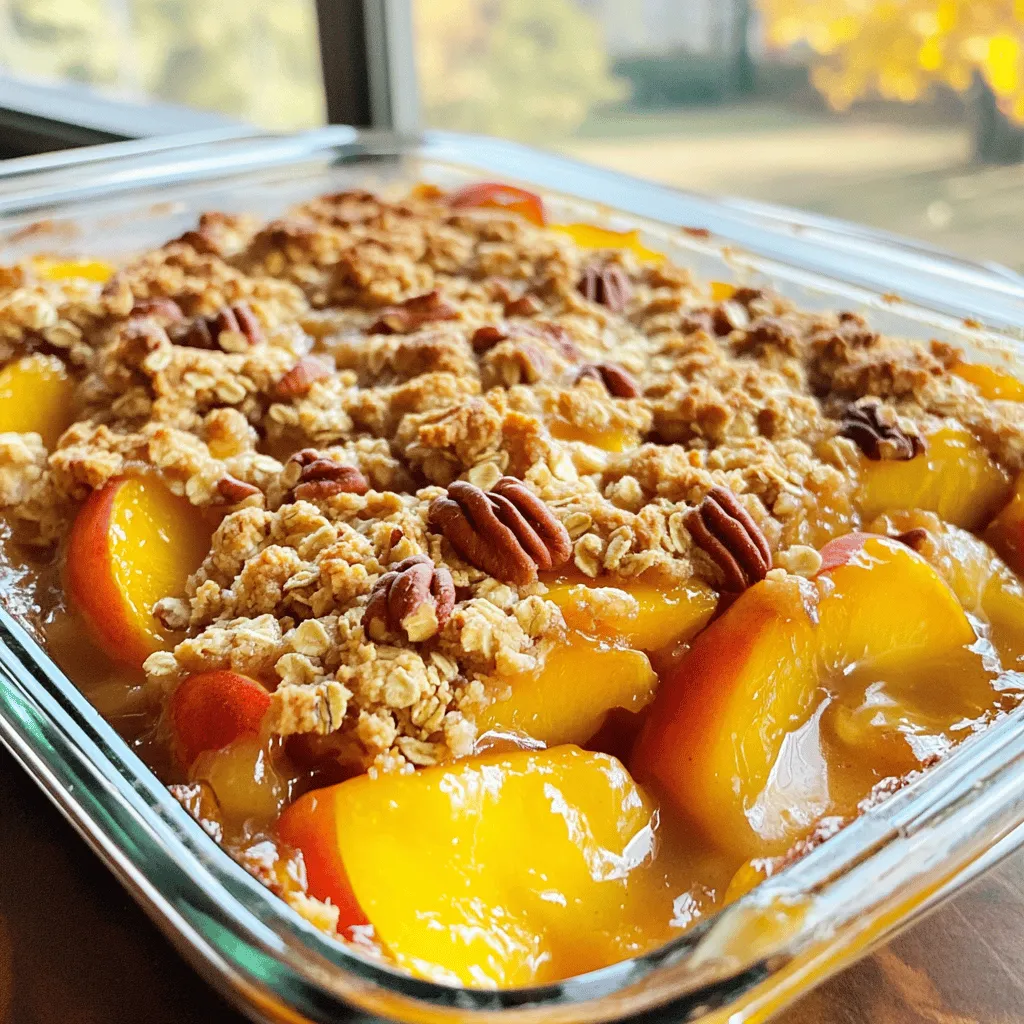
Looking for an easy, mouthwatering dessert? This Peach Crisp recipe is both delightful and simple! With juicy peaches and a crispy, sweet topping, you’ll create a treat that warms your heart. Whether you’re serving dinner guests or enjoying a cozy night in, this dessert is the perfect finish. Keep reading to discover fresh ingredients, step-by-step instructions, and exciting variations to make your Peach Crisp truly special!
Ingredients
Fresh Ingredients
– 6 ripe peaches, peeled and sliced into wedges
– 1/2 cup granulated sugar
– 1 cup rolled oats
Pantry Staples
– 1/2 cup all-purpose flour
– 1/2 cup brown sugar, packed
– 1/4 cup unsalted butter, melted
Flavor Enhancers
– 1 teaspoon ground cinnamon, divided
– 1/4 teaspoon freshly grated nutmeg
– A pinch of salt
– 1/2 teaspoon pure vanilla extract
– 1/4 cup chopped pecans or walnuts (optional for added crunch)
Using fresh ingredients makes a big difference. I love ripe peaches for their sweet taste. They should be firm but slightly soft to the touch. Granulated sugar brings out the peach flavor. Rolled oats give the topping a nice crunch.
Now, let’s talk about pantry staples. All-purpose flour is key for binding. Brown sugar adds a rich flavor and moisture. Unsalted butter helps create that crumbly topping we all love.
Flavor enhancers are the secret to a great peach crisp. Ground cinnamon adds warmth. Nutmeg brings a unique twist. A pinch of salt balances the sweetness. Pure vanilla extract elevates the flavor. If you want more crunch, try adding pecans or walnuts.
Step-by-Step Instructions
Preparation Steps
– Preheat your oven to 350°F (175°C).
– Grease a 9-inch square baking dish.
Peach Layer
– Toss sliced peaches with granulated sugar and cinnamon.
– Spread the peach mixture evenly in the baking dish.
Crisp Topping
– Combine rolled oats, flour, brown sugar, cinnamon, nutmeg, and salt.
– Mix in melted butter and vanilla until crumbly.
– Fold in nuts if desired and spread over the peaches.
Baking Process
– Bake for 30-35 minutes until golden brown and bubbling.
– Allow to cool for 10 minutes before serving.
Make sure to follow each step closely. This is how you create that perfect Peach Crisp Delight.Enjoy the sweet aroma filling your kitchen as it bakes!
Tips & Tricks
Perfecting Your Peach Crisp
– Use ripe peaches for the best flavor. Ripe peaches are juicy and sweet.
– Opt for a mix of yellow and white peaches for added depth. This mix gives a richer taste.
Serving Suggestions
– Serve warm with vanilla ice cream. The cold ice cream melts into the warm crisp.
– Drizzle with caramel sauce for an extra touch. This adds a sweet, rich flavor.
Presentation Ideas
– Garnish with fresh mint leaves. This adds color and freshness to your dish.
– Serve in clear dessert bowls for an elegant display. Clear bowls showcase the layers beautifully.

Variations
Dietary Adaptations
You can easily change this recipe to fit your needs. For a gluten-free peach crisp, simply swap all-purpose flour with almond flour. This change keeps the crisp tasty while removing gluten. If you want a vegan option, replace the butter with coconut oil. Use a plant-based sugar to keep it vegan-friendly.
Flavor Variations
Looking to spice things up? Add a pinch of ginger or cardamom to the topping for a unique twist. You can also mix in other fruits, like blueberries or raspberries. These additions bring fun flavors and colors to your peach crisp.
Serving Sizes
You can adjust the recipe for your gathering size. For small get-togethers, cut the recipe in half. For larger crowds, double the ingredients. Another fun idea is to make mini peach crisps in individual ramekins. This way, everyone has their own serving, making it easy to enjoy!
Storage Info
Refrigeration
Store leftovers in an airtight container in the fridge for up to 3 days. This keeps the peach crisp fresh and tasty. If you enjoy it warm, just reheat before serving.
Freezing Instructions
You can freeze baked peach crisp for up to 3 months. When you are ready to enjoy it, thaw it overnight in the fridge. Reheat it in the oven for best results. This helps keep the crisp topping crunchy and the peaches juicy.
Reheating Tips
Reheat your peach crisp in a preheated oven instead of the microwave. This way, you maintain the texture. Cover with foil to prevent over-browning. This simple step keeps your dessert looking and tasting great. Enjoy your warm peach crisp with a scoop of ice cream!
FAQs
What type of peaches are best for peach crisp?
Yellow or white peaches are ideal due to their sweetness and flavor. Yellow peaches have a bright taste and juicy texture. White peaches offer a floral note that enhances the dish. Both types work well, so choose what you like best.
Can I make this recipe ahead of time?
Yes, you can prepare the layers and bake it later for optimal freshness. Slice the peaches and mix them with sugar and cinnamon. Then, store them in the fridge. You can also make the crisp topping ahead. Just keep it in a separate container. When ready, combine and bake for a warm treat.
What can I serve with peach crisp?
Pair it with ice cream, whipped cream, or yogurt for a delightful dessert. Vanilla ice cream adds creaminess and balances the sweetness. Whipped cream lightens the dish, while yogurt offers a tangy contrast. Each option enhances the flavors in your peach crisp.
Is it possible to make peach crisp without sugar?
Yes, try using honey or maple syrup as a natural sweetener. Both alternatives add a rich flavor without refined sugar. Adjust the amount based on your taste. You can also consider ripe peaches for their natural sweetness, which helps reduce the need for added sugars.
Peach crisp is simple and delicious. You need fresh peaches and basic pantry items. The step-by-step instructions make it easy to create a warm, fruity treat. Remember to try different flavors and ingredients for variety. With some care, your peach crisp can impress anyone. Store leftovers for later, or freeze them for a quick dessert. Enjoy your baking, and share this tasty recipe with friends and family. It’s a treat that everyone will love. Happy baking!


![Caramel apple cookies blend sweet apples and rich caramel in a soft cookie. This recipe makes about 24 cookies. You will love the warm flavors of fall in every bite. - 1 cup unsalted butter, softened to room temperature - 1 cup packed brown sugar - 1/2 cup granulated sugar - 2 large eggs - 1 teaspoon pure vanilla extract - 2 1/4 cups all-purpose flour - 1 teaspoon baking soda - 1/2 teaspoon fine sea salt - 1 teaspoon ground cinnamon - 1 cup fresh apples, diced (peeled and cored) - 1/2 cup caramel sauce (plus extra for drizzling) - 1/2 cup chopped walnuts or pecans (optional) - A pinch of sea salt for garnish You can customize your cookies! Try adding chocolate chips for extra sweetness. Use almond flour for a gluten-free option. If you want a nut-free treat, skip the walnuts or pecans. You can even swap the apples for pears for a unique twist. Enjoy experimenting! Start by preheating your oven to 350°F (175°C). This helps the cookies bake evenly. Next, line a baking sheet with parchment paper. This step prevents the cookies from sticking. In a large bowl, cream together one cup of softened butter, one cup of packed brown sugar, and half a cup of granulated sugar. Use an electric mixer on medium speed until the mix is light and fluffy. Next, add two large eggs. Beat them in one at a time. After that, stir in one teaspoon of pure vanilla extract until it blends in well. In another bowl, whisk together two and a quarter cups of all-purpose flour, one teaspoon of baking soda, half a teaspoon of fine sea salt, and one teaspoon of ground cinnamon. Gradually sift the dry mix into the wet mix. Stir gently until just combined. Be careful not to overmix; this keeps the cookies soft. Now, fold in one cup of diced apples and half a cup of caramel sauce. If you like, add half a cup of chopped walnuts or pecans too. Using a tablespoon or a cookie scoop, drop rounded portions of dough onto the prepared baking sheet. Leave about two inches between each cookie to allow for spreading. Place the baking sheet in the preheated oven. Bake the cookies for 10 to 12 minutes. Keep an eye on them. The edges should turn lightly golden, while the centers may look slightly underbaked. They will set as they cool. Once baked, remove the cookies from the oven. Let them cool on the baking sheet for about five minutes. After that, transfer the cookies to a wire rack to cool completely. For a delightful finish, drizzle extra caramel sauce over the cookies. Sprinkle a tiny pinch of sea salt on top of each one to enhance the flavor. This recipe makes about 24 cookies. Enjoy every bite of your caramel apple cookies! For a full recipe, check out the [Full Recipe]. To get the best texture in your caramel apple cookies, use softened butter. This helps create a nice, soft dough. Mix well but don’t overdo it. Overmixing can lead to tough cookies. When you add the apples, make sure they are diced small, so they blend into the dough. Avoid adding too much caramel sauce; it can make the dough too wet. For making these cookies, you need a few simple tools: - Mixing bowls - Electric mixer - Baking sheets - Parchment paper - Cookie scoop or tablespoon - Wire rack for cooling Using the right tools will make the process easier and more fun. One common mistake is not measuring ingredients correctly. Use proper measuring cups and spoons. Another mistake is baking cookies at the wrong temperature. Always preheat your oven before baking. Watch the cookies closely in the oven. If you take them out too soon, they may fall apart. If you leave them too long, they can get hard. Follow the Full Recipe carefully for the best results. {{image_4}} You can switch up the flavors in your caramel apple cookies. Try adding: - 1/2 cup of chocolate chips for a sweet touch. - 1 teaspoon of nutmeg for a warm spice flavor. - A splash of maple syrup for a unique twist. Experimenting helps you discover new favorites! Want to make these cookies fit your needs? Here are simple swaps: - For gluten-free cookies, use a 1:1 gluten-free flour blend. - To make them vegan, replace the butter with coconut oil and the eggs with flax eggs. - Substitute the caramel sauce with homemade date caramel for a healthy option. These swaps keep the taste delicious while catering to different diets. Make your cookies shine each fall! Add these seasonal spices: - A teaspoon of pumpkin spice for a cozy flavor. - A hint of ginger for a warm, zesty kick. - Chopped pecans or walnuts for a crunch that complements the apples. These twists make your caramel apple cookies perfect for any autumn gathering. For the full recipe, check out the earlier section! To keep your caramel apple cookies fresh, store them properly. Use an airtight container to keep out air and moisture. Place parchment paper between layers to prevent sticking. Store them at room temperature for up to one week. If you want to enjoy them longer, consider freezing them. Freezing your cookies is simple. Wait until they cool completely. Then, wrap them tightly in plastic wrap or foil. Place them in a freezer-safe bag. You can freeze them for up to three months. When you're ready to eat, just thaw them at room temperature. To regain that fresh-baked taste, reheat your cookies. Preheat your oven to 350°F (175°C). Place the cookies on a baking sheet. Heat for about 5 to 7 minutes. Check to avoid overbaking. The cookies should feel warm and soft again. Enjoy them warm with a drizzle of caramel sauce for a delightful touch! To make your caramel apple cookies chewy, focus on a few key steps. First, use brown sugar in your dough. Brown sugar has molasses, which adds moisture. Second, do not overmix the dough. Overmixing can make cookies tough. Third, underbake them slightly. When you take them out, they should look set but soft in the middle. They will continue to cook as they cool. This will give you that perfect chewy texture that you crave. Yes, you can make the dough ahead of time! Just prepare the dough as you normally would. After mixing, cover it tightly with plastic wrap or place it in an airtight container. You can store it in the fridge for up to 2 days. When ready to bake, let it sit at room temperature for about 10-15 minutes before scooping and baking. This makes it easy to enjoy fresh cookies whenever you want. Caramel apple cookies pair well with several treats. A scoop of vanilla ice cream adds creaminess and balances the sweet flavors. You can also serve them with warm caramel sauce for dipping. For a cozy touch, try them with a cup of hot apple cider. This drink brings out the fall flavors and makes for a delightful combination. You can get the full recipe for these tasty cookies to impress your friends and family. This post covered how to make delicious caramel apple cookies. We went through essential ingredients, preparation, and baking. I shared tips to avoid common mistakes and variations for your tastes. You learned how to store and reheat these cookies for the best flavor. With simple steps, you can bake a treat that impresses everyone. Enjoy experimenting with different flavors and adjustments. Happy baking!](https://fastmealmate.com/wp-content/uploads/2025/07/9c1a808e-f093-4e89-97b6-472e42d8d3a6-768x768.webp)
![- Canned mixed beans: I love using black beans, kidney beans, and chickpeas. They add protein and fiber to the soup. Their different textures make the soup hearty and filling. Look for low-sodium options for a healthier choice. - Fresh vegetables: Carrots and celery bring sweetness and crunch. They create a great base for the soup. I also like adding kale or spinach for color and nutrients. These greens wilt nicely and enhance the soup's flavor. - Seasoning essentials: Garlic powder, onion powder, and smoked paprika are key. They add depth and warmth to the soup. Don't forget salt and cracked black pepper to taste. These simple seasonings really bring the dish to life. - Suggestions for proteins: You can add cooked chicken or sausage for extra heartiness. If you prefer plant-based, try tofu or tempeh. These options add flavor and make the soup more filling. - Boosting nutrition: Consider adding grains like quinoa or barley. They add texture and make the soup even more nutritious. You can also toss in lentils for a protein boost. - Alternative greens: If you want to mix things up, try Swiss chard or arugula. They offer different tastes and nutrients. Experimenting with greens keeps the soup fresh and exciting. Check out the Full Recipe for all the details on making this delicious soup! Start by heating the olive oil in a medium saucepan over medium heat. You want it shimmering but not smoking. Add the diced carrots and celery. Sauté them for about three minutes. This helps release their sweet flavors. Don’t rush this step; the heat must be just right. It sets a strong base for your soup. Next, it’s time to build your soup. Stir in the mixed beans. Cook them for one more minute. This warms the beans and helps their flavor blend in. Then, pour in the vegetable broth and diced tomatoes. Season with garlic powder, onion powder, and smoked paprika. Sprinkle in salt and black pepper to taste. Bring the broth to a gentle simmer. Let it cook for about five minutes. This allows the flavors to meld beautifully. Now, fold in the chopped kale or spinach right before serving. Cook them for just one minute. This will wilt the greens without overcooking them. Finally, taste your soup. Adjust the seasoning with more salt and pepper if you like. Serve it hot, and don’t forget to garnish with fresh herbs. For the full recipe, check the provided link. Enjoy your healthy, hearty bean soup! Using pre-cooked or canned ingredients makes cooking fast. Canned mixed beans are a great choice. They save time, and you get lots of protein. Just rinse and drain them. This helps remove extra sodium. To cut cooking time further, sauté your veggies first. Carrots and celery soften quickly. Once they start to cook, add your beans. This gives them a warm flavor. Combine everything in the pot with broth and tomatoes. You’ll have a tasty soup in just ten minutes. To boost flavor, use fresh herbs like parsley or cilantro. They add a bright taste and look nice. Spices like smoked paprika and garlic powder also help. They give the soup depth. Balancing acidity is key. Use diced tomatoes for a sweet touch. You can add a splash of lemon juice too. This adds brightness without overpowering the soup. Taste as you go, and adjust seasoning to suit your liking. Explore more flavor ideas in the [Full Recipe]. {{image_4}} You can easily make a vegetarian or vegan version of Minute Hearty Bean Soup. The base of this soup is already plant-based. Just ensure you use vegetable broth. This way, the soup stays rich in flavor and nutrition. You can also add more beans or lentils for extra protein. For those needing gluten-free options, focus on your broth and ingredients. Use certified gluten-free vegetable broth. Most canned mixed beans are gluten-free, too. Check the labels to be safe. You can also use fresh or frozen vegetables, which are naturally gluten-free. To make this soup even more exciting, try adding global flavors. For a Mexican twist, add corn and chili powder. Fresh cilantro gives it a bright taste too. For Mediterranean flair, stir in some olives and use herbs like oregano and thyme. If you want an Asian twist, consider adding ginger and soy sauce. You can also toss in some bok choy or mushrooms. This fusion idea keeps the soup fun and fresh. Feel free to mix ingredients from different cuisines for a unique taste experience. For more details on how to prepare this delicious soup, check out the Full Recipe. To keep your Minute Hearty Bean Soup fresh, store it properly. When you refrigerate it, it lasts for about three to four days. Make sure to use an airtight container. This helps prevent any off-flavors and keeps it safe. If you want to save it for later, freezing is a great option. The soup will stay good for around three months in the freezer. Use freezer-safe bags or containers. Leave some space at the top, as the soup expands when it freezes. When thawing, place it in the fridge overnight for best results. Reheating your soup is easy. The best way is to use the stove. Pour the soup into a saucepan and warm it over medium heat. Stir it often to avoid sticking. This keeps the texture nice. If you’re short on time, you can use a microwave. Place the soup in a microwave-safe bowl and cover it loosely. Heat it in short bursts, stirring in between. This helps it heat evenly. Sometimes, reheated soup can lose some flavor. You can fix this! Add a splash of fresh broth or a squeeze of lemon juice. This will brighten up the taste and make it feel fresh again. For the full recipe, check the [Full Recipe]. Can I use dried beans instead of canned? Yes, you can use dried beans. Just soak them overnight and cook them first. This adds time but gives great flavor. Make sure to adjust the broth and cooking time. How can I make the soup spicier or milder? To spice it up, add crushed red pepper or cayenne. For milder soup, skip these spices. You can also balance spice with a dollop of sour cream or plain yogurt. What can I use instead of vegetable broth? You can use chicken broth for a richer taste. Water works too, but it may lack flavor. Add more spices if you use water. Alternatives to kale or spinach for greens? Swiss chard or collard greens are great options. You can also use arugula for a peppery kick. Each green brings its own unique flavor and nutrition. What to serve with hearty bean soup? Crusty bread is a perfect match. You can also pair it with a fresh salad or grilled cheese. These sides add texture and balance to the meal. Creative ways to enjoy leftovers? Try using the soup as a base for a grain bowl. Top it with cooked rice or quinoa. You can also blend it for a creamy dip or sauce. This blog post covered how to make Minute Hearty Bean Soup. We explored essential ingredients like canned beans and fresh veggies. I shared steps for crafting a rich base and enhancing flavors. You learned quick cooking tips to save time without losing taste. There are also many variations, like vegan options and global twists. In closing, this soup is easy, tasty, and very versatile. Enjoy creating your perfect bowl!](https://fastmealmate.com/wp-content/uploads/2025/06/6eb35ef4-c964-4ad2-94ab-a053d6d9dc9e-768x768.webp)
![To make this tasty Parmesan Spinach Couscous, you need a few simple items. - 1 cup couscous - 2 cups vegetable broth - 2 cups fresh spinach, finely chopped - 1 cup cherry tomatoes, halved - 1/2 cup freshly grated Parmesan cheese - 2 tablespoons extra virgin olive oil - 1 tablespoon freshly squeezed lemon juice - 1 garlic clove, minced - Salt and freshly ground black pepper to taste - Fresh parsley, finely chopped, for garnish (optional) Each ingredient adds a layer of flavor. Couscous is light and fluffy. Spinach brings a fresh taste. Cherry tomatoes add sweetness and color. Parmesan cheese gives a rich, creamy finish. Olive oil smooths everything out. Lemon juice adds a bright zing. Garlic gives it a warm aroma. Salt and pepper enhance all the flavors. This recipe is easy to follow. You can find the Full Recipe above to make it at home. Enjoy cooking! - Start by boiling 2 cups of vegetable broth in a medium saucepan. - Once it boils, add 1 cup of couscous. Stir it well. - Cover the saucepan and take it off the heat. - Let it rest for 5 minutes, so the couscous soaks up the broth. - In a large skillet, heat 2 tablespoons of extra virgin olive oil over medium heat. - Add 1 minced garlic clove and sauté for about 1 minute. - Toss in 2 cups of finely chopped spinach and 1 cup of halved cherry tomatoes. - Cook for 3-4 minutes, stirring until the spinach wilts and tomatoes soften. - After the couscous rests, fluff it with a fork. - Gently mix the fluffy couscous with the sautéed vegetables. - Sprinkle in 1/2 cup of freshly grated Parmesan cheese. - Drizzle 1 tablespoon of freshly squeezed lemon juice over the mix. - Stir until the cheese melts and coats everything. - Season with salt and black pepper to your taste. - Serve warm, and if you like, garnish with fresh parsley. For the complete recipe, check out the [Full Recipe]. To avoid mushy couscous, use the right liquid-to-couscous ratio. Stick to 2 cups of broth for every 1 cup of couscous. This keeps it fluffy. When cooking, bring your broth to a boil first. Then add the couscous quickly. Cover it and let it rest for five minutes. This lets the couscous absorb the flavors without overcooking. Spices can take your dish to the next level. I like adding a pinch of red pepper flakes for heat. Fresh herbs like basil or thyme also add a nice touch. If you want to mix it up, try using feta cheese instead of Parmesan. Feta gives a tangy twist. You can also explore vegan cheese options for a dairy-free dish. Parmesan spinach couscous pairs well with grilled chicken or fish. You can also serve it alongside a fresh salad. The dish tastes best warm. Serve it right after cooking for the best flavor and texture. If you let it sit, the couscous may clump together. For the full recipe, check the earlier section. {{image_4}} You can add protein to make your Parmesan spinach couscous heartier. Grilled chicken works well. Simply slice it and mix it in just before serving. It adds a nice flavor and texture. If you want a vegetarian option, try incorporating chickpeas or beans. They boost the protein and add fiber. Just rinse and drain them, then fold them into the couscous. Feel free to swap spinach for kale. Kale adds a different bite and is very nutritious. You can also use seasonal vegetables. Try bell peppers in summer or butternut squash in fall. Each option gives a new taste to the dish and keeps it fresh. You can experiment with different cheeses too. Feta or goat cheese can be great choices. They add a tangy twist. For those who prefer vegan options, look for vegan cheese. There are many great brands that melt well and taste delicious. Each cheese brings its own flavor, making the dish unique each time. To store leftovers, let the couscous cool first. Place it in an airtight container. This keeps it fresh for later use. I recommend glass or BPA-free plastic containers. These options help keep food safe and tasty. You can freeze Parmesan Spinach Couscous if you have extra. Scoop the cooled dish into freezer-safe bags. Press out as much air as you can before sealing. This helps prevent freezer burn. When you're ready to eat, thaw it overnight in the fridge. Reheat in a skillet over low heat. Add a splash of broth to help it warm up nicely. In the fridge, the couscous lasts about 3 to 5 days. Check for any off smells or mold, which are signs of spoilage. If it looks dry or hard, it's best to toss it out. Always trust your senses when it comes to food safety. You can easily make Parmesan Spinach Couscous gluten-free. Just swap regular couscous for gluten-free couscous. Brands like Bob's Red Mill or Trader Joe's offer great options. Make sure to check the label for any hidden gluten. The cooking method stays the same, and you will still enjoy all the flavors! Yes, you can prep this dish ahead of time. Make the couscous and sauté the veggies earlier in the day. Store them separately in the fridge. When you’re ready to eat, just combine them with the cheese and heat everything gently. This keeps the dish fresh and tasty! Parmesan Spinach Couscous pairs well with many dishes. Here are some great options: - Grilled chicken for protein - Roasted vegetables like zucchini or bell peppers - A fresh garden salad with a light vinaigrette - Sautéed shrimp for a seafood twist Feel free to mix and match based on your taste! For the full recipe, check out the section above. This recipe for Parmesan Spinach Couscous is both simple and tasty. You learned the ingredient list, step-by-step cooking methods, and tips for a great dish. Plus, we explored fun variations and storage ideas. With these insights, you can make a meal that pleases everyone. Experiment with different flavors and ingredients to match your taste. Enjoy every bite and feel good about your cooking!](https://fastmealmate.com/wp-content/uploads/2025/05/f4ccb392-4fc5-4f37-838a-261a9f2c6c95-768x768.webp)