Zucchini Brownies Irresistible and Easy Dessert Recipe
![When making zucchini brownies, you need simple and quality ingredients. Here’s what you will need: - 1 cup shredded zucchini - 1/2 cup unsweetened applesauce - 1/3 cup pure maple syrup or agave nectar - 1/4 cup vegetable oil or melted coconut oil - 1 teaspoon pure vanilla extract - 1/2 cup all-purpose flour or gluten-free flour - 1/4 cup unsweetened cocoa powder - 1/2 teaspoon baking soda - 1/2 teaspoon baking powder - 1/4 teaspoon fine sea salt - 1/2 cup chocolate chips These ingredients come together to create a rich and moist brownie. The zucchini adds moisture without a strong taste. Applesauce keeps the brownies soft. The maple syrup or agave nectar sweetens them naturally. You can use vegetable oil or coconut oil, depending on your preference. Using high-quality cocoa powder makes a big difference in flavor. The baking soda and baking powder help the brownies rise. Finally, the chocolate chips give a delightful chocolate burst in every bite. For the full recipe, check out the [Full Recipe]. - Set temperature to 350°F (175°C). - Prepare your baking pan by greasing it or lining it with parchment paper. - In a large bowl, combine shredded zucchini, applesauce, maple syrup, oil, and vanilla. - Mix until the mixture is smooth and well blended. - In a separate bowl, whisk together flour, cocoa powder, baking soda, baking powder, and salt until mixed well. - Gradually add the dry ingredients to the wet mixture. - Mix gently to avoid overmixing, which can make the brownies dense. - Fold in the chocolate chips. - Make sure they are evenly spread throughout the batter for a rich flavor. - Pour the batter into the prepared pan. - Bake for 25-30 minutes. - After baking, cool in the pan for at least 15 minutes before cutting. Enjoy the delightfully unexpected zucchini boost hidden in every bite with this full recipe! To make your brownies moist, avoid overmixing the batter. Overmixing adds air, which can make them dry. Mix until just combined for a fudgy treat. Using ripe zucchini is key too. Ripe zucchini has more water, which adds moisture and flavor. Shred the zucchini and squeeze out excess water. This keeps your brownies rich and tasty. You can add nuts or spices to boost flavor. Chopped walnuts or pecans add crunch. A sprinkle of cinnamon or nutmeg makes them warm and cozy. You could also mix in chocolate chunks for extra gooeyness. For toppings, serve with ice cream or whipped cream. A scoop of vanilla ice cream on warm brownies is heavenly! Check your brownies for doneness by inserting a toothpick in the center. It should come out with a few moist crumbs. If you live at a high altitude, bake for less time. High altitude can change how baked goods rise and cook. Start checking at the lower end of baking time, around 25 minutes. Adjust as needed. {{image_4}} You can make these brownies gluten-free. Just swap the all-purpose flour for a gluten-free flour blend. Many blends work well. Look for ones that contain rice flour or almond flour. These blends give the brownies a nice texture. Make sure to check the package for the right measurements. This way, you still get that rich, fudgy taste. For a vegan version, you can replace the eggs. Use a flaxseed or chia seed mixture instead. To make this, mix one tablespoon of ground flaxseed or chia seeds with three tablespoons of water. Let it sit for five minutes until it thickens. This works great in the recipe. Your brownies will still be moist and delicious without eggs. If you want a healthier treat, try different sweeteners. You can use stevia or coconut sugar instead of maple syrup. Both options lower the sugar content. Stevia is quite sweet, so use less. Coconut sugar adds a nice caramel flavor. These substitutes keep your brownies tasty while making them a bit healthier. For the full recipe, check out the main article. To keep your zucchini brownies fresh, use an airtight container. This helps seal in moisture and flavor. You can store them at room temperature for up to two days. If you want to keep them longer, refrigerate them for up to a week. If you want to save some for later, freezing is a great option. First, cut the brownies into squares. Wrap each square in plastic wrap, and then place them in a freezer-safe bag. This way, they won’t stick together. You can freeze them for up to three months. When you’re ready to enjoy, take them out and thaw at room temperature. For the best texture, you can also warm them in the microwave for a few seconds. These tips will help you enjoy your zucchini brownies at their best! For the complete recipe, check out the [Full Recipe]. Yes, you can use yellow squash. The texture will be similar, but the flavor differs. Yellow squash has a slightly sweeter taste. Zucchini tends to have a more neutral flavor. This can change how the brownies taste. If you like sweetness, yellow squash is a great choice. To check if brownies are done, insert a toothpick into the center. If it comes out with a few moist crumbs, they are ready. If it comes out wet with batter, they need more time. Brownies should look set but still soft. These brownies can be made ahead of time. Bake them, let them cool, then store them. Wrap them in plastic wrap or place them in an airtight container. They keep well for about three days at room temperature. You can also refrigerate them for up to a week. If your brownies are dense, try a few tips. First, check your mixing. Overmixing can cause density. Mix until just combined. You can also add a bit more liquid. Adding an extra tablespoon of applesauce can help. Lastly, ensure your baking powder is fresh for proper rise. These zucchini brownies are easy to make and taste great. We covered the ingredients, step-by-step instructions, and tips to boost flavor and texture. You learned how to store them and gave answers to common questions. Experiment with different flours or sweeteners to fit your needs. Enjoy these tasty treats that offer a fun twist on the classic brownie! Happy baking!](https://fastmealmate.com/wp-content/uploads/2025/06/384a547d-f08a-42f3-b5f4-9a38b6c4e0e7.webp)
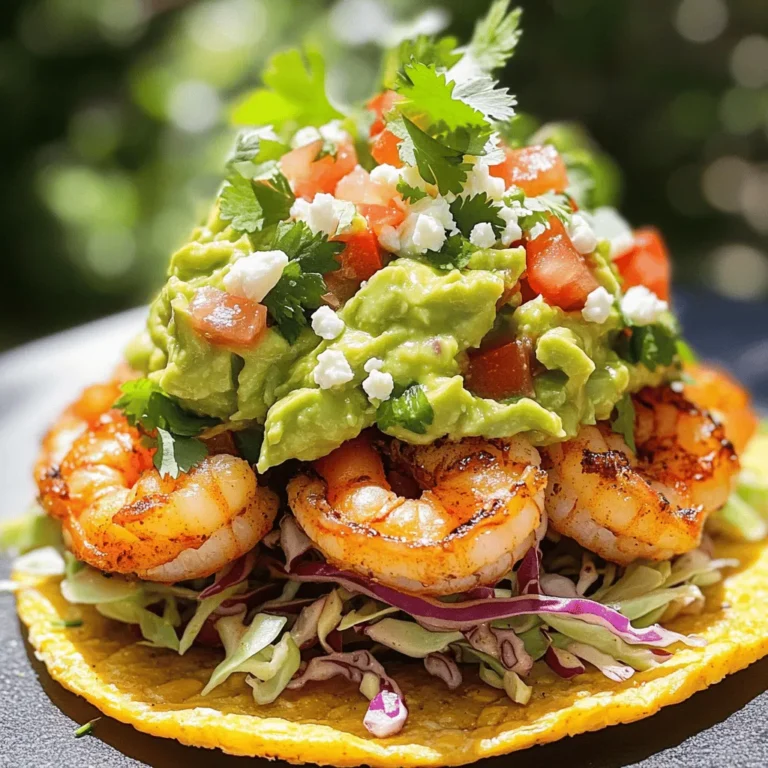
Are you ready to indulge in a dessert that’s both delicious and surprisingly healthy? These Zucchini Brownies are not only easy to make, but they also pack a secret veggie punch! Moist, chocolatey, and perfect for any occasion, this recipe will satisfy your sweet tooth without any guilt. Follow along as I guide you through simple steps to create this irresistible treat that everyone will love!
Ingredients
When making zucchini brownies, you need simple and quality ingredients. Here’s what you will need:
– 1 cup shredded zucchini
– 1/2 cup unsweetened applesauce
– 1/3 cup pure maple syrup or agave nectar
– 1/4 cup vegetable oil or melted coconut oil
– 1 teaspoon pure vanilla extract
– 1/2 cup all-purpose flour or gluten-free flour
– 1/4 cup unsweetened cocoa powder
– 1/2 teaspoon baking soda
– 1/2 teaspoon baking powder
– 1/4 teaspoon fine sea salt
– 1/2 cup chocolate chips
These ingredients come together to create a rich and moist brownie. The zucchini adds moisture without a strong taste. Applesauce keeps the brownies soft. The maple syrup or agave nectar sweetens them naturally. You can use vegetable oil or coconut oil, depending on your preference.
Using high-quality cocoa powder makes a big difference in flavor. The baking soda and baking powder help the brownies rise. Finally, the chocolate chips give a delightful chocolate burst in every bite.
Step-by-Step Instructions
Preheat Oven
– Set temperature to 350°F (175°C).
– Prepare your baking pan by greasing it or lining it with parchment paper.
Mix Wet Ingredients
– In a large bowl, combine shredded zucchini, applesauce, maple syrup, oil, and vanilla.
– Mix until the mixture is smooth and well blended.
Combine Dry Ingredients
– In a separate bowl, whisk together flour, cocoa powder, baking soda, baking powder, and salt until mixed well.
Combine Mixtures
– Gradually add the dry ingredients to the wet mixture.
– Mix gently to avoid overmixing, which can make the brownies dense.
Add Chocolate Chips
– Fold in the chocolate chips.
– Make sure they are evenly spread throughout the batter for a rich flavor.
Bake and Cool
– Pour the batter into the prepared pan.
– Bake for 25-30 minutes.
– After baking, cool in the pan for at least 15 minutes before cutting.
Tips & Tricks
Making Brownies Moist
To make your brownies moist, avoid overmixing the batter. Overmixing adds air, which can make them dry. Mix until just combined for a fudgy treat. Using ripe zucchini is key too. Ripe zucchini has more water, which adds moisture and flavor. Shred the zucchini and squeeze out excess water. This keeps your brownies rich and tasty.
Flavor Enhancements
You can add nuts or spices to boost flavor. Chopped walnuts or pecans add crunch. A sprinkle of cinnamon or nutmeg makes them warm and cozy. You could also mix in chocolate chunks for extra gooeyness. For toppings, serve with ice cream or whipped cream. A scoop of vanilla ice cream on warm brownies is heavenly!
Baking Time Adjustments
Check your brownies for doneness by inserting a toothpick in the center. It should come out with a few moist crumbs. If you live at a high altitude, bake for less time. High altitude can change how baked goods rise and cook. Start checking at the lower end of baking time, around 25 minutes. Adjust as needed.
Variations
Gluten-Free Option
You can make these brownies gluten-free. Just swap the all-purpose flour for a gluten-free flour blend. Many blends work well. Look for ones that contain rice flour or almond flour. These blends give the brownies a nice texture. Make sure to check the package for the right measurements. This way, you still get that rich, fudgy taste.
Vegan Adaptation
For a vegan version, you can replace the eggs. Use a flaxseed or chia seed mixture instead. To make this, mix one tablespoon of ground flaxseed or chia seeds with three tablespoons of water. Let it sit for five minutes until it thickens. This works great in the recipe. Your brownies will still be moist and delicious without eggs.
Healthier Substitutes
If you want a healthier treat, try different sweeteners. You can use stevia or coconut sugar instead of maple syrup. Both options lower the sugar content. Stevia is quite sweet, so use less. Coconut sugar adds a nice caramel flavor. These substitutes keep your brownies tasty while making them a bit healthier.
Storage Info
Storing Leftovers
To keep your zucchini brownies fresh, use an airtight container. This helps seal in moisture and flavor. You can store them at room temperature for up to two days. If you want to keep them longer, refrigerate them for up to a week.
Freezing Instructions
If you want to save some for later, freezing is a great option. First, cut the brownies into squares. Wrap each square in plastic wrap, and then place them in a freezer-safe bag. This way, they won’t stick together. You can freeze them for up to three months. When you’re ready to enjoy, take them out and thaw at room temperature. For the best texture, you can also warm them in the microwave for a few seconds.
These tips will help you enjoy your zucchini brownies at their best!
FAQs
Can I use yellow squash instead of zucchini?
Yes, you can use yellow squash. The texture will be similar, but the flavor differs. Yellow squash has a slightly sweeter taste. Zucchini tends to have a more neutral flavor. This can change how the brownies taste. If you like sweetness, yellow squash is a great choice.
How do I know if my brownies are done?
To check if brownies are done, insert a toothpick into the center. If it comes out with a few moist crumbs, they are ready. If it comes out wet with batter, they need more time. Brownies should look set but still soft.
Can these brownies be made ahead of time?
These brownies can be made ahead of time. Bake them, let them cool, then store them. Wrap them in plastic wrap or place them in an airtight container. They keep well for about three days at room temperature. You can also refrigerate them for up to a week.
What can I do if my brownies are too dense?
If your brownies are dense, try a few tips. First, check your mixing. Overmixing can cause density. Mix until just combined. You can also add a bit more liquid. Adding an extra tablespoon of applesauce can help. Lastly, ensure your baking powder is fresh for proper rise.
These zucchini brownies are easy to make and taste great. We covered the ingredients, step-by-step instructions, and tips to boost flavor and texture. You learned how to store them and gave answers to common questions. Experiment with different flours or sweeteners to fit your needs. Enjoy these tasty treats that offer a fun twist on the classic brownie! Happy baking!
![When making zucchini brownies, you need simple and quality ingredients. Here’s what you will need: - 1 cup shredded zucchini - 1/2 cup unsweetened applesauce - 1/3 cup pure maple syrup or agave nectar - 1/4 cup vegetable oil or melted coconut oil - 1 teaspoon pure vanilla extract - 1/2 cup all-purpose flour or gluten-free flour - 1/4 cup unsweetened cocoa powder - 1/2 teaspoon baking soda - 1/2 teaspoon baking powder - 1/4 teaspoon fine sea salt - 1/2 cup chocolate chips These ingredients come together to create a rich and moist brownie. The zucchini adds moisture without a strong taste. Applesauce keeps the brownies soft. The maple syrup or agave nectar sweetens them naturally. You can use vegetable oil or coconut oil, depending on your preference. Using high-quality cocoa powder makes a big difference in flavor. The baking soda and baking powder help the brownies rise. Finally, the chocolate chips give a delightful chocolate burst in every bite. For the full recipe, check out the [Full Recipe]. - Set temperature to 350°F (175°C). - Prepare your baking pan by greasing it or lining it with parchment paper. - In a large bowl, combine shredded zucchini, applesauce, maple syrup, oil, and vanilla. - Mix until the mixture is smooth and well blended. - In a separate bowl, whisk together flour, cocoa powder, baking soda, baking powder, and salt until mixed well. - Gradually add the dry ingredients to the wet mixture. - Mix gently to avoid overmixing, which can make the brownies dense. - Fold in the chocolate chips. - Make sure they are evenly spread throughout the batter for a rich flavor. - Pour the batter into the prepared pan. - Bake for 25-30 minutes. - After baking, cool in the pan for at least 15 minutes before cutting. Enjoy the delightfully unexpected zucchini boost hidden in every bite with this full recipe! To make your brownies moist, avoid overmixing the batter. Overmixing adds air, which can make them dry. Mix until just combined for a fudgy treat. Using ripe zucchini is key too. Ripe zucchini has more water, which adds moisture and flavor. Shred the zucchini and squeeze out excess water. This keeps your brownies rich and tasty. You can add nuts or spices to boost flavor. Chopped walnuts or pecans add crunch. A sprinkle of cinnamon or nutmeg makes them warm and cozy. You could also mix in chocolate chunks for extra gooeyness. For toppings, serve with ice cream or whipped cream. A scoop of vanilla ice cream on warm brownies is heavenly! Check your brownies for doneness by inserting a toothpick in the center. It should come out with a few moist crumbs. If you live at a high altitude, bake for less time. High altitude can change how baked goods rise and cook. Start checking at the lower end of baking time, around 25 minutes. Adjust as needed. {{image_4}} You can make these brownies gluten-free. Just swap the all-purpose flour for a gluten-free flour blend. Many blends work well. Look for ones that contain rice flour or almond flour. These blends give the brownies a nice texture. Make sure to check the package for the right measurements. This way, you still get that rich, fudgy taste. For a vegan version, you can replace the eggs. Use a flaxseed or chia seed mixture instead. To make this, mix one tablespoon of ground flaxseed or chia seeds with three tablespoons of water. Let it sit for five minutes until it thickens. This works great in the recipe. Your brownies will still be moist and delicious without eggs. If you want a healthier treat, try different sweeteners. You can use stevia or coconut sugar instead of maple syrup. Both options lower the sugar content. Stevia is quite sweet, so use less. Coconut sugar adds a nice caramel flavor. These substitutes keep your brownies tasty while making them a bit healthier. For the full recipe, check out the main article. To keep your zucchini brownies fresh, use an airtight container. This helps seal in moisture and flavor. You can store them at room temperature for up to two days. If you want to keep them longer, refrigerate them for up to a week. If you want to save some for later, freezing is a great option. First, cut the brownies into squares. Wrap each square in plastic wrap, and then place them in a freezer-safe bag. This way, they won’t stick together. You can freeze them for up to three months. When you’re ready to enjoy, take them out and thaw at room temperature. For the best texture, you can also warm them in the microwave for a few seconds. These tips will help you enjoy your zucchini brownies at their best! For the complete recipe, check out the [Full Recipe]. Yes, you can use yellow squash. The texture will be similar, but the flavor differs. Yellow squash has a slightly sweeter taste. Zucchini tends to have a more neutral flavor. This can change how the brownies taste. If you like sweetness, yellow squash is a great choice. To check if brownies are done, insert a toothpick into the center. If it comes out with a few moist crumbs, they are ready. If it comes out wet with batter, they need more time. Brownies should look set but still soft. These brownies can be made ahead of time. Bake them, let them cool, then store them. Wrap them in plastic wrap or place them in an airtight container. They keep well for about three days at room temperature. You can also refrigerate them for up to a week. If your brownies are dense, try a few tips. First, check your mixing. Overmixing can cause density. Mix until just combined. You can also add a bit more liquid. Adding an extra tablespoon of applesauce can help. Lastly, ensure your baking powder is fresh for proper rise. These zucchini brownies are easy to make and taste great. We covered the ingredients, step-by-step instructions, and tips to boost flavor and texture. You learned how to store them and gave answers to common questions. Experiment with different flours or sweeteners to fit your needs. Enjoy these tasty treats that offer a fun twist on the classic brownie! Happy baking!](https://fastmealmate.com/wp-content/uploads/2025/06/384a547d-f08a-42f3-b5f4-9a38b6c4e0e7-300x300.webp)
![To make these tasty bars, you need a few simple ingredients: - 1 cup creamy peanut butter - 1/2 cup honey or maple syrup - 1 1/2 cups rolled oats - 1/2 cup almond flour - 1/4 cup unsweetened cocoa powder - 1/2 teaspoon vanilla extract - A pinch of salt - 1/3 cup dark chocolate chips (optional) These ingredients blend well together. The peanut butter gives a rich flavor. Honey or maple syrup adds sweetness. Oats provide a hearty base, making them filling. You may want to add some extra touches for more flavor: - A sprinkle of cinnamon for warmth - Chopped nuts for crunch - Dried fruits for sweetness These options can change the taste and texture. Feel free to mix and match based on your preferences. If you have allergies, here are some easy swaps: - Use sunflower seed butter instead of peanut butter - Substitute maple syrup for honey if needed - Replace almond flour with oat flour or coconut flour These substitutions keep the recipe safe and delicious. You can still enjoy the bars while avoiding allergens. Just remember to follow the same steps, and you’ll be good to go! Start by gathering your ingredients. Place the creamy peanut butter and honey in a large bowl. Use a spatula or wooden spoon to mix them. Stir until the mix is smooth and creamy. This step is key to a tasty bar. Next, add the rolled oats, almond flour, cocoa powder, vanilla, and salt. Mix everything together well. You want to see no dry spots. This creates a thick and sticky dough that holds together nicely. Now, take an 8x8 inch baking dish and line it with parchment paper. Leave some paper hanging over the edges. This makes it easy to lift out the bars later. Transfer your peanut butter mixture into the dish. Use your hands or a spatula to press it down. Make sure it’s even and firm across the bottom. If you want to add a chocolate drizzle, melt the dark chocolate chips next. Place them in a microwave-safe bowl. Heat in 15-second bursts, stirring each time. Once melted, drizzle the chocolate over the pressed mixture. Use a spoon or piping bag for a nice look. Finally, place your baking dish in the fridge. Chill for at least 1-2 hours. This helps the bars set firmly. Once ready, lift them out by the parchment paper. Cut into squares or bars as you like. You can find the full recipe [Full Recipe]. To get the best texture, mix the peanut butter and honey well. You want it smooth and creamy. If your mixture seems too dry, add a bit more honey or a splash of water. This helps bind everything together. The rolled oats should be well coated to hold the bars nicely. When you press the mixture into the dish, use damp hands. This prevents sticking. Start at the center and push outward. Press firmly and evenly to avoid air pockets. A flat spatula can help smooth the top. Make sure the layer is compact and even for better bars. For a great look, cut the bars into squares or rectangles. Place them on a colorful plate. You can add fresh fruit like berries or banana slices on the side. For a fun touch, sprinkle some extra cocoa powder or crushed nuts on top. This makes your treat look even more inviting. {{image_4}} You can make these bars even better with fun mix-ins. Chopped nuts add crunch. Walnuts or almonds work great. Dried fruits like cranberries or raisins give a sweet touch. Mix in about 1/2 cup of these before you press the mixture into the dish. This way, each bite has a surprise! Want to change the flavor? Use coconut or almond extract! Just add a teaspoon to the mix. Coconut gives a tropical twist. Almond makes it rich and nutty. You can also add shredded coconut for extra texture. It’s easy to make each batch unique! You can swap honey for maple syrup if you want. Both sweeteners work well, but they taste different. Maple syrup has a deep flavor. Honey is sweeter and lighter. You can also use agave nectar if you prefer. Just remember, the texture may change slightly with each choice. Use the one that you love best for your no-bake peanut butter bars. For the full recipe, check the details above! To keep your no-bake peanut butter bars fresh, use an airtight container. This helps lock in moisture. Place a piece of parchment paper between layers if you stack them. This prevents sticking and makes them easy to grab. Store them in the refrigerator for the best taste and texture. You can freeze these bars for later. Cut them into squares first and wrap each one in plastic wrap. Then, place them in a freezer-safe bag. Squeeze out as much air as you can before sealing. They will last up to three months in the freezer. When you're ready to enjoy, thaw them in the fridge overnight. These bars can last up to one week in the fridge. Keep them cool and away from heat. Check for any changes in smell or texture before eating. If you notice anything off, it's best to toss them. Following these tips ensures you always have a tasty treat on hand. If you want the full recipe, you can check it out for more details! Yes, you can use crunchy peanut butter. It will add some nice texture to the bars. The flavor will be the same, but the crunch gives a fun bite. If you like a little crunch, go for it! The bars need to chill for at least 1-2 hours. This time helps them set well. If you can wait longer, they will be even firmer and easier to cut. Just make sure they are cold before slicing. They can be vegan if you use maple syrup instead of honey. Just check your peanut butter, too, to ensure it doesn’t have added ingredients. With the right swaps, you can enjoy this treat without any animal products! You can use any nut flour, like hazelnut or cashew flour. If you need a nut-free option, try oat flour or even whole wheat flour. Just remember that different flours may change the texture a bit. The bars are set when they are firm to the touch. They should hold their shape when you lift them out of the pan. If they feel soft, give them more time in the fridge. Once set, they are ready to cut into pieces. These no-bake peanut butter bars are simple and tasty. We covered ingredients, steps, and great tips. You can customize them with different flavors and mix-ins. Remember to store them well for freshness. Feel free to experiment with substitutes and variations. Enjoy making these treats for yourself or to share. They are quick to whip up, perfect for any snack. Now, it’s your turn to enjoy this easy, delicious recipe!](https://fastmealmate.com/wp-content/uploads/2025/07/4c36effc-71ba-4d9d-bf30-f4c7732f2b92-768x768.webp)

![- 4 medium cucumbers, sliced into rounds - 1 teaspoon sea salt - 1 teaspoon freshly ground black pepper - 1 teaspoon smoky chili powder - 1 tablespoon freshly squeezed lime juice - 1/4 cup crumbled queso fresco (or feta) - 1/4 cup fresh cilantro, finely chopped - 1 jalapeño, finely chopped (optional) - 1 tablespoon extra virgin olive oil When I make Mexican-style cucumbers, I focus on fresh, vibrant ingredients. Each item plays a key role in flavor and texture. The cucumbers are crisp and refreshing. They are the star of this dish. The sea salt enhances their natural taste. Black pepper adds a nice kick, while smoky chili powder gives it depth. Fresh lime juice brings brightness. It balances the flavors perfectly. Queso fresco adds a creamy touch, and cilantro gives a fresh burst. If you like heat, jalapeño adds a nice spicy twist. The extra virgin olive oil ties everything together, making it rich and smooth. - Mixing bowl - Cutting board and knife - Measuring spoons - Serving bowl Using the right tools makes cooking easier. A good knife helps slice cucumbers evenly. A mixing bowl is perfect for combining all the ingredients. Measuring spoons ensure you get the flavors just right. Finally, a nice serving bowl makes your dish look great at the table. You can find the full recipe for Mexican-style cucumbers to guide you through this process. - Rinse cucumbers under cold water. - Trim ends and slice into 1/4 inch rounds. Start by washing your cucumbers. Cold water helps remove dirt and any residue. After rinsing, trim off the ends. Now, slice each cucumber into rounds about 1/4 inch thick. This size gives a nice bite and ensures even seasoning. - Combine cucumber slices with salt, pepper, and chili powder. - Toss gently to coat evenly. In a big bowl, mix the cucumber slices with sea salt, black pepper, and smoky chili powder. The salt enhances the cucumber's natural flavor. The chili powder adds a great kick. Toss the cucumbers gently. You want every slice to be coated well without breaking them. - Drizzle lime juice and olive oil over the cucumbers. - Fold in queso fresco and cilantro. - Optionally add jalapeño for extra spice. - Let marinate for 10 minutes before serving. Next, drizzle fresh lime juice and olive oil over the cucumbers. This adds brightness and richness. Fold in crumbled queso fresco and chopped cilantro. If you like spice, add jalapeño. Mix everything gently so the flavors blend well. Let it sit for at least 10 minutes. This waiting time helps the cucumbers soak up all those delicious flavors. Enjoy your vibrant and tasty dish! For the full recipe, refer back here. To make your Mexican style cucumbers shine, use fresh lime juice. The juice brightens the taste and adds a zesty kick. You can also experiment with different types of peppers. If you like heat, try serrano or habanero peppers. Each pepper brings a unique taste and spice level, making your dish fun and exciting. For a stunning look, serve your cucumbers in a stylish bowl. Top them with lime wedges and fresh cilantro. This not only adds color but also enhances the flavor. You might sprinkle extra chili powder for even more appeal. This small touch can make your dish look gourmet and inviting. Use a mandoline to slice your cucumbers evenly. This tool helps create uniform rounds, making them look professional. You can also prepare your ingredients in advance. Chop everything and store them separately. This way, you can quickly assemble your dish when you're ready. These shortcuts save time and make cooking more enjoyable. For the full recipe, check out the [Full Recipe]. {{image_4}} To add heat to your dish, try these tips: - Increase the jalapeño or add serrano peppers for more spice. - Include chopped red onions for extra crunch and flavor. These changes create a perfect balance of spice and freshness. You can adjust the heat level to match your taste. The spicy version pairs well with grilled meats or tacos. For a rich, creamy twist, consider these ideas: - Add Greek yogurt or sour cream for a smooth texture. - Mix in avocado for added creaminess and nutrition. This creamy variation is great for those who enjoy a thicker dressing. It also makes the dish more filling and satisfying. Serve it with pita chips or as a dip for veggies. Want to try something sweet? Here’s how: - Incorporate diced mango or pineapple for a fruity twist. - Drizzle with honey to create a unique flavor combo. This sweet and tangy version is refreshing and fun. It's perfect for summer gatherings or as a light snack. Each bite bursts with flavor, making it a hit with kids and adults alike. For the full recipe, check out the details above. To store leftover Mexican style cucumbers, place them in an airtight container. This keeps them fresh and safe. You should eat them within 2-3 days for the best taste and crunch. Freezing cucumbers is not a good idea. The texture changes when frozen, making them watery and mushy. Instead, enjoy them fresh! To keep your cucumbers fresh, wait to add dressing until you serve. This prevents them from getting soggy. You can also store them with paper towels. The towels soak up extra moisture, keeping your dish crisp and tasty. Mexican-style cucumbers stand out due to their unique seasoning blends. I use fresh, vibrant ingredients like lime juice, smoky chili powder, and cilantro. These flavors combine to create a refreshing taste that dances on your palate. The mix of spices gives a fun twist to simple cucumbers, making them a delightful dish. Yes, you can easily make this recipe vegan. Just replace queso fresco with a plant-based cheese alternative. This change keeps the dish creamy and delicious while fitting a vegan diet. You can still enjoy all the flavors without dairy. These cucumbers shine as a side dish with grilled meats. They also work well as a standalone salad. Pair them with tacos, chicken, or fish for a complete meal. Their crispness complements rich dishes perfectly. Letting cucumbers marinate for at least 10 minutes is best. This time allows the flavors to meld together. However, if you let them sit longer, the taste gets even better. Just be sure to keep them at room temperature, and they will be ready to serve. Mexican-style cucumbers are low in calories and rich in vitamins. They provide hydration, making them perfect for hot days. This dish is also great for weight loss, as it fills you up without adding many calories. Enjoy the freshness guilt-free! This blog post covered the core ingredients and step-by-step instructions to make delicious Mexican-style cucumbers. We discussed how to enhance flavors and provided tips for presentation. You can easily vary the recipe to suit your taste or dietary needs. Remember to store leftovers properly for the best taste. Enjoy refreshing, healthy cucumbers as a side or salad! Making them at home is simple, fun, and sure to impress anyone you serve. Your kitchen can be a hub of fresh taste!](https://fastmealmate.com/wp-content/uploads/2025/06/eb69b124-1af5-44a9-95ae-72c395866c25-768x768.webp)