Fresh Peach Custard Pie Simply Delicious Delight
![Fresh peaches are the star of this pie. Choose ripe, sweet peaches for the best flavor. Use about 1 ½ cups of peaches, peeled and sliced. The slices should be thick enough to hold their shape. This will give your pie a lovely texture and taste. You have a few choices for the pie crust. A store-bought 9-inch pie crust is quick and easy. If you want to make it from scratch, use flour, butter, and a pinch of salt. Either way, the crust should be crisp and flaky. This creates a nice contrast with the smooth custard. Here’s a quick look at the other ingredients you’ll need: - ¾ cup granulated sugar - 3 tablespoons cornstarch - 2 large eggs - 1 cup heavy cream - 1 teaspoon pure vanilla extract - ½ teaspoon ground cinnamon - Pinch of salt These ingredients work together to form the rich custard. The sugar adds sweetness, while cornstarch helps it set. Eggs provide structure, and heavy cream gives a creamy texture. Vanilla and cinnamon add depth to the flavor. For the full recipe, check out the details above. To start, preheat your oven to 375°F (190°C). Take your store-bought pie crust and fit it snugly into a 9-inch pie plate. Use a fork to prick the bottom. This helps prevent bubbling. Place the crust in the oven for about 10 minutes. You want it set but not browned. Once done, take it out and let it cool on a wire rack. Next, grab a large mixing bowl. In it, combine the granulated sugar, cornstarch, ground cinnamon, and a pinch of salt. Mix these dry ingredients well to avoid any lumps. In a separate bowl, crack two large eggs and whisk them until well beaten. Add the heavy cream and vanilla extract, whisking until everything blends into a smooth mixture. Gradually pour this egg mixture into the dry ingredients. Stir continuously to create a smooth custard. Now, let's assemble the pie. Start by evenly distributing your sliced fresh peaches over the base of the pre-baked pie crust. Carefully pour the custard mixture over the peaches. Make sure they are all covered. Place the pie in the oven and bake for 30-35 minutes. The custard should be firm and slightly golden. To check if it's set, gently shake the pie. The center should jiggle just a bit. Once baked, let the pie cool on a wire rack for about an hour. This helps the custard firm up nicely. For the best results, refrigerate the pie for at least 2 hours before slicing. This step makes the custard even better. You can find the full recipe here: [Full Recipe]. To get a creamy custard, mix the sugar and cornstarch well. This step avoids lumps. When you add the eggs and cream, whisk until smooth. This ensures a rich texture. Bake until the center slightly jiggles. This tells you the custard is set but still soft. It will firm up as it cools. A soggy crust ruins your pie. To prevent this, bake the crust first. Prick the bottom with a fork to let steam escape. Bake it for about ten minutes until it’s just set. Once out of the oven, let it cool before adding the custard. This keeps the crust crisp and flaky. For a lovely presentation, slice the pie neatly. Serve each piece with whipped cream on top. A sprinkle of ground cinnamon adds warmth and charm. Add a slice of fresh peach on the side. This highlights the fresh flavors in the pie. Enjoy your beautiful creation! For more detailed steps, check the Full Recipe. {{image_4}} You can swap fresh peaches for other fruits. Try ripe nectarines for a similar taste. Plums add a tart kick and are juicy, too. Blueberries give a pop of color and sweetness. Apples offer a crunchy bite, especially if you bake them a bit first. Each fruit brings its own charm to the pie. If you need a gluten-free crust, several options exist. Almond flour is a great choice for a nutty flavor. You can also use a gluten-free pie crust mix from the store. Just follow the package instructions for best results. Make sure to check that all ingredients are gluten-free. This way, everyone can enjoy this tasty treat. To make your pie stand out, try some flavor boosts. A dash of lemon juice brightens the peach flavor. You can mix in some nutmeg for warmth, too. Adding a splash of bourbon or rum gives a nice depth. Experimenting with spices lets you create a unique pie that reflects your taste. Get creative and have fun with it! For the complete recipe, check out the [Full Recipe]. To store leftover pie, let it cool completely. Cover it with plastic wrap or foil. You can also use an airtight container. Keep it in the fridge for up to three days. The pie stays fresh this way. Avoid stacking anything on top to prevent crushing. If you want to freeze the pie, make sure it’s fully cooled. Wrap it tightly in plastic wrap, then in aluminum foil. This helps prevent freezer burn. You can freeze it for up to three months. To enjoy later, just thaw it in the fridge overnight before serving. To reheat the pie, preheat your oven to 350°F (175°C). Place the pie in an oven-safe dish. Cover it with foil to keep it from browning too much. Heat for about 15-20 minutes, or until warm. If you like, you can microwave individual slices for a quick snack. Just heat for 30 seconds, checking often. Enjoy your pie as if it were fresh! Yes, you can use canned peaches. However, fresh peaches taste better. Canned peaches are softer and sweeter. If you choose them, drain the syrup well. Pat them dry with a paper towel. This helps reduce excess moisture. Use the same amount as fresh peaches. But keep in mind that the texture will change. You can use half-and-half or whole milk as a lighter option. For a dairy-free choice, use coconut cream or almond milk. These will alter the flavor slightly. If you want to keep the richness, try a mix of milk and butter. Use 1 cup of milk and 2 tablespoons of melted butter. This gives a similar creamy texture. The custard is set when it has a smooth, firm texture. Give the pie a gentle shake. If the center jiggles slightly, it is ready. You can also insert a knife into the center. If it comes out clean, the custard is done. Let it cool for a bit to firm up further. For the best texture, refrigerate it for at least two hours. Enjoy this pie chilled for the best flavor! You learned how to make a delicious peach pie from scratch. We covered fresh peaches, pie crust options, and key ingredients. I detailed steps for prepping the crust, making the custard, and baking. Plus, I shared tips for a perfect texture and stunning presentation. You can even explore variations with different fruits and gluten-free options. Finally, we talked about storage and reheating to keep the pie tasty. Now, you have all you need to create this delightful treat! Enjoy every bite of your homemade peach pie.](https://fastmealmate.com/wp-content/uploads/2025/06/869ea291-58a7-44e1-8c29-8ce1fa52617f.webp)
Are you ready to dive into a dessert that screams summer? This Fresh Peach Custard Pie brings together the sweet, juicy taste of fresh peaches and creamy custard, creating a treat that is simply delicious! In this guide, I’ll share easy steps, tips, and tricks to help you make this delightful pie. Let’s turn your kitchen into a fruity paradise that everyone will love!
Ingredients
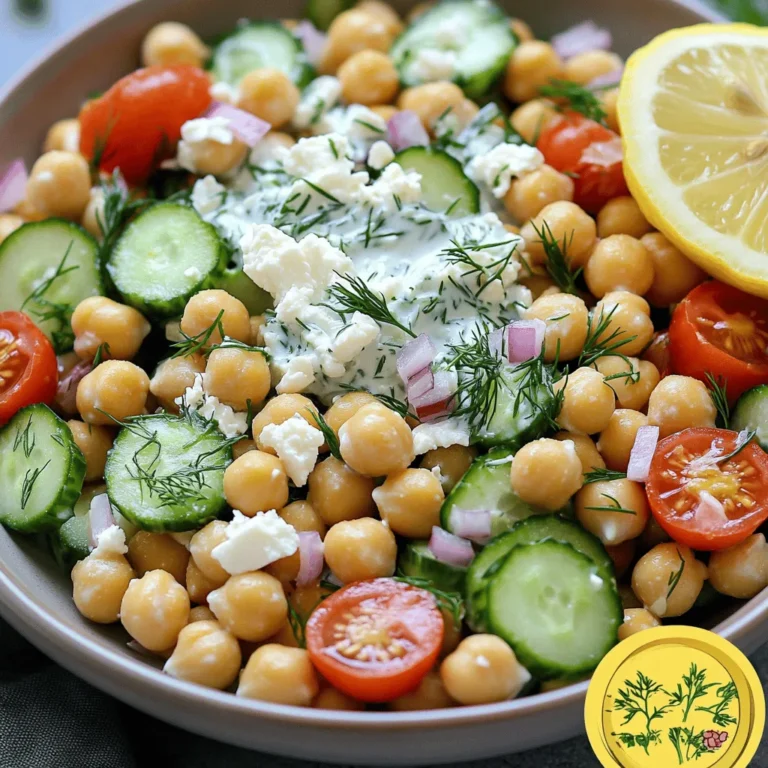
Fresh Peaches
Fresh peaches are the star of this pie. Choose ripe, sweet peaches for the best flavor. Use about 1 ½ cups of peaches, peeled and sliced. The slices should be thick enough to hold their shape. This will give your pie a lovely texture and taste.
Pie Crust Options
You have a few choices for the pie crust. A store-bought 9-inch pie crust is quick and easy. If you want to make it from scratch, use flour, butter, and a pinch of salt. Either way, the crust should be crisp and flaky. This creates a nice contrast with the smooth custard.
Key Ingredients Overview
Here’s a quick look at the other ingredients you’ll need:
– ¾ cup granulated sugar
– 3 tablespoons cornstarch
– 2 large eggs
– 1 cup heavy cream
– 1 teaspoon pure vanilla extract
– ½ teaspoon ground cinnamon
– Pinch of salt
These ingredients work together to form the rich custard. The sugar adds sweetness, while cornstarch helps it set. Eggs provide structure, and heavy cream gives a creamy texture. Vanilla and cinnamon add depth to the flavor.
Step-by-Step Instructions
Prepping the Pie Crust
To start, preheat your oven to 375°F (190°C). Take your store-bought pie crust and fit it snugly into a 9-inch pie plate. Use a fork to prick the bottom. This helps prevent bubbling. Place the crust in the oven for about 10 minutes. You want it set but not browned. Once done, take it out and let it cool on a wire rack.
Making the Custard Mixture
Next, grab a large mixing bowl. In it, combine the granulated sugar, cornstarch, ground cinnamon, and a pinch of salt. Mix these dry ingredients well to avoid any lumps. In a separate bowl, crack two large eggs and whisk them until well beaten. Add the heavy cream and vanilla extract, whisking until everything blends into a smooth mixture. Gradually pour this egg mixture into the dry ingredients. Stir continuously to create a smooth custard.
Baking the Pie
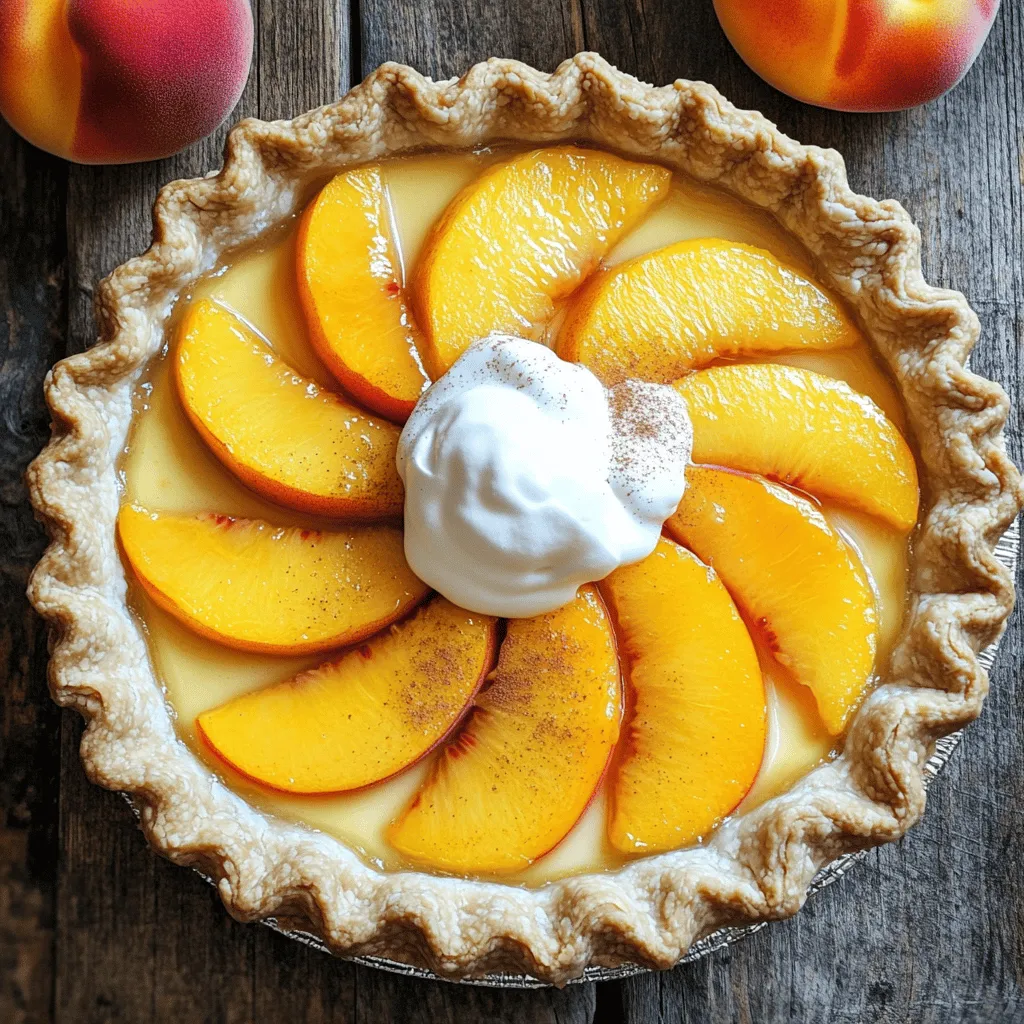
Now, let’s assemble the pie. Start by evenly distributing your sliced fresh peaches over the base of the pre-baked pie crust. Carefully pour the custard mixture over the peaches. Make sure they are all covered. Place the pie in the oven and bake for 30-35 minutes. The custard should be firm and slightly golden. To check if it’s set, gently shake the pie. The center should jiggle just a bit. Once baked, let the pie cool on a wire rack for about an hour. This helps the custard firm up nicely. For the best results, refrigerate the pie for at least 2 hours before slicing. This step makes the custard even better.
Tips & Tricks
Ensuring a Perfect Custard Texture
To get a creamy custard, mix the sugar and cornstarch well. This step avoids lumps. When you add the eggs and cream, whisk until smooth. This ensures a rich texture. Bake until the center slightly jiggles. This tells you the custard is set but still soft. It will firm up as it cools.
Preventing a Soggy Bottom Crust
A soggy crust ruins your pie. To prevent this, bake the crust first. Prick the bottom with a fork to let steam escape. Bake it for about ten minutes until it’s just set. Once out of the oven, let it cool before adding the custard. This keeps the crust crisp and flaky.
Presentation Tips for Serving
For a lovely presentation, slice the pie neatly. Serve each piece with whipped cream on top. A sprinkle of ground cinnamon adds warmth and charm. Add a slice of fresh peach on the side. This highlights the fresh flavors in the pie. Enjoy your beautiful creation!
Variations
Alternative Fruits to Use
You can swap fresh peaches for other fruits. Try ripe nectarines for a similar taste. Plums add a tart kick and are juicy, too. Blueberries give a pop of color and sweetness. Apples offer a crunchy bite, especially if you bake them a bit first. Each fruit brings its own charm to the pie.
Gluten-Free Crust Options
If you need a gluten-free crust, several options exist. Almond flour is a great choice for a nutty flavor. You can also use a gluten-free pie crust mix from the store. Just follow the package instructions for best results. Make sure to check that all ingredients are gluten-free. This way, everyone can enjoy this tasty treat.
Adding Flavor Enhancements
To make your pie stand out, try some flavor boosts. A dash of lemon juice brightens the peach flavor. You can mix in some nutmeg for warmth, too. Adding a splash of bourbon or rum gives a nice depth. Experimenting with spices lets you create a unique pie that reflects your taste. Get creative and have fun with it!
Storage Info
How to Store Leftover Pie
To store leftover pie, let it cool completely. Cover it with plastic wrap or foil. You can also use an airtight container. Keep it in the fridge for up to three days. The pie stays fresh this way. Avoid stacking anything on top to prevent crushing.
Freezing Instructions
If you want to freeze the pie, make sure it’s fully cooled. Wrap it tightly in plastic wrap, then in aluminum foil. This helps prevent freezer burn. You can freeze it for up to three months. To enjoy later, just thaw it in the fridge overnight before serving.
Best Practices for Reheating
To reheat the pie, preheat your oven to 350°F (175°C). Place the pie in an oven-safe dish. Cover it with foil to keep it from browning too much. Heat for about 15-20 minutes, or until warm. If you like, you can microwave individual slices for a quick snack. Just heat for 30 seconds, checking often. Enjoy your pie as if it were fresh!
FAQs
Can I use canned peaches instead of fresh?
Yes, you can use canned peaches. However, fresh peaches taste better. Canned peaches are softer and sweeter. If you choose them, drain the syrup well. Pat them dry with a paper towel. This helps reduce excess moisture. Use the same amount as fresh peaches. But keep in mind that the texture will change.
What can I substitute for heavy cream?
You can use half-and-half or whole milk as a lighter option. For a dairy-free choice, use coconut cream or almond milk. These will alter the flavor slightly. If you want to keep the richness, try a mix of milk and butter. Use 1 cup of milk and 2 tablespoons of melted butter. This gives a similar creamy texture.
How do I know when the custard is set?
The custard is set when it has a smooth, firm texture. Give the pie a gentle shake. If the center jiggles slightly, it is ready. You can also insert a knife into the center. If it comes out clean, the custard is done. Let it cool for a bit to firm up further. For the best texture, refrigerate it for at least two hours. Enjoy this pie chilled for the best flavor!
You learned how to make a delicious peach pie from scratch. We covered fresh peaches, pie crust options, and key ingredients. I detailed steps for prepping the crust, making the custard, and baking. Plus, I shared tips for a perfect texture and stunning presentation. You can even explore variations with different fruits and gluten-free options. Finally, we talked about storage and reheating to keep the pie tasty. Now, you have all you need to create this delightful treat! Enjoy every bite of your homemade peach pie.
![Fresh peaches are the star of this pie. Choose ripe, sweet peaches for the best flavor. Use about 1 ½ cups of peaches, peeled and sliced. The slices should be thick enough to hold their shape. This will give your pie a lovely texture and taste. You have a few choices for the pie crust. A store-bought 9-inch pie crust is quick and easy. If you want to make it from scratch, use flour, butter, and a pinch of salt. Either way, the crust should be crisp and flaky. This creates a nice contrast with the smooth custard. Here’s a quick look at the other ingredients you’ll need: - ¾ cup granulated sugar - 3 tablespoons cornstarch - 2 large eggs - 1 cup heavy cream - 1 teaspoon pure vanilla extract - ½ teaspoon ground cinnamon - Pinch of salt These ingredients work together to form the rich custard. The sugar adds sweetness, while cornstarch helps it set. Eggs provide structure, and heavy cream gives a creamy texture. Vanilla and cinnamon add depth to the flavor. For the full recipe, check out the details above. To start, preheat your oven to 375°F (190°C). Take your store-bought pie crust and fit it snugly into a 9-inch pie plate. Use a fork to prick the bottom. This helps prevent bubbling. Place the crust in the oven for about 10 minutes. You want it set but not browned. Once done, take it out and let it cool on a wire rack. Next, grab a large mixing bowl. In it, combine the granulated sugar, cornstarch, ground cinnamon, and a pinch of salt. Mix these dry ingredients well to avoid any lumps. In a separate bowl, crack two large eggs and whisk them until well beaten. Add the heavy cream and vanilla extract, whisking until everything blends into a smooth mixture. Gradually pour this egg mixture into the dry ingredients. Stir continuously to create a smooth custard. Now, let's assemble the pie. Start by evenly distributing your sliced fresh peaches over the base of the pre-baked pie crust. Carefully pour the custard mixture over the peaches. Make sure they are all covered. Place the pie in the oven and bake for 30-35 minutes. The custard should be firm and slightly golden. To check if it's set, gently shake the pie. The center should jiggle just a bit. Once baked, let the pie cool on a wire rack for about an hour. This helps the custard firm up nicely. For the best results, refrigerate the pie for at least 2 hours before slicing. This step makes the custard even better. You can find the full recipe here: [Full Recipe]. To get a creamy custard, mix the sugar and cornstarch well. This step avoids lumps. When you add the eggs and cream, whisk until smooth. This ensures a rich texture. Bake until the center slightly jiggles. This tells you the custard is set but still soft. It will firm up as it cools. A soggy crust ruins your pie. To prevent this, bake the crust first. Prick the bottom with a fork to let steam escape. Bake it for about ten minutes until it’s just set. Once out of the oven, let it cool before adding the custard. This keeps the crust crisp and flaky. For a lovely presentation, slice the pie neatly. Serve each piece with whipped cream on top. A sprinkle of ground cinnamon adds warmth and charm. Add a slice of fresh peach on the side. This highlights the fresh flavors in the pie. Enjoy your beautiful creation! For more detailed steps, check the Full Recipe. {{image_4}} You can swap fresh peaches for other fruits. Try ripe nectarines for a similar taste. Plums add a tart kick and are juicy, too. Blueberries give a pop of color and sweetness. Apples offer a crunchy bite, especially if you bake them a bit first. Each fruit brings its own charm to the pie. If you need a gluten-free crust, several options exist. Almond flour is a great choice for a nutty flavor. You can also use a gluten-free pie crust mix from the store. Just follow the package instructions for best results. Make sure to check that all ingredients are gluten-free. This way, everyone can enjoy this tasty treat. To make your pie stand out, try some flavor boosts. A dash of lemon juice brightens the peach flavor. You can mix in some nutmeg for warmth, too. Adding a splash of bourbon or rum gives a nice depth. Experimenting with spices lets you create a unique pie that reflects your taste. Get creative and have fun with it! For the complete recipe, check out the [Full Recipe]. To store leftover pie, let it cool completely. Cover it with plastic wrap or foil. You can also use an airtight container. Keep it in the fridge for up to three days. The pie stays fresh this way. Avoid stacking anything on top to prevent crushing. If you want to freeze the pie, make sure it’s fully cooled. Wrap it tightly in plastic wrap, then in aluminum foil. This helps prevent freezer burn. You can freeze it for up to three months. To enjoy later, just thaw it in the fridge overnight before serving. To reheat the pie, preheat your oven to 350°F (175°C). Place the pie in an oven-safe dish. Cover it with foil to keep it from browning too much. Heat for about 15-20 minutes, or until warm. If you like, you can microwave individual slices for a quick snack. Just heat for 30 seconds, checking often. Enjoy your pie as if it were fresh! Yes, you can use canned peaches. However, fresh peaches taste better. Canned peaches are softer and sweeter. If you choose them, drain the syrup well. Pat them dry with a paper towel. This helps reduce excess moisture. Use the same amount as fresh peaches. But keep in mind that the texture will change. You can use half-and-half or whole milk as a lighter option. For a dairy-free choice, use coconut cream or almond milk. These will alter the flavor slightly. If you want to keep the richness, try a mix of milk and butter. Use 1 cup of milk and 2 tablespoons of melted butter. This gives a similar creamy texture. The custard is set when it has a smooth, firm texture. Give the pie a gentle shake. If the center jiggles slightly, it is ready. You can also insert a knife into the center. If it comes out clean, the custard is done. Let it cool for a bit to firm up further. For the best texture, refrigerate it for at least two hours. Enjoy this pie chilled for the best flavor! You learned how to make a delicious peach pie from scratch. We covered fresh peaches, pie crust options, and key ingredients. I detailed steps for prepping the crust, making the custard, and baking. Plus, I shared tips for a perfect texture and stunning presentation. You can even explore variations with different fruits and gluten-free options. Finally, we talked about storage and reheating to keep the pie tasty. Now, you have all you need to create this delightful treat! Enjoy every bite of your homemade peach pie.](https://fastmealmate.com/wp-content/uploads/2025/06/869ea291-58a7-44e1-8c29-8ce1fa52617f-300x300.webp)


![- 200g ramen noodles - 150g pancetta or guanciale, diced - 2 large eggs The key to this dish starts with the ramen noodles. They add a lovely texture. We use 200g of fresh ramen noodles. You can also use dried noodles if needed. Next, we have the pancetta or guanciale. I prefer guanciale for its rich flavor, but pancetta works great too. You need about 150g, diced into small pieces. Finally, the eggs bind everything together, giving a creamy texture. - 1 cup heavy cream - 1 cup grated Parmesan cheese - 2 cloves garlic, minced For the creamy sauce, use 1 cup of heavy cream. This gives the dish its rich base. Add in 1 cup of grated Parmesan cheese for a salty kick. The cheese melts beautifully into the sauce. Don't forget 2 cloves of minced garlic. Garlic adds depth and a warm aroma. - Fresh black pepper, to taste - Salt, to taste - Fresh parsley, chopped (for garnish) Seasoning is crucial. I recommend using fresh black pepper to taste. It adds a nice heat. You will also need salt to enhance the flavors. Finally, chop some fresh parsley for garnish. It adds color and freshness to the dish. For the full recipe, check out the details provided earlier. To cook ramen noodles properly, I follow the package instructions. I boil water in a pot and add the noodles. I cook them for about 3-4 minutes until they are tender. Then, I drain the noodles but save a small cup of the pasta water. This water helps adjust the sauce later, making it creamy. For crispy pancetta, I heat olive oil in a large skillet over medium heat. I add the diced pancetta and sauté it for 5-7 minutes. The pancetta should turn golden brown and crisp up nicely. Next, I add minced garlic to the skillet. I cook it for just one minute, stirring all the time. This way, the garlic does not burn and turn bitter. Now, I whisk together two large eggs, one cup of heavy cream, and one cup of grated Parmesan cheese in a bowl. I make sure the mixture is smooth. Season with fresh black pepper and a pinch of salt to boost the flavors. This creamy sauce makes the dish rich and tasty. For the full recipe, check out the instructions again. To get that perfect creamy texture, you must mix the egg and cream well. Whisk the eggs, cream, and cheese together until smooth. This will help avoid scrambling the eggs when you add them to the hot noodles. When you mix the sauce with the ramen, keep the heat low. Slowly pour the egg mixture while tossing the noodles. If the sauce seems thick, add a little reserved pasta water. This will make it silky and rich. Using fresh ingredients can greatly change the taste. Fresh pancetta or guanciale adds a deeper flavor. Look for high-quality meat for the best results. When buying pancetta, choose one that is thick-cut and well-marbled. Guanciale is even better, but it can be harder to find. If you can’t get either, good bacon can work too, but it will change the taste slightly. Serve your creamy carbonara ramen right after mixing. This dish tastes best hot and fresh. Once you finish mixing, transfer it to bowls quickly. To know if it’s ready, check if the noodles are coated well and warm. You want to see a glossy sauce, not clumpy or dry. For the best experience, add a sprinkle of fresh parsley right before serving from the [Full Recipe]. This adds color and freshness to your dish. {{image_4}} You can add fresh spinach or green peas to your ramen bowls. They bring color and nutrition. - Spinach: Add it just before serving. It wilts quickly and adds a nice touch. - Peas: Stir them in while cooking the pancetta. They cook fast and add sweetness. Other vegetables can also work. Try sliced mushrooms for umami, or julienned carrots for crunch. If you want a different meat, consider bacon or turkey. They both give a distinct taste. - Bacon: Use it for a smoky flavor. Cook until crispy, just like the pancetta. - Turkey: A leaner choice that still adds great flavor. For a meatless option, use mushrooms or tofu. They absorb flavors well and make the dish hearty. Want some heat? Red pepper flakes are a great start. Add them based on your spice level. - Mild: Start with a pinch. You can always add more later. - Spicy: Use a teaspoon or more for a real kick. You can also try other spices. Fresh herbs like basil or thyme add freshness. Garlic powder or onion powder can boost flavor too. For the complete experience, check the Full Recipe. To keep your Creamy Carbonara Ramen Bowls fresh, store them in the fridge. Use airtight containers to prevent moisture loss. It’s best to eat leftovers within 2-3 days for the best taste. Make sure to cool the dish to room temperature before sealing it up. This helps keep the flavors intact. When reheating, do so gently. Use a skillet over low heat to warm the noodles. Add a splash of cream or pasta water to keep it creamy. Stir often to avoid burning. Never microwave it directly, as it can make the sauce clumpy. You can freeze this dish, but it’s not ideal. The cream may separate when thawed. If you choose to freeze, do so in portions. Use freezer-safe containers and label them. When ready to eat, thaw in the fridge overnight. Then, reheat gently, adding a bit of cream to restore its smooth texture. Yes, you can. To make a vegetarian version, swap the pancetta for mushrooms. Use shiitake or cremini for a rich taste. You can also add spinach or peas for extra color and flavor. Another great option is to use smoked tofu for a protein boost. Parmesan cheese is the classic choice. Its salty and nutty flavor works well. Pecorino Romano is another good option. It’s sharper and adds a nice kick. You can mix both cheeses for a layered taste. To keep your sauce smooth, add pasta water gradually. Start with a small splash and mix it in. This helps create a creamy texture without clumping. Stir quickly to combine and avoid scrambling the eggs. The total time for Creamy Carbonara Ramen Bowls is about 30 minutes. Prep time takes around 10 minutes. Cooking the dish takes about 20 minutes. This quick recipe is perfect for busy nights. Pair this dish with garlic bread for a crunchy side. A fresh green salad also works well. You can add a light vinaigrette to balance the rich flavors. For a fun twist, try pickled vegetables for a tangy contrast. In this article, we explored how to create delicious Creamy Carbonara Ramen Bowls. We covered the main ingredients, including ramen noodles, pancetta, eggs, and a rich sauce made from cream and Parmesan. You learned step-by-step instructions for cooking the noodles, preparing the pancetta, and making the creamy sauce. Remember, using fresh ingredients can greatly enhance the dish's flavor. Try out the variations and tips for success. Enjoy your creamy creation and make it your own!](https://fastmealmate.com/wp-content/uploads/2025/07/91aa5888-7f38-4185-abdc-18228452c956-768x768.webp)