Southern Fried Okra Crispy and Flavorful Delight
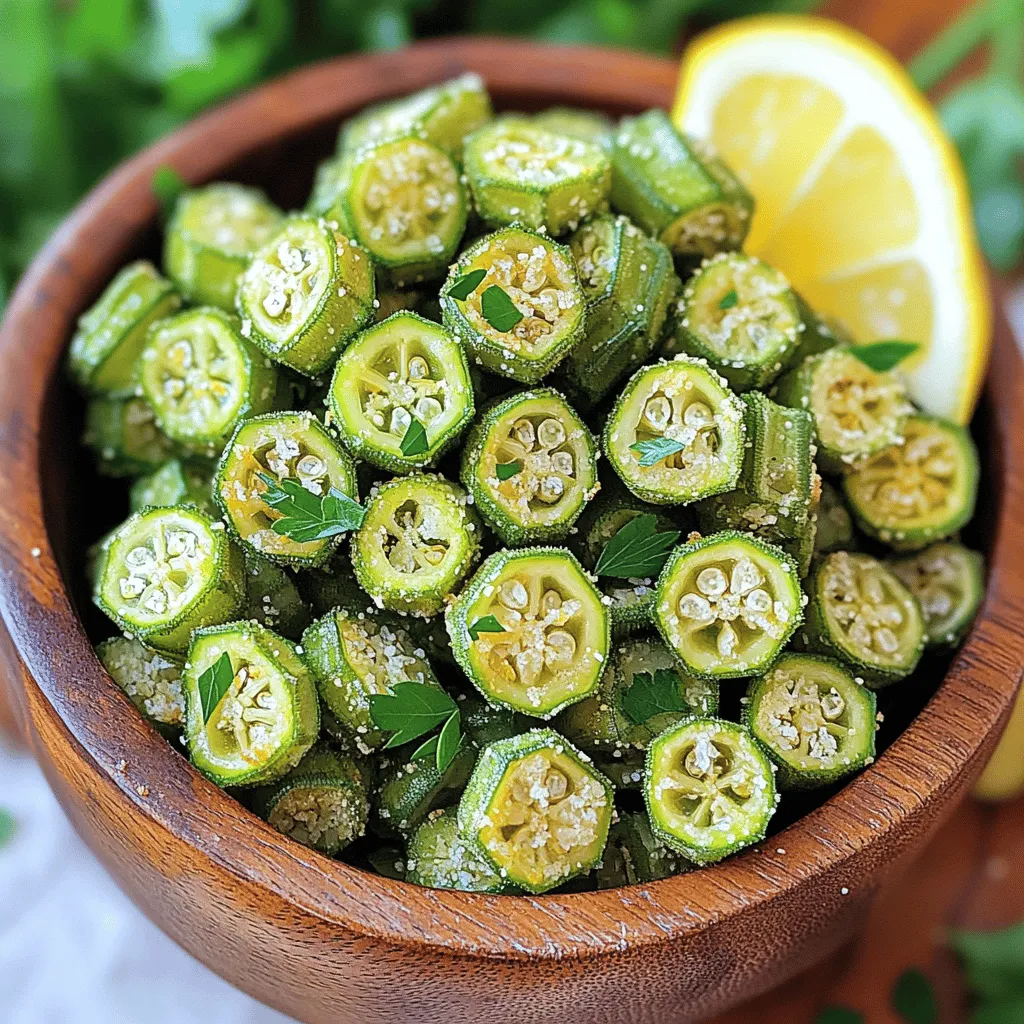
![To make this Southern fried okra, start with 1 pound of fresh okra. Look for bright green pods that feel firm. Avoid any that show signs of browning or softness. Slice the okra into 1/2 inch rounds. This size helps them cook evenly and keeps their crunch. Next, prepare the coating. You will need: - 1 cup buttermilk - 1 cup cornmeal - 1/2 cup all-purpose flour - 1 teaspoon garlic powder - 1 teaspoon onion powder - 1 teaspoon smoked paprika - 1/2 teaspoon cayenne pepper (you can adjust this for spice) - Salt and pepper to taste Mix the cornmeal, flour, and spices in a bowl. This blend adds flavor and crunch. The buttermilk will help the coating stick well to the okra. For frying, use vegetable or canola oil. You need enough to fill your skillet by about 1 inch. This depth helps fry the okra evenly. Heat the oil to 350°F (175°C). A thermometer is handy for this step. Getting the oil hot enough is key for that crispy texture. Check the Full Recipe for detailed steps on cooking. Enjoy making this tasty dish! To start, you need fresh okra. Rinse it well under cold water. This cleans any dirt off the pods. Next, slice the okra into 1/2 inch rounds. Make sure each piece is uniform in size. This helps them cook evenly. Once sliced, set the okra aside on a clean plate. Now, grab a mixing bowl and pour in 1 cup of buttermilk. Add the sliced okra to the bowl. Make sure each piece is well-coated with buttermilk. Soak the okra for about 15 minutes. This step adds moisture and flavor. In another bowl, mix the dry ingredients. Combine 1 cup of cornmeal and 1/2 cup of all-purpose flour. Add 1 teaspoon each of garlic powder, onion powder, and smoked paprika. For extra heat, mix in 1/2 teaspoon of cayenne pepper. Lastly, add salt and pepper to taste. Whisk everything together well. This will create a tasty coating for the okra. For the complete recipe, check out the [Full Recipe]. Start by heating the oil in a skillet. Pour about an inch of vegetable or canola oil into a large skillet. Set the heat to medium-high. You want the oil to reach 350°F (175°C). Use a cooking thermometer for accuracy. This temperature is key for a crispy texture. After soaking the okra in buttermilk, lift it out carefully. Allow the excess buttermilk to drip off. Now, place each piece in the cornmeal mixture. Coat them well, but shake off any extra coating. This step helps avoid clumps. Once the oil is hot, add the coated okra in small batches. Avoid overcrowding the pan to keep the oil hot. Fry the okra for 3-4 minutes. Turn them occasionally to get an even golden color. When they look crispy and brown, use a slotted spoon to transfer them to a plate lined with paper towels. This removes any excess oil for a light bite. For the full experience, serve your Southern Fried Okra warm with your favorite dipping sauce. Enjoy the crunch and flavor that comes from this classic dish! {{image_4}} To make your Southern Fried Okra crispy, follow these steps: - Use fresh okra. Freshness matters for flavor and crunch. - Soak in buttermilk. This adds moisture and helps the coating stick well. - Mix dry ingredients well. A good mix of cornmeal and flour creates a great crust. - Heat oil properly. The oil should be around 350°F (175°C). Use a thermometer for accuracy. - Don't overcrowd the pan. Fry in small batches to keep the oil hot. Dipping sauces can enhance your okra’s flavor. Here are my favorites: - Creamy ranch dressing. This classic pairs well with the crunch. - Spicy remoulade. For a kick, this sauce adds a nice zest. - Honey mustard sauce. A sweet twist that complements the savory fried okra. Avoid these errors for the best okra: - Skipping the buttermilk soak. This step is key for flavor and texture. - Using cold oil. Cold oil makes the okra soggy, not crispy. - Not draining excess oil. Place fried okra on paper towels to remove oil. - Frying too many pieces at once. This lowers the oil temperature and makes the coating soggy. With these tips, your Southern Fried Okra will shine! For the full recipe, check the Southern Fried Okra Delight section above. To add some heat, use cayenne pepper. You can adjust the amount to your taste. For more spice, mix in some finely chopped jalapeños. Add them to the buttermilk soak for a spicy kick. You can also sprinkle hot sauce in the buttermilk. This brings out the zest in the dish. Spicy Southern fried okra pairs well with creamy dips. Want a lighter option? Try baking instead of frying. Coat the okra in the same buttermilk and cornmeal mix. Then, place them on a baking sheet lined with parchment. Spray a little oil on top for crispiness. Bake at 425°F (220°C) for about 20-25 minutes. Turn them halfway through to ensure even cooking. You’ll still enjoy the great flavor with less oil. Get creative with your okra! Try adding cheese to the coating. Grated Parmesan or cheddar blends well with cornmeal. You can also add herbs like thyme or dill for a fresh taste. For a sweet twist, sprinkle some brown sugar in the coating mix. This gives a nice contrast to the okra's natural flavor. Each version brings new excitement to your meal. Don’t forget to try these variations when following the Full Recipe! To keep your fried okra fresh, let it cool first. Place it in an airtight container. You can store it in the fridge for up to three days. For longer storage, freeze it in a freezer-safe bag. Just remember to remove as much air as you can. This way, your okra stays tasty and avoids freezer burn. When you are ready to enjoy your leftovers, you can reheat them easily. The best method is to use an oven. Preheat your oven to 350°F (175°C). Spread the fried okra on a baking sheet. Bake for about 10-15 minutes until hot and crispy again. You can also use an air fryer for a quick reheating. Set it to 350°F (175°C) for about 5-7 minutes. Serve your Southern Fried Okra warm for the best taste. It pairs well with several dips. Try ranch dressing for a creamy option or a spicy remoulade for some heat. You can also serve it as a side dish with fried chicken or barbecue. For a fun twist, add it to salads or tacos for extra crunch. Enjoy your crispy and flavorful delight! Yes, you can use frozen okra. Just thaw it first. Pat it dry with a kitchen towel. This helps remove excess moisture. Too much water can make the coating soggy. For the best flavor, fresh okra is still the top choice. Frozen okra works in a pinch, though! To keep your okra crispy, follow these tips: - Soak the okra in buttermilk. This adds moisture and flavor. - Make sure to coat each piece well in the cornmeal mixture. - Do not overcrowd the pan when frying. This keeps the oil hot. - Drain the fried okra on paper towels. This removes excess oil. These steps help you get that crunchy texture every time! Southern Fried Okra has roots in the American South. It came from African culinary traditions. Okra traveled with enslaved people to the U.S. They used it in many dishes. Over time, it became a staple in Southern cooking. Today, it is loved for its unique flavor and crispy texture. Enjoying Southern Fried Okra connects us to this rich history. We explored how to make Southern Fried Okra from fresh ingredients. We covered the best ways to prepare okra, soak it properly, and fry it for crispiness. You learned tips for tasty dipping sauces and ways to avoid common mistakes. Variations let you spice things up or make a healthier version. Lastly, we discussed how to store leftovers and serve them well. Enjoy this fun treat as a snack or side dish! Your fried okra will impress everyone!](https://fastmealmate.com/wp-content/uploads/2025/06/ecd84e34-27de-41dd-a177-4579a9f233b7.webp)
Are you ready to dive into a delicious Southern classic? Southern fried okra is a tasty treat that brings comfort to any meal. I’ll share my favorite recipe, from selecting fresh okra to achieving that perfect crispy texture. You’ll learn tips, tricks, and tasty variations to impress your family or friends. Let’s get started on this crispy and flavorful delight that you’ll want to make again and again!
Ingredients
Fresh Okra
To make this Southern fried okra, start with 1 pound of fresh okra. Look for bright green pods that feel firm. Avoid any that show signs of browning or softness. Slice the okra into 1/2 inch rounds. This size helps them cook evenly and keeps their crunch.
Coating Mixture
Next, prepare the coating. You will need:
– 1 cup buttermilk
– 1 cup cornmeal
– 1/2 cup all-purpose flour
– 1 teaspoon garlic powder
– 1 teaspoon onion powder
– 1 teaspoon smoked paprika
– 1/2 teaspoon cayenne pepper (you can adjust this for spice)
– Salt and pepper to taste
Mix the cornmeal, flour, and spices in a bowl. This blend adds flavor and crunch. The buttermilk will help the coating stick well to the okra.
Frying Oil
For frying, use vegetable or canola oil. You need enough to fill your skillet by about 1 inch. This depth helps fry the okra evenly. Heat the oil to 350°F (175°C). A thermometer is handy for this step. Getting the oil hot enough is key for that crispy texture.Enjoy making this tasty dish!
Step-by-Step Instructions
Preparing the Okra
To start, you need fresh okra. Rinse it well under cold water. This cleans any dirt off the pods. Next, slice the okra into 1/2 inch rounds. Make sure each piece is uniform in size. This helps them cook evenly. Once sliced, set the okra aside on a clean plate.
Soaking in Buttermilk
Now, grab a mixing bowl and pour in 1 cup of buttermilk. Add the sliced okra to the bowl. Make sure each piece is well-coated with buttermilk. Soak the okra for about 15 minutes. This step adds moisture and flavor.
Mixing Dry Ingredients
In another bowl, mix the dry ingredients. Combine 1 cup of cornmeal and 1/2 cup of all-purpose flour. Add 1 teaspoon each of garlic powder, onion powder, and smoked paprika. For extra heat, mix in 1/2 teaspoon of cayenne pepper. Lastly, add salt and pepper to taste. Whisk everything together well. This will create a tasty coating for the okra.
Frying Process
Heating the Oil
Start by heating the oil in a skillet. Pour about an inch of vegetable or canola oil into a large skillet. Set the heat to medium-high. You want the oil to reach 350°F (175°C). Use a cooking thermometer for accuracy. This temperature is key for a crispy texture.
Coating the Okra
After soaking the okra in buttermilk, lift it out carefully. Allow the excess buttermilk to drip off. Now, place each piece in the cornmeal mixture. Coat them well, but shake off any extra coating. This step helps avoid clumps.
Frying to Perfection
Once the oil is hot, add the coated okra in small batches. Avoid overcrowding the pan to keep the oil hot. Fry the okra for 3-4 minutes. Turn them occasionally to get an even golden color. When they look crispy and brown, use a slotted spoon to transfer them to a plate lined with paper towels. This removes any excess oil for a light bite.
For the full experience, serve your Southern Fried Okra warm with your favorite dipping sauce. Enjoy the crunch and flavor that comes from this classic dish!
Tips & Tricks
Achieving the Perfect Crispy Texture
To make your Southern Fried Okra crispy, follow these steps:
– Use fresh okra. Freshness matters for flavor and crunch.
– Soak in buttermilk. This adds moisture and helps the coating stick well.
– Mix dry ingredients well. A good mix of cornmeal and flour creates a great crust.
– Heat oil properly. The oil should be around 350°F (175°C). Use a thermometer for accuracy.
– Don’t overcrowd the pan. Fry in small batches to keep the oil hot.
Recommended Dipping Sauces
Dipping sauces can enhance your okra’s flavor. Here are my favorites:
– Creamy ranch dressing. This classic pairs well with the crunch.
– Spicy remoulade. For a kick, this sauce adds a nice zest.
– Honey mustard sauce. A sweet twist that complements the savory fried okra.
Common Mistakes to Avoid
Avoid these errors for the best okra:
– Skipping the buttermilk soak. This step is key for flavor and texture.
– Using cold oil. Cold oil makes the okra soggy, not crispy.
– Not draining excess oil. Place fried okra on paper towels to remove oil.
– Frying too many pieces at once. This lowers the oil temperature and makes the coating soggy.
With these tips, your Southern Fried Okra will shine!
Variations
Spicy Southern Fried Okra
To add some heat, use cayenne pepper. You can adjust the amount to your taste. For more spice, mix in some finely chopped jalapeños. Add them to the buttermilk soak for a spicy kick. You can also sprinkle hot sauce in the buttermilk. This brings out the zest in the dish. Spicy Southern fried okra pairs well with creamy dips.
Healthier Baked Version
Want a lighter option? Try baking instead of frying. Coat the okra in the same buttermilk and cornmeal mix. Then, place them on a baking sheet lined with parchment. Spray a little oil on top for crispiness. Bake at 425°F (220°C) for about 20-25 minutes. Turn them halfway through to ensure even cooking. You’ll still enjoy the great flavor with less oil.
Unique Flavor Additions
Get creative with your okra! Try adding cheese to the coating. Grated Parmesan or cheddar blends well with cornmeal. You can also add herbs like thyme or dill for a fresh taste. For a sweet twist, sprinkle some brown sugar in the coating mix. This gives a nice contrast to the okra’s natural flavor. Each version brings new excitement to your meal.
Storage Info & Serving Suggestions
How to Store Leftovers
To keep your fried okra fresh, let it cool first. Place it in an airtight container. You can store it in the fridge for up to three days. For longer storage, freeze it in a freezer-safe bag. Just remember to remove as much air as you can. This way, your okra stays tasty and avoids freezer burn.
Reheating Tips
When you are ready to enjoy your leftovers, you can reheat them easily. The best method is to use an oven. Preheat your oven to 350°F (175°C). Spread the fried okra on a baking sheet. Bake for about 10-15 minutes until hot and crispy again. You can also use an air fryer for a quick reheating. Set it to 350°F (175°C) for about 5-7 minutes.
Best Serving Practices
Serve your Southern Fried Okra warm for the best taste. It pairs well with several dips. Try ranch dressing for a creamy option or a spicy remoulade for some heat. You can also serve it as a side dish with fried chicken or barbecue. For a fun twist, add it to salads or tacos for extra crunch. Enjoy your crispy and flavorful delight!
FAQs
Can I use frozen okra for this recipe?
Yes, you can use frozen okra. Just thaw it first. Pat it dry with a kitchen towel. This helps remove excess moisture. Too much water can make the coating soggy. For the best flavor, fresh okra is still the top choice. Frozen okra works in a pinch, though!
How do I make sure the okra stays crispy?
To keep your okra crispy, follow these tips:
– Soak the okra in buttermilk. This adds moisture and flavor.
– Make sure to coat each piece well in the cornmeal mixture.
– Do not overcrowd the pan when frying. This keeps the oil hot.
– Drain the fried okra on paper towels. This removes excess oil.
These steps help you get that crunchy texture every time!
What is the historical origin of Southern Fried Okra?
Southern Fried Okra has roots in the American South. It came from African culinary traditions. Okra traveled with enslaved people to the U.S. They used it in many dishes. Over time, it became a staple in Southern cooking. Today, it is loved for its unique flavor and crispy texture. Enjoying Southern Fried Okra connects us to this rich history.
We explored how to make Southern Fried Okra from fresh ingredients. We covered the best ways to prepare okra, soak it properly, and fry it for crispiness. You learned tips for tasty dipping sauces and ways to avoid common mistakes. Variations let you spice things up or make a healthier version. Lastly, we discussed how to store leftovers and serve them well. Enjoy this fun treat as a snack or side dish! Your fried okra will impress everyone!
![To make this Southern fried okra, start with 1 pound of fresh okra. Look for bright green pods that feel firm. Avoid any that show signs of browning or softness. Slice the okra into 1/2 inch rounds. This size helps them cook evenly and keeps their crunch. Next, prepare the coating. You will need: - 1 cup buttermilk - 1 cup cornmeal - 1/2 cup all-purpose flour - 1 teaspoon garlic powder - 1 teaspoon onion powder - 1 teaspoon smoked paprika - 1/2 teaspoon cayenne pepper (you can adjust this for spice) - Salt and pepper to taste Mix the cornmeal, flour, and spices in a bowl. This blend adds flavor and crunch. The buttermilk will help the coating stick well to the okra. For frying, use vegetable or canola oil. You need enough to fill your skillet by about 1 inch. This depth helps fry the okra evenly. Heat the oil to 350°F (175°C). A thermometer is handy for this step. Getting the oil hot enough is key for that crispy texture. Check the Full Recipe for detailed steps on cooking. Enjoy making this tasty dish! To start, you need fresh okra. Rinse it well under cold water. This cleans any dirt off the pods. Next, slice the okra into 1/2 inch rounds. Make sure each piece is uniform in size. This helps them cook evenly. Once sliced, set the okra aside on a clean plate. Now, grab a mixing bowl and pour in 1 cup of buttermilk. Add the sliced okra to the bowl. Make sure each piece is well-coated with buttermilk. Soak the okra for about 15 minutes. This step adds moisture and flavor. In another bowl, mix the dry ingredients. Combine 1 cup of cornmeal and 1/2 cup of all-purpose flour. Add 1 teaspoon each of garlic powder, onion powder, and smoked paprika. For extra heat, mix in 1/2 teaspoon of cayenne pepper. Lastly, add salt and pepper to taste. Whisk everything together well. This will create a tasty coating for the okra. For the complete recipe, check out the [Full Recipe]. Start by heating the oil in a skillet. Pour about an inch of vegetable or canola oil into a large skillet. Set the heat to medium-high. You want the oil to reach 350°F (175°C). Use a cooking thermometer for accuracy. This temperature is key for a crispy texture. After soaking the okra in buttermilk, lift it out carefully. Allow the excess buttermilk to drip off. Now, place each piece in the cornmeal mixture. Coat them well, but shake off any extra coating. This step helps avoid clumps. Once the oil is hot, add the coated okra in small batches. Avoid overcrowding the pan to keep the oil hot. Fry the okra for 3-4 minutes. Turn them occasionally to get an even golden color. When they look crispy and brown, use a slotted spoon to transfer them to a plate lined with paper towels. This removes any excess oil for a light bite. For the full experience, serve your Southern Fried Okra warm with your favorite dipping sauce. Enjoy the crunch and flavor that comes from this classic dish! {{image_4}} To make your Southern Fried Okra crispy, follow these steps: - Use fresh okra. Freshness matters for flavor and crunch. - Soak in buttermilk. This adds moisture and helps the coating stick well. - Mix dry ingredients well. A good mix of cornmeal and flour creates a great crust. - Heat oil properly. The oil should be around 350°F (175°C). Use a thermometer for accuracy. - Don't overcrowd the pan. Fry in small batches to keep the oil hot. Dipping sauces can enhance your okra’s flavor. Here are my favorites: - Creamy ranch dressing. This classic pairs well with the crunch. - Spicy remoulade. For a kick, this sauce adds a nice zest. - Honey mustard sauce. A sweet twist that complements the savory fried okra. Avoid these errors for the best okra: - Skipping the buttermilk soak. This step is key for flavor and texture. - Using cold oil. Cold oil makes the okra soggy, not crispy. - Not draining excess oil. Place fried okra on paper towels to remove oil. - Frying too many pieces at once. This lowers the oil temperature and makes the coating soggy. With these tips, your Southern Fried Okra will shine! For the full recipe, check the Southern Fried Okra Delight section above. To add some heat, use cayenne pepper. You can adjust the amount to your taste. For more spice, mix in some finely chopped jalapeños. Add them to the buttermilk soak for a spicy kick. You can also sprinkle hot sauce in the buttermilk. This brings out the zest in the dish. Spicy Southern fried okra pairs well with creamy dips. Want a lighter option? Try baking instead of frying. Coat the okra in the same buttermilk and cornmeal mix. Then, place them on a baking sheet lined with parchment. Spray a little oil on top for crispiness. Bake at 425°F (220°C) for about 20-25 minutes. Turn them halfway through to ensure even cooking. You’ll still enjoy the great flavor with less oil. Get creative with your okra! Try adding cheese to the coating. Grated Parmesan or cheddar blends well with cornmeal. You can also add herbs like thyme or dill for a fresh taste. For a sweet twist, sprinkle some brown sugar in the coating mix. This gives a nice contrast to the okra's natural flavor. Each version brings new excitement to your meal. Don’t forget to try these variations when following the Full Recipe! To keep your fried okra fresh, let it cool first. Place it in an airtight container. You can store it in the fridge for up to three days. For longer storage, freeze it in a freezer-safe bag. Just remember to remove as much air as you can. This way, your okra stays tasty and avoids freezer burn. When you are ready to enjoy your leftovers, you can reheat them easily. The best method is to use an oven. Preheat your oven to 350°F (175°C). Spread the fried okra on a baking sheet. Bake for about 10-15 minutes until hot and crispy again. You can also use an air fryer for a quick reheating. Set it to 350°F (175°C) for about 5-7 minutes. Serve your Southern Fried Okra warm for the best taste. It pairs well with several dips. Try ranch dressing for a creamy option or a spicy remoulade for some heat. You can also serve it as a side dish with fried chicken or barbecue. For a fun twist, add it to salads or tacos for extra crunch. Enjoy your crispy and flavorful delight! Yes, you can use frozen okra. Just thaw it first. Pat it dry with a kitchen towel. This helps remove excess moisture. Too much water can make the coating soggy. For the best flavor, fresh okra is still the top choice. Frozen okra works in a pinch, though! To keep your okra crispy, follow these tips: - Soak the okra in buttermilk. This adds moisture and flavor. - Make sure to coat each piece well in the cornmeal mixture. - Do not overcrowd the pan when frying. This keeps the oil hot. - Drain the fried okra on paper towels. This removes excess oil. These steps help you get that crunchy texture every time! Southern Fried Okra has roots in the American South. It came from African culinary traditions. Okra traveled with enslaved people to the U.S. They used it in many dishes. Over time, it became a staple in Southern cooking. Today, it is loved for its unique flavor and crispy texture. Enjoying Southern Fried Okra connects us to this rich history. We explored how to make Southern Fried Okra from fresh ingredients. We covered the best ways to prepare okra, soak it properly, and fry it for crispiness. You learned tips for tasty dipping sauces and ways to avoid common mistakes. Variations let you spice things up or make a healthier version. Lastly, we discussed how to store leftovers and serve them well. Enjoy this fun treat as a snack or side dish! Your fried okra will impress everyone!](https://fastmealmate.com/wp-content/uploads/2025/06/ecd84e34-27de-41dd-a177-4579a9f233b7-300x300.webp)
. To keep your loaded baked potato salad fresh, store it in an airtight container. Make sure to cover the salad tightly to prevent air from entering. This keeps the flavors intact and stops the salad from drying out. In the refrigerator, your salad stays fresh for up to three days. After three days, the taste and texture start to decline. Reheating loaded baked potato salad can be tricky. The best way to do it is slowly. You can warm it in the microwave on low power. Stir it gently to help the heat spread evenly. Avoid using high heat, as it can make the potatoes mushy. You can also serve it cold for a refreshing twist. Can it be frozen? Yes, but it may change the texture. If you freeze it, store it in a freezer-safe container. When you thaw it, the salad might be a bit watery. To fix this, just stir it well and add a bit of sour cream or mayonnaise to bring back creaminess. Enjoy your loaded baked potato salad, no matter how you choose to serve it! You can prepare this salad up to a day in advance. Just follow all the steps and chill it in the fridge. This makes it perfect for parties or picnics. The flavors will mix together nicely, making it taste even better. Absolutely! You can use any cheese you like. Try mozzarella for a milder taste or pepper jack for some spice. Just make sure your cheese melts well if you bake the potatoes. If you want to cut calories, try Greek yogurt or a mix of sour cream and yogurt. Both options keep the creamy texture but add extra protein. They also help the salad taste fresh and zesty. This potato salad will stay fresh for about 3 to 5 days in the fridge. Just make sure to store it in an airtight container. Check for any changes in smell or texture before serving. Yes! This salad is very flexible. You can add diced tomatoes, jalapeños, or olives. Try mixing in some corn or bell peppers for extra crunch. Get creative and add whatever you enjoy! You can find the full recipe for Loaded Baked Potato Salad in this article. It has all the details you need to create this delicious dish at home. In this blog post, we explored how to make a creamy Loaded Baked Potato Salad. We covered important ingredients, step-by-step prep, and helpful tips. Remember, choosing the right potatoes and mixing well makes a big difference. Feel free to customize with your favorite toppings and seasonings. This dish works great for gatherings or as a side for grilled meats. With these guidelines, you can serve a delicious and satisfying salad any time. Trust me, it’s worth the effort! Enjoy your cooking adventure!](https://fastmealmate.com/wp-content/uploads/2025/06/841684b0-3d76-4995-bccc-748e700eeb02-768x768.webp)
. - Cut watermelon into small cubes. - Slice peaches into delicate wedges. First, I start with the watermelon. I cut it into small cubes. This shape makes it easy to scoop. Next, I slice the peaches into delicate wedges. Their sweet juices will add a nice touch to the salad. - Combine watermelon and peach slices in a large bowl. - Fold in feta cheese and basil leaves. In a large bowl, I combine the watermelon and peach slices. Their colors make a beautiful mix. Then, I gently fold in crumbled feta cheese and torn basil leaves. This step helps blend the flavors well without breaking the fruit. - Whisk together honey, lime juice, salt, and pepper. In a small bowl, I whisk honey and lime juice. I add a pinch of salt and a few cracks of pepper. This dressing brings sweet and tangy flavors together. - Drizzle dressing over salad and gently toss. - Sprinkle chopped pistachios on top just before serving. I drizzle the honey-lime dressing over the salad. Then, I gently toss everything together. This ensures each piece of fruit gets coated. If I want extra crunch, I sprinkle chopped pistachios on top just before serving. Enjoy right away for the best taste or chill for a bit first. For the full recipe, check out the details above! To make the best Summer Peach Watermelon Salad, start with ripe fruits. Look for peaches that are soft to touch but not mushy. They should smell sweet and fragrant. For watermelon, choose a heavy one with a uniform color. A yellow spot on the bottom shows ripeness. Freshness matters a lot for flavor. The riper your fruits are, the sweeter and juicier your salad will taste. When serving this salad, choose a large, colorful bowl. A bright bowl adds to the salad's appeal. You can also use clear glass bowls for individual servings. This way, everyone can see the vibrant colors. Consider garnishing with more basil leaves on top for a fresh look. This salad pairs well with grilled meats, like chicken or shrimp. You can also serve it alongside other dishes for a complete meal. To elevate your Summer Peach Watermelon Salad, think about adding fresh herbs. Mint or cilantro can add a new twist. You could also sprinkle some chili flakes for a kick. For dressings, try mixing olive oil with balsamic vinegar. This adds a rich layer of flavor. A simple honey-lemon dressing is also a great choice. These enhancements will make your salad even more delicious. You can find the Full Recipe to explore more ideas. {{image_4}} You can change up this salad easily. Swap feta cheese for goat cheese or mozzarella. Both add a creamy touch. If you want some crunch, add nuts or seeds. Try walnuts, almonds, or sunflower seeds for a nice bite. Summer brings many fruits. You can add strawberries or blueberries for a twist. These fruits pair well with peaches and watermelon. If you want a fall twist, use apples and nuts. This keeps the salad fun and fresh all year round. This salad is gluten-free, making it safe for those with gluten issues. If you want a vegan version, skip the cheese and honey. Use agave syrup instead of honey for sweetness. This way, everyone can enjoy this tasty dish! To keep your Summer Peach Watermelon Salad fresh, store it properly. First, place any leftover salad in an airtight container. This helps prevent air from wilting the greens and fruits. It’s best to store the dressing separately. This way, the salad maintains its crispness and flavor. For containers, use glass or BPA-free plastic. Glass containers work well as they do not absorb odors. If you use plastic, ensure it is food-grade. This keeps your salad safe and fresh for longer. You can keep the salad in the refrigerator for about 2 days. After that, the fruits may start to break down. Signs of spoilage include a mushy texture or off smell. If the salad looks slimy, it’s best to toss it. Always trust your senses when it comes to food safety. Yes, you can prepare this salad ahead of time. To keep it fresh, follow these tips: - Cut fruits just before serving: Watermelon and peaches taste best when fresh. - Keep dressing separate: Mix honey and lime juice just before serving. - Store in an airtight container: This helps prevent browning and keeps the salad crisp. You can add many fruits to enhance the taste. Here are some great options: - Strawberries: Their sweet and tart flavor pairs well with peaches. - Blueberries: These tiny gems add a pop of color and sweetness. - Mango: Its juicy texture complements the watermelon nicely. You can easily tweak the sweetness to fit your taste. Here are some ideas: - Add more honey: If you like it sweeter, drizzle in more honey. - Use less honey: For a lighter taste, use less honey while mixing. - Add lime juice: This adds a tangy flavor that balances sweetness. This blog post covers how to make a refreshing summer salad with watermelon and peaches. You learned about the best fresh ingredients, how to prepare the fruits, mix the salad, and create a light dressing. I shared tips for choosing top-quality fruits and offered variations to suit your taste. Remember, freshness is key for flavor. This salad is perfect for warm days and pairs well with grilled dishes. Enjoy this delightful recipe and make it your own with unique twists! Your summer meals will shine with this colorful dish.](https://fastmealmate.com/wp-content/uploads/2025/07/6d26c9a9-fbdd-445d-815a-0962cba54d08-768x768.webp)
![- 4 medium cucumbers, sliced into rounds - 1 teaspoon sea salt - 1 teaspoon freshly ground black pepper - 1 teaspoon smoky chili powder - 1 tablespoon freshly squeezed lime juice - 1/4 cup crumbled queso fresco (or feta) - 1/4 cup fresh cilantro, finely chopped - 1 jalapeño, finely chopped (optional) - 1 tablespoon extra virgin olive oil When I make Mexican-style cucumbers, I focus on fresh, vibrant ingredients. Each item plays a key role in flavor and texture. The cucumbers are crisp and refreshing. They are the star of this dish. The sea salt enhances their natural taste. Black pepper adds a nice kick, while smoky chili powder gives it depth. Fresh lime juice brings brightness. It balances the flavors perfectly. Queso fresco adds a creamy touch, and cilantro gives a fresh burst. If you like heat, jalapeño adds a nice spicy twist. The extra virgin olive oil ties everything together, making it rich and smooth. - Mixing bowl - Cutting board and knife - Measuring spoons - Serving bowl Using the right tools makes cooking easier. A good knife helps slice cucumbers evenly. A mixing bowl is perfect for combining all the ingredients. Measuring spoons ensure you get the flavors just right. Finally, a nice serving bowl makes your dish look great at the table. You can find the full recipe for Mexican-style cucumbers to guide you through this process. - Rinse cucumbers under cold water. - Trim ends and slice into 1/4 inch rounds. Start by washing your cucumbers. Cold water helps remove dirt and any residue. After rinsing, trim off the ends. Now, slice each cucumber into rounds about 1/4 inch thick. This size gives a nice bite and ensures even seasoning. - Combine cucumber slices with salt, pepper, and chili powder. - Toss gently to coat evenly. In a big bowl, mix the cucumber slices with sea salt, black pepper, and smoky chili powder. The salt enhances the cucumber's natural flavor. The chili powder adds a great kick. Toss the cucumbers gently. You want every slice to be coated well without breaking them. - Drizzle lime juice and olive oil over the cucumbers. - Fold in queso fresco and cilantro. - Optionally add jalapeño for extra spice. - Let marinate for 10 minutes before serving. Next, drizzle fresh lime juice and olive oil over the cucumbers. This adds brightness and richness. Fold in crumbled queso fresco and chopped cilantro. If you like spice, add jalapeño. Mix everything gently so the flavors blend well. Let it sit for at least 10 minutes. This waiting time helps the cucumbers soak up all those delicious flavors. Enjoy your vibrant and tasty dish! For the full recipe, refer back here. To make your Mexican style cucumbers shine, use fresh lime juice. The juice brightens the taste and adds a zesty kick. You can also experiment with different types of peppers. If you like heat, try serrano or habanero peppers. Each pepper brings a unique taste and spice level, making your dish fun and exciting. For a stunning look, serve your cucumbers in a stylish bowl. Top them with lime wedges and fresh cilantro. This not only adds color but also enhances the flavor. You might sprinkle extra chili powder for even more appeal. This small touch can make your dish look gourmet and inviting. Use a mandoline to slice your cucumbers evenly. This tool helps create uniform rounds, making them look professional. You can also prepare your ingredients in advance. Chop everything and store them separately. This way, you can quickly assemble your dish when you're ready. These shortcuts save time and make cooking more enjoyable. For the full recipe, check out the [Full Recipe]. {{image_4}} To add heat to your dish, try these tips: - Increase the jalapeño or add serrano peppers for more spice. - Include chopped red onions for extra crunch and flavor. These changes create a perfect balance of spice and freshness. You can adjust the heat level to match your taste. The spicy version pairs well with grilled meats or tacos. For a rich, creamy twist, consider these ideas: - Add Greek yogurt or sour cream for a smooth texture. - Mix in avocado for added creaminess and nutrition. This creamy variation is great for those who enjoy a thicker dressing. It also makes the dish more filling and satisfying. Serve it with pita chips or as a dip for veggies. Want to try something sweet? Here’s how: - Incorporate diced mango or pineapple for a fruity twist. - Drizzle with honey to create a unique flavor combo. This sweet and tangy version is refreshing and fun. It's perfect for summer gatherings or as a light snack. Each bite bursts with flavor, making it a hit with kids and adults alike. For the full recipe, check out the details above. To store leftover Mexican style cucumbers, place them in an airtight container. This keeps them fresh and safe. You should eat them within 2-3 days for the best taste and crunch. Freezing cucumbers is not a good idea. The texture changes when frozen, making them watery and mushy. Instead, enjoy them fresh! To keep your cucumbers fresh, wait to add dressing until you serve. This prevents them from getting soggy. You can also store them with paper towels. The towels soak up extra moisture, keeping your dish crisp and tasty. Mexican-style cucumbers stand out due to their unique seasoning blends. I use fresh, vibrant ingredients like lime juice, smoky chili powder, and cilantro. These flavors combine to create a refreshing taste that dances on your palate. The mix of spices gives a fun twist to simple cucumbers, making them a delightful dish. Yes, you can easily make this recipe vegan. Just replace queso fresco with a plant-based cheese alternative. This change keeps the dish creamy and delicious while fitting a vegan diet. You can still enjoy all the flavors without dairy. These cucumbers shine as a side dish with grilled meats. They also work well as a standalone salad. Pair them with tacos, chicken, or fish for a complete meal. Their crispness complements rich dishes perfectly. Letting cucumbers marinate for at least 10 minutes is best. This time allows the flavors to meld together. However, if you let them sit longer, the taste gets even better. Just be sure to keep them at room temperature, and they will be ready to serve. Mexican-style cucumbers are low in calories and rich in vitamins. They provide hydration, making them perfect for hot days. This dish is also great for weight loss, as it fills you up without adding many calories. Enjoy the freshness guilt-free! This blog post covered the core ingredients and step-by-step instructions to make delicious Mexican-style cucumbers. We discussed how to enhance flavors and provided tips for presentation. You can easily vary the recipe to suit your taste or dietary needs. Remember to store leftovers properly for the best taste. Enjoy refreshing, healthy cucumbers as a side or salad! Making them at home is simple, fun, and sure to impress anyone you serve. Your kitchen can be a hub of fresh taste!](https://fastmealmate.com/wp-content/uploads/2025/06/eb69b124-1af5-44a9-95ae-72c395866c25-768x768.webp)