
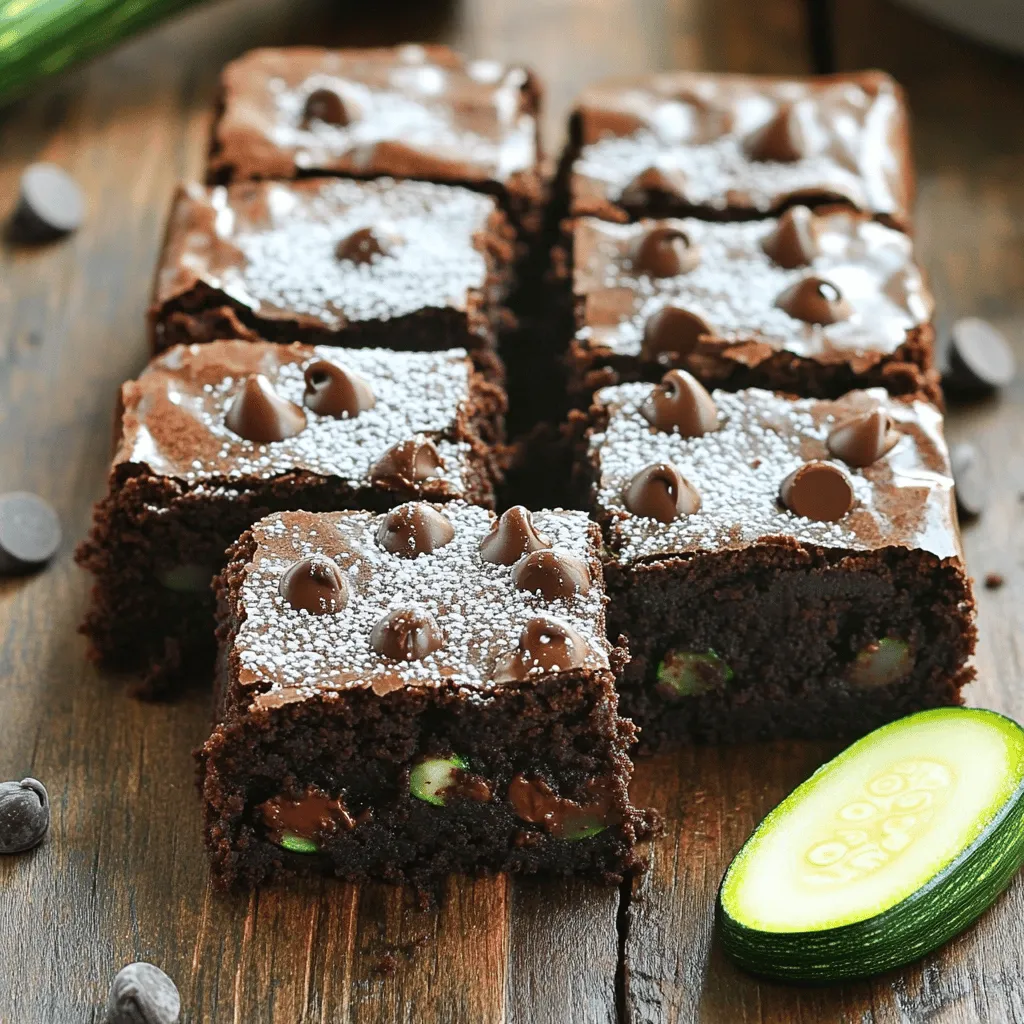
Ingredient Zucchini Brownies Tasty and Easy Treat
![- 1 cup grated zucchini - ½ cup unsweetened applesauce - ½ cup brown sugar - ¼ cup white sugar The main ingredients in these brownies are simple and nutritious. Zucchini adds moisture and keeps the brownies soft. The applesauce replaces some fat while adding sweetness. Using both brown and white sugar gives the brownies a rich flavor and a nice texture. - ⅓ cup vegetable oil or melted coconut oil - 2 large eggs - 1 teaspoon vanilla extract - 1 cup all-purpose flour - ⅓ cup unsweetened cocoa powder - ½ teaspoon baking soda - ¼ teaspoon baking powder - ¼ teaspoon salt - ½ cup chocolate chips - Optional: ¼ cup chopped nuts (e.g., walnuts or pecans) The additional ingredients help create a great structure in the brownies. The oil keeps them moist, while the eggs bind everything together. Flour and cocoa powder provide the base, giving that rich, chocolate flavor. Baking soda and baking powder help the brownies rise. The chocolate chips melt into sweet pockets of goodness. If you like nuts, they add a nice crunch and flavor. You can find the complete list of ingredients in the Full Recipe section for more details on how to get started. - Preheat your oven to 350°F (175°C). - Prepare an 8x8 inch baking pan. You can grease it or line it with parchment paper. - In a large bowl, combine the wet ingredients. Mix grated zucchini, applesauce, brown sugar, white sugar, oil, eggs, and vanilla extract until well blended. - In another bowl, mix the dry ingredients. Whisk flour, cocoa powder, baking soda, baking powder, and salt together. - Now, add the dry mixture to the wet ingredients. Stir gently until just combined. Be careful not to overmix. - Pour the brownie batter into the prepared pan. Use a spatula to smooth the top. - Bake in the preheated oven for 25-30 minutes. Check for doneness by inserting a toothpick. It should come out with a few moist crumbs. - Let the brownies cool in the pan for about 10 minutes. Then transfer them to a wire rack to cool completely. You can find the full recipe in the earlier sections. Enjoy your delicious zucchini brownies! To make perfect zucchini brownies, focus on two key tips: - Avoid overmixing: Mix just enough until the dry and wet ingredients blend. Overmixing can make brownies tough. - Drain excess moisture from zucchini: Zucchini holds a lot of water. Grate it, then put it in a clean cloth. Squeeze out the extra moisture. This step helps achieve a fudgy texture. Baking these brownies is simple. Here are two tips to ensure the best results: - Check for doneness with a toothpick: Insert a toothpick into the center. If it comes out with moist crumbs, your brownies are done. If it comes out clean, they might be overbaked. - Cooling suggestions for optimal texture: After baking, let the brownies cool in the pan for about 10 minutes. Then, transfer them to a wire rack to cool completely. This cooling method helps keep the brownies soft and chewy. For more details, check the Full Recipe. {{image_4}} You can make these brownies gluten-free! Just swap regular flour for a gluten-free flour blend. This simple change works well without affecting taste. Look for blends that contain rice flour, almond flour, or coconut flour. These options hold moisture and keep the brownies soft. Want to mix it up? Try different types of chocolate in your brownies. You can use milk chocolate, dark chocolate, or even white chocolate. Each type adds its own unique taste. Adding spices like cinnamon or nutmeg can enhance the flavor too. A pinch of cinnamon gives warmth, while nutmeg adds a hint of sweetness. You can also add dried fruits or seeds for more texture. Try mixing in chopped nuts, like walnuts or pecans, for a nice crunch. Dried cherries or raisins can add a burst of sweetness. These additions make your brownies even more delightful and fun to eat. For the full recipe, check out the Chocolate Zucchini Brownies Full Recipe! To keep your zucchini brownies fresh, use an airtight container. This helps seal in moisture and flavor. Place them in the container after they cool down. You can store them at room temperature for up to four days. If you want them to last longer, keep them in the fridge. They can stay fresh for about a week in the fridge. Just make sure they are well-covered to avoid drying out. Freezing zucchini brownies is a great way to save some for later. First, let the brownies cool completely. Then, cut them into squares. Wrap each square in plastic wrap, and place them in a freezer bag. Make sure to remove as much air as possible from the bag. You can freeze them for up to three months. When you're ready to eat them, simply thaw them in the fridge overnight. This way, they will keep their great taste and soft texture. For the full recipe, check out the Chocolate Zucchini Brownies full recipe. Yes, you can use sugar substitutes. Common options are stevia, erythritol, or monk fruit. These substitutes can make your brownies lower in calories. However, they may change the taste and texture. Some might be sweeter, so adjust the amount. Always check the package for the right measurement. This way, your brownies will still taste great. To check if your brownies are done, look for a few signs. The edges will pull away from the pan. The top should look set and have a slight sheen. You can also use a toothpick. Insert it into the center of the brownies. If it comes out with a few moist crumbs, they are ready. If it has wet batter, bake a few more minutes. Yes, you can make these brownies vegan. Replace eggs with flax eggs or applesauce. Use 1 tablespoon of flaxseed meal mixed with 2.5 tablespoons of water for each egg. For dairy, substitute with plant-based milk or yogurt. You can also use coconut oil instead of butter. These swaps will keep the brownies moist and tasty. Each brownie has about 150 calories. They contain around 6 grams of fat and 20 grams of sugar. The exact numbers can change based on the ingredients used. For example, using less sugar or different oils can lower calories. Adding nuts can increase healthy fats and protein. Always check the recipe for detailed info. Zucchini brownies can last up to a week when stored properly. Keep them in an airtight container at room temperature. If you want them to last longer, freeze them. They can stay fresh in the freezer for up to three months. Just remember to wrap them well in plastic wrap or foil. For the complete recipe, check out the Chocolate Zucchini Brownies [Full Recipe]. Zucchini brownies blend health and taste. We covered key ingredients, easy steps, and tips. Think alternatives like gluten-free flour or added spices for fun flavors. Proper storage keeps them fresh, while freezing maintains taste and texture. With answers to common questions, you now have all you need for success. Try making these tasty brownies soon! You'll enjoy a delicious treat that also sneaks in some veggies.](https://fastmealmate.com/wp-content/uploads/2025/06/6955e8e8-deef-478f-bc92-a4114a14f9ca.webp)
Are you ready to enjoy a delicious dessert without the guilt? With these Ingredient Zucchini Brownies, you’ll get a rich, chocolatey treat packed with healthy goodness. I’ll walk you through simple ingredients, easy steps, and helpful tips to create mouthwatering brownies everyone will love. Whether you’re a baking novice or a kitchen pro, these brownies are sure to impress! Let’s dive in!
Ingredients
Main Ingredients for Zucchini Brownies
– 1 cup grated zucchini
– ½ cup unsweetened applesauce
– ½ cup brown sugar
– ¼ cup white sugar
The main ingredients in these brownies are simple and nutritious. Zucchini adds moisture and keeps the brownies soft. The applesauce replaces some fat while adding sweetness. Using both brown and white sugar gives the brownies a rich flavor and a nice texture.
Additional Ingredients
– ⅓ cup vegetable oil or melted coconut oil
– 2 large eggs
– 1 teaspoon vanilla extract
– 1 cup all-purpose flour
– ⅓ cup unsweetened cocoa powder
– ½ teaspoon baking soda
– ¼ teaspoon baking powder
– ¼ teaspoon salt
– ½ cup chocolate chips
– Optional: ¼ cup chopped nuts (e.g., walnuts or pecans)
The additional ingredients help create a great structure in the brownies. The oil keeps them moist, while the eggs bind everything together. Flour and cocoa powder provide the base, giving that rich, chocolate flavor. Baking soda and baking powder help the brownies rise. The chocolate chips melt into sweet pockets of goodness. If you like nuts, they add a nice crunch and flavor.
Step-by-Step Instructions
Preparation Steps
– Preheat your oven to 350°F (175°C).
– Prepare an 8×8 inch baking pan. You can grease it or line it with parchment paper.
Mixing Instructions
– In a large bowl, combine the wet ingredients. Mix grated zucchini, applesauce, brown sugar, white sugar, oil, eggs, and vanilla extract until well blended.
– In another bowl, mix the dry ingredients. Whisk flour, cocoa powder, baking soda, baking powder, and salt together.
– Now, add the dry mixture to the wet ingredients. Stir gently until just combined. Be careful not to overmix.
Baking Process
– Pour the brownie batter into the prepared pan. Use a spatula to smooth the top.
– Bake in the preheated oven for 25-30 minutes. Check for doneness by inserting a toothpick. It should come out with a few moist crumbs.
– Let the brownies cool in the pan for about 10 minutes. Then transfer them to a wire rack to cool completely.Enjoy your delicious zucchini brownies!
Tips & Tricks
How to Get the Best Texture
To make perfect zucchini brownies, focus on two key tips:
– Avoid overmixing: Mix just enough until the dry and wet ingredients blend. Overmixing can make brownies tough.
– Drain excess moisture from zucchini: Zucchini holds a lot of water. Grate it, then put it in a clean cloth. Squeeze out the extra moisture. This step helps achieve a fudgy texture.
Baking Tips
Baking these brownies is simple. Here are two tips to ensure the best results:
– Check for doneness with a toothpick: Insert a toothpick into the center. If it comes out with moist crumbs, your brownies are done. If it comes out clean, they might be overbaked.
– Cooling suggestions for optimal texture: After baking, let the brownies cool in the pan for about 10 minutes. Then, transfer them to a wire rack to cool completely. This cooling method helps keep the brownies soft and chewy.
Variations
Gluten-Free Option
You can make these brownies gluten-free! Just swap regular flour for a gluten-free flour blend. This simple change works well without affecting taste. Look for blends that contain rice flour, almond flour, or coconut flour. These options hold moisture and keep the brownies soft.
Flavor Variations
Want to mix it up? Try different types of chocolate in your brownies. You can use milk chocolate, dark chocolate, or even white chocolate. Each type adds its own unique taste. Adding spices like cinnamon or nutmeg can enhance the flavor too. A pinch of cinnamon gives warmth, while nutmeg adds a hint of sweetness.
Additional Ingredients
You can also add dried fruits or seeds for more texture. Try mixing in chopped nuts, like walnuts or pecans, for a nice crunch. Dried cherries or raisins can add a burst of sweetness. These additions make your brownies even more delightful and fun to eat.
Storage Info
Proper Storage Techniques
To keep your zucchini brownies fresh, use an airtight container. This helps seal in moisture and flavor. Place them in the container after they cool down. You can store them at room temperature for up to four days. If you want them to last longer, keep them in the fridge. They can stay fresh for about a week in the fridge. Just make sure they are well-covered to avoid drying out.
Freezing Tips
Freezing zucchini brownies is a great way to save some for later. First, let the brownies cool completely. Then, cut them into squares. Wrap each square in plastic wrap, and place them in a freezer bag. Make sure to remove as much air as possible from the bag. You can freeze them for up to three months. When you’re ready to eat them, simply thaw them in the fridge overnight. This way, they will keep their great taste and soft texture.
FAQs
Can I replace sugar with a sugar substitute?
Yes, you can use sugar substitutes. Common options are stevia, erythritol, or monk fruit. These substitutes can make your brownies lower in calories. However, they may change the taste and texture. Some might be sweeter, so adjust the amount. Always check the package for the right measurement. This way, your brownies will still taste great.
How do I know when my zucchini brownies are done?
To check if your brownies are done, look for a few signs. The edges will pull away from the pan. The top should look set and have a slight sheen. You can also use a toothpick. Insert it into the center of the brownies. If it comes out with a few moist crumbs, they are ready. If it has wet batter, bake a few more minutes.
Can I make these zucchini brownies vegan?
Yes, you can make these brownies vegan. Replace eggs with flax eggs or applesauce. Use 1 tablespoon of flaxseed meal mixed with 2.5 tablespoons of water for each egg. For dairy, substitute with plant-based milk or yogurt. You can also use coconut oil instead of butter. These swaps will keep the brownies moist and tasty.
What is the nutritional information for zucchini brownies?
Each brownie has about 150 calories. They contain around 6 grams of fat and 20 grams of sugar. The exact numbers can change based on the ingredients used. For example, using less sugar or different oils can lower calories. Adding nuts can increase healthy fats and protein. Always check the recipe for detailed info.
How long do zucchini brownies last?
Zucchini brownies can last up to a week when stored properly. Keep them in an airtight container at room temperature. If you want them to last longer, freeze them. They can stay fresh in the freezer for up to three months. Just remember to wrap them well in plastic wrap or foil.
Zucchini brownies blend health and taste. We covered key ingredients, easy steps, and tips. Think alternatives like gluten-free flour or added spices for fun flavors. Proper storage keeps them fresh, while freezing maintains taste and texture. With answers to common questions, you now have all you need for success. Try making these tasty brownies soon! You’ll enjoy a delicious treat that also sneaks in some veggies.
![- 1 cup grated zucchini - ½ cup unsweetened applesauce - ½ cup brown sugar - ¼ cup white sugar The main ingredients in these brownies are simple and nutritious. Zucchini adds moisture and keeps the brownies soft. The applesauce replaces some fat while adding sweetness. Using both brown and white sugar gives the brownies a rich flavor and a nice texture. - ⅓ cup vegetable oil or melted coconut oil - 2 large eggs - 1 teaspoon vanilla extract - 1 cup all-purpose flour - ⅓ cup unsweetened cocoa powder - ½ teaspoon baking soda - ¼ teaspoon baking powder - ¼ teaspoon salt - ½ cup chocolate chips - Optional: ¼ cup chopped nuts (e.g., walnuts or pecans) The additional ingredients help create a great structure in the brownies. The oil keeps them moist, while the eggs bind everything together. Flour and cocoa powder provide the base, giving that rich, chocolate flavor. Baking soda and baking powder help the brownies rise. The chocolate chips melt into sweet pockets of goodness. If you like nuts, they add a nice crunch and flavor. You can find the complete list of ingredients in the Full Recipe section for more details on how to get started. - Preheat your oven to 350°F (175°C). - Prepare an 8x8 inch baking pan. You can grease it or line it with parchment paper. - In a large bowl, combine the wet ingredients. Mix grated zucchini, applesauce, brown sugar, white sugar, oil, eggs, and vanilla extract until well blended. - In another bowl, mix the dry ingredients. Whisk flour, cocoa powder, baking soda, baking powder, and salt together. - Now, add the dry mixture to the wet ingredients. Stir gently until just combined. Be careful not to overmix. - Pour the brownie batter into the prepared pan. Use a spatula to smooth the top. - Bake in the preheated oven for 25-30 minutes. Check for doneness by inserting a toothpick. It should come out with a few moist crumbs. - Let the brownies cool in the pan for about 10 minutes. Then transfer them to a wire rack to cool completely. You can find the full recipe in the earlier sections. Enjoy your delicious zucchini brownies! To make perfect zucchini brownies, focus on two key tips: - Avoid overmixing: Mix just enough until the dry and wet ingredients blend. Overmixing can make brownies tough. - Drain excess moisture from zucchini: Zucchini holds a lot of water. Grate it, then put it in a clean cloth. Squeeze out the extra moisture. This step helps achieve a fudgy texture. Baking these brownies is simple. Here are two tips to ensure the best results: - Check for doneness with a toothpick: Insert a toothpick into the center. If it comes out with moist crumbs, your brownies are done. If it comes out clean, they might be overbaked. - Cooling suggestions for optimal texture: After baking, let the brownies cool in the pan for about 10 minutes. Then, transfer them to a wire rack to cool completely. This cooling method helps keep the brownies soft and chewy. For more details, check the Full Recipe. {{image_4}} You can make these brownies gluten-free! Just swap regular flour for a gluten-free flour blend. This simple change works well without affecting taste. Look for blends that contain rice flour, almond flour, or coconut flour. These options hold moisture and keep the brownies soft. Want to mix it up? Try different types of chocolate in your brownies. You can use milk chocolate, dark chocolate, or even white chocolate. Each type adds its own unique taste. Adding spices like cinnamon or nutmeg can enhance the flavor too. A pinch of cinnamon gives warmth, while nutmeg adds a hint of sweetness. You can also add dried fruits or seeds for more texture. Try mixing in chopped nuts, like walnuts or pecans, for a nice crunch. Dried cherries or raisins can add a burst of sweetness. These additions make your brownies even more delightful and fun to eat. For the full recipe, check out the Chocolate Zucchini Brownies Full Recipe! To keep your zucchini brownies fresh, use an airtight container. This helps seal in moisture and flavor. Place them in the container after they cool down. You can store them at room temperature for up to four days. If you want them to last longer, keep them in the fridge. They can stay fresh for about a week in the fridge. Just make sure they are well-covered to avoid drying out. Freezing zucchini brownies is a great way to save some for later. First, let the brownies cool completely. Then, cut them into squares. Wrap each square in plastic wrap, and place them in a freezer bag. Make sure to remove as much air as possible from the bag. You can freeze them for up to three months. When you're ready to eat them, simply thaw them in the fridge overnight. This way, they will keep their great taste and soft texture. For the full recipe, check out the Chocolate Zucchini Brownies full recipe. Yes, you can use sugar substitutes. Common options are stevia, erythritol, or monk fruit. These substitutes can make your brownies lower in calories. However, they may change the taste and texture. Some might be sweeter, so adjust the amount. Always check the package for the right measurement. This way, your brownies will still taste great. To check if your brownies are done, look for a few signs. The edges will pull away from the pan. The top should look set and have a slight sheen. You can also use a toothpick. Insert it into the center of the brownies. If it comes out with a few moist crumbs, they are ready. If it has wet batter, bake a few more minutes. Yes, you can make these brownies vegan. Replace eggs with flax eggs or applesauce. Use 1 tablespoon of flaxseed meal mixed with 2.5 tablespoons of water for each egg. For dairy, substitute with plant-based milk or yogurt. You can also use coconut oil instead of butter. These swaps will keep the brownies moist and tasty. Each brownie has about 150 calories. They contain around 6 grams of fat and 20 grams of sugar. The exact numbers can change based on the ingredients used. For example, using less sugar or different oils can lower calories. Adding nuts can increase healthy fats and protein. Always check the recipe for detailed info. Zucchini brownies can last up to a week when stored properly. Keep them in an airtight container at room temperature. If you want them to last longer, freeze them. They can stay fresh in the freezer for up to three months. Just remember to wrap them well in plastic wrap or foil. For the complete recipe, check out the Chocolate Zucchini Brownies [Full Recipe]. Zucchini brownies blend health and taste. We covered key ingredients, easy steps, and tips. Think alternatives like gluten-free flour or added spices for fun flavors. Proper storage keeps them fresh, while freezing maintains taste and texture. With answers to common questions, you now have all you need for success. Try making these tasty brownies soon! You'll enjoy a delicious treat that also sneaks in some veggies.](https://fastmealmate.com/wp-content/uploads/2025/06/6955e8e8-deef-478f-bc92-a4114a14f9ca-300x300.webp)


![- 2 cups all-purpose flour - 1 teaspoon baking powder - 1/2 teaspoon baking soda - 1/2 teaspoon salt - 1 teaspoon ground cinnamon - 3/4 cup granulated sugar - 1/2 cup packed brown sugar - 1/2 cup unsalted butter, melted - 2 large eggs, at room temperature - 1 teaspoon pure vanilla extract - 1 cup plain yogurt (or sour cream) - 2 cups apples, peeled and diced (approximately 2 medium apples) - 1/2 cup old-fashioned rolled oats When you measure your ingredients, use proper tools. For dry ingredients, a dry measuring cup is best. Press flour down slightly to avoid gaps. For liquids, use a liquid measuring cup and check at eye level. This ensures you get the right amounts for recipes. Accurate measurements lead to better results. You can switch some ingredients if needed. Use whole wheat flour for a healthier option. If you want a dairy-free muffin, try almond or coconut yogurt instead. Apples are key, but you can use pears or peaches too. For a nutty touch, add chopped walnuts or pecans. Always feel free to adjust! Make sure to check the [Full Recipe] for detailed instructions and baking times! Preheating the Oven Start by preheating your oven to 350°F (175°C). This step is key for even baking. Preparing the Muffin Tin Line a standard muffin tin with paper liners. You can also spray each cup with non-stick cooking spray. This helps the muffins release easily after baking. Dry Mixture Preparation In a large bowl, whisk together 2 cups of all-purpose flour, 1 teaspoon of baking powder, 1/2 teaspoon of baking soda, 1/2 teaspoon of salt, and 1 teaspoon of ground cinnamon. Mix well and set it aside. Sugar and Butter Mixture In another bowl, combine 3/4 cup of granulated sugar, 1/2 cup of packed brown sugar, and 1/2 cup of melted butter. Stir until this mixture is smooth and creamy. Wet and Dry Ingredient Integration Gently pour the sugar-butter mixture into the bowl with the dry ingredients. Use a spatula to mix just until combined. Be careful not to overmix, as this keeps the muffins light and fluffy. Folding in Apples Next, fold in 2 cups of peeled and diced apples. Use a spatula to distribute them evenly without overmixing the batter. Preparing the Crumb Topping In a small bowl, mix 1/2 cup of old-fashioned rolled oats with 1/4 cup of flour, 1/4 cup of brown sugar, and 1/4 cup of melted butter. Blend until it becomes crumbly. This topping adds a nice crunch. Filling Muffin Liners Spoon the muffin batter into the lined muffin cups. Fill each about two-thirds full. This allows room for the muffins to rise while baking. Baking Instructions Place the muffin tin in your preheated oven. Bake for 20 to 25 minutes. To check if they are done, insert a toothpick into the center of a muffin. It should come out clean. These steps will guide you to make delicious apple crumb muffins. For more details, check the Full Recipe. Preventing Overmixing To keep your muffins light, mix gently. After adding the wet ingredients to the dry, stir just until combined. If you see some flour lumps, that’s okay. Overmixing can make your muffins dense, not fluffy. Ensuring Proper Baking Time Baking time is key. Set your timer for 20 minutes. Check doneness by inserting a toothpick in the center. If it comes out clean, they’re ready. If not, check every minute. Be careful not to open the oven too often, as it can affect the rise. Adding a pinch of nutmeg can boost flavor. You might also try mixing in some chopped walnuts or pecans. They add a nice crunch and depth. If you love spice, a dash of ginger pairs well with apple too. Presentation makes your muffins shine. Arrange them on a rustic wooden platter. A light dusting of powdered sugar adds charm. For an extra touch, place slices of fresh apples around the muffins. This creates a warm and inviting look. {{image_4}} Choosing the right apple makes a big difference. Sweet apples like Fuji or Honeycrisp work well. They add a nice balance of flavor. Tart apples like Granny Smith give a refreshing zing. You can mix different apples for a unique taste. This adds layers of flavor to your muffins. Adding nuts or dried fruits can enhance your muffins. Chopped walnuts or pecans add a nice crunch. Dried cranberries or raisins bring a burst of sweetness. Just fold them in with the apples to keep it simple. Consider adding spices for extra flavor. A pinch of nutmeg gives warmth. You can also try cardamom for a unique twist. Just remember to balance the spices so they don’t overpower the apples. You can make these muffins gluten-free. Substitute all-purpose flour with a gluten-free blend. This works well and keeps the texture light. Just ensure your baking powder is gluten-free too. If you want to cut back on sugar, try using applesauce. It keeps the muffins moist and sweet. You can also use less butter or switch to a lighter oil. This way, you enjoy a tasty treat without the guilt. For the complete recipe, check out the Full Recipe section. Store your leftover muffins in an airtight container. This keeps them fresh for up to four days. If you want to keep them longer, consider freezing them. To freeze muffins, let them cool completely. Wrap each muffin in plastic wrap and place them in a freezer bag. They can last up to three months in the freezer. When you're ready to enjoy, just take them out and let them thaw at room temperature. Reheat muffins in the oven for the best taste. Preheat your oven to 350°F (175°C). Place the muffins on a baking sheet and warm them for about 10 minutes. You can also use the microwave. Heat each muffin for about 20-30 seconds. Enjoy them warm for the best flavor! For more details on making these muffins, check out the Full Recipe. You can use sour cream instead of yogurt. It gives a similar texture and flavor. Another option is to use buttermilk, which makes the muffins moist. Yes, you can make mini muffins. Just adjust the baking time to 12-15 minutes. Keep an eye on them, so they don’t overbake. Check for doneness by inserting a toothpick into the center of a muffin. If it comes out clean, they are ready. You can also lightly press the top; it should spring back. These muffins stay fresh for about 3 days at room temperature. Store them in an airtight container to keep them soft. Yes, you can prepare the batter the night before. Cover it and store it in the fridge. When you're ready, bake them fresh in the morning. For the full recipe, check the earlier section. You’ll find all the steps and ingredients needed to make these tasty Apple Crumb Muffins. You now have all the key steps to make delicious Apple Crumb Muffins. We covered ingredients, preparation, and baking instructions to ensure your muffins turn out great. Remember to follow the tips for flavor and presentation. With these easy instructions, you can enjoy warm muffins at home. Whether you share them or keep them all, they are sure to impress. Happy baking!](https://fastmealmate.com/wp-content/uploads/2025/07/c8d25f82-9d23-458d-8a15-e1a22d6eabb0-768x768.webp)
![- Dried hibiscus flowers - Water - Honey or agave syrup - Freshly squeezed lime juice - Sparkling water - Fresh mint leaves - Lime slices To create a hibiscus mocktail, you need simple ingredients. Dried hibiscus flowers are the star of the drink. They give a deep red color and a tart flavor. You will also need water to steep the flowers. Honey or agave syrup adds sweetness, so choose what you prefer. Freshly squeezed lime juice brings in a zesty kick. Sparkling water gives it a bubbly touch that makes it refreshing. For garnishing, fresh mint leaves and lime slices add a nice look and extra flavor. This recipe is easy to follow, and you can find the full recipe above for more details. Each ingredient plays a role in making the mocktail vibrant and tasty. Enjoy crafting this delightful drink! 1. Boiling the water Start by boiling 4 cups of water in a medium pot. This gets the process rolling and ensures you have hot water for steeping. 2. Steeping the hibiscus flowers Once the water boils, add 2 cups of dried hibiscus flowers. Reduce the heat to a simmer. Let these flowers steep for about 15 minutes. This step is key to getting that rich color and flavor. 3. Straining the mixture After steeping, remove the pot from the heat. Use a fine mesh sieve to strain the tea into a large bowl. Discard the used flowers. You’ll be left with a beautiful, deep red liquid. 4. Sweetening the tea While the tea is warm, add in 1/2 cup of honey or agave syrup. Stir until it fully dissolves. Adjust the sweetness to fit your taste. 5. Chilling the mocktail Let the sweetened tea cool to room temperature. For a refreshing drink, chill it in the fridge for at least 30 minutes. This helps all the flavors blend nicely. 6. Serving suggestions To serve, fill glasses with ice. Pour the chilled hibiscus mixture until it’s about 3/4 full. Add 1-2 cups of sparkling water on top. This adds a fun fizz! Garnish Finish off with fresh mint leaves and a slice of lime. This adds a pop of color and a zesty aroma. This recipe is a fun way to make a delicious drink at home. Check out the Full Recipe for a detailed guide. Enjoy your refreshing hibiscus mocktail! - Adjusting sweetness levels The key to a great hibiscus mocktail is balance. You can tweak the sweetness to your taste. Start with half a cup of honey or agave syrup. Taste it after mixing in the lime juice. If it’s too tart, add more sweetener slowly. Mix well after each addition. Remember, everyone has different preferences! - Choosing the right garnish Garnishes can elevate your drink. Fresh mint leaves add a pop of green and a lovely aroma. Lime slices make it bright and colorful. You can also use edible flowers for a stunning look. Choose what you love and what fits your vibe. A well-garnished mocktail looks as good as it tastes! - Serving suggestions for gatherings When serving at a party, think about presentation. Use tall glasses filled with ice for a cool effect. A pitcher of the hibiscus mix makes it easy to serve. Guests can add their own sparkling water to taste. This way, everyone can enjoy a refreshing drink made just for them. Plus, it’s a fun way to get people involved! You can find the full recipe to make this refreshing drink in the earlier sections. Enjoy crafting your perfect hibiscus mocktail! {{image_4}} You can make the hibiscus mocktail even more exciting. Adding different flavors can create fun twists. Here are some great ideas. - Adding fruit blends: You can mix in berries like strawberries or blueberries. Orange juice also works well and adds a sweet touch. Just blend these fruits into the hibiscus tea. They will give your drink a fruity punch and vibrant color. - Herbal modifications: Herbs can add a unique taste. Try including fresh basil or rosemary. Add a few leaves to your glass before pouring the drink. The aroma from the herbs will enhance your experience. - Using flavored sparkling water: Instead of plain sparkling water, try flavored versions. Options like lime, lemon, or berry-flavored sparkling water can boost the flavor. This small change can make your mocktail stand out. Feel free to mix and match these ideas. Experimenting can lead to your new favorite drink! For an easy start, check out the Full Recipe. Storing your hibiscus mocktail properly keeps it fresh and tasty. Here’s how to do it: - Refrigeration tips: First, pour any leftover mocktail into a clean glass jar. Seal it tightly with a lid. You can store it in the fridge for up to three days. The cold will help maintain its bright flavor. - Freezing options for hibiscus tea: If you want to keep it longer, freeze the hibiscus tea. Pour the tea into ice cube trays. Once frozen, transfer the cubes to a freezer bag. This way, you can add them to drinks later. - Best practices for maintaining freshness: Always keep your mocktail in an airtight container. Avoid direct sunlight and heat. This helps prevent spoilage and keeps the flavor bright. You can find the [Full Recipe] to make this delightful drink at any time! What is a hibiscus mocktail? A hibiscus mocktail is a non-alcoholic drink made with hibiscus tea. It is bright red and has a tart, fruity flavor. You can enjoy it on hot days or at parties. This drink is refreshing and easy to make. What are the health benefits of hibiscus? Hibiscus is rich in vitamins and minerals. It can help lower blood pressure and improve heart health. It also has antioxidants that support overall wellness. Plus, it is low in calories, making it a great choice for a healthy drink. Can I make hibiscus tea ahead of time? Yes, you can make hibiscus tea ahead of time. Prepare it, cool it, and store it in the fridge. It will stay fresh for about three to five days. This way, you can have it ready for your mocktail anytime. Is there a caffeine content in hibiscus? No, hibiscus is caffeine-free. This makes it a perfect choice for anyone avoiding caffeine. You can enjoy a hibiscus mocktail at any time of day without worrying about keeping you awake. For the complete recipe, check out the Full Recipe section. This blog post covered how to make a refreshing hibiscus mocktail. We discussed the key ingredients and steps to create it, from boiling water to sweetening and chilling. I shared tips to adjust sweetness and serve the perfect drink at gatherings. You also learned some fun variations to mix up flavors. Finally, I offered storage advice to keep leftovers fresh. Enjoy making this fun drink and experimenting with your own twists! It's a great way to stay cool and healthy.](https://fastmealmate.com/wp-content/uploads/2025/07/6370854b-b453-4acd-b9ab-c5472d702266-768x768.webp)