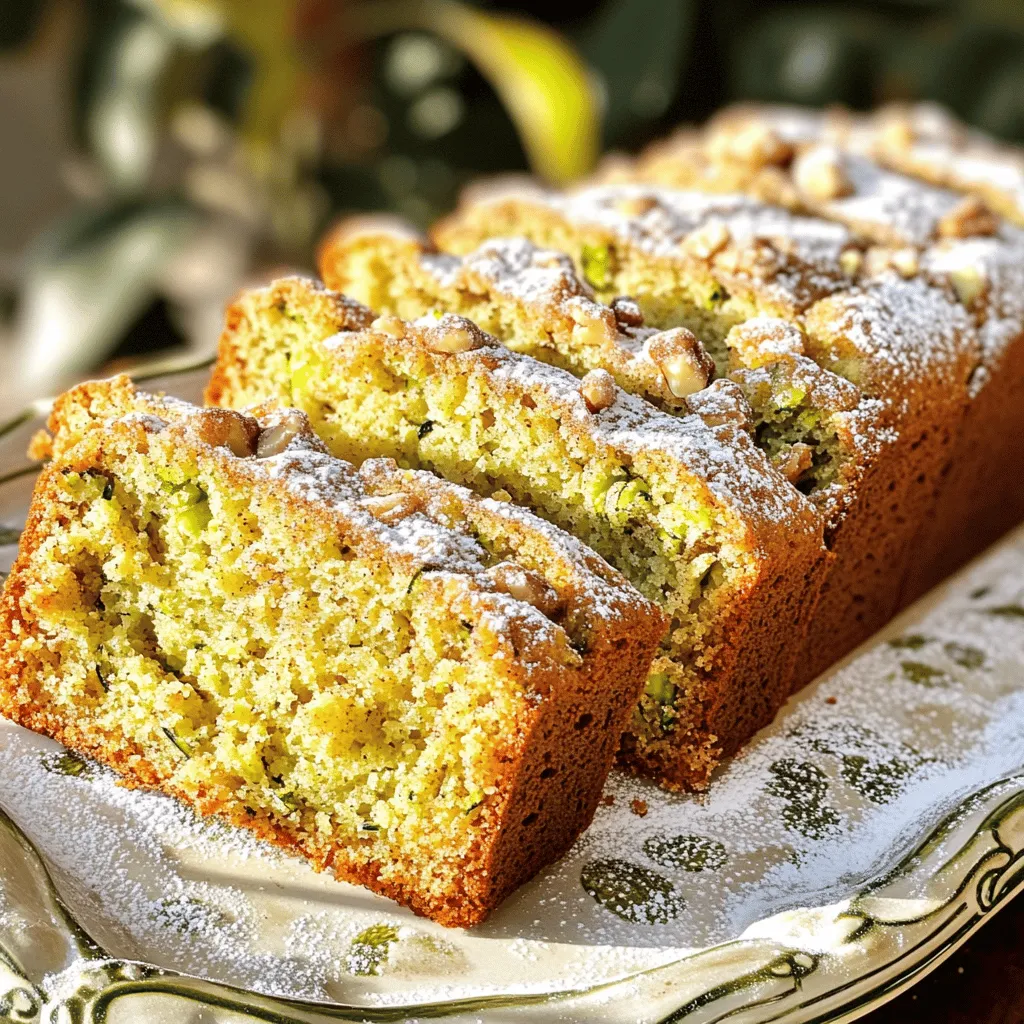
Snickerdoodle Zucchini Bread Tasty and Simple Recipe
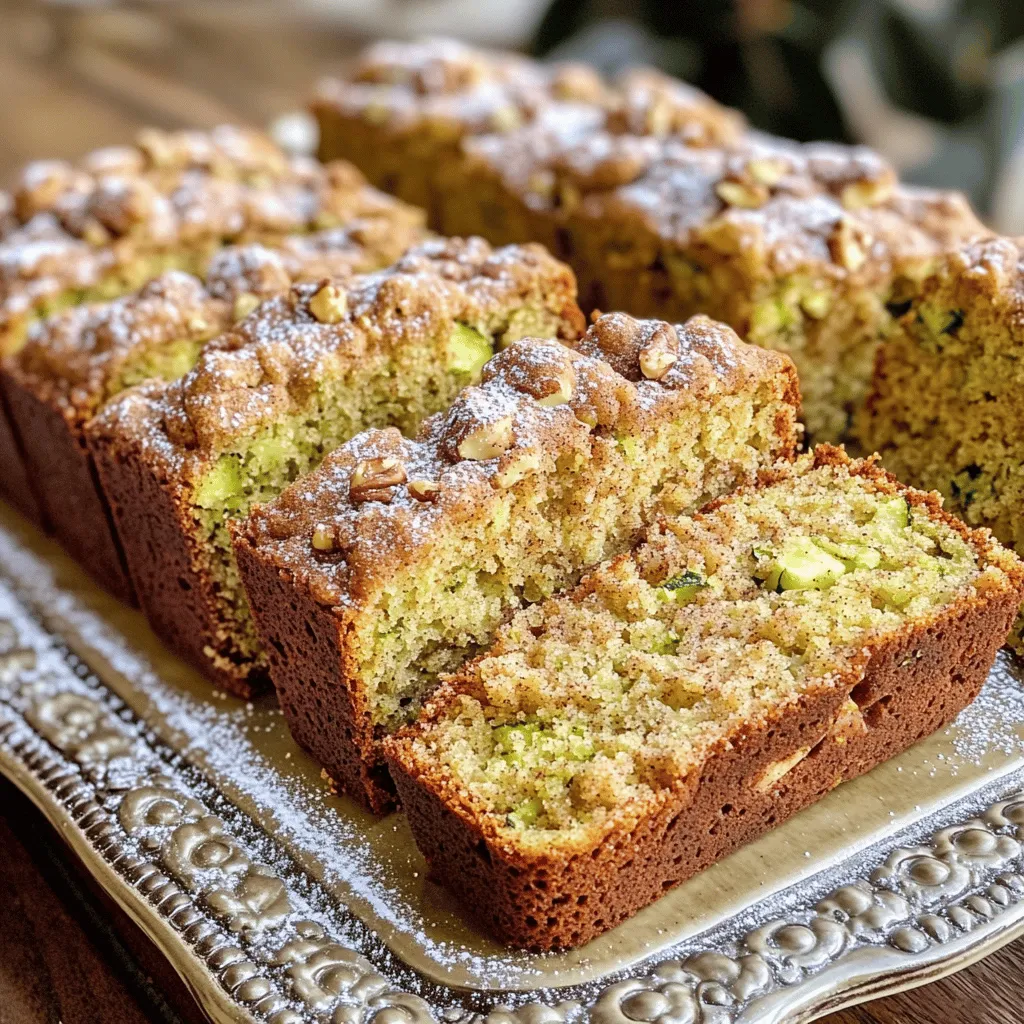
Ready to try a fun twist on a classic treat? Snickerdoodle Zucchini Bread combines sweet cinnamon flavor with a moist texture from fresh zucchini. It’s easy to make and perfect for a snack or dessert. In this post, I’ll share a simple recipe along with tips to ensure your bread turns out just right. Let’s dive in and whip up some deliciousness together!
Ingredients
List of Ingredients
– 1 ½ cups grated zucchini
– 1 ½ cups all-purpose flour
– 1 cup granulated sugar
– ½ cup packed brown sugar
– 1 teaspoon baking soda
– ½ teaspoon baking powder
– 1 teaspoon ground cinnamon
– ¼ teaspoon ground nutmeg
– ½ teaspoon salt
– 2 large eggs, at room temperature
– ½ cup vegetable oil
– 1 teaspoon vanilla extract
– ½ cup chopped walnuts or pecans (optional)
– 2 tablespoons granulated sugar (for topping)
– 1 teaspoon ground cinnamon (for topping)
You need fresh ingredients for the best flavor. Zucchini adds moisture to the bread. I like using medium-sized zucchini, about one will do. Make sure to grate it well.
Use good-quality flour to give the bread a nice rise. The sugars create a sweet balance. Granulated and brown sugar work great together.
Baking soda and baking powder help the bread rise. Spices like cinnamon and nutmeg add warmth. Don’t skip the salt; it enhances all the flavors.
Room temperature eggs mix better and help with rising. Vegetable oil keeps the bread moist. Vanilla extract adds a lovely depth.
If you want a crunch, add walnuts or pecans. The topping of sugar and cinnamon gives a sweet crust.Get ready to bake!
Step-by-Step Instructions
Prepping the Oven and Pan
– Preheat the oven to 350°F (175°C).
– Prepare the loaf pan by greasing it or lining it with parchment paper. This helps with easy removal later.
Preparing the Zucchini
– Grate 1 medium zucchini until you have about 1 ½ cups.
– Place the grated zucchini in a clean kitchen towel.
– Wring it out to remove excess moisture. Set it aside to dry.
Mixing Dry Ingredients
– In a large bowl, combine these dry ingredients:
– 1 ½ cups all-purpose flour
– 1 cup granulated sugar
– ½ cup packed brown sugar
– 1 teaspoon baking soda
– ½ teaspoon baking powder
– 1 teaspoon ground cinnamon
– ¼ teaspoon ground nutmeg
– ½ teaspoon salt
– Whisk everything together until well mixed. This ensures no lumps remain.
Combining Wet Ingredients
– In another bowl, crack 2 large eggs and beat them lightly.
– Add ½ cup vegetable oil and 1 teaspoon vanilla extract to the eggs.
– Mix until everything is well blended.
Final Mixing Steps
– Pour the egg mixture into the dry ingredients.
– Stir gently with a spatula until just combined.
– A few lumps are okay; do not over-mix.
– Fold in the drained zucchini and ½ cup chopped walnuts or pecans if you choose to use them.
Baking the Bread
– Transfer the batter into the prepared loaf pan.
– Smooth the top with a spatula.
– In a small bowl, mix 2 tablespoons of granulated sugar with 1 teaspoon of cinnamon for the topping.
– Evenly sprinkle this mixture over the batter.
– Bake in the preheated oven for 60-65 minutes.
– The bread is done when a toothpick inserted in the center comes out clean or with a few moist crumbs.
– Let the bread cool in the pan for about 10 minutes.
– Carefully remove it from the pan and cool completely on a wire rack.
Tips & Tricks
Perfecting Your Zucchini Bread
To avoid a soggy texture in your Snickerdoodle Zucchini Bread, you must remove excess moisture from the zucchini. After grating, place the zucchini in a clean kitchen towel. Squeeze it tightly to extract as much water as possible. This simple step makes a big difference!
Ensuring even baking is also key. Make sure to preheat your oven fully before putting in the bread. Use an oven thermometer if needed. This helps your bread cook evenly and rise properly.
Flavor Enhancements
You can add spices to boost flavor. Try a pinch of ginger or some allspice. These spices can add warmth and depth to your bread.
For alternative toppings, consider using chopped nuts or even a drizzle of glaze. Chopped pecans or walnuts give a nice crunch. You could also sprinkle some chocolate chips on top for fun!
Common Mistakes to Avoid
One common mistake is over-mixing the batter. When you combine your wet and dry ingredients, mix until just combined. A few lumps are okay. Over-mixing can lead to dense bread.
Another mistake is under-preparing the zucchini. If you skip squeezing out the water, your bread may turn out too wet. Always remember to wring out the zucchini well before adding it to the batter.
Variations
Healthier Substitutions
– Whole wheat flour option: You can swap all-purpose flour for whole wheat flour. This change adds fiber. It also gives the bread a nutty flavor. Use the same amount, but the bread may be denser.
– Reducing sugar content: Cut down the granulated sugar by ¼ cup. This change still keeps the bread sweet. You can also use a sugar substitute like stevia or monk fruit.
Flavor Variations
– Adding chocolate chips or cinnamon chips: Chocolate chips add a rich taste to the bread. Mix in about ½ cup. If you love cinnamon, use cinnamon chips instead. They blend well with the snickerdoodle flavor.
– Incorporating different nuts or fruits: Try adding pecans or walnuts for crunch. You can also mix in dried fruits like raisins or cranberries. These additions give the bread a tasty twist.
Seasonal Twists
– Pumpkin spice version for fall: For a cozy feel, add 1 teaspoon of pumpkin spice. This spice captures the essence of fall. It pairs well with zucchini and cinnamon.
– Lemon zest addition for a refreshing touch: Add 1 tablespoon of lemon zest for brightness. This twist makes the bread lighter and fresh. The citrus flavor contrasts nicely with the sweetness.Enjoy trying these fun variations!
Storage Info
Best Storage Practices
To keep your Snickerdoodle Zucchini Bread fresh, wrap it well. Use plastic wrap or aluminum foil. This keeps the bread moist and soft. Store it at room temperature for up to three days. If you live in a humid area, consider placing it in an airtight container. This prevents any sogginess.
Freezing Instructions
Freezing slices is easy! First, let the bread cool completely. Then, slice it into pieces. Wrap each slice in plastic wrap. Place the wrapped slices in a freezer bag. Squeeze out air to prevent freezer burn. This method keeps your bread fresh for up to three months. When you’re ready to eat, take out a slice. Thaw it at room temperature or pop it in the microwave for a few seconds.
Shelf Life
In the fridge, your Snickerdoodle Zucchini Bread lasts about a week. Check for signs of spoilage like mold or a sour smell. If the bread feels dry or crumbly, it may be past its prime. Discard it if you see any signs of spoilage. Enjoying this bread fresh is always best!
FAQs
How do you make Snickerdoodle Zucchini Bread from scratch?
To make Snickerdoodle Zucchini Bread, follow these steps:
1. Preheat your oven to 350°F (175°C). Grease a 9×5-inch loaf pan or line it with parchment paper.
2. Grate the zucchini using a box grater. Squeeze the grated zucchini in a clean towel to get rid of excess moisture.
3. Mix dry ingredients in a bowl. Combine 1 ½ cups of flour, 1 cup of granulated sugar, ½ cup of brown sugar, 1 teaspoon of baking soda, ½ teaspoon of baking powder, 1 teaspoon of cinnamon, ¼ teaspoon of nutmeg, and ½ teaspoon of salt.
4. Beat the eggs in another bowl. Add ½ cup of vegetable oil and 1 teaspoon of vanilla extract. Mix until combined.
5. Combine the mixtures. Pour the egg mixture into the dry ingredients. Stir until just combined; lumps are okay.
6. Fold in the zucchini. Add the squeezed zucchini and any nuts, mixing gently.
7. Prepare the topping. Mix 2 tablespoons of sugar and 1 teaspoon of cinnamon in a small bowl.
8. Transfer the batter into the prepared loaf pan and smooth the top. Sprinkle the cinnamon-sugar mixture on top.
9. Bake for 60-65 minutes. Check with a toothpick; it should come out clean.
10. Cool the bread for about 10 minutes in the pan. Then remove it and let it cool on a wire rack.
Can I use frozen zucchini in the recipe?
Yes, you can use frozen zucchini. However, you must thaw it and drain any excess water. Frozen zucchini can lose some texture, but it works well in baked goods. The taste remains the same, and it saves prep time. Just ensure to squeeze out as much moisture as possible after thawing.
What can I substitute for eggs in this recipe?
If you want to make this recipe vegan, you can replace each egg with ¼ cup of unsweetened applesauce or ¼ cup of mashed banana. You can also use flax eggs by mixing 1 tablespoon of ground flaxseed with 2.5 tablespoons of water. Let this sit for 5 minutes before adding it to your mix. These substitutes will help bind the ingredients without using eggs.
How long does it take to bake Snickerdoodle Zucchini Bread?
It takes about 60-65 minutes to bake. You know it’s done when a toothpick inserted in the center comes out clean, or with just a few moist crumbs attached. If the top browns too fast, you can tent it with foil.
What is the best way to serve Snickerdoodle Zucchini Bread?
Slice the bread into thick pieces and arrange them on a pretty platter. For a lovely touch, dust the top with powdered sugar before serving. This bread is tasty warm, spread with butter or cream cheese. Enjoy every bite!
You’ve learned how to make delicious Snickerdoodle Zucchini Bread from scratch. We detailed the key ingredients, tools needed, and step-by-step instructions. With tips on flavor and storage, you’re set to bake a perfect loaf. Remember, the right prep and mixing are crucial. Try adding your own twists to make this recipe unique. Enjoy every slice and feel proud of your baking skills. Now, it’s time to bake and share your creation!

![- 2 boneless, skinless chicken breasts - 8 oz penne pasta - 1 cup heavy cream For this dish, chicken breasts serve as the star. They cook up juicy and tender, making every bite satisfying. I choose penne pasta because its shape holds the creamy sauce well. Heavy cream adds richness, turning the dish into a creamy delight. - 1 teaspoon Italian seasoning - 1 teaspoon smoked paprika - 3 cloves garlic, minced Italian seasoning gives the dish a warm depth. Smoked paprika brings a hint of smokiness that pairs perfectly with chicken. Fresh garlic adds a punch of flavor that fills your kitchen with a lovely aroma. - 1 cup sun-dried tomatoes, chopped - 2 cups fresh spinach - 1/2 cup freshly grated Parmesan cheese Sun-dried tomatoes add a sweet and tangy note, brightening the pasta. Fresh spinach wilts down, adding color and nutrition. Finally, Parmesan cheese gives the sauce a savory kick, making it irresistible. For the complete cooking process, check the Full Recipe. - Bring a large pot of salted water to a boil. - Add 8 oz penne pasta and cook until al dente, about 8-10 minutes. - Drain the pasta in a colander and set it aside. - Season 2 boneless, skinless chicken breasts with salt, pepper, Italian seasoning, and smoked paprika. - Heat 2 tablespoons of olive oil in a large skillet over medium heat. - Add the seasoned chicken to the skillet. Cook for 5-7 minutes per side until golden brown and fully cooked. - Remove the chicken from the skillet and let it rest for a few minutes. Slice it into thin strips. - In the same skillet, sauté 3 cloves of minced garlic for about 30 seconds until fragrant. - Stir in 1 cup of heavy cream and bring it to a gentle simmer. Scrape any tasty bits off the bottom of the pan. - Add 1 cup of chopped sun-dried tomatoes and 1/2 cup of freshly grated Parmesan cheese. Mix well until the cheese melts and the sauce is rich. - Toss in 2 cups of fresh spinach and cook for 2-3 minutes until it wilts. - Add the cooked penne pasta to the sauce, mixing gently to coat it evenly. - Serve the creamy pasta topped with sliced chicken and fresh basil leaves for garnish. For the full recipe, check out the [Full Recipe]. - Always check that the chicken is fully cooked. It should reach 165°F. - When adding spinach, avoid overcooking. Cook it just until it wilts. - Taste the sauce as you cook. Adjust seasoning to your liking. Cooking is all about your personal touch. If you prefer more garlic or a bolder flavor, feel free to adjust. It’s your meal, after all! - Serve the pasta in deep, wide bowls. This makes it look inviting. - For garnish, sprinkle extra grated Parmesan on top. Fresh basil leaves add color. - A dash of chili flakes can enhance the look and flavor. These small touches can make a big difference. A beautifully presented dish is always more appealing. Enjoy the process of making your meal look as good as it tastes! {{image_4}} You can easily make Creamy Marry Me Chicken Pasta your own. Here are some simple swaps: - Alternative proteins: You can use turkey, shrimp, or tofu instead of chicken. Each option brings a unique taste. - Gluten-free pasta options: Try gluten-free penne or spiralized zucchini for a lighter touch. Both work well with the creamy sauce. - Vegan adaptations: Use plant-based cream and cheese. You can also swap chicken for mushrooms or chickpeas to keep it hearty. Enhancing the sauce can add extra flavor and texture. Here are some ideas: - Adding different vegetables: Toss in bell peppers, mushrooms, or broccoli. These add color and nutrients and blend well with the sauce. - Spice variations: Add red pepper flakes for heat or a dash of lemon zest for brightness. Experiment to find what you love. - Cheese alternatives: If you want a lighter option, use nutritional yeast instead of Parmesan. It provides a cheesy flavor without dairy. For full details on this delicious recipe, check out the Full Recipe. To store leftovers, let the pasta cool first. Place it in an airtight container. This keeps the pasta fresh and tasty. You can store it in the fridge for up to three days. After that, it may lose flavor and texture. For the best reheating, use the stove. Place the pasta in a skillet over low heat. Add a splash of water or cream to keep it moist. Stir often to heat it evenly. You can also use the microwave. Place the pasta in a microwave-safe dish. Cover it with a damp paper towel to keep moisture in. Heat in short bursts, stirring in between. Avoiding sogginess is key. If you notice the pasta is getting too wet, don't add too much liquid. A little goes a long way. For more tips, try checking out the Full Recipe. How can I make Creamy Marry Me Chicken Pasta ahead of time? You can prepare this dish a day in advance. Cook the pasta and chicken, then store them separately. Make the sauce and mix it just before serving. This keeps everything fresh and tasty. Can I freeze this dish? Yes, you can freeze Creamy Marry Me Chicken Pasta. Store it in an airtight container. It lasts up to three months in the freezer. Thaw it in the fridge overnight before reheating. What can I serve with Creamy Marry Me Chicken Pasta? Pair this dish with a simple salad or garlic bread. A light side helps balance the rich flavors of the pasta. You can also add a glass of white wine for a special touch. Can I use a different type of pasta? Absolutely! You can use any pasta you like. Fettuccine, rigatoni, or even gluten-free options work well. Just adjust the cooking time as needed. How do I ensure the sauce stays creamy? To keep the sauce creamy, avoid boiling it too hard. Stir gently and keep the heat low once you add the cream. This helps maintain that smooth texture. What if I don't have sun-dried tomatoes? If you lack sun-dried tomatoes, you can use fresh tomatoes instead. Just chop them and sauté them with the garlic. You can also add a bit of tomato paste for extra flavor. You now have a clear guide to make Creamy Marry Me Chicken Pasta. We covered key ingredients, from chicken breasts to fresh spinach. Preparing this dish involves cooking pasta, sautéing chicken, and making a rich cream sauce. My final thoughts? This recipe is flexible. You can swap ingredients and adjust flavors easily. With the tips I shared, you’ll impress anyone you serve. Enjoy cooking and have fun with your food!](https://fastmealmate.com/wp-content/uploads/2025/06/1a3e0cf0-432f-4f1f-8432-b7eabdbc76b2-768x768.webp)
![- 1 medium ripe dragonfruit (pitaya) - 1 ripe banana - 1 cup coconut milk - 1/2 cup Greek yogurt - 1/2 cup passion fruit pulp - 1 tablespoon honey or maple syrup - 1/2 cup ice cubes - Fresh mint leaves for garnish The dragonfruit is the star of our smoothie. Its bright pink skin and white flesh make your drink pop. This fruit is sweet and has tiny seeds that add a nice crunch. Bananas bring a creamy texture to the mix. They also add natural sweetness, which balances the tartness of the passion fruit. Coconut milk gives a rich, tropical flavor. It makes the smoothie creamy and smooth. You can switch it with almond milk if you want a nutty touch. Greek yogurt boosts the protein content. It also adds a pleasant tang, making the smoothie thicker. Passion fruit pulp offers a burst of flavor. It has a sweet and tangy taste that brightens the smoothie. You can use fresh or canned pulp, depending on what's available. Honey or maple syrup acts as a sweetener. You can adjust this based on your taste. Ice cubes keep the drink cold and refreshing. They make it perfect for hot days. Finally, fresh mint leaves add a splash of color and a hint of freshness. - Dairy-free options: Use a dairy-free yogurt instead of Greek yogurt. Almond or oat milk can replace coconut milk. - Sweetener variations: Try agave syrup or stevia if you want different sweeteners. - Flavor enhancers: Add vanilla extract or a squeeze of lime for a unique twist. These substitutions help you create a smoothie that fits your diet and taste. You can easily customize this drink to make it your own! For the full recipe, be sure to check the [Full Recipe]. First, gather your ingredients. You need dragonfruit, banana, coconut milk, Greek yogurt, and honey. Cut the dragonfruit in half and scoop out the flesh. In your high-speed blender, add the dragonfruit, banana, coconut milk, Greek yogurt, and honey. Blend on medium-high speed for about 30 seconds. The goal is a smooth and creamy texture. A high-speed blend helps mix everything well. This step is key for a tasty base. Now, let’s make that beautiful swirl. Pour half of the dragonfruit mixture into a tall glass. Make sure you leave some space at the top for the passion fruit pulp. Next, return the rest of the mixture to the blender. Add the passion fruit pulp and blend briefly. You want to mix just enough to create a marbled look. Pour the passion fruit blend over the first layer in the glass. This lets the colors swirl together, making it look stunning. It’s time to make your smoothie look great! Use clear glasses to show off the layers. Top your drink with ice cubes to keep it cool. For a touch of color, add a sprig of fresh mint leaves. This fresh mint not only looks nice but adds a nice aroma too. Enjoy your Dragonfruit Passion Swirl Smoothie! For the full recipe, check the instructions above. To make your smoothie creamy, use a high-speed blender. Start on medium speed, then switch to high. Blend until smooth, which usually takes about 30 seconds. For chilled drinks, ice is key. Use fresh ice cubes, but don’t overdo it. Too much ice can make your smoothie watery. Aim for a balance between ice and liquid. Sweetness is easy to adjust. If you want it sweeter, add more honey or maple syrup. You can also try different fruits like mango or berries. These fruits add layers of flavor and can change the taste profile. Experiment with what you like best! Preparing dragonfruit is simple. Cut it in half, then scoop out the flesh with a spoon. For passion fruit, cut it in half and scoop out the pulp. Make sure to use ripe fruits for the best flavor. If you have leftovers, store them in airtight containers in the fridge. This keeps your ingredients fresh for later use. {{image_4}} Trying different flavors keeps our smoothies exciting. Here are some fun ideas to mix things up. You can create a tropical fruit mix by adding mango or pineapple. These fruits bring sweetness and a sunny flavor. You can also add berries, like strawberries or blueberries. They boost the color and add a tart taste. If you want to add protein, mix in some protein powder. This helps make your smoothie a meal. For those watching calories, use low-calorie sweeteners. This keeps the taste without the extra calories. Change your smoothie with the seasons. In summer, try adding fresh peaches or watermelon for a refreshing twist. In fall, consider adding spices like cinnamon or pumpkin puree. These ingredients bring warm flavors to your drink. Experiment with these variations for a fun smoothie experience. For the full recipe, check out the previous section! You can store your Dragonfruit Passion Swirl Smoothie in the fridge for up to 24 hours. Just keep it in a sealed container to maintain freshness. If you want to prep for the week, pour the smoothie into ice cube trays or small containers. This way, you can easily blend a quick smoothie whenever you want. Frozen portions can last for about three months. To keep fresh dragonfruit and passion fruit at their best, store them at room temperature. Once you cut them, wrap them tightly and put them in the fridge. This helps keep them fresh for up to three days. For coconut milk and yogurt, always check the expiration date. Store them in the fridge and use them within a week after opening for the best taste. Look out for any strange smells or colors in your ingredients. If your dragonfruit turns brown or feels mushy, it’s time to toss it. For passion fruit, if the skin is too wrinkled or hard, it’s past its prime. Always check for mold on yogurt or coconut milk. When in doubt, it’s best to avoid using those ingredients. Freshness is key to enjoying your smoothie to the fullest. Dragonfruit is packed with nutrients. It has a high vitamin C content. This fruit supports your immune system. It contains fiber, which aids digestion. Dragonfruit is low in calories, making it a great snack. It also has antioxidants that help fight free radicals. These properties may lower your risk of chronic diseases. Eating dragonfruit can improve heart health by lowering bad cholesterol. Overall, dragonfruit is a tasty and healthy choice. Yes, you can use frozen fruits! Frozen fruits make the smoothie cold and thick. They are also convenient since they last longer. If you use frozen dragonfruit, thaw it slightly for easier blending. For other fruits, like bananas, you can slice and freeze them in advance. Just remember to adjust the amount of ice. If you want a creamier smoothie, reduce the ice when using frozen fruits. Making this smoothie vegan is easy! Simply swap Greek yogurt with a dairy-free yogurt. Almond or coconut yogurt works well. Replace honey with maple syrup for a vegan sweetener. You can also add a scoop of plant-based protein powder for extra nutrition. These simple swaps keep the smoothie delicious and vegan-friendly. Absolutely! This smoothie is bright and colorful, which kids love. The sweet taste of dragonfruit and banana makes it appealing. It has a creamy texture that is easy to drink. Packed with vitamins, it is a healthy choice for kids. Serve it in fun cups or with a colorful straw to make it exciting. This smoothie is a great way to sneak in some fruit for kids! This blog post laid out all you need for a tasty Dragonfruit Passion Swirl Smoothie. We covered the main ingredients, tips for blending, and fun variations. Remember, you can tweak the recipe to match your taste and needs. Smoothies are great for quick meals or snacks. Enjoy experimenting with flavors and ingredients! Drink it fresh for the best taste and health benefits. Your smoothie journey begins now!](https://fastmealmate.com/wp-content/uploads/2025/06/150b527a-71cf-4bb1-8c82-2935aeae296c-768x768.webp)