
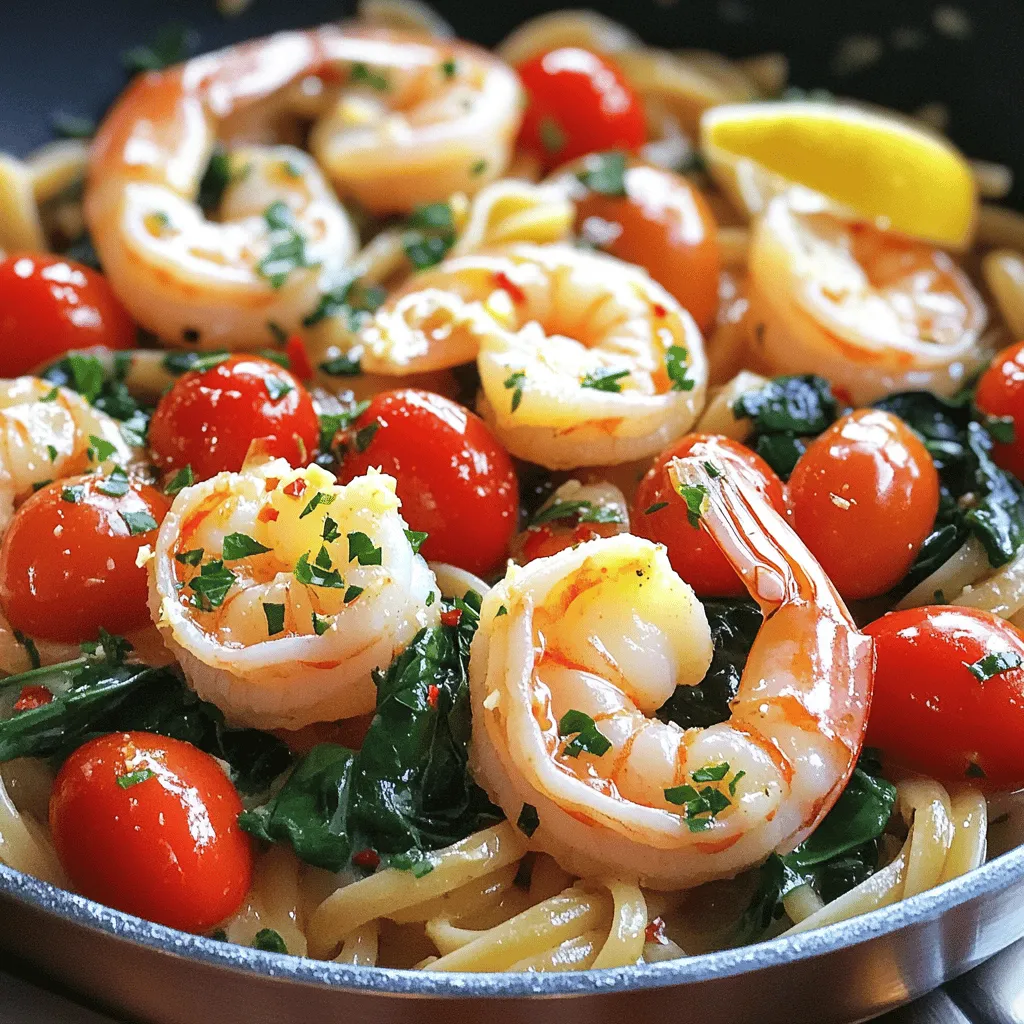
Garlic Butter Shrimp Skillet Savory One-Pan Delight

If you love quick and tasty meals, you’re in for a treat! This Garlic Butter Shrimp Skillet is a savory one-pan delight that will impress anyone at your table. With fresh ingredients and simple steps, you can whip up this dish in no time. Get ready to savor each bite of perfectly cooked shrimp, infused with rich garlic butter. Let’s dive into the details so you can make this fantastic meal!
Ingredients
Essential Ingredients for Garlic Butter Shrimp Skillet
– 1 pound large shrimp, peeled and deveined
– 4 tablespoons unsalted butter
– 4 cloves garlic, finely minced
– 1 teaspoon red pepper flakes (adjust based on heat preference)
– 1 lemon, juiced and zested
– Sea salt and freshly cracked black pepper, to taste
– 2 tablespoons fresh parsley, finely chopped
– 1 cup cherry tomatoes, halved
– 1 cup fresh spinach (optional, for added color and nutrition)
– Cooked pasta or rice, for serving
Fresh ingredients make a big difference in flavor. Use large, bright shrimp for the best taste. The garlic should be fresh and aromatic. It adds a punch to the dish. Use unsalted butter to control the salt level. Fresh herbs like parsley add color and freshness.
Optional Add-ins
– 1/2 cup bell pepper, chopped
– 1/2 cup zucchini, sliced
– 1 tablespoon capers for a briny kick
These add-ins boost taste and nutrition. Swap bell pepper or zucchini for other veggies you love. For a dairy-free option, you can use olive oil instead of butter. Enjoy experimenting with these choices!
Step-by-Step Instructions
Preparing the Skillet
Start by heating a large skillet over medium heat. Once it’s hot, add 2 tablespoons of unsalted butter. Let it melt completely. This butter will bring rich flavor to the dish.
Be careful with the garlic! After the butter melts, add 4 cloves of finely minced garlic and 1 teaspoon of red pepper flakes. Sauté for about 1 minute. You want the garlic fragrant but not brown. Burnt garlic can spoil the taste, so keep an eye on it.
Cooking the Shrimp
Now, it’s time to add the star of the dish: 1 pound of large shrimp. Before you toss them in, season the shrimp with sea salt and freshly cracked black pepper. Sprinkle generously for great flavor.
Sauté the shrimp for 2-3 minutes. You’ll know they are done when they turn pink and opaque. Toss them occasionally for even cooking. It’s a good time to enjoy the amazing smell!
Final Touches
Next, add 1 cup of halved cherry tomatoes and 1 cup of fresh spinach if you want the color and nutrition boost. Sauté for an additional 2 minutes. Watch the spinach wilt and the tomatoes soften—this creates a lovely mix.
Drizzle the shrimp and veggies with the juice of 1 lemon. Then, sprinkle some lemon zest over the top. Add the remaining 2 tablespoons of butter and stir until melted. This creates your luscious garlic butter sauce.
Finally, remove the skillet from heat and sprinkle 2 tablespoons of chopped fresh parsley on top. This adds a burst of color and flavor.
Tips & Tricks
How to Perfect Your Garlic Butter Shrimp
To enhance the flavor of your garlic butter shrimp, here are some simple tips:
– Use fresh ingredients. Fresh shrimp and garlic make a big difference.
– Melt the butter slowly. This helps release its rich flavor without burning.
– Sauté garlic carefully. Cook it just until fragrant. Avoid browning, as this can cause bitterness.
– Season well. Don’t be shy with salt and pepper. It brings out the shrimp’s natural sweetness.
– Cook shrimp properly. Watch for the color change. They should turn pink and opaque in about 2-3 minutes.
Timing is key. Overcooked shrimp become rubbery. For perfect shrimp, work swiftly but carefully.
Make Ahead & Meal Prep Suggestions
You can save time by prepping some parts in advance:
– Peel and devein shrimp. This can be done a day before and stored in the fridge.
– Minced garlic can be prepared early. Keep it in a small container in the fridge.
– Wash and chop veggies ahead. Store them in airtight bags for quick access.
For quick meals, store leftover shrimp in an airtight container. It lasts about 2-3 days in the fridge. Reheat gently to keep the shrimp tender. For a fast meal, serve it over cooked pasta or rice. You can also freeze portions for later. Just remember, shrimp can lose some texture when frozen.
Variations
Ingredient Swaps
You can change up the protein in this dish easily. Instead of shrimp, try scallops or chicken. Both options cook well in the garlic butter. If you want a vegetarian meal, use mushrooms or tofu. They soak up the flavors nicely and add texture.
For a vegan option, swap the butter for olive oil or vegan butter. Use firm tofu for protein and add some extra veggies. Zucchini or bell peppers work great. These swaps let everyone enjoy this tasty dish.
Flavor Profile Adjustments
You can also adjust the spice level to suit your taste. If you want more heat, add more red pepper flakes. For a milder dish, skip them entirely. Fresh herbs like basil or cilantro can also boost flavors. Sprinkle them in at the end for a fresh kick.
Want to pair this dish with different cuisines? Serve it with rice for Asian flair or crusty bread for Italian vibes. You could also add a splash of soy sauce or sesame oil. These small tweaks create new flavor profiles, making your dinner exciting.
Storage Info
Storing Leftovers
To keep your garlic butter shrimp fresh, store leftovers in an airtight container. Place the container in the fridge. Your shrimp will stay good for up to three days. If you want to store it longer, you can freeze it. Just make sure to use freezer-safe bags or containers. In the freezer, it will last about three months.
Reheating Tips
When reheating shrimp, avoid high heat. Use low to medium heat on the stove. This helps keep the texture nice. Add a splash of water or broth to help it steam. Cover the pan to keep moisture in. For the best flavor, add a little more fresh garlic or lemon juice while reheating. This will brighten up the dish and keep it tasty.
FAQs
Can I use frozen shrimp for this recipe?
Yes, you can use frozen shrimp. Just make sure to thaw them first. Place them in cold water for about 20 minutes, or leave them overnight in the fridge. Once thawed, dry them with a paper towel before cooking. This helps your shrimp sear better in the skillet. If you add them straight from the freezer, they may release extra water and not cook evenly.
What can I serve with Garlic Butter Shrimp Skillet?
Garlic butter shrimp pairs well with many sides. Here are some ideas:
– Cooked pasta: Spaghetti or fettuccine works great.
– Rice: White or brown rice soaks up the sauce well.
– Fresh salad: A light mixed green salad adds crunch.
– Crusty bread: Perfect for dipping in the garlic butter sauce.
These options complement the dish’s rich flavors and make your meal more filling.
Is it possible to make this recipe dairy-free?
Yes, you can easily make this dish dairy-free. Use olive oil instead of butter. You can also try vegan butter or coconut oil for a different flavor. To keep the taste rich, add more garlic or a squeeze of lemon juice. Try adding nutritional yeast for a cheesy flavor without the dairy. These swaps keep the dish creamy and delicious while meeting your dietary needs.
This blog post covered the essential ingredients and step-by-step instructions for making Garlic Butter Shrimp Skillet. We explored tips for cooking perfectly and how to customize the dish. You can adjust the flavor and ingredients based on your diet. Remember, fresh ingredients make a big difference in taste. With the right storage and reheating tips, you can enjoy this meal anytime. Dive into this recipe, and enjoy the rich, buttery flavors!
![- 2 large chicken breasts, cut into 1-inch cubes - 1 cup assorted bell peppers (red, yellow, green), chopped into 1-inch pieces - 1 medium red onion, cut into wedges - 1 medium zucchini, sliced into rounds - 1 tablespoon extra-virgin olive oil - 2 tablespoons of your favorite BBQ sauce - 1 tablespoon honey for a touch of sweetness - Sea salt and freshly cracked pepper to taste - 4 cups mixed salad greens (a blend of arugula, spinach, and romaine) - 1/2 cup cherry tomatoes, halved for a pop of color - 1/4 cup crumbled feta cheese, optional for a tangy kick - Fresh parsley, roughly chopped for a vibrant garnish - Cheese and Garnishes - Feta cheese adds a nice salty bite. - Chopped nuts can add a crunch. - Alternative Proteins - You can use shrimp or tofu instead of chicken. - Beef or pork works well too. - Additional Vegetables - Try adding cucumbers for extra freshness. - Avocado can give a creamy texture. Using fresh and colorful ingredients makes this BBQ chicken skewer salad a true feast for the eyes and the taste buds. The combination of marinated chicken and vibrant veggies creates a healthy and satisfying meal. For the full recipe, check out the detailed preparation steps. - Marinating the Chicken Start by cutting the chicken breasts into 1-inch cubes. In a mixing bowl, add the chicken, extra-virgin olive oil, BBQ sauce, honey, sea salt, and cracked pepper. Mix everything well, so each piece gets coated. Cover the bowl with plastic wrap. Place it in the fridge for at least 30 minutes. This time allows the flavors to blend well. - Assembling Skewers After marinating, it’s time to get skewering! Take your marinated chicken and thread it onto skewers. Alternate the chicken cubes with colorful bell peppers, red onion wedges, and zucchini rounds. This not only adds flavor but also makes the skewers look great. - Preheating the Grill While you prepare the skewers, preheat your grill or grill pan to medium-high heat. A hot grill will help achieve nice grill marks and a great char on the chicken. - Cooking the Skewers Place the skewers on the grill. Cook them for about 10-12 minutes. Turn them occasionally to ensure even cooking. The chicken should reach an internal temperature of 165°F. For added flavor, brush some BBQ sauce on the skewers in the last few minutes of cooking. - Combining Salad Ingredients In a large bowl, toss together the mixed salad greens, halved cherry tomatoes, and crumbled feta cheese if you want that tangy kick. The bright colors will make the salad look fresh and inviting. - Plating and Presentation Once the skewers are grilled, let them rest for a minute. Arrange the skewers on top of the salad. Garnish with chopped parsley for a burst of color. If you like, drizzle some extra BBQ sauce over the top for added flavor. This BBQ Chicken Skewer Salad is not just tasty; it looks amazing too! For the complete recipe, check [Full Recipe]. Achieving Perfect Grill Marks To get those perfect grill marks, heat your grill well. Use medium-high heat for the best results. Make sure your grill grates are clean and oiled. Place the skewers at an angle on the grill. After a few minutes, rotate them for those classic crosshatch marks. This not only looks great but adds flavor from the char. Avoiding Dry Chicken To keep your chicken juicy, don’t overcook it. Aim for a cooking time of 10 to 12 minutes. Always check the internal temperature. It should reach 165°F for safety. Marinating the chicken helps lock in moisture. The honey in the marinade adds sweetness and keeps it tender. Pairing with Side Dishes This BBQ chicken skewer salad pairs well with many sides. Try cornbread for a sweet touch or baked beans for heartiness. A light coleslaw adds crunch and balances the meal. You can also serve it with grilled corn on the cob. These sides enhance the flavors of your dish. Creative Ways to Serve For a fun twist, serve the salad in a large bowl. Let guests build their own plates with skewers on top. You could also use small plates for individual servings. Arrange skewers and salad artfully. This makes your meal feel special and inviting. Using Different BBQ Sauces Experiment with various BBQ sauces to find your favorite. A tangy vinegar-based sauce adds zest. A sweet and smoky sauce brings comfort. You can even try spicy sauces for a kick. Each sauce changes the skewer's flavor profile, making it unique. Adding Herbs and Spices Fresh herbs and spices can elevate your salad. Try adding chopped cilantro or basil for brightness. A sprinkle of smoked paprika or cumin gives depth. You can mix in garlic powder or onion powder in the marinade too. This simple addition makes a big difference in taste. For more detailed instructions, check out the Full Recipe. {{image_4}} Gluten-Free Options You can easily make this salad gluten-free. Use gluten-free BBQ sauce to ensure no gluten sneaks in. Check labels on sauces and dressings to be safe. Vegetarian Alternatives For a tasty vegetarian twist, swap chicken for firm tofu or tempeh. Marinate the tofu in the same BBQ sauce for great flavor. Add extra veggies like mushrooms or eggplant for more texture. Spicy BBQ Chicken Skewers Want a kick? Mix in some cayenne pepper or chili powder in your BBQ sauce. You can also serve with a spicy dipping sauce. This will spice up your salad and give it a fun twist. Asian-Inspired Salad Version Try an Asian spin! Replace BBQ sauce with teriyaki sauce for a new flavor. Add sesame oil and some sliced green onions for extra zing. Serve with a sprinkle of sesame seeds on top for crunch. Summer Veggie Additions Summer is perfect for fresh veggies. Add corn, cherry tomatoes, or cucumbers to your salad. These bright flavors make your dish feel light and refreshing. Fall-inspired Ingredients As the weather cools, swap in autumn veggies like roasted butternut squash or Brussels sprouts. Toss in some dried cranberries or walnuts for a seasonal touch. These changes will warm up your meal perfectly. For the full recipe, check out BBQ Chicken Skewer Salad with a Twist. - Best Practices for Refrigeration After making your BBQ chicken skewer salad, let it cool to room temperature. Place any leftovers in an airtight container. Store it in the fridge. This keeps your meal fresh and safe to eat for later. Enjoy your salad within three days for the best taste. - Freezing Chicken Skewers If you have leftover chicken skewers, you can freeze them. Wrap each skewer tightly in plastic wrap. Then, place them in a freezer bag. Be sure to remove as much air as possible before sealing. This helps prevent freezer burn. You can freeze them for up to three months. - Best Methods for Reheating To reheat your chicken skewers, the oven works best. Preheat your oven to 350°F. Place the skewers on a baking sheet and cover them with foil. Heat for about 10-15 minutes. You can also use a microwave. Heat on a microwave-safe plate for 1-2 minutes, checking often. - Tips to Maintain Flavor If you want to keep the flavor strong, brush the skewers with a bit of BBQ sauce before reheating. This adds moisture and taste. Avoid reheating the salad, as fresh greens lose their crunch. - Recommended Storage Timeframes Your BBQ chicken skewer salad lasts about three days in the fridge. Chicken skewers can stay fresh in the freezer for up to three months. Always check for freshness before eating. - Signs of Spoilage Look for changes in color or smell. If the chicken looks dull or has an off odor, discard it. Wilting greens or slimy texture are also signs your salad is no longer good. Always trust your senses when it comes to food safety. - Alternative Proteins: You can use shrimp, beef, or pork. These meats add unique flavors and textures. Cut them into similar-sized pieces to ensure even cooking. - Plant-Based Options: Try tofu or tempeh for a vegan twist. Firm tofu holds up well on skewers. Marinate it just like chicken to soak up all the flavors. - Prepping Ingredients in Advance: Yes! You can chop the veggies and marinate the chicken a day before. Just keep them in the fridge until you’re ready to grill. - Storing Marinated Chicken: Store the marinated chicken in an airtight container. This keeps it fresh and ready for grilling later. - Popular BBQ Sauce Brands: Look for brands like Sweet Baby Ray’s or Stubbs. They offer bold flavors that work well for grilling. - Homemade BBQ Sauce Recommendations: Making your own is easy! Combine ketchup, brown sugar, and vinegar for a tangy taste. Add spices like paprika and garlic for extra flavor. This blog post covered key steps for making delicious chicken skewers and salad. We explored main and optional ingredients, ensuring you have choices for every taste. The grilling process was detailed, alongside tips for perfecting flavors. Variations and storage tips help you adapt and maintain your dish. Cooking can be fun and easy. With practice, you can master this recipe and impress others. Enjoy your tasty creations and share them with friends!](https://fastmealmate.com/wp-content/uploads/2025/06/4abc5258-ee82-48d5-ae8b-570509c2b72d-768x768.webp)
. To make your shortcake soft and fluffy, avoid overmixing the dough. Overmixing can lead to tough shortcakes. Mix just until the dough comes together. This keeps your shortcakes light. The temperature of your ingredients matters. Use cold butter and chilled cream. Cold butter creates steam when baked. This steam helps the shortcakes rise. Chilled cream keeps the dough from getting warm. Use a good pastry cutter or your hands to mix the butter. A sturdy mixing bowl helps, too. For cutting, a round biscuit cutter works best. It gives neat edges for your shortcakes. For baking, use a parchment-lined baking sheet. This prevents sticking and makes cleanup easier. A wire rack helps cool the shortcakes evenly after baking. Whipped cream is a classic topping for your shortcake. It adds creaminess and balances the sweetness of the strawberries. You can also use ice cream for a richer dessert. For a beautiful presentation, garnish with fresh strawberries on top. A sprinkle of mint leaves adds color and freshness. Serve your shortcake with a dollop of whipped cream on the side for extra delight. For the full recipe, check the Classic Strawberry Shortcake Delight. {{image_4}} You can swap strawberries for other fruits. Berries, peaches, and rhubarb work great. For berries, use blueberries, raspberries, or blackberries. Just follow the same steps for macerating. With peaches, slice them thin and sprinkle with sugar. Let them sit for about 20 minutes to get juicy. Rhubarb needs a little cooking. Chop it and simmer with sugar until tender. Then use it just like strawberries. Whipped cream can be fun! Try adding different flavors to it. Mix in vanilla, almond, or even a bit of lemon zest. You can create a unique taste. For a twist, drizzle chocolate or caramel over the top. Melt chocolate chips for a rich sauce, or warm up caramel. Both add a nice touch to your dessert. Want a vegan version? Swap dairy for plant-based options. Use coconut cream instead of heavy cream. For the shortcake, replace butter with coconut oil. You can choose almond milk or soy milk for the liquid. If you're looking for sugar-free options, use a sugar substitute. Stevia or monk fruit can work well. Just adjust the amount to your taste. Feeling adventurous? Check the Full Recipe to see all the details! To keep your baked shortcakes fresh, store them in an airtight container. Place parchment paper between layers to avoid sticking. Store at room temperature for up to two days. If you need to keep them longer, refrigerate for up to a week. However, cold can change the texture. For best taste, eat them fresh. After macerating your strawberries, cover them tightly with plastic wrap. This keeps them juicy and tasty. Store them in the fridge for up to three days. Avoid washing them until just before use. Moisture can cause strawberries to spoil quickly. If you have leftover shortcakes, you can warm them up. Preheat your oven to 350°F (175°C). Wrap each shortcake in foil to keep them soft. Heat for about 10 minutes. You can also microwave them for about 15-20 seconds. Just be careful not to overheat. Enjoy the warmth and flavor! Strawberry shortcake has roots in England. The dessert started as a simple biscuit, served with cream and fruit. In the 19th century, it made its way to America. Here, chefs added sweetened strawberries and whipped cream. This combination made it a summer favorite. Today, it remains a beloved treat, especially during strawberry season. Yes, you can prepare some parts ahead. Make the shortcakes and store them in an airtight container. You can also prepare the strawberries and chilling cream earlier. Just keep the strawberries in the fridge. When you're ready to serve, assemble the shortcake. This way, you keep the shortcakes fresh and fluffy. Look for a golden-brown color on top. The edges should feel firm, and the center should spring back when touched. You can also insert a toothpick into the center. If it comes out clean, your shortcakes are done. Be careful not to overbake, as this can dry them out. Yes, you can freeze leftover shortcake. Wrap each piece tightly in plastic wrap, then place them in a freezer bag. They can last up to three months in the freezer. When you want to enjoy them, thaw them in the fridge overnight. Reheat in the oven for a few minutes to restore warmth and texture. In this blog post, we explored how to make great strawberry shortcake. We covered fresh ingredients, the right techniques, and tips for perfect results. Remember, the quality of your ingredients matters most. You can swap in different fruits and toppings for variety. Storing and reheating your shortcake can keep it fresh. I hope these steps inspire you to whip up this classic dessert. Enjoy the sweet rewards of your hard work!](https://fastmealmate.com/wp-content/uploads/2025/06/e92a88f0-b46a-45f1-a24e-50dd1609a02e-768x768.webp)
![For the Chicken Caesar Pasta Salad, you will need these main ingredients: - 8 oz fusilli pasta - 1 cup cooked chicken breast, diced (or rotisserie chicken) - 1 cup romaine lettuce, chopped into bite-sized pieces - 1/2 cup cherry tomatoes, halved - 1/4 cup freshly grated Parmesan cheese - 1/4 cup Caesar dressing - 2 tablespoons freshly squeezed lemon juice - 1 teaspoon garlic powder - Salt and black pepper, to taste - 1/4 cup crunchy croutons (for garnish) - Fresh parsley, finely chopped (for garnish) These ingredients come together to create a vibrant and tasty dish. Feel free to customize your salad with these optional ingredients: - Avocado slices for creaminess - Grilled zucchini or bell peppers for extra veggies - Bacon bits for a smoky flavor - Extra herbs like basil or dill for freshness Adding these extras can make your salad unique and tailored to your taste. This salad not only tastes great but also packs some nutritional value. Here is a rough estimate of what you get per serving: - Calories: About 400 - Protein: 30g - Carbohydrates: 35g - Fat: 20g - Fiber: 3g This Chicken Caesar Pasta Salad is a balanced meal, making it perfect for lunch or dinner. You can find the full recipe at [Full Recipe]. First, grab a large pot and fill it with water. Bring the water to a rolling boil. Add a pinch of salt to the water. Now, add 8 oz of fusilli pasta. Cook it for 8-10 minutes until it's al dente. When the pasta is done, drain it well. Rinse it under cold water to stop cooking. This helps keep the pasta firm and cool. Set the pasta aside in a large bowl. Next, let’s focus on the chicken. If you have leftover cooked chicken, chop it into small pieces. If you’re using fresh chicken, season it with salt, black pepper, and 1 teaspoon of garlic powder. Cook it in a skillet over medium heat for 6-8 minutes. Make sure it’s cooked through and no longer pink. Let the chicken rest for a few minutes, then chop it into bite-sized pieces. Now, it’s time to bring it all together. In the large bowl with the pasta, add the diced chicken. Then, toss in 1 cup of chopped romaine lettuce and 1/2 cup of halved cherry tomatoes. Gently mix everything to keep the lettuce fresh. In a small bowl, whisk together 1/4 cup of Caesar dressing and 2 tablespoons of fresh lemon juice. Pour the dressing over the salad and toss it all together. Sprinkle 1/4 cup of grated Parmesan cheese and 1/4 cup of crunchy croutons on top. For a fresh touch, add some chopped parsley. Enjoy your Chicken Caesar Pasta Salad right away for the best taste! To make the best Caesar dressing, use fresh ingredients. Start with a good Caesar dressing base. Add freshly squeezed lemon juice for a bright taste. This gives your salad a fresh kick. If you like garlic, mix in some minced garlic. This adds depth to the flavor. Taste your dressing before pouring it over the salad. Adjust salt and pepper to your liking. For a creamier texture, whisk in some Greek yogurt or sour cream. This can make the salad richer and more satisfying. Serve this salad in a big bowl to show off its colors. Layer it with extra romaine for a nice crunch. Add more cherry tomatoes for a sweet touch. For a fun twist, sprinkle some bacon bits or chopped olives on top. This adds extra flavor and texture. You can also serve it as a side dish for grilled meats. Pair it with garlic bread for a full meal. For a picnic, pack the salad in a jar. Just layer the ingredients and keep the dressing separate until serving. To save time, use rotisserie chicken. It’s already cooked and ready to go. You can also cook the pasta in advance. Just store it in the fridge until you’re ready to mix the salad. Pre-chop your veggies and store them in airtight containers. This makes assembly quick and easy. If you have leftovers, make sure to keep the dressing separate. This keeps the salad fresh and crunchy. You can enjoy it for lunch the next day, too! Check out the full recipe for more details. {{image_4}} You can add many proteins to your Chicken Caesar Pasta Salad. Grilled shrimp gives a sweet and savory taste. You can use steak for a heartier meal. If you like fish, try adding tuna for a fresh twist. Each protein adds a unique flavor and texture. For a vegetarian version, skip the chicken and use chickpeas. They add protein and a nice bite. To make it vegan, swap the Caesar dressing for a plant-based version. You can also use nutritional yeast instead of Parmesan cheese for a cheesy flavor without dairy. If you have dietary needs, you can make simple swaps. Use gluten-free pasta if you need to avoid gluten. For a lower carb option, try zucchini noodles. If you're watching calories, cut down on the dressing or use a lighter version. Always feel free to adjust this recipe to fit your diet. To store your Chicken Caesar Pasta Salad, place it in an airtight container. This keeps the flavors fresh and prevents it from drying out. Make sure it cools down first before sealing. You can store it in the fridge for up to three days. For meal prep, divide the salad into single-serving containers. This makes it easy to grab and go. Keep the croutons and dressing separate until you're ready to eat. This way, the salad stays crisp, and the flavors blend perfectly when you mix it. The salad tastes best cold. If you want to reheat it, warm the chicken separately, then mix it back in. However, I recommend enjoying it cold for the best flavor. The salad keeps well for about three days, but the croutons may lose their crunch after a day. For the freshest taste, eat it sooner rather than later. For more details, check out the Full Recipe. To make Chicken Caesar Pasta Salad less calorie-dense, you can swap some ingredients. Use whole wheat pasta instead of regular. This change adds fiber and nutrients. You can also replace Caesar dressing with a lighter version or make your own with yogurt. This option cuts down on fat. Reducing the amount of cheese and croutons helps too. You get the flavor without the extra calories. Focus on using more veggies, like cucumbers or bell peppers. They add crunch and volume without many calories. Yes, you can use different types of pasta for this salad. Fusilli is great, but penne, rotini, or even whole wheat pasta works well too. Gluten-free pasta is an option if you need it. Each type brings its unique shape and texture. Just make sure to cook it al dente as per package directions. This ensures it holds up well with the dressing and other ingredients. When looking for the best store-bought Caesar dressings, I recommend a few brands. Look for ones with natural ingredients and low sugar. Some great options include Annie's Organic Caesar, Ken's Steakhouse, and Cardini's. These dressings have a good balance of flavor and creaminess. Always check the label. You want a dressing that fits your taste and dietary needs. If possible, try a few to find your favorite! This post detailed how to make Chicken Caesar Pasta Salad. You learned about main ingredients, tips for making the best dressing, and how to customize your meal. We covered storage, time-saving tricks, and tasty variations. In summary, this salad is easy to make. You can enjoy it fresh or save it for later. Use these tips to make your dish unique. Enjoy your cooking journey!](https://fastmealmate.com/wp-content/uploads/2025/06/c8df564d-281f-4520-b900-ec1f4444fefb-768x768.webp)