Cherry Cola Jello Salad Delightful and Easy Treat

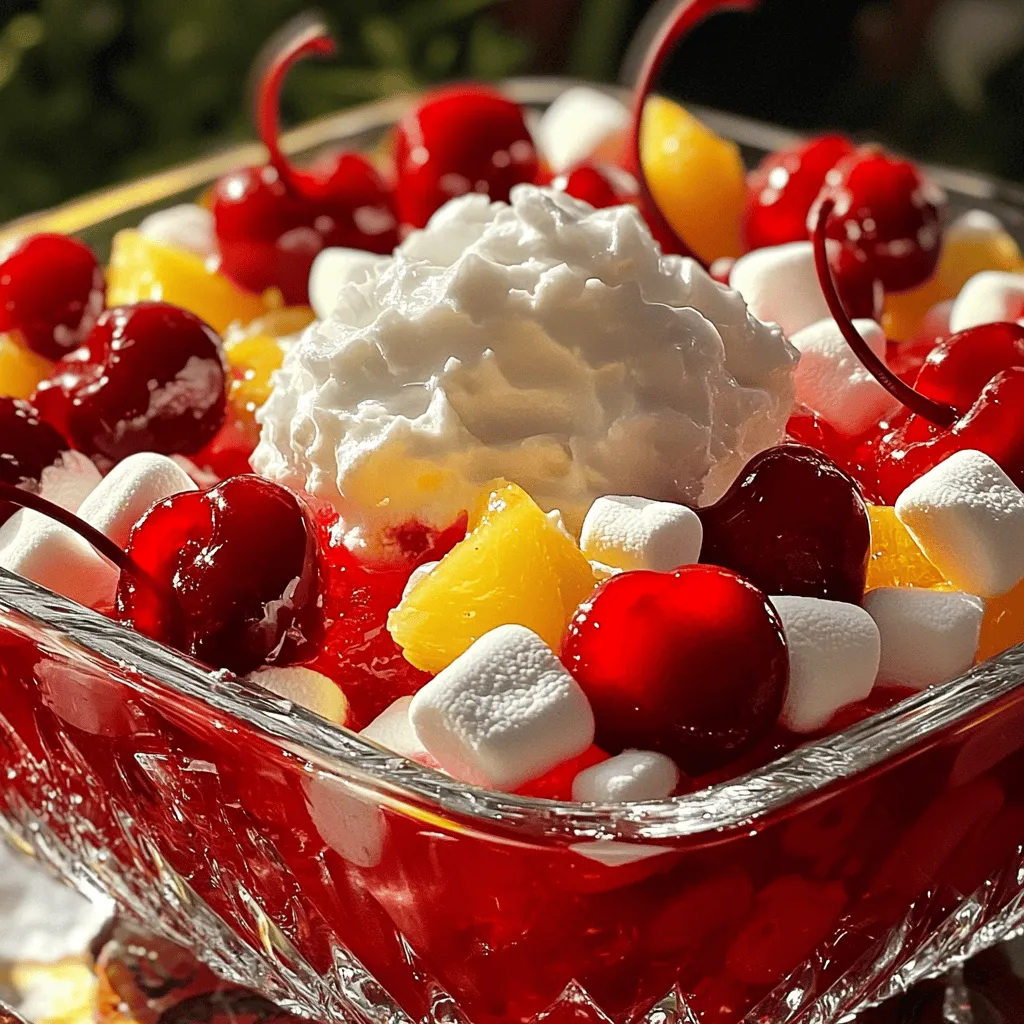
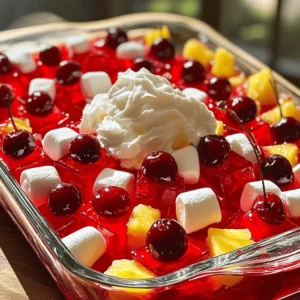
Are you ready to make a fun and tasty Cherry Cola Jello Salad? This delightful treat is super easy to whip up and perfect for any gathering. With just a few ingredients, you can create a colorful dish that impresses friends and family. Let me guide you through this refreshing recipe that combines the sweet flavors of cherry cola, cherries, and whipped cream. Let’s dive into this tasty adventure!
Ingredients
Main Ingredients
– 1 cup cherry cola (caffeine-free optional)
– 1 cup cherry juice
– 1 package (3 oz) cherry-flavored gelatin
Additional Ingredients
– 1 cup canned cherries, drained and halved
– 1/2 cup mini marshmallows
– 1/2 cup crushed pineapple, drained
– 1 cup whipped cream or whipped topping
– 1/2 cup chopped pecans (optional)
To make Cherry Cola Jello Salad, you need a few key ingredients. First, you will want to grab your cherry cola. You can use a caffeine-free version if you like. Then, get some cherry juice for extra flavor. Don’t forget the cherry-flavored gelatin, as it helps the salad set.
Next, let’s talk about the fun extras. Canned cherries add a nice bite, while mini marshmallows give it a sweet touch. Crushed pineapple brings a tropical twist, and whipped cream adds creaminess. If you want a crunch, chop up some pecans and toss them in. This mix of flavors creates a tasty treat that is sure to impress.Enjoy each step as you create this delightful dish!
Step-by-Step Instructions
Preparing the Jello Base
– Heat 1 cup of cherry cola and 1 cup of cherry juice in a saucepan.
– Stir gently until warm but do not boil.
– Remove from heat and slowly sprinkle in 1 package of cherry-flavored gelatin.
– Stir until the gelatin fully dissolves and the mix is smooth.
Combining Ingredients
– Let the mixture cool for a few minutes.
– Fold in 1 cup of halved canned cherries, 1/2 cup of mini marshmallows, and 1/2 cup of drained crushed pineapple.
– Make sure all ingredients mix evenly.
– Carefully pour the mixture into a serving dish or individual bowls.
Chilling and Serving
– Refrigerate the salad for at least 4 hours, or until set.
– After it sets, fold in 1 cup of whipped cream until light and fluffy.
– If you like, add 1/2 cup of chopped pecans for a nice crunch.
– Serve chilled and enjoy your Cherry Cola Jello Salad! For added flair, garnish with cherry halves and whipped cream.
Tips & Tricks
Perfecting the Texture
To avoid lumps in gelatin, always sprinkle it over warm liquids slowly. Stir it in well as you go. This step helps it dissolve evenly. If you see lumps, gently whisk the mixture until smooth.
When folding in whipped cream, use a spatula for the best results. Start with a small portion of the whipped cream. This makes it easier to mix. Then, add the rest and fold gently. You want to keep the light, airy texture.
Serving Suggestions
Garnishing your Cherry Cola Jello Salad can make it pop. Use fresh cherries and mint leaves for a bright look. Place a few cherry halves on top for color. A dollop of extra whipped cream adds a nice touch, too.
For serving bowls, think outside the box. Colorful glass bowls can add charm. You can also use clear cups for individual servings. This way, everyone can see the layers and colors.
Making Ahead
Preparing Cherry Cola Jello Salad in advance is smart. You can make it the day before a party. Chill it overnight for the best flavor and texture. Just make sure to store it in the fridge. This way, it will be ready to serve when you are.
Variations
Flavor Enhancements
You can add other fruits to your Cherry Cola Jello Salad for fun flavors. Strawberries and blueberries work great. They add sweet and tart notes. Fresh fruit keeps the dish bright and colorful. You can also try substituting other sodas for different flavors. Root beer or orange soda can give a new twist. This way, you can create your own unique recipe!
Dietary Adjustments
If you need a healthier option, consider sugar-free alternatives. Use sugar-free gelatin and whipped cream. They make it easier to enjoy this treat without the extra sugar. For vegan options, use coconut cream instead of whipped topping. You can also find vegan gelatin made from agar-agar. These swaps let everyone enjoy this delightful dish!
Serving Styles
You can serve Cherry Cola Jello Salad in different ways. Individual servings look great and are easy to grab. Use small cups or jars for a fun touch. A large dish can be a nice centerpiece for a gathering. Layering different colors of Jello can create a stunning display. This adds visual appeal and makes it even more fun to eat!
Storage Info
Refrigeration Guidelines
To keep your Cherry Cola Jello Salad fresh, store it in an airtight container. This helps prevent it from absorbing odors from the fridge. If you have leftovers, enjoy them within three to five days. The flavors will stay bright and tasty during this time.
Freezing Considerations
Can you freeze Jello salads? Yes, but I don’t recommend it. Freezing can change the texture of the gelatin. If you decide to freeze it, use a freezer-safe container. When you want to eat it, let it thaw in the fridge overnight. Avoid using the microwave, as it can melt the gelatin unevenly.
FAQs
Common Questions
What can I substitute for cherry cola?
You can use any fruit soda, like grape or orange soda. You can also try lemon-lime soda for a lighter twist. Keep in mind that the flavor will change.
Is it safe to consume homemade Jello after a certain time?
Homemade Jello is best eaten within a week. After that, it might lose its texture and taste. Always check for any signs of spoilage.
Can I make Cherry Cola Jello Salad without gelatin?
Yes, you can use agar-agar or pectin as a substitute. These options will create a similar texture without using gelatin.
Troubleshooting
Why did my Jello not set properly?
If your Jello did not set, it may be due to not using enough gelatin. Ensure you follow the recipe for the right amount. Also, check the temperature of the liquid; it should not be too hot when you mix in the gelatin.
How can I fix a too-sweet Jello salad?
To fix a too-sweet Jello salad, you can add a bit of lemon juice. This will help balance the sweetness. You can also mix in some unsweetened fruit like berries for a nice contrast.
Special Diets
Is Cherry Cola Jello Salad gluten-free?
Yes, Cherry Cola Jello Salad is gluten-free. All the ingredients, like gelatin and fruit, do not contain gluten. Always check the labels to be sure.
Suitable alternatives for nut allergies?
If you have nut allergies, simply leave out the chopped pecans. You can replace them with seeds, like pumpkin or sunflower seeds, for added crunch without the nuts.
You now have all the steps to make a tasty Cherry Cola Jello Salad. From the main ingredients to helpful tips, each part plays a role in creating a fun dish. Remember to keep your salad chilled and feel free to mix in your favorite fruits or flavors. Making this dish is simple and can be done ahead of time. With a bit of creativity, this salad will be a hit at any gathering. Enjoy your delightful treat!
![For a great crispy tofu panini, you need: - 1 block firm tofu, well-pressed and sliced into 1/2 inch slabs - 1 tablespoon soy sauce - 1 tablespoon sesame oil - 1 tablespoon cornstarch - 1 large round ciabatta or focaccia bread, sliced in half horizontally - 1/2 cup fresh spinach leaves, washed and dried - 1/2 red bell pepper, roasted, peeled, and sliced thin - 1 small ripe avocado, sliced - 2 tablespoons hummus or vegan mayonnaise - Salt and freshly ground black pepper to taste - Olive oil, for grilling These ingredients work together to create a crispy, tasty panini that is both filling and healthy. You can add some extra flavor with these ingredients: - Sliced tomatoes for freshness - Red onion for a bit of bite - Fresh herbs like basil or cilantro - A dash of hot sauce for heat If you want to mix things up, these optional ingredients can make your panini even better. To make your meal complete, consider these sides: - A light salad with lemon vinaigrette - Sweet potato fries for crunch - A bowl of soup, like tomato or lentil These sides balance the flavors and add variety to your meal. Plus, they are easy to prepare! For the full recipe, check out the detailed steps to bring your crispy tofu panini to life. To start, we need to prepare the tofu. First, press the block of firm tofu. Use a clean kitchen towel or tofu press. This step removes excess moisture. Removing moisture is key for achieving crispiness later. Once pressed, slice the tofu into even slabs, each about 1/2 inch thick. This ensures even cooking and crispiness. Next, we will marinate the tofu. In a mixing bowl, whisk together soy sauce, sesame oil, and a pinch of salt and pepper. Then, add your tofu slices to this mixture. Make sure each piece gets coated well. Let the tofu soak in the marinade for about 15 minutes. This allows the tofu to absorb all those tasty flavors. Now, it’s time to cook the tofu. After marinating, take the slices out and sprinkle cornstarch on both sides. This coating is crucial for that nice, crispy texture. Heat a non-stick skillet over medium heat. Add a drizzle of olive oil to the pan. When the oil shimmers, carefully lay the coated tofu slices in the skillet. Cook each slice for about 4-5 minutes on each side. Look for a golden brown color and a crispy texture. Once done, transfer the tofu to a plate and set it aside. Let’s move on to assembling the panini. Take your ciabatta or focaccia bread and cut it in half horizontally. Spread hummus or vegan mayo on the inside of both halves. This adds moisture and flavor to the sandwich. On the bottom half, layer fresh spinach leaves first. Then add the crispy tofu slices, followed by roasted red bell pepper slices. Finally, place avocado slices on top. Now, close the sandwich with the top half of the bread. Press it down gently to hold everything in place. Next, we grill the panini. Preheat your panini press or another skillet over medium heat. Brush the outside of the sandwich with olive oil. This helps to create a crunchy crust while grilling. If using a skillet, place a heavy pan on top of the sandwich. This presses it down as it cooks. Grill for about 3-4 minutes on each side. Look for a beautiful golden brown color and a crispy texture. Once grilled to perfection, remove the panini from the heat. Slice it in half with a sharp knife and serve warm for the best taste. Enjoy your crispy tofu panini, a flavorful and satisfying delight! For the full recipe, check out the earlier sections. To make your tofu crispy, follow these tips: - Press the tofu well: Remove as much water as possible. This helps the tofu absorb flavors better. - Use cornstarch: Coat both sides of the tofu slices with cornstarch. This creates a crunchy crust. - Heat your skillet properly: Use medium heat and wait for the oil to shimmer before adding the tofu. - Do not overcrowd the pan: Cook in batches if needed. This allows each piece to get crisp. Here are some mistakes to watch out for: - Skipping the marination: Marinating adds flavor. Don’t rush this step. - Using too little oil: A light drizzle helps achieve that golden color and crisp texture. - Not slicing evenly: Make sure your tofu slabs are even. This ensures consistent cooking. - Opening the panini too soon: Let it grill fully to get the best texture. Having the right tools makes a big difference. Here are my top picks: - Panini press: This tool cooks evenly and gives perfect grill marks. - Non-stick skillet: If you don’t have a press, a good skillet works too. - Heavy pan: Use it to press down the sandwich while it cooks in a skillet. - Sharp knife: A sharp knife helps slice your panini without squishing it. Using these tips and tools, you can create a delicious crispy tofu panini. For the full recipe, check out the earlier sections. {{image_4}} When making a crispy tofu panini, you can switch up the ingredients to match your taste. This adds fun and keeps things interesting. You can use different sauces or spreads. Try using pesto or spicy mustard instead of hummus. Swap spinach for kale or arugula for a bolder flavor. For added crunch, add sliced cucumbers or pickles. You can also replace the red bell pepper with grilled zucchini or eggplant. Each swap brings a new twist to your panini. To keep this dish vegan, stick with plant-based ingredients. Use gluten-free bread to make it gluten-free. Many brands offer delicious options that taste great. Check labels to ensure they have no animal products. This allows everyone to enjoy the crispy tofu panini without worry. Fresh produce can change with the seasons. In spring, try adding fresh asparagus or sprouts. In summer, include ripe tomatoes or zucchini. In fall, swap in roasted butternut squash for a sweet flavor. Winter might call for roasted root vegetables like carrots or sweet potatoes. These seasonal swaps help you enjoy fresh tastes all year long. This recipe offers endless possibilities for creativity. Use the [Full Recipe] as your base, and let your imagination run wild with variations! To keep your crispy tofu panini fresh, wrap it tightly. Use plastic wrap or foil for best results. Store it in the fridge for up to three days. Avoid leaving it out at room temperature. This helps prevent sogginess and keeps the flavors intact. To reheat, use a skillet over medium heat. Place the panini in the skillet and cover it. Heat for about 4-5 minutes on each side. This method helps restore the crispiness. You can also use a toaster oven for a similar effect. Avoid the microwave, as it can make the bread soft. If you want to freeze your panini, wrap it well in plastic wrap and foil. It can last for up to a month in the freezer. When you’re ready to eat, thaw it in the fridge overnight. Reheat it in a skillet for the best texture. This way, you can enjoy a quick meal without losing flavor. To make tofu extra crispy, start with firm tofu. Press it well to remove water. Slice it into even slabs. Marinate the slices in soy sauce and sesame oil. Let them soak for at least 15 minutes. After marinating, coat each slice with cornstarch. This coating helps create that crunchy texture you want. Cook the tofu in a hot skillet with olive oil. Flip it until golden brown on both sides. Yes, you can use many types of bread. Ciabatta and focaccia work great, but others can too. Try sourdough or whole grain for a different taste. Each bread type adds its own flavor and texture. Choose one that you love, and enjoy your panini in a new way. Dipping sauces can enhance your panini experience. Hummus is a classic choice. It adds creaminess and flavor. Vegan mayo also works well for a smooth dip. You can try spicy salsa for a kick. Another option is a tangy vinaigrette. Each sauce complements the crispy tofu and adds fun flavors. For more ideas, check out the Full Recipe for inspiration. In summary, we explored how to make a crispy tofu panini. We covered the main and optional ingredients, step-by-step cooking tips, and even some fun variations. Remember to store leftovers well and reheat them correctly for the best taste. Experiment with flavors and enjoy this dish as part of your meals. With a few simple steps, you can have a delicious, crispy tofu panini that satisfies your cravings. Enjoy your cooking journey!](https://fastmealmate.com/wp-content/uploads/2025/06/c0074219-6fc3-4ba3-a1d2-dcd469194d4e-768x768.webp)
![To make these tasty bars, you need a few simple ingredients: - 1 cup creamy peanut butter - 1/2 cup honey or maple syrup - 1 1/2 cups rolled oats - 1/2 cup almond flour - 1/4 cup unsweetened cocoa powder - 1/2 teaspoon vanilla extract - A pinch of salt - 1/3 cup dark chocolate chips (optional) These ingredients blend well together. The peanut butter gives a rich flavor. Honey or maple syrup adds sweetness. Oats provide a hearty base, making them filling. You may want to add some extra touches for more flavor: - A sprinkle of cinnamon for warmth - Chopped nuts for crunch - Dried fruits for sweetness These options can change the taste and texture. Feel free to mix and match based on your preferences. If you have allergies, here are some easy swaps: - Use sunflower seed butter instead of peanut butter - Substitute maple syrup for honey if needed - Replace almond flour with oat flour or coconut flour These substitutions keep the recipe safe and delicious. You can still enjoy the bars while avoiding allergens. Just remember to follow the same steps, and you’ll be good to go! Start by gathering your ingredients. Place the creamy peanut butter and honey in a large bowl. Use a spatula or wooden spoon to mix them. Stir until the mix is smooth and creamy. This step is key to a tasty bar. Next, add the rolled oats, almond flour, cocoa powder, vanilla, and salt. Mix everything together well. You want to see no dry spots. This creates a thick and sticky dough that holds together nicely. Now, take an 8x8 inch baking dish and line it with parchment paper. Leave some paper hanging over the edges. This makes it easy to lift out the bars later. Transfer your peanut butter mixture into the dish. Use your hands or a spatula to press it down. Make sure it’s even and firm across the bottom. If you want to add a chocolate drizzle, melt the dark chocolate chips next. Place them in a microwave-safe bowl. Heat in 15-second bursts, stirring each time. Once melted, drizzle the chocolate over the pressed mixture. Use a spoon or piping bag for a nice look. Finally, place your baking dish in the fridge. Chill for at least 1-2 hours. This helps the bars set firmly. Once ready, lift them out by the parchment paper. Cut into squares or bars as you like. You can find the full recipe [Full Recipe]. To get the best texture, mix the peanut butter and honey well. You want it smooth and creamy. If your mixture seems too dry, add a bit more honey or a splash of water. This helps bind everything together. The rolled oats should be well coated to hold the bars nicely. When you press the mixture into the dish, use damp hands. This prevents sticking. Start at the center and push outward. Press firmly and evenly to avoid air pockets. A flat spatula can help smooth the top. Make sure the layer is compact and even for better bars. For a great look, cut the bars into squares or rectangles. Place them on a colorful plate. You can add fresh fruit like berries or banana slices on the side. For a fun touch, sprinkle some extra cocoa powder or crushed nuts on top. This makes your treat look even more inviting. {{image_4}} You can make these bars even better with fun mix-ins. Chopped nuts add crunch. Walnuts or almonds work great. Dried fruits like cranberries or raisins give a sweet touch. Mix in about 1/2 cup of these before you press the mixture into the dish. This way, each bite has a surprise! Want to change the flavor? Use coconut or almond extract! Just add a teaspoon to the mix. Coconut gives a tropical twist. Almond makes it rich and nutty. You can also add shredded coconut for extra texture. It’s easy to make each batch unique! You can swap honey for maple syrup if you want. Both sweeteners work well, but they taste different. Maple syrup has a deep flavor. Honey is sweeter and lighter. You can also use agave nectar if you prefer. Just remember, the texture may change slightly with each choice. Use the one that you love best for your no-bake peanut butter bars. For the full recipe, check the details above! To keep your no-bake peanut butter bars fresh, use an airtight container. This helps lock in moisture. Place a piece of parchment paper between layers if you stack them. This prevents sticking and makes them easy to grab. Store them in the refrigerator for the best taste and texture. You can freeze these bars for later. Cut them into squares first and wrap each one in plastic wrap. Then, place them in a freezer-safe bag. Squeeze out as much air as you can before sealing. They will last up to three months in the freezer. When you're ready to enjoy, thaw them in the fridge overnight. These bars can last up to one week in the fridge. Keep them cool and away from heat. Check for any changes in smell or texture before eating. If you notice anything off, it's best to toss them. Following these tips ensures you always have a tasty treat on hand. If you want the full recipe, you can check it out for more details! Yes, you can use crunchy peanut butter. It will add some nice texture to the bars. The flavor will be the same, but the crunch gives a fun bite. If you like a little crunch, go for it! The bars need to chill for at least 1-2 hours. This time helps them set well. If you can wait longer, they will be even firmer and easier to cut. Just make sure they are cold before slicing. They can be vegan if you use maple syrup instead of honey. Just check your peanut butter, too, to ensure it doesn’t have added ingredients. With the right swaps, you can enjoy this treat without any animal products! You can use any nut flour, like hazelnut or cashew flour. If you need a nut-free option, try oat flour or even whole wheat flour. Just remember that different flours may change the texture a bit. The bars are set when they are firm to the touch. They should hold their shape when you lift them out of the pan. If they feel soft, give them more time in the fridge. Once set, they are ready to cut into pieces. These no-bake peanut butter bars are simple and tasty. We covered ingredients, steps, and great tips. You can customize them with different flavors and mix-ins. Remember to store them well for freshness. Feel free to experiment with substitutes and variations. Enjoy making these treats for yourself or to share. They are quick to whip up, perfect for any snack. Now, it’s your turn to enjoy this easy, delicious recipe!](https://fastmealmate.com/wp-content/uploads/2025/07/4c36effc-71ba-4d9d-bf30-f4c7732f2b92-768x768.webp)