
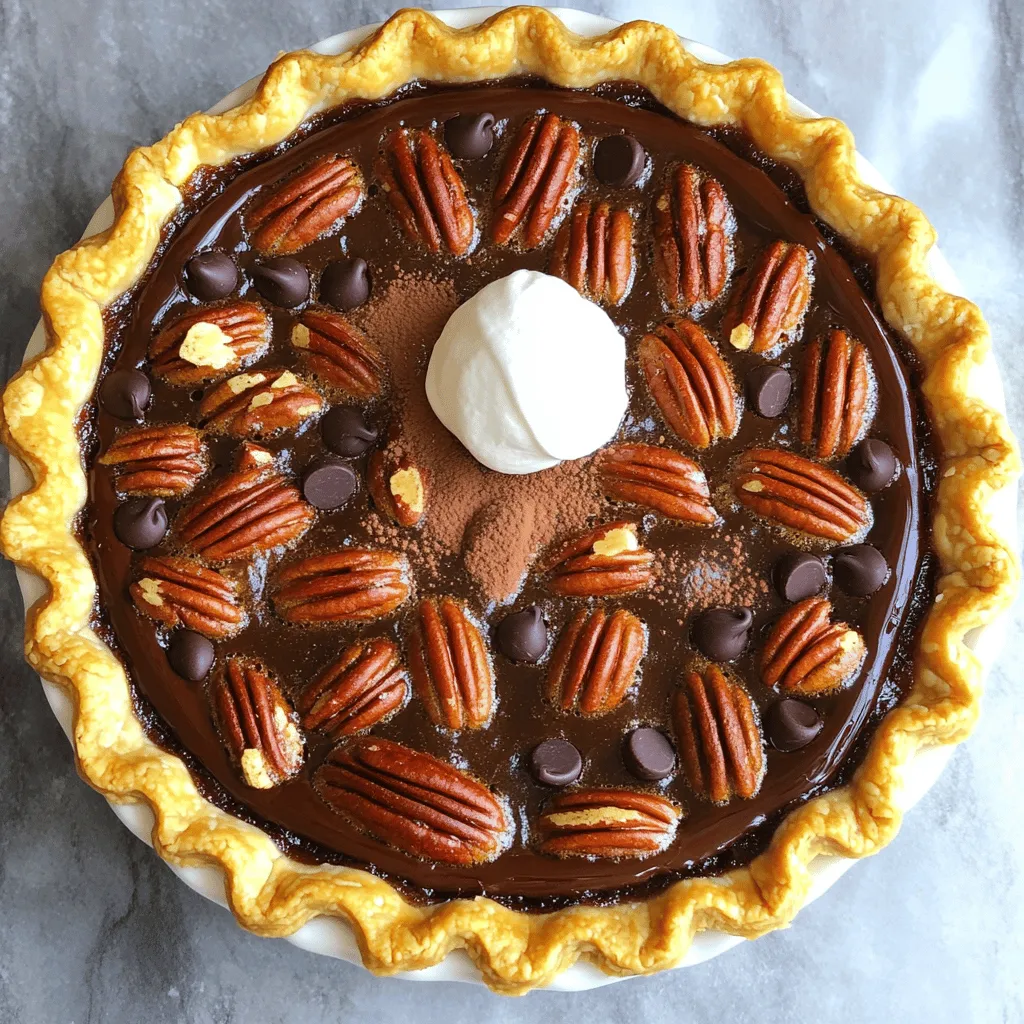
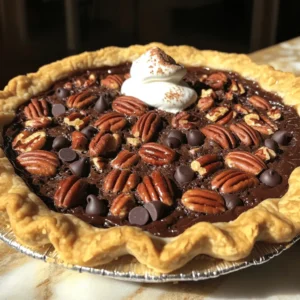
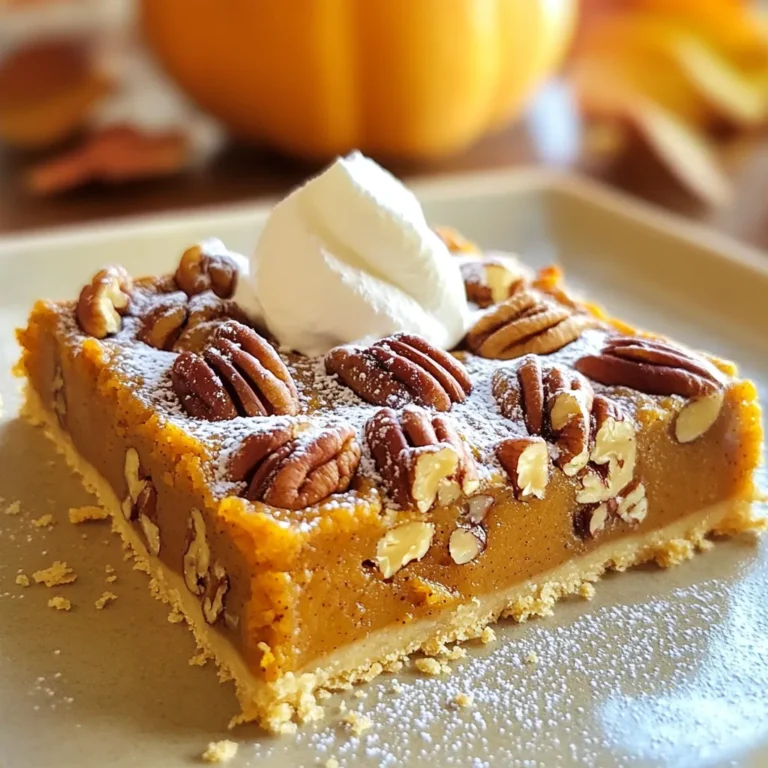
Chocolate Pecan Pie Irresistible Dessert Delight
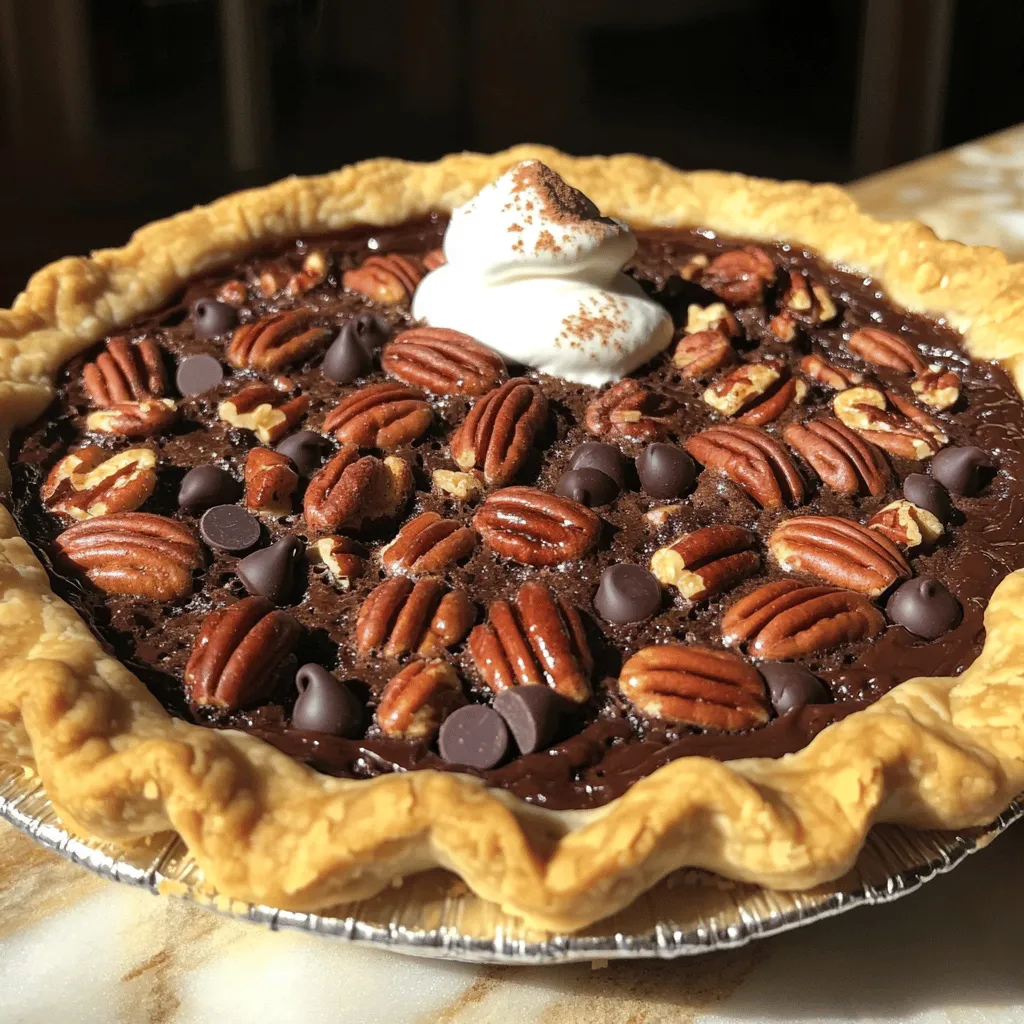
Looking for a dessert that wows every time? Look no further! My Chocolate Pecan Pie is an irresistible blend of rich chocolate and crunchy pecans. This recipe is simple and filled with tips that guarantee success in your kitchen. Whether you’re a novice baker or a seasoned pro, get ready to impress your family and friends with this delightful treat that they’ll be copying for years!
Ingredients
Essential Ingredients for Chocolate Pecan Pie
To make a great chocolate pecan pie, you need the right ingredients. Here they are:
– 1 cup pecan halves
– 1 cup semi-sweet chocolate chips
– 1 unbaked pie crust (store-bought or homemade)
– 3 large eggs
– 1 cup light corn syrup
– 1/2 cup packed brown sugar
– 1 teaspoon pure vanilla extract
– 1/4 teaspoon sea salt
– 1/4 teaspoon ground cinnamon
These ingredients blend well to create a rich, sweet filling. The pecans add crunch, while the chocolate brings a smooth, creamy taste.
Optional Ingredients for Enhanced Flavor
You can boost the flavor of your chocolate pecan pie with a few optional ingredients:
– 1/2 cup chopped nuts (like walnuts or hazelnuts)
– 1 tablespoon bourbon or whiskey for depth
– A pinch of nutmeg for warmth
Using these additions can give your pie a unique twist. Experiment to find your favorite mix!
Recommended Tools & Equipment
Having the right tools makes a big difference. Here’s what I recommend:
– 9-inch pie dish
– Mixing bowls
– Whisk for beating eggs
– Saucepan for heating syrup
– Spatula for mixing and spreading filling
These tools help ensure a smooth baking process. They make it easy to mix, pour, and bake your pie.
Step-by-Step Instructions
Preparing the Crust
To start, I recommend using a store-bought pie crust. It saves time and effort. If you prefer homemade, roll out your dough to fit a 9-inch pie pan. Make sure to press it firmly into the edges. Trim any excess dough and crimp the edges for a nice look. If you want a flaky crust, chill it in the fridge for 30 minutes before baking.
Making the Chocolate Pecan Filling
Next, gather your filling ingredients. In a medium saucepan, combine the light corn syrup, brown sugar, and sea salt. Heat over medium heat. Stir until the sugar dissolves, and the mix is smooth. Remove the pan from heat and let it cool a bit. In another bowl, crack the eggs and beat them well. Slowly add the warm syrup mix while whisking. This step is key to keep the eggs from scrambling. Mix in the vanilla and cinnamon. Finally, fold in the chocolate chips and pecans. Make sure they are evenly mixed.
Baking & Cooling the Pie
Now it’s time to bake! Preheat your oven to 350°F (175°C). Carefully pour the filling into your prepared crust. Spread it out evenly with a spatula. Bake the pie for 55-60 minutes. The filling should puff slightly, and a bit of jiggle in the center is okay. This jiggle means it will be creamy once cooled. After baking, let the pie cool at room temperature for at least two hours. This cooling time helps the filling set, making it easier to slice. Enjoy this sweet treat!
Tips & Tricks
How to Achieve the Perfect Crust
To make a great crust, use cold butter. Cut the butter into small pieces. Mix it into the flour until it looks like sand. Add ice water slowly until the dough sticks together. Chill the dough for at least 30 minutes. This helps the crust hold its shape when baking. Roll the dough out evenly for a smooth finish.
Troubleshooting Common Baking Issues
If your crust shrinks, it might be too warm. Chill it before rolling. If the filling bubbles over, the pie may be too full. Use a deep dish crust to prevent this. If the pie is too soft after baking, it needs more time in the oven. Bake until the center jiggles just a little.
Best Practices for Chocolate Melting
When melting chocolate, use low heat. You can use a double boiler or microwave. If using a microwave, heat in short bursts. Stir the chocolate often to avoid burning. Adding a little butter or cream helps it melt smoothly. This way, you get a rich, glossy finish for your pie.Enjoy your baking!
Variations
Different Types of Chocolate to Use
You can use many types of chocolate in your pie. Semi-sweet chocolate chips are a classic choice. They melt well and add a rich flavor. Dark chocolate adds a deeper taste and a touch of bitterness. If you want a sweeter pie, try milk chocolate. For a unique twist, consider using white chocolate. It gives a creamy texture and a different taste. Just remember to adjust sweetness levels if you switch chocolates.
Creative Toppings and Add-Ins
Toppings can make your chocolate pecan pie even better. Try adding a sprinkle of sea salt on top. This enhances the flavor and adds a nice crunch. You can also drizzle melted chocolate over each slice. It makes the pie look fancy and taste divine. If you love fruit, try adding chopped cherries or raspberries. They add a fresh burst of flavor. For a nutty twist, sprinkle crushed almonds or walnuts on top.
Alternative Sweeteners for Dietary Needs
If you need to avoid sugar, there are great options. Maple syrup can replace corn syrup for a unique taste. Honey is another natural sweetener you can use. If you prefer a zero-calorie option, try stevia or erythritol. Just be mindful of the sweetness. Each sweetener will change the pie’s final taste and texture. Always taste as you go to get it just right.
Storage Info
How to Properly Store Chocolate Pecan Pie
To keep your chocolate pecan pie fresh, let it cool completely. Then, cover it with plastic wrap or aluminum foil. You can also use an airtight container. Store it in the fridge. This method keeps the pie moist and tasty. Make sure to eat it within three to four days for the best flavor.
Freezing Tips for Leftover Pie
If you have leftover pie, freezing is a great option. First, slice the pie into pieces. Wrap each slice in plastic wrap. Then, place the wrapped slices in a freezer-safe bag. Label the bag with the date and type of pie. You can freeze chocolate pecan pie for up to three months. When you want to eat it, thaw the slice in the fridge overnight.
Shelf Life and Best Practices
The shelf life of your chocolate pecan pie depends on storage. In the fridge, it lasts about three to four days. If you freeze it, you extend the shelf life to three months. Always check for signs of spoilage before eating. If it smells off or looks strange, it’s best to toss it. These simple steps help you enjoy your delicious pie longer.
FAQs
Can I make Chocolate Pecan Pie ahead of time?
Yes, you can make Chocolate Pecan Pie ahead of time. I often bake it a day in advance. Just let it cool completely, then cover it tightly. Store it in the fridge for up to three days. This waiting time also allows the flavors to meld nicely.
What are the best pie crust options?
The best pie crust options include both homemade and store-bought. A flaky homemade crust adds a lovely touch. However, a good quality store-bought crust saves time and still tastes great. You can also use a graham cracker crust for a fun twist.
How do I know when the pie is done baking?
You will know the pie is done when the filling is set. Bake it for 55 to 60 minutes at 350°F (175°C). The center should have a slight jiggle when you gently shake it. This jiggle means the filling will be creamy once it cools.
Can I substitute ingredients in this recipe?
Yes, you can substitute some ingredients in this recipe. For example, use dark chocolate instead of semi-sweet if you like a richer taste. You can also replace light corn syrup with maple syrup for a natural sweetness. Just keep in mind that changes may alter the final flavor or texture.Enjoy your baking!
In this post, we covered how to make a delicious chocolate pecan pie. We looked at essential and optional ingredients, tools you need, and step-by-step instructions. Tips helped you avoid common baking problems. We also explored tasty variations and proper storage methods.
Enjoying this treat can be simple and fun. With practice, you will master it. Your chocolate pecan pie can become a family favorite. Let your creativity shine with your unique twists on this classic dessert.
![To make garlic butter shrimp, gather these simple ingredients: - 1 lb large shrimp, deveined and peeled - 6 tablespoons unsalted butter - 5 cloves garlic, finely minced - 1 teaspoon red pepper flakes - 1 lemon, zested and juiced - 2 tablespoons fresh parsley, finely chopped - Salt and freshly ground black pepper, to taste - Optional: 1 tablespoon extra virgin olive oil These ingredients create a dish full of flavor. The shrimp give a sweet and briny taste. The garlic brings a warm, earthy aroma. Butter adds richness and a smooth texture. Lemon juice brightens the dish and balances the flavors. Fresh parsley gives a pop of color and freshness. Feel free to adjust the red pepper flakes. If you like heat, add more! If you prefer a milder flavor, use less. The optional olive oil helps prevent butter from burning. It adds depth to the dish. Once you gather these ingredients, you're ready to dive into the world of garlic butter shrimp. For a full recipe, check out the section above. To start, heat a large skillet over medium heat. Add 3 tablespoons of unsalted butter and, if you like, 1 tablespoon of extra virgin olive oil. This oil helps keep the butter from burning and adds flavor. Once the butter melts, add 5 cloves of minced garlic along with 1 teaspoon of red pepper flakes. Sauté for about 1-2 minutes. Stir often until the garlic smells great and turns light golden brown. Watch closely, so the garlic doesn’t burn. Now, it’s time for the shrimp. Carefully add 1 pound of peeled and deveined shrimp to the skillet. Spread them out in a single layer. Season with salt and freshly ground black pepper. Let the shrimp cook for about 2-3 minutes without stirring. You will see them change color to pink and opaque. When they look good, gently flip the shrimp over. Add the zest and juice from 1 lemon along with the remaining 3 tablespoons of butter. Cook for another 2-3 minutes until the shrimp are fully cooked and coated in the buttery sauce. When the shrimp are done, take the skillet off the heat. Stir in 2 tablespoons of finely chopped parsley. Taste the dish and adjust seasoning by adding more salt or pepper if needed. Serve the garlic butter shrimp hot to enjoy the best flavor. For more details, check the Full Recipe. To make your garlic butter shrimp shine, focus on two key areas: garlic and seasoning. - Avoid burning garlic: Garlic burns fast. Keep your heat at medium. Stir it often. You want it golden, not dark. Burnt garlic tastes bad. - Adjust seasoning to preference: Taste is personal. Start with salt and pepper. Add more to match your liking. You can also play with red pepper flakes for heat. Now, let’s talk about how to serve your dish. Presentation matters, and there are tasty ways to enjoy it. - Pairing with rice or bread: Serve your shrimp over fluffy rice. Jasmine or basmati works great. If you prefer, slice some warm bread. It soaks up the sauce well. - Garnishing ideas: Fresh parsley adds color. A few lemon wedges brighten your plate. A sprinkle of extra red pepper flakes adds a kick. Need more help? Here are some useful tools. - Suggested video tutorial or high-quality images: Look for a video that shows the steps in action. It helps to see the cooking process. - Nutritional information: Check out the calories and nutrients in this dish. It’s good to know what you're eating. For the full recipe, click [Full Recipe]. Enjoy cooking! {{image_4}} You can play with the flavors in garlic butter shrimp. For a kick, try Spicy Garlic Butter Shrimp. Just add more red pepper flakes. Adjust the heat to your taste. This gives the dish a nice kick that many love. Another great option is Lemon Herb Garlic Shrimp. Add fresh herbs like thyme or basil for a fresh twist. You can also squeeze extra lemon juice for more brightness. This variation makes the dish feel light and refreshing. You can swap some ingredients for different flavors. Instead of butter, try using olive oil. This gives a different taste and is a healthier choice. You can also use ghee for a rich flavor. Adding vegetables can change the dish too. Toss in asparagus or cherry tomatoes. These add color and nutrients. They cook quickly and soak up the garlic butter sauce. If you need gluten-free options, this recipe is easy. Just make sure your red pepper flakes and any other spices are gluten-free. For a dairy-free option, use olive oil instead of butter. You can also try vegan butter. This keeps the flavor while making it suitable for those avoiding dairy. By making these small adjustments, you can enjoy garlic butter shrimp in many ways. For the full recipe, check out the details above. To store leftovers, place the garlic butter shrimp in an airtight container. Ensure the shrimp cool down first. This keeps them fresh and tasty. You should eat the leftovers within 2 days. The flavors stay best within this time. For reheating, I suggest using a skillet. Heat it on low and add a little butter. This method keeps the shrimp moist. Stir gently to avoid overcooked shrimp. If you use the microwave, heat in short bursts. Check every 30 seconds until warm. You can freeze cooked shrimp for later use. Place them in a freezer-safe bag and remove as much air as possible. They can last up to 3 months in the freezer. To defrost, place the shrimp in the fridge overnight. For a faster method, submerge the bag in cold water. This way, you can enjoy your garlic butter shrimp whenever you want. For the full recipe, check out the [Full Recipe]. Cook shrimp for about 2-3 minutes on each side. They turn pink and opaque. This short time keeps them tender and juicy. Overcooking makes them tough. Always check their texture before serving. Yes, you can use frozen shrimp. Thaw them first in cold water. It takes about 15-20 minutes. Pat them dry before cooking. This helps them sear nicely in the pan. Cooking frozen shrimp directly may not give the best results. You can pair garlic butter shrimp with many sides. Rice is a great choice, like jasmine or basmati. You can also serve it with crusty bread. A fresh salad or steamed veggies work well too. They balance the rich flavors of the shrimp. This recipe is very flexible. You can adjust the spice level by adding more or less red pepper flakes. Want a different flavor? Try adding fresh herbs like basil or cilantro. You can even add veggies like asparagus or bell peppers. The choice is yours! For the full recipe, check the earlier section. This blog post covered a simple garlic butter shrimp recipe with step-by-step instructions. You learned about key ingredients, cooking tips, and variations for flavor. Storing and reheating shrimp was also discussed. This dish is not only easy to make, but it’s also delicious too. Experiment with the ingredients or try new sides to make it your own. Enjoy your cooking, and have fun exploring different flavors and options!](https://fastmealmate.com/wp-content/uploads/2025/05/4326bcb2-842f-4d6f-96a8-35ed43fbf561-768x768.webp)
![- 4 cups of juicy watermelon (cut into cubes) - 2 cups of crisp cucumber (diced) - 1 cup of creamy feta cheese (crumbled) - 1/4 cup of fresh mint leaves (finely chopped) - 2 tablespoons of high-quality olive oil - 1 tablespoon of balsamic reduction (optional) - Sea salt to taste - Freshly cracked black pepper to taste - Juice from one fresh lemon The ingredients for this salad create a refreshing blend. The watermelon brings sweetness, while the cucumber adds crunch. Feta cheese gives a creamy touch, making the dish rich and satisfying. Fresh mint adds a burst of flavor that brightens every bite. Using high-quality olive oil enhances the taste, while balsamic reduction adds a sweet twist. You can adjust salt and pepper to fit your taste. The lemon juice lifts the flavors, making everything pop. This salad is perfect for hot days. It’s simple to make and looks great on any table. Plus, it’s a great way to enjoy fresh, seasonal produce. For the full recipe, check out the detailed steps later in this article. To cube watermelon, start with a big, ripe piece. Cut off both ends to make it stable. Stand it up, then slice down the sides to remove the skin. Now, cut the flesh into thick slabs. After that, slice the slabs into cubes. Aim for bite-sized pieces so they are easy to eat. For the cucumber, wash it well. Cut off the ends, then slice it in half lengthwise. Use a spoon to scrape out the seeds if you want a less watery salad. Next, chop it into small, even pieces. This helps the cucumber mix well with other ingredients. When it comes to crumbling feta cheese, first take it out of its packaging. Use your hands or a fork to break it into small pieces. Try to keep the crumbles big enough to stay distinct in the salad. This way, you get that lovely creamy bite. In a large bowl, start by adding the cubed watermelon and diced cucumber. Gently mix them together, ensuring they are evenly combined. Next, sprinkle the crumbled feta cheese over the top. This will add a creamy texture and a salty kick. Add the finely chopped mint leaves next. This herb brightens the salad with its fresh flavor. Now, drizzle the olive oil and squeeze the fresh lemon juice over the salad. This will give it a bright, zesty taste. Using a large spoon, carefully toss the salad. Do this gently to keep the feta from mashing. You want to mix the flavors without losing the feta's shape. Now it's time to season the salad. Add sea salt and freshly cracked black pepper to taste. Start with a little, then adjust as needed. The salt will help enhance all the flavors. Let the salad rest for about 10 minutes before serving. This step is key. It allows the flavors to meld together. The watermelon will release some juice, creating a light dressing. For the complete recipe, check the [Full Recipe]. To create the best flavor in your salad, balance sweetness and acidity. Watermelon is sweet, so you need acidity to cut through that. Fresh lemon juice adds bright notes. You can also try balsamic reduction for a sweet twist. Adjust seasonings to your taste. Add sea salt and black pepper slowly. Taste as you go. This way, the salad fits your personal preference. Presentation matters when serving this salad. For a colorful display, choose a large bowl. Layer the watermelon, cucumber, and feta beautifully. You can also arrange the watermelon cubes in a fun pattern. Lastly, garnish with extra mint leaves. This adds a pop of green and a fresh smell. Having the right tools makes preparation easy. A sharp chef's knife is key for cutting watermelon and cucumber. Use a sturdy mixing bowl to combine all ingredients gently. These tools ensure you maintain the salad's texture and create a lovely dish. For the best results, make sure your tools are clean and ready to go. For a complete guide, check the Full Recipe. {{image_4}} You can swap feta cheese for a vegan option like tofu or almond cheese. These substitutes provide a similar creamy texture. If you want to add more flavor, try using a vegan feta made from cashews. For fruits or vegetables, consider adding berries, mango, or radishes. These additions add color and a unique taste to your salad. Watermelon pairs well with many fruits, so feel free to get creative! Different dressings can enhance your salad. A simple lemon vinaigrette works great. Mix olive oil, lemon juice, salt, and pepper for a fresh taste. You can also make your own balsamic reduction at home. Just simmer balsamic vinegar on low heat until it thickens. This sweet and tangy sauce pairs well with the salad, adding depth to the flavors. Changing the salad with the seasons can keep it fresh. In summer, add fresh basil or strawberries for a sweet twist. In fall, try diced apples or pears for a crunchy bite. For winter, include pomegranate seeds or citrus fruits. These ingredients add a pop of color and flavor to your dish. Always look for seasonal produce to keep your salad exciting and vibrant! To keep your leftover salad fresh, place it in an airtight container. This helps prevent moisture loss and keeps flavors strong. You can use glass or plastic containers. Glass is great for easy cleaning and doesn’t absorb odors. If you want to keep it extra fresh, add a layer of plastic wrap on top before sealing. You can freeze Watermelon Cucumber Feta Salad, but it’s not ideal. Freezing can change the texture of watermelon and cucumber. If you choose to freeze, prepare it without the feta and dressing. Store the fruit and cucumber in a freezer-safe bag. When you're ready to eat, thaw it in the fridge overnight. Add feta and dressing just before serving. In the fridge, this salad lasts about 2 to 3 days. After that, it may start to lose its crispness. Look for signs of spoilage, like a mushy texture or off smell. If the feta starts to look slimy, it’s time to toss it. Always trust your senses when deciding if food is still good to eat. To make this salad heartier, add protein or grains. You can include: - Grilled chicken breast, sliced thin - Cooked quinoa for a nutty flavor - Chickpeas for a plant-based option - Shrimp for a light seafood touch These ingredients mix well with the fresh flavors and keep your salad satisfying. Yes, you can prep ingredients ahead. To keep the salad fresh: - Chop watermelon and cucumber a few hours before serving. - Store the feta separately to avoid sogginess. - Mix everything together just before serving. This way, you enjoy that crisp texture and vibrant taste. Watermelon is hydrating and low in calories. It has vitamins A and C, which support your skin and immune system. Cucumber is also hydrating and offers fiber, which is good for digestion. This salad fits into a healthy diet by providing essential nutrients with low calories. Yes, this salad is gluten-free. All the ingredients, including watermelon, cucumber, and feta, do not contain gluten. For extra options: - Serve it with gluten-free crackers. - Pair it with gluten-free bread for a light meal. Feel free to enjoy this salad without worries about gluten! The Watermelon Cucumber Feta Salad is a refreshingly light dish. You learned about its main ingredients, step-by-step preparation, and unique variations. Remember to balance flavors and let it rest before serving. With tips for storage and healthy options, you can enjoy this salad any time. This recipe is simple, delicious, and perfect for warm days. Now, you have the tools to create a great salad that impresses everyone. Enjoy making it your own!](https://fastmealmate.com/wp-content/uploads/2025/07/b20d6dc1-e7c2-400f-acd5-da5290acfeaa-768x768.webp)