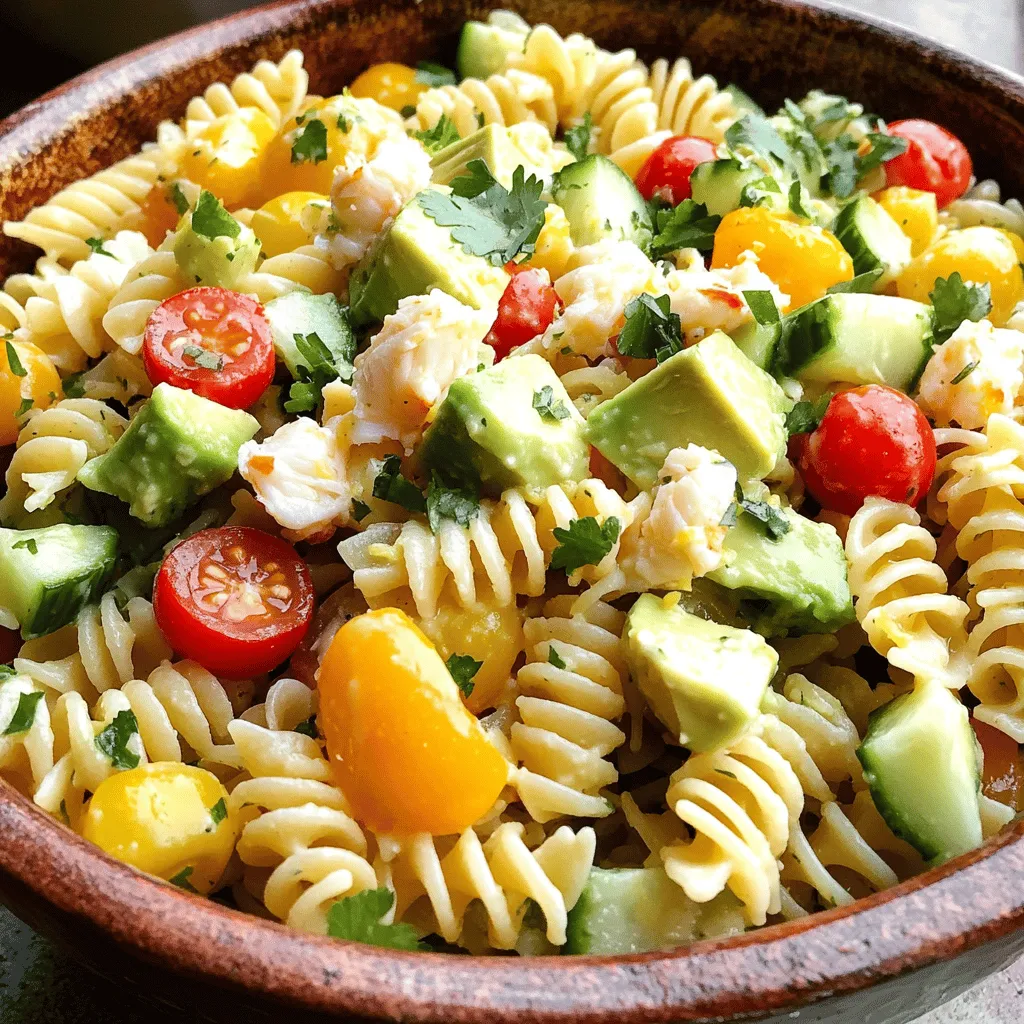
Pasta Salad with Crab Delightful and Simple Recipe

If you’re craving a fresh, flavorful dish that’s easy to prepare, this Pasta Salad with Crab is perfect for you. With tender rotini pasta, sweet crab meat, and bright veggies, it’s a delightful meal that bursts with taste. I’ll guide you through simple steps, so you can impress friends or family at your next gathering. Let’s dive into the deliciousness and make mealtime memorable!
Ingredients
List of Essential Ingredients
– 8 oz rotini pasta
– 1 cup cooked crab meat
– 1 ripe avocado, diced
– 1 cup cherry tomatoes, halved
– 1/2 cucumber, diced
– 1/4 red onion, finely chopped
– 1/4 cup fresh cilantro, roughly chopped
– 3 tablespoons fresh lemon juice
– 2 tablespoons extra virgin olive oil
– Sea salt and pepper
– Optional: 1/4 teaspoon cayenne pepper
Gathering the right ingredients makes this pasta salad shine. I love using rotini pasta because its curves hold onto the dressing well. For crab meat, I prefer lump or claw for the best texture.
Make sure your avocado is ripe. It should be soft but not mushy. Cherry tomatoes add a fresh burst, while cucumber gives a nice crunch. The red onion brings a hint of bite and color.
Cilantro adds a bright flavor, but you can skip it if you’re not a fan. Fresh lemon juice brightens the dish, and olive oil brings it all together. Don’t forget sea salt and pepper for seasoning. If you like some heat, cayenne pepper gives a gentle kick.
With these ingredients, you can create a simple, yet delightful salad.
Step-by-Step Instructions
Cooking the Pasta
To start, you need salted water. Bring it to a boil in a large pot. Add the rotini pasta and cook it until al dente, about 8-10 minutes. Drain the pasta and rinse it under cold water. This stops the cooking process and cools the pasta down.
Making the Dressing
Next, grab a medium-sized mixing bowl. Whisk together fresh lemon juice, olive oil, sea salt, and black pepper. If you like some heat, add a pinch of cayenne pepper. Mix well and taste. Adjust the seasoning to your liking.
Combining the Salad Ingredients
In a large mixing bowl, combine the cooled pasta with crab meat, diced avocado, halved cherry tomatoes, diced cucumber, finely chopped red onion, and roughly chopped cilantro. Make sure everything is evenly mixed. Each bite should have a bit of everything.
Dressing the Salad
Now, slowly pour the dressing over the salad mixture. Use a spatula or a large spoon to toss everything together carefully. Be gentle to avoid mashing the avocado pieces.
Chilling the Salad
Cover the bowl with plastic wrap or transfer the salad to an airtight container. Refrigerate for at least 30 minutes. This chilling time helps all the flavors blend together.
Serving Suggestions
When it’s time to serve, give the salad a gentle toss to mix any settled ingredients. Serve it chilled in individual bowls or on a large dish. Enjoy the colorful and tasty salad!
Tips & Tricks
Choosing the Right Crab Meat
Choosing crab meat can make a big difference in the flavor. You can pick between lump and claw crab meat. Lump meat is big and sweet. It is great for salads. Claw meat is darker and has a stronger taste. It can be a bit cheaper, too.
You can also buy pre-cooked or raw crab meat. Pre-cooked crab is easy and saves time. It’s ready to use right away. Raw crab needs to be cooked first, but it can taste fresher. If you choose raw, follow safe cooking steps.
Perfecting the Dressing
The dressing brings everything together. You can adjust the flavor with lemon juice or spices. If you want more zing, add more lemon. For a bit of heat, try cayenne pepper.
Don’t forget about herbs! Fresh herbs like cilantro or parsley can add a lot. Try different seasonings, too. This is a chance to make the dish your own.
Ensuring the Best Texture
Cooling your pasta is key. After cooking, drain it and rinse it with cold water. This stops the cooking. It also helps the pasta stay firm.
When mixing the salad, be gentle. Toss lightly to keep the avocado pieces whole. Over-mixing can turn the avocado into mush. You want nice bites of avocado in every scoop.
Variations
Ingredient Substitutions
You can switch up the pasta to suit your needs. For gluten-free options, try brown rice or chickpea pasta. These choices taste great and keep the dish light. If you’re not a fan of crab, you can use shrimp or cooked chicken instead. These swaps work well and add their unique flavors.
Adding More Vegetables
Boost the nutrition of your pasta salad by adding seasonal vegetables. Think about using fresh zucchini or asparagus in spring, or roasted butternut squash in fall. For added crunch, toss in diced bell peppers or radishes. They bring a nice texture and a pop of color to the dish.
Flavor Enhancements
To elevate the taste, mix in different dressings. A creamy ranch or tangy vinaigrette can change the flavor profile. Don’t be afraid to experiment with herbs too. Fresh dill or basil can add a new twist to your crab salad. These changes make the dish more fun and exciting.
Storage Info
Refrigeration Guidelines
Pasta salad with crab stays fresh in the fridge for up to three days. Store it in an airtight container to keep it safe from odors and moisture. Before serving, check for freshness. If it looks or smells off, it’s best to toss it.
Freezing Tips
Freezing pasta salad is not ideal, especially with avocado. The texture of the avocado changes when frozen. However, you can freeze just the pasta and crab mixture. Keep it in a freezer-safe bag for up to one month. When ready, thaw it in the fridge overnight.
Reheating Recommendations
If you store the salad in the fridge, serve it cold. If you freeze it, thaw it first. Avoid reheating it in the microwave, as this can make the crab tough and ruin the avocado. Always enjoy it chilled for the best taste and texture.
FAQs
Can I use canned crab meat for this recipe?
Yes, you can use canned crab meat. Here are some pros and cons:
– Pros: It’s easy to find and saves time. Canned crab is pre-cooked, so you skip cooking.
– Cons: It may lack the fresh taste of lump crab meat. The texture can be less appealing.
If you choose canned crab, look for high-quality brands. This helps ensure better flavor and texture.
How do I prevent the avocado from browning?
To keep your avocado fresh, try these tips:
– Use lemon juice: The acid helps slow browning.
– Cover tightly: Use plastic wrap to minimize air contact.
– Add just before serving: Mix in the avocado last to keep it vibrant.
These steps help maintain the bright color and flavor of the avocado in your salad.
What can I serve with pasta salad?
Pasta salad pairs well with various side dishes. Here are some tasty options:
– Grilled chicken or shrimp for protein.
– Garlic bread for a crunchy side.
– A light green salad for extra veggies.
These choices enhance your meal and create a balanced plate. Enjoy your delicious crab pasta salad with these sides!
In this blog post, we covered how to make a tasty crab pasta salad. We listed all the essential ingredients and provided step-by-step instructions for cooking and mixing everything. I shared tips for picking the best crab meat and adjusting flavors. We also explored variations and storage options for your salad.
This dish is easy to modify and a great choice for any meal. Enjoy making it fresh and flavorful!

![- 1 cup Biscoff cookie spread - 2 cups whole milk - 1 cup heavy cream - 1/2 cup granulated sugar - 1/4 cup cornstarch - 1 teaspoon vanilla extract - 1/8 teaspoon salt - 3 ripe bananas, sliced - 1 cup crushed Biscoff cookies (for layering and garnish) - Whipped cream (optional, for topping) The Biscoff banana pudding is a treat, but it comes with calories. Each serving has about 350 calories. It has sugar and fat from the cookies and cream. If you want to reduce calories, you can use less sugar or lighter cream. You can also switch to a non-dairy milk for a vegan option. This dessert has a good mix of flavors and textures. You get the creaminess from the pudding and the crunch from the cookies. - Mix Dry Ingredients: In a medium saucepan, combine 1/2 cup granulated sugar, 1/4 cup cornstarch, and 1/8 teaspoon salt. Whisk them until there are no lumps. - Add Milk and Cook Mixture: Slowly pour in 2 cups of whole milk while whisking. This helps to avoid clumps in your pudding. Place the saucepan on medium heat and stir constantly. Cook until the mixture thickens and bubbles, about 5 to 7 minutes. - Incorporate Flavors: Once thickened, remove the saucepan from heat. Stir in 1 teaspoon vanilla extract and 1 cup of Biscoff cookie spread. Mix well until everything is smooth and combined. - Whip the Cream: In a separate bowl, whip 1 cup of heavy cream using an electric mixer. Beat until soft peaks form. Make sure it holds shape but is not too stiff. - Combine with Biscoff Mixture: Gently fold the whipped cream into the Biscoff mixture. Use a spatula and be gentle to keep the airy texture. - Layer the Dessert: In a large dish or individual cups, lay down sliced bananas. Then, spoon a layer of the Biscoff pudding over the bananas. - Add Crushed Cookies: Sprinkle a layer of crushed Biscoff cookies on the pudding. Repeat the layers with the remaining ingredients. Ensure the top layer is the Biscoff pudding. - Finishing Touches: For a nice look, pipe or dollop whipped cream on top. Garnish with extra crushed Biscoff cookies. - Chill the Dessert: Cover the dessert and place it in the fridge for at least 4 hours, or overnight. This helps all the flavors blend together. For the complete recipe, check the [Full Recipe]. Enjoy your cooking! To get the right whipped cream consistency, start with cold heavy cream. Use a clean bowl and beaters for the best results. Whip at medium speed until soft peaks form. This means the cream should hold its shape but still be smooth. Avoid over-whipping, as this can turn it into butter. To prevent lumps in the pudding, whisk the dry ingredients well before adding milk. Pour in the milk slowly while stirring. This helps mix everything evenly. Keep stirring as you cook the mixture over medium heat. This ensures a smooth pudding without any lumps. For the best presentation, use clear glasses or bowls. This shows off the lovely layers of bananas, creamy pudding, and crunchy cookies. You can also add a banana slice or a whole Biscoff cookie on top for a nice touch. This makes each serving look even more inviting. For garnishing ideas, sprinkle extra crushed Biscoff cookies on top. A dollop of whipped cream adds a nice finishing touch. You can also drizzle some melted Biscoff cookie spread over the top for added flavor and flair. The best time to prepare this dessert is a day ahead. This gives the flavors time to blend well. The pudding needs at least 4 hours in the fridge, but overnight is even better. This chilling time lets the pudding set perfectly. For optimal flavor, chill the dessert for at least 4 hours. This helps all the elements come together. The longer you chill, the more delicious it gets! Enjoy your Biscoff banana pudding after the wait; it will be worth it. {{image_4}} You can make this dessert even more fun by adding chocolate layers. Just mix cocoa powder into the Biscoff pudding. This mix creates a rich, sweet flavor. You can also use chocolate pudding as a layer. The blend of chocolate and Biscoff is a match made in dessert heaven. You can easily make a vegan version of Biscoff banana pudding. Use almond milk or coconut milk instead of whole milk. For the cream, try coconut cream. You can replace granulated sugar with maple syrup or agave. These swaps keep the taste yummy while being plant-based. If you need a gluten-free option, use gluten-free cookies. Look for brands that make gluten-free Biscoff-style cookies. Ensure that all other ingredients are gluten-free. This way, everyone can enjoy this delightful dessert without worry. To keep your Biscoff banana pudding fresh, store leftovers in the fridge. Use an airtight container to prevent air and moisture from spoiling it. If you don’t have one, cover the dish tightly with plastic wrap. This keeps the pudding creamy and tasty. In the fridge, this pudding lasts about 3 to 5 days. After that, it may lose its texture and flavor. Always check for any signs of spoilage before enjoying it again. If it smells off or looks strange, it’s best to toss it. Yes, you can freeze this pudding! To freeze, spoon it into a freezer-safe container, leaving room for expansion. Cover tightly with a lid or plastic wrap. When you're ready to eat, thaw in the fridge overnight. Avoid refreezing once thawed, as it may change the texture. Enjoy your creamy treat! For the full recipe, check out the Biscoff banana pudding delight. Can I use other nut butters instead of Biscoff? You can try using almond or peanut butter. However, Biscoff has a unique flavor. It adds a sweet, spiced taste. This makes it hard to replicate. Use other nut butters if you prefer them. The result will be different but still tasty. How do I know when the pudding mixture is thick enough? Stir the mixture while it cooks. It will start to bubble and thicken. When it coats the back of a spoon, it's ready. If it drips off the spoon slowly, you've got the right texture. This usually takes about 5-7 minutes. Can I make this dessert ahead of time? Yes, you can make it a day in advance. It tastes better when the flavors blend. Just cover it well and chill it in the fridge. This way, you save time and enjoy a delicious dessert. Can I use low-fat milk? Low-fat milk works, but it changes the creaminess. The pudding may be less rich. If you choose this option, consider adding a little extra whipped cream for texture. What if I don't have cornstarch? You can use flour as a substitute. It will work to thicken the pudding. Use about twice the amount of flour. Just remember, it might slightly change the taste. What can I pair with Biscoff banana pudding? This dessert pairs well with fresh fruit. Try berries or slices of mango. It also goes great with coffee or tea. The flavors balance nicely. Is it suitable for special occasions? Absolutely! Biscoff banana pudding is perfect for parties. Its layers look stunning in clear cups. Everyone loves a sweet and creamy dessert like this. It's a showstopper that impresses guests! This blog post covered how to make a delicious Biscoff banana pudding. We explored key ingredients and discussed the preparation and assembly steps to perfect the dish. I shared tips for achieving the best texture and serving suggestions to impress guests. You also learned about variations for diet needs and how to store leftovers safely. Enjoying this pudding can bring joy to many occasions. With the right ingredients and care, you can make this treat a family favorite.](https://fastmealmate.com/wp-content/uploads/2025/05/85e9a37f-c50b-46e1-af24-a41950287baa-768x768.webp)
![- 2 cups fresh or frozen cherries, pitted - 1 cup cherry cola - 1/2 cup granulated sugar - 1 tablespoon freshly squeezed lemon juice - 1 teaspoon pure vanilla extract - A pinch of salt When I make no churn cherry cola sorbet, I start with fresh or frozen cherries. I always pit the cherries first, as this makes blending easy. The cherry cola gives the sorbet a fun and fizzy flavor. I use granulated sugar to sweeten the mix. If you want a tart twist, add freshly squeezed lemon juice. I also add a teaspoon of pure vanilla extract for depth. A pinch of salt balances the sweetness and enhances the flavors. You can swap out granulated sugar for other sweeteners like honey or agave syrup. These can change the taste, making it unique. You might also try adding a splash of almond extract for a nutty flavor. Or, mix in a handful of mint leaves for a refreshing touch. Each variation leads to a new and exciting treat! For the full recipe, check out the [Full Recipe]. To start, you will blend the cherries and cola. Take your pitted cherries and add them to a high-speed blender. Pour in the cherry cola. Blend on high speed until the mixture is smooth. This smooth texture is key for your sorbet. If it’s too chunky, blend it a bit longer. Next, it's time to mix in the flavorings. Add in the granulated sugar, lemon juice, vanilla extract, and a pinch of salt. Blend again until all the ingredients are well combined. The sugar should dissolve completely. You can taste the mixture to see if you want it sweeter. If so, slowly add more sugar and blend until smooth. Now, you’ll prepare to freeze your mixture. Pour the cherry cola blend into a shallow dish. This shape helps it freeze faster. Place the dish in the freezer for about 2 hours. After 2 hours, take it out and scrape the mixture with a fork. This step breaks up ice crystals, giving a nice texture. Return the dish to the freezer. For the next 2 hours, scrape it every hour. This helps keep it light and fluffy. After about 6 hours, your sorbet should be ready. Let it sit at room temp for a few minutes before serving. Serve in chilled bowls for the best look. Enjoy your No Churn Cherry Cola Sorbet! To make a smooth sorbet, avoid ice crystals. After the first two hours of freezing, take the mixture out and scrape it with a fork. This breaks up any ice. Repeat this every hour for the next two hours. It helps create a light and fluffy texture. Use a shallow dish for freezing. This gives the mixture more surface area. A food processor or high-speed blender works best to blend the cherries and cola. These tools help achieve a creamy consistency. Taste your mixture after blending in the sugar. If it’s not sweet enough, add more sugar. Do this little by little. Blend until it’s smooth. You want the flavor to pop. Remember, the sweetness can change after freezing. Serve your sorbet in chilled bowls or glass cups. This keeps it cool longer. For a fun touch, garnish with fresh cherries or mint leaves. You can also drizzle a little chocolate sauce on top. It adds visual appeal and extra flavor. Enjoy showing off your beautiful dessert! {{image_4}} You can mix up this cherry cola sorbet by using different fruits. Here are some fun ideas: - Raspberry Cola: Swap cherries for raspberries. This gives a tart twist. - Peach Delight: Use fresh peaches for a sweet and juicy flavor. - Mixed Berry: Combine strawberries, blueberries, and blackberries for a berry blast. You can also enhance the flavor with simple extras: - Mint: Add fresh mint for a refreshing taste. - Lemon Zest: A bit of lemon zest can brighten the sorbet. - Coconut Milk: For a creamy texture, mix in coconut milk. If you want to make this sorbet healthier, there are easy swaps for sugar. Here are some options: - Honey: Use honey instead of granulated sugar for natural sweetness. - Agave Syrup: This works well for a lower glycemic option. - Stevia: This zero-calorie sweetener is a great choice for low-sugar diets. For those following a vegan diet, you can make this sorbet vegan-friendly. Just make sure to choose a vegan-friendly cola. The other ingredients are naturally plant-based, so you are all set! To keep your sorbet fresh, store it in an airtight container. This helps prevent ice crystals from forming. You can also use a shallow dish for freezing. This allows for quicker freezing and a smoother texture. If you have leftovers, let them cool before sealing. You can layer parchment paper on top to reduce air exposure. This extra step helps maintain its flavor and texture. No churn cherry cola sorbet lasts about two weeks in the freezer. After this time, the flavor may fade. The texture could change too, becoming icy and less smooth. To enjoy it at its best, try to eat it within this time frame. If you notice any signs of freezer burn, it’s best to toss it. Enjoy this sweet treat while it’s fresh! To make this sorbet, follow these simple steps: 1. Blend the Cherries: Start by mixing the pitted cherries with cherry cola in a blender. Blend until smooth. 2. Mix in Flavorings: Add sugar, lemon juice, vanilla, and salt. Blend until well combined. 3. Taste and Adjust Sweetness: Sample the mix and add more sugar if needed. Blend again. 4. Prepare to Freeze: Pour the mixture into a shallow dish. Spread it out evenly. 5. Initial Freezing: Freeze for about 2 hours, then scrape the mixture with a fork. 6. Scrape and Refine: Freeze again, scraping every hour for 2 more hours. 7. Final Freezing: After 6 hours, let it sit for a few minutes before scooping. This method creates a light and fluffy sorbet. For the full recipe, check out the section above. Yes, you can use diet or caffeine-free cherry cola. This option is great for those who want fewer calories or caffeine. The flavor may change slightly, but it will still be tasty. Many brands offer these choices, so look for one you like. If you don’t have fresh cherries, frozen cherries work well too. They are picked at peak ripeness and often taste just as good. Using frozen cherries saves prep time since they come pitted. Just blend them straight from the freezer for a smooth consistency. You can make this sorbet ahead of time. It stays fresh in the freezer for up to two weeks. Just be sure to store it in an airtight container. This makes it a perfect treat for parties or hot summer days. Prepare it a day in advance to let the flavors meld together nicely. This blog post covered how to make Cherry Cola Sorbet from start to finish. We explored essential ingredients and optional add-ons, ensuring you can personalize your treat. You learned about blending and freezing techniques to get the best texture. I shared tips on adjusting sweetness and creative ways to serve your sorbet. Finally, remember that this recipe is flexible. You can switch fruits, and modify sweetness, and dietary needs. Enjoy making your sorbet, and let your taste buds celebrate!](https://fastmealmate.com/wp-content/uploads/2025/07/14b20058-6f09-46d4-b73d-218062a29ce5-768x768.webp)