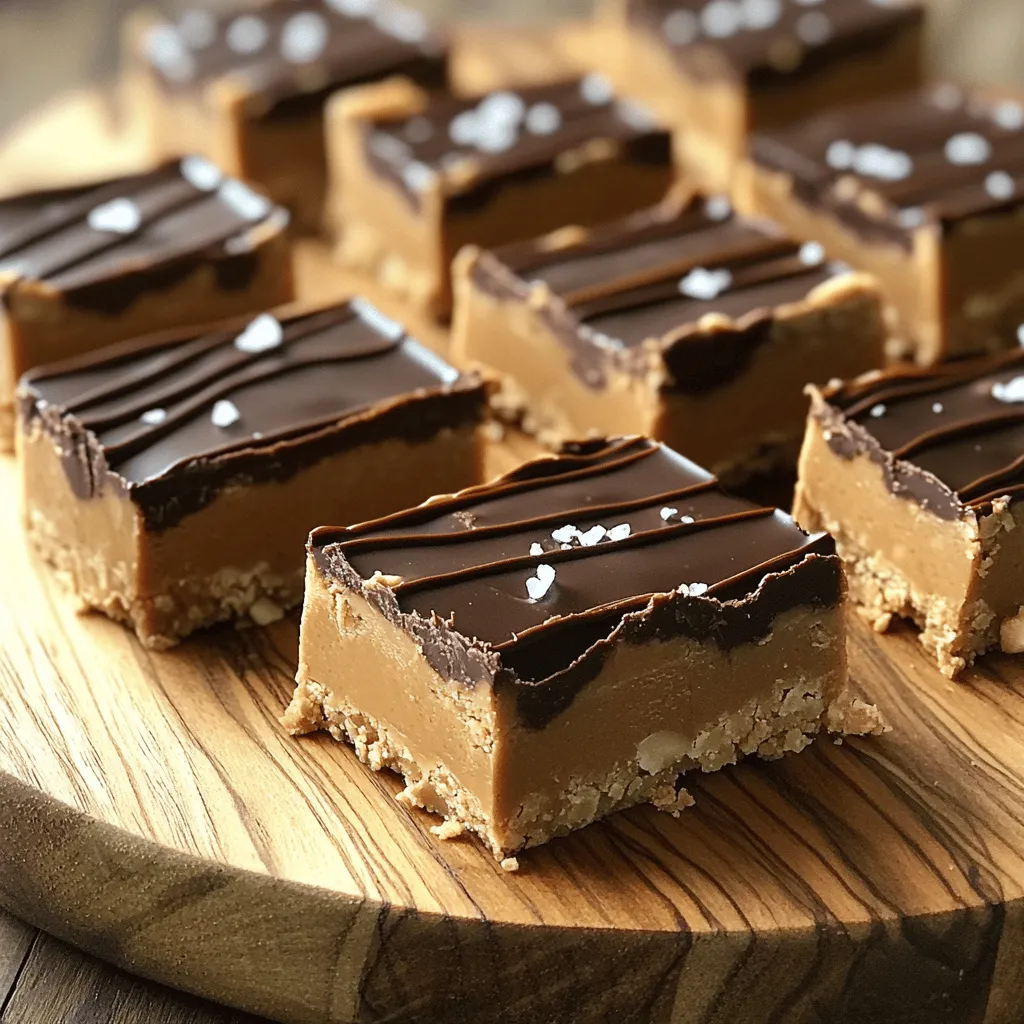
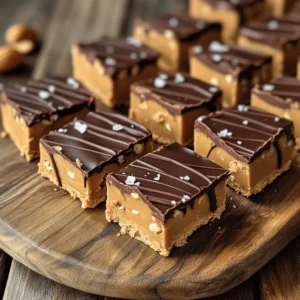
No-Bake Peanut Butter Bars Easy and Tasty Treat

Craving a sweet treat that’s simple and quick? Look no further! My No-Bake Peanut Butter Bars are easy to whip up and require no baking. You’ll only need a few ingredients that you probably already have at home. These delicious bars are perfect for any time of day. In just a few steps, you can enjoy a tasty treat that kids and adults will love. Let’s dive into the recipe!
Ingredients
Detailed List of Ingredients
To make no-bake peanut butter bars, gather these simple items:
– 1 cup creamy peanut butter
– 1/2 cup honey or maple syrup
– 2 cups rolled oats
– 1/2 cup vanilla protein powder (optional for added nutrition)
– 1/4 cup dark chocolate chips
– 1/4 cup chopped nuts (such as almonds or walnuts)
– A pinch of sea salt
Ingredient Substitutions
You can swap some ingredients if needed. Here are my suggestions:
– Use crunchy peanut butter for a different texture.
– Maple syrup can replace honey for a vegan option.
– Swap rolled oats with quick oats for a softer bar.
– If you don’t have protein powder, leave it out.
– Use butterscotch chips instead of dark chocolate for a sweeter taste.
Nutritional Information
These bars are not only tasty but also nutritious. Here’s a quick breakdown:
– Each bar has around 150 calories.
– You get protein from peanut butter and optional protein powder.
– They provide fiber from oats and nuts.
– Dark chocolate adds some antioxidants.
– The bars contain healthy fats, keeping you full longer.
Enjoy making and sharing these easy treats.
Step-by-Step Instructions
Overview of Preparation Steps
Making no-bake peanut butter bars is simple and fun. You need just a few steps. Start by mixing the wet ingredients. Then, add the dry ingredients. Finally, chill the mixture in the fridge.
Mixing and Combining Ingredients
First, grab a medium mixing bowl. Add 1 cup of creamy peanut butter and 1/2 cup of honey or maple syrup. Mix them well with a spoon. You want a smooth blend, so take your time. Next, slowly add 2 cups of rolled oats and 1/2 cup of vanilla protein powder, if using. Stir until the mixture is fully combined. Lastly, fold in 1/4 cup of dark chocolate chips and 1/4 cup of chopped nuts. Be gentle to keep the chips intact.
Chilling and Slicing the Bars
Now, prepare an 8×8 inch baking dish. Line it with parchment paper, letting some hang over the edges. This helps with easy removal later. Pour the mixture into the dish. Use your hands or a spatula to press it down flat. Sprinkle a pinch of sea salt on top to enhance the flavor. Cover the dish and place it in the fridge for at least 2 hours. Once set, lift the bars out using the parchment paper. Cut them into squares or rectangles for serving.
Tips & Tricks
How to Ensure Proper Consistency
To get the best bars, you need the right mix. Start with peanut butter and honey. Mix these until they are smooth. If the mixture is too dry, add a splash of water or more honey. If it’s too wet, add extra oats. This way, you control how firm your bars will be.
Best Tools for Preparation
Using the right tools makes cooking easier. A medium mixing bowl works well for combining ingredients. A spatula helps you mix and press the mixture evenly. Use an 8×8 inch baking dish lined with parchment paper for easy removal. A sharp knife is great for cutting the bars after they chill.
Enhancing Flavor Profiles
Want to boost flavor? Add a pinch of sea salt to balance sweetness. You can also mix in vanilla extract for warmth. For a twist, try adding spices like cinnamon or nutmeg. Experiment with nuts or seeds for crunch. Each small change can make your bars unique and tasty.
Variations
Adding Different Flavor Elements
You can change the taste of these bars easily. Try adding 1/4 cup of shredded coconut for a tropical twist. You can also use flavored protein powder. Chocolate or vanilla flavors work best for this. If you like spice, add a dash of cinnamon. This gives a warm flavor that pairs well with peanut butter.
Nut-Free Alternatives
If you need a nut-free option, use sunbutter. This sunflower seed spread mimics peanut butter. It has a similar texture and flavor. You can also try soy nut butter. Both of these options work well in the recipe. For crunch, add seeds like pumpkin or chia seeds instead of nuts.
Healthier Substitutions and Additions
To make these bars even healthier, use oats that are gluten-free. This helps those with gluten issues enjoy the treat. You can also swap honey for agave syrup to reduce sugar. If you want, add flaxseed meal or chia seeds for extra fiber. These ingredients boost the nutrition without changing the taste.
Storage Info
How to Store Leftover Bars
Store leftover no-bake peanut butter bars in an airtight container. This helps keep them fresh. You can place a piece of parchment paper between layers to avoid sticking. If you want to keep them longer, refrigeration is your best bet. The cool air keeps the bars firm and tasty.
Freezing Instructions
To freeze the bars, first cut them into squares or rectangles. Wrap each piece in plastic wrap. Then, put the wrapped bars in a freezer bag or container. This keeps them safe from freezer burn. You can freeze them for up to three months. When you want a bar, just take one out. Let it thaw in the fridge for a bit before enjoying.
Shelf Life and Best Practices
When stored properly in the fridge, these bars last about one week. For the best taste and texture, eat them fresh within this time. If you freeze them, remember to label the bag with the date. This way, you know when to eat them by. Enjoying fresh bars gives you the best flavor and crunch.
FAQs
Can I use crunchy peanut butter instead of creamy?
Yes, you can use crunchy peanut butter. It will add texture to the bars. The flavor stays the same, but you get little bits of peanut in each bite. This can make the bars even more fun to eat! Just remember to mix it well with honey or maple syrup for the best results.
What if I don’t have rolled oats?
If you don’t have rolled oats, you can use quick oats. They will work just fine in this recipe. You can also try using crushed graham crackers or almond flour. These options can change the texture a bit, but they will still taste great! Just make sure to adjust the liquid amounts if needed.
How do I know when the bars are set?
The bars are set when they feel firm to the touch. After chilling for at least two hours, check the texture. They should hold their shape when you take them out of the dish. If they still feel soft, give them more time in the fridge. Once set, you can slice them into squares or rectangles for easy snacking.
In this blog post, we explored key ingredients and their substitutes, analyzed nutritional value, and shared easy steps to prepare delicious bars. We highlighted tips for perfect consistency and tools to enhance flavor. The variations section offered creative ideas, while storage tips ensured your bars stay fresh.
In closing, these insights make it simple for you to create tasty and healthy snacks. Enjoy your time in the kitchen and have fun experimenting!
![- Salmon fillets - Sweet chili sauce - Jasmine rice - Mixed vegetables - Soy sauce - Sesame oil - Avocado - Green onions - Sesame seeds - Fresh cilantro (optional) - Baking sheet - Mixing bowl - Medium pot - Non-stick skillet In this Sweet Chili Salmon Bowl, you need fresh salmon fillets as the star. The sweet chili sauce adds a rich flavor that pairs well with the fish. Jasmine rice provides a soft base. Mixed vegetables add color and crunch to the bowl. For added flavor, include soy sauce and sesame oil. Sliced avocado gives a creamy touch. Green onions and sesame seeds serve as tasty garnishes. If you want, sprinkle fresh cilantro for a pop of freshness. To prepare this dish, you will need a few kitchen tools. Use a baking sheet to cook the salmon. A mixing bowl helps combine the marinade. Cook the rice in a medium pot. Lastly, a non-stick skillet is perfect for sautéing the vegetables. You can find the [Full Recipe] to follow these steps easily! With these ingredients and tools, you are set for a delicious meal. - Combine sweet chili sauce, soy sauce, and sesame oil in a bowl. - Place salmon fillets in the bowl and marinate for 15 minutes. Marinating the salmon gives it a rich flavor. The sweet chili sauce adds a nice sweetness. The soy sauce brings some saltiness, while sesame oil adds a nutty taste. This step is key for a tasty salmon bowl. - Bring vegetable broth or water to a boil in a pot. - Add jasmine rice and let it simmer until fluffy. Using vegetable broth adds extra flavor to the rice. Jasmine rice is fragrant and pairs well with the salmon. Once cooked, it should be light and fluffy. - Sauté mixed vegetables in a non-stick skillet. - Cook until they are tender yet crisp. I like to use bell peppers, snap peas, and carrots. These veggies add color and crunch. Sautéing keeps them bright and fresh, which balances the dish. - Preheat the oven to 400°F (200°C). - Bake marinated salmon for 12-15 minutes. Baking the salmon helps it stay moist. It should flake easily with a fork when done. This cooking method keeps the flavors intact. - Fluff the cooked rice and distribute it into bowls. - Top with vegetables, salmon, and avocado slices. Assembling the bowl is fun and creative. You can layer the ingredients however you prefer. The avocado adds creaminess, making every bite delicious. - Sprinkle green onions and sesame seeds on top. - Drizzle remaining marinade if desired. Adding garnishes makes the dish look pretty. Green onions bring a mild onion flavor, while sesame seeds add crunch. The extra marinade enhances the taste, so don’t skip this step! For the complete recipe, check out the Full Recipe. To get the best salmon, focus on the cooking temperature. Aim for 400°F (200°C) when baking. This heat cooks the fish evenly. It keeps the salmon moist and tender. Use a thermometer to check the internal temperature. It should reach 145°F (63°C) for safe eating. Next, look for flakiness to know when it is done. Gently press the salmon with a fork. If it flakes easily, it is ready. Don't overcook it, as this can make the salmon dry. To boost the taste, try different sauces. You can use teriyaki or garlic sauce instead of sweet chili. Each sauce adds a new twist to the dish. Also, add spices to the vegetables before sautéing. A pinch of garlic powder or ginger can elevate the flavor. This simple step makes your veggies pop. Pair your bowl with side salads or crispy wontons for crunch. This adds a nice texture balance. You can also serve it with extra avocado for creaminess. The creamy avocado complements the salmon well. It makes each bite even better. Feel free to explore the [Full Recipe] for more tips and ideas! {{image_4}} You can swap the salmon for chicken or tofu. Chicken works well with the sweet chili sauce. Marinate it just like you do the salmon. Tofu absorbs flavors nicely, making it a great option, too. You can also try different fish like trout or tilapia. Each fish will give your bowl a unique taste. Seasonal vegetables can really change your bowl. Think fresh corn in summer or pumpkin in fall. You can also add leafy greens like spinach or kale. Broccoli offers a nice crunch and pairs well with the sauce. Mix and match to keep it exciting! Want more kick? Try a spicy chili sauce instead of sweet chili sauce. This will give your bowl a bold flavor. You can also add citrus zest, like lime or lemon, for a fresh twist. These small changes can make a big difference in taste. For the full recipe, check out the details above! After you enjoy your Sweet Chili Salmon Bowl, store any leftovers in airtight containers. This keeps the food fresh and tasty. Place the containers in the fridge. Your meal will stay good for 2-3 days. Make sure to cool the food first before sealing it up. If you want to save your meal for longer, freezing is a great option. Freeze the cooked salmon separately to keep its quality. Salmon can lose its texture if frozen with rice and veggies. Store your rice and mixed vegetables in separate containers. This way, they stay fresh and tasty when you thaw them. When you're ready to eat, reheating is easy. You can use the microwave or stovetop for quick reheating. Just be careful not to overcook the salmon. Overcooking can make it dry and tough. Heat it gently to keep the flavor and texture intact. Enjoy your delicious meal again! Yes, you can prepare the ingredients in advance. Store each item separately in the fridge. This way, you save time when you are ready to cook. Just mix and heat everything when you want to eat. If you want a change, you can substitute jasmine rice with brown rice or quinoa. Both options are healthy and add a nice flavor. Quinoa is a great choice if you want extra protein. Absolutely! You can make this bowl spicy by adding fresh chili peppers or a dash of hot sauce. Adjust the heat to your liking. This adds a fun kick to the dish. To make the Sweet Chili Salmon Bowl healthier, reduce the amount of sauce you use. You can also add more veggies, like leafy greens or broccoli. This boosts nutrition and flavor. Yes, this bowl can be enjoyed cold too! It makes a refreshing salad dish. Just let it cool before serving. Enjoy it as a light meal on a warm day. For the full recipe, check out the detailed steps above. This guide showed how to make a tasty salmon bowl using sweet chili sauce and veggies. You learned about the key ingredients, tools, and steps. Remember, marinating the salmon and choosing the right veggies can boost flavor. Feel free to experiment with proteins and spices. Finally, you can store leftovers for quick meals later. Enjoy making this dish your own!](https://fastmealmate.com/wp-content/uploads/2025/07/c95c4cfe-a415-4c4e-8f12-f828502a92fe-768x768.webp)