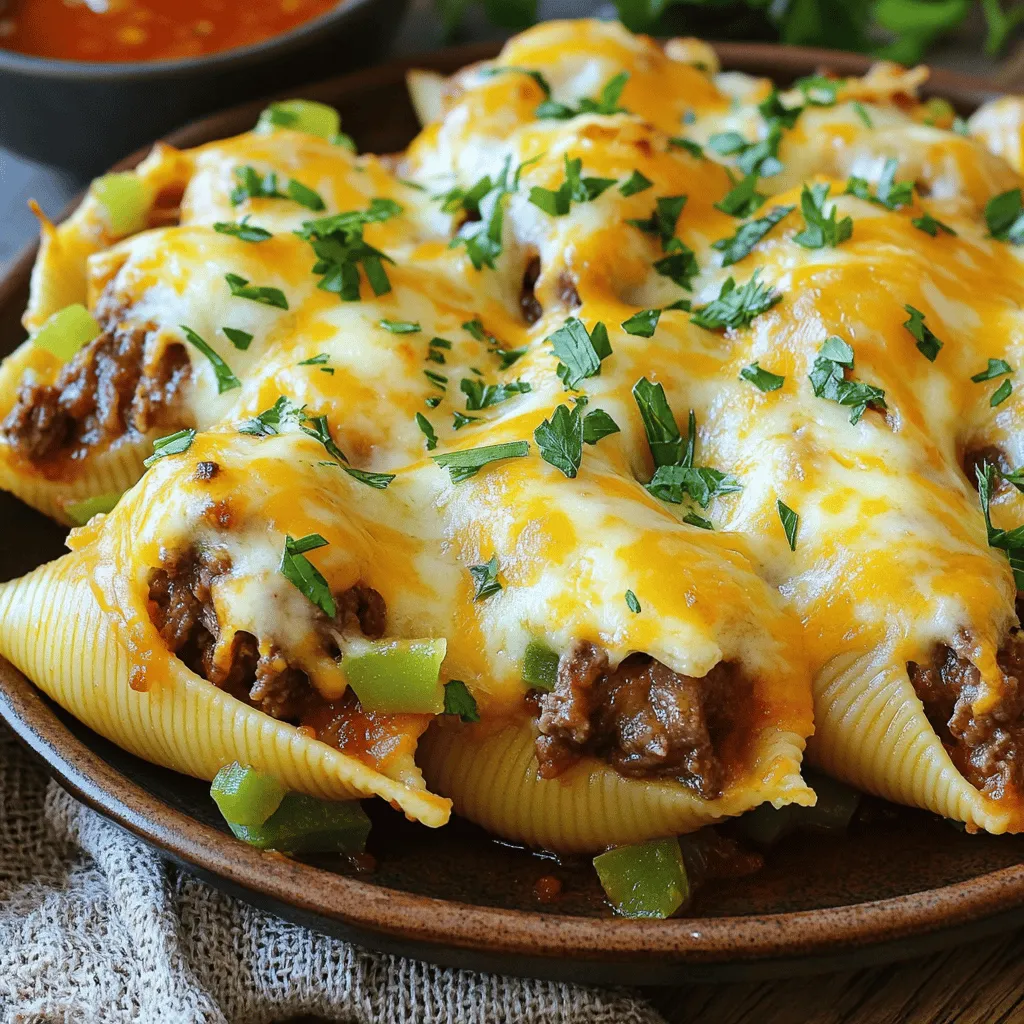
Philly Cheesesteak Stuffed Shells Flavorful Family Meal
. To store leftover stuffed shells, let them cool first. Place them in an airtight container. Make sure to separate layers with parchment paper to avoid sticking. You can keep them in the fridge for up to three days. You can freeze these stuffed shells for later enjoyment. Follow these steps: - Cool Completely: Allow the cooked shells to cool fully. - Wrap Well: Use plastic wrap or aluminum foil to wrap the shells tightly. - Use a Freezer Bag: Place the wrapped shells in a freezer-safe bag. Remove as much air as possible. - Label and Date: Write the date on the bag. This helps you track how long they’ve been frozen. To thaw, move the shells from the freezer to the fridge. Let them thaw overnight. For quicker thawing, place them in cold water for about two hours. Reheating stuffed shells is easy. Here are a few methods: - Oven: Preheat your oven to 350°F (175°C). Place the shells in a baking dish, cover with foil, and heat for 20 minutes. Remove the foil for the last five minutes to crisp the cheese. - Microwave: Place a few shells on a microwave-safe plate. Cover them with a damp paper towel. Heat in short bursts of 30 seconds until warm. - Skillet: Heat a skillet over medium heat. Add a splash of water and place the shells in the skillet. Cover with a lid and steam for about 5 minutes. These methods keep the flavors strong and the cheese melty. Enjoy your tasty leftovers! You can serve Philly Cheesesteak Stuffed Shells with a crisp salad. A simple green salad works well. You can also add a side of garlic bread. Garlic bread pairs nicely with the rich flavors of the shells. Marinara sauce makes a tasty dip for the shells too. Try adding pickles or roasted vegetables for a crunchy side. Yes, you can make these stuffed shells ahead of time. Prepare them fully and store in the fridge. Cover the baking dish tightly with plastic wrap. You can also freeze them before baking. Just thaw them in the fridge overnight before baking. This saves time and is great for busy days. The stuffed shells are done when the cheese is bubbly. You should see a golden brown color on top. Use a food thermometer; the center should reach 165°F. If you want to be sure, cut one open. The filling should be hot and melted. Keep an eye on them during the last 10 minutes of baking. In this blog post, I shared how to make Philly Cheesesteak Stuffed Shells. We covered the ingredients, cooking steps, and tips for perfect results. I also included storage info and answered common questions. Making these stuffed shells is easy and fun. You can tweak the recipe to fit your taste. Don’t be afraid to try new flavors. Enjoy your delicious creation and share it with others!](https://fastmealmate.com/wp-content/uploads/2025/06/11767e89-6c0f-469f-be11-885f6dce3423.webp)
Are you ready to spice up your dinner routine? These Philly Cheesesteak Stuffed Shells combine the classic taste of a cheesesteak with the comfort of pasta. You’ll enjoy a hearty meal that’s easy for the whole family. In this guide, you’ll discover simple ingredients, step-by-step cooking instructions, and helpful tips to make your meal special. Let’s create something delicious together that everyone will love!
Ingredients
List of Ingredients with Measurements
– 20 large pasta shells
– 1 lb sirloin steak, thinly sliced
– 1 tablespoon olive oil
– 1 medium onion, diced
– 1 green bell pepper, diced
– 2 cloves garlic, minced
– 1 cup cream cheese, softened
– 1 cup shredded provolone cheese
– 1 cup shredded mozzarella cheese
– 1 teaspoon Worcestershire sauce
– Salt and pepper to taste
– Fresh parsley, chopped (for garnish)
Necessary Cooking Equipment
You will need a few simple tools to make this dish. Gather these items before you start:
– Large pot for boiling pasta
– Large skillet for cooking steak and veggies
– Mixing bowl for the cheese filling
– Baking dish for the stuffed shells
– Aluminum foil to cover the baking dish
– Wooden spoon or spatula for mixing
Recommended Brand Options for Ingredients
Choosing good brands can really enhance your dish. Here are my top picks:
– Pasta: Barilla or De Cecco for pasta shells
– Steak: Certified Angus Beef for sirloin steak
– Cream Cheese: Philadelphia for a creamy texture
– Cheese: Kraft or Sargento for shredded provolone and mozzarella
– Olive Oil: California Olive Ranch for a rich flavor
This list gives you everything you need to create a fantastic family meal. Enjoy the process and savor the flavors!
Step-by-Step Instructions
Preparation and Cooking Overview
To make Philly cheesesteak stuffed shells, first gather all your ingredients. This dish combines tender steak with creamy cheese. You will stuff large pasta shells and bake them until bubbly. It takes about 50 minutes from start to finish. The process is easy and fun, perfect for family meals.
Detailed Cooking Steps for Philly Cheesesteak Stuffed Shells
1. Preheat the Oven: Start by heating your oven to 375°F (190°C).
2. Cook the Pasta: Boil water in a large pot. Add the pasta shells and cook them until al dente. Drain the shells and let them cool for a bit.
3. Sauté the Steak: Heat olive oil in a large skillet over medium-high heat. Add the thinly sliced sirloin steak. Season it with salt and pepper. Cook for about 3-4 minutes until browned. Set the steak aside.
4. Cook the Vegetables: In the same skillet, add diced onion and green bell pepper. Sauté for about 5 minutes until soft. Add minced garlic and cook for one more minute.
5. Combine Steak and Veggies: Put the cooked steak back in the skillet. Drizzle in Worcestershire sauce and mix well. Remove the skillet from heat.
6. Mix the Cheese Filling: In a bowl, combine softened cream cheese, provolone cheese, and half of the mozzarella cheese. Add the steak and veggies to the cheese mix. Stir until well blended.
7. Stuff the Shells: Take a pasta shell and fill it with the steak and cheese mix. Place each stuffed shell in a greased baking dish. Fit them snugly together.
8. Add More Cheese: Sprinkle the rest of the mozzarella cheese over the filled shells.
9. Bake in the Oven: Cover the dish with foil and bake for 20 minutes. Remove the foil and bake for another 10 minutes until the cheese is golden and bubbly.
10. Garnish and Serve: Before serving, add chopped parsley on top for color.Enjoy cooking and sharing this tasty meal!
Tips & Tricks
Pro Tips for Perfect Stuffed Shells
To make the best Philly Cheesesteak Stuffed Shells, keep these tips in mind:
– Cook Pasta Al Dente: This helps shells hold their shape and not become mushy.
– Use Quality Steak: Sirloin works great, but ribeye adds more flavor. Choose what you enjoy.
– Mix Cheese Well: Ensure cream cheese blends smoothly with the other cheeses for a creamy filling.
– Don’t Overstuff: Fill each shell generously, but avoid overfilling to prevent spills during baking.
Common Mistakes to Avoid
Here are some common slip-ups to watch for:
– Skipping the Cooling Step: Let the pasta shells cool slightly before stuffing. This keeps them from tearing.
– Not Seasoning Enough: Season every layer. The steak, veggies, and cheese all need flavor.
– Forgetting to Cover: Cover the dish with foil while baking. This helps cook evenly and keeps the cheese moist.
Ways to Enhance Flavor and Texture
Want to take your stuffed shells up a notch? Try these ideas:
– Add Spices: A pinch of smoked paprika or Italian seasoning can boost flavor.
– Mix in Veggies: Mushrooms or spinach can add texture and nutrition to the filling.
– Top with Sauce: Drizzle marinara or Alfredo on top before baking for extra richness.
– Use Different Cheeses: Mixing cheddar or gouda with provolone can create a unique taste.
These tips and tricks will help you create a flavorful family meal with your Philly Cheesesteak Stuffed Shells.
Variations
Vegetarian and Vegan Adaptations
You can turn Philly cheesesteak stuffed shells into a veggie delight. Replace the sirloin steak with mushrooms, lentils, or tempeh. These ingredients add great texture and flavor. Use a mix of bell peppers, zucchini, and spinach for more color and nutrition. For a vegan cheese option, try cashew cream cheese or dairy-free mozzarella. These swaps keep your dish tasty and filling without the meat.
Alternative Fillings and Toppings
Feel free to get creative with your fillings. You can mix in cooked chicken, ground beef, or even shrimp. For a spicy kick, add jalapeños or hot sauce to the filling. You can also layer in some sautéed mushrooms or caramelized onions for added depth. Top with different cheeses, like cheddar or gouda, to switch things up. This way, each bite can be a surprise.
Gluten-Free Options
To make this dish gluten-free, use gluten-free pasta shells. Many brands offer great options that taste just as good. You can also substitute the Worcestershire sauce with a gluten-free version. Ensure all other ingredients are gluten-free, like the cheese. This way, everyone can enjoy this hearty meal without worry.
Storage Info
How to Store Leftover Stuffed Shells
To store leftover stuffed shells, let them cool first. Place them in an airtight container. Make sure to separate layers with parchment paper to avoid sticking. You can keep them in the fridge for up to three days.
Freezing Tips and Thawing Instructions
You can freeze these stuffed shells for later enjoyment. Follow these steps:
– Cool Completely: Allow the cooked shells to cool fully.
– Wrap Well: Use plastic wrap or aluminum foil to wrap the shells tightly.
– Use a Freezer Bag: Place the wrapped shells in a freezer-safe bag. Remove as much air as possible.
– Label and Date: Write the date on the bag. This helps you track how long they’ve been frozen.
To thaw, move the shells from the freezer to the fridge. Let them thaw overnight. For quicker thawing, place them in cold water for about two hours.
Reheating Methods for Best Results
Reheating stuffed shells is easy. Here are a few methods:
– Oven: Preheat your oven to 350°F (175°C). Place the shells in a baking dish, cover with foil, and heat for 20 minutes. Remove the foil for the last five minutes to crisp the cheese.
– Microwave: Place a few shells on a microwave-safe plate. Cover them with a damp paper towel. Heat in short bursts of 30 seconds until warm.
– Skillet: Heat a skillet over medium heat. Add a splash of water and place the shells in the skillet. Cover with a lid and steam for about 5 minutes.
These methods keep the flavors strong and the cheese melty. Enjoy your tasty leftovers!
FAQs
What can I serve with Philly Cheesesteak Stuffed Shells?
You can serve Philly Cheesesteak Stuffed Shells with a crisp salad. A simple green salad works well. You can also add a side of garlic bread. Garlic bread pairs nicely with the rich flavors of the shells. Marinara sauce makes a tasty dip for the shells too. Try adding pickles or roasted vegetables for a crunchy side.
Can I make these stuffed shells ahead of time?
Yes, you can make these stuffed shells ahead of time. Prepare them fully and store in the fridge. Cover the baking dish tightly with plastic wrap. You can also freeze them before baking. Just thaw them in the fridge overnight before baking. This saves time and is great for busy days.
How do I know when the stuffed shells are fully cooked?
The stuffed shells are done when the cheese is bubbly. You should see a golden brown color on top. Use a food thermometer; the center should reach 165°F. If you want to be sure, cut one open. The filling should be hot and melted. Keep an eye on them during the last 10 minutes of baking.
In this blog post, I shared how to make Philly Cheesesteak Stuffed Shells. We covered the ingredients, cooking steps, and tips for perfect results. I also included storage info and answered common questions.
Making these stuffed shells is easy and fun. You can tweak the recipe to fit your taste. Don’t be afraid to try new flavors. Enjoy your delicious creation and share it with others!
. To store leftover stuffed shells, let them cool first. Place them in an airtight container. Make sure to separate layers with parchment paper to avoid sticking. You can keep them in the fridge for up to three days. You can freeze these stuffed shells for later enjoyment. Follow these steps: - Cool Completely: Allow the cooked shells to cool fully. - Wrap Well: Use plastic wrap or aluminum foil to wrap the shells tightly. - Use a Freezer Bag: Place the wrapped shells in a freezer-safe bag. Remove as much air as possible. - Label and Date: Write the date on the bag. This helps you track how long they’ve been frozen. To thaw, move the shells from the freezer to the fridge. Let them thaw overnight. For quicker thawing, place them in cold water for about two hours. Reheating stuffed shells is easy. Here are a few methods: - Oven: Preheat your oven to 350°F (175°C). Place the shells in a baking dish, cover with foil, and heat for 20 minutes. Remove the foil for the last five minutes to crisp the cheese. - Microwave: Place a few shells on a microwave-safe plate. Cover them with a damp paper towel. Heat in short bursts of 30 seconds until warm. - Skillet: Heat a skillet over medium heat. Add a splash of water and place the shells in the skillet. Cover with a lid and steam for about 5 minutes. These methods keep the flavors strong and the cheese melty. Enjoy your tasty leftovers! You can serve Philly Cheesesteak Stuffed Shells with a crisp salad. A simple green salad works well. You can also add a side of garlic bread. Garlic bread pairs nicely with the rich flavors of the shells. Marinara sauce makes a tasty dip for the shells too. Try adding pickles or roasted vegetables for a crunchy side. Yes, you can make these stuffed shells ahead of time. Prepare them fully and store in the fridge. Cover the baking dish tightly with plastic wrap. You can also freeze them before baking. Just thaw them in the fridge overnight before baking. This saves time and is great for busy days. The stuffed shells are done when the cheese is bubbly. You should see a golden brown color on top. Use a food thermometer; the center should reach 165°F. If you want to be sure, cut one open. The filling should be hot and melted. Keep an eye on them during the last 10 minutes of baking. In this blog post, I shared how to make Philly Cheesesteak Stuffed Shells. We covered the ingredients, cooking steps, and tips for perfect results. I also included storage info and answered common questions. Making these stuffed shells is easy and fun. You can tweak the recipe to fit your taste. Don’t be afraid to try new flavors. Enjoy your delicious creation and share it with others!](https://fastmealmate.com/wp-content/uploads/2025/06/11767e89-6c0f-469f-be11-885f6dce3423-300x300.webp)
![- 3 medium zucchinis, thinly sliced - 1 cup corn kernels (fresh, frozen, or canned) - 1 cup cherry tomatoes, halved - 1 cup shredded cheddar cheese - 1 cup shredded Monterey Jack cheese - 1 medium onion, diced - 2 cloves garlic, minced - 3 large eggs - 1 cup milk (dairy or non-dairy) - 1 teaspoon dried oregano - 1 teaspoon paprika - Salt and black pepper to taste - Olive oil for greasing In this recipe, zucchini shines as the main ingredient. It adds a fresh taste and soft texture. The Monterey Jack cheese provides a creamy melt that perfectly blends with the other veggies. I love how the corn adds a sweet crunch, while the tomatoes burst with juiciness. - 1 cup cooked quinoa or rice (for added texture, optional) - Different cheese options like feta or gouda If you want to add more texture, quinoa or rice works great. They make the dish heartier and more filling. You can also switch out the cheese. Try feta for a tangy kick or gouda for a smoky flavor. Each option adds something unique to the casserole. - Dairy-free alternatives using almond or oat milk - Gluten-free options with quinoa instead of rice You can easily adapt this dish for different diets. For dairy-free options, use almond or oat milk and dairy-free cheese. If you need it to be gluten-free, just swap rice for quinoa. This way, everyone can enjoy this yummy meal without worry! 1. Preheat the oven and grease the dish: Start by setting your oven to 375°F (190°C). This step is key to ensure even baking. Use olive oil to grease a 9x13 inch casserole dish. This helps the casserole come out easily after baking. 2. Sautéing garlic and onion: In a large skillet, pour a tablespoon of olive oil. Heat it over medium heat. Once hot, add the diced onion and minced garlic. Sauté them for about 5 minutes. You want the onion to be soft and clear. 1. Combining vegetables and seasonings: In a big mixing bowl, add the sliced zucchini, corn, and halved cherry tomatoes. Toss in the sautéed onion and garlic. If you are using quinoa or rice, add it now. Sprinkle in the dried oregano, paprika, salt, and black pepper. Mix everything well. This ensures all flavors blend nicely. 2. Preparing the egg and cheese mixture: In another bowl, whisk together the eggs and milk until smooth. Then, fold in half of the shredded cheddar and Monterey Jack cheese. This will make the egg mix creamy and rich. 1. Layering the ingredients: Pour half of the veggie mix into the greased dish. Next, take half of the egg and cheese mixture and pour it over the veggies. Repeat with the rest of the vegetable and egg mixtures. This layering builds great flavor. 2. Adding cheese on top: Finish by sprinkling the remaining cheddar and Monterey Jack cheese on top. This creates a cheesy crust that everyone will love. Now, your casserole is ready to bake. For the full recipe, check out the details provided earlier. To avoid sogginess in your Easy Zucchini Jack Casserole, make sure to salt the zucchini first. This draws out excess water. Let it sit for about 10 minutes, then pat it dry with a paper towel. This simple step helps keep the casserole firm. Adjusting the cooking time is important too. If you add more vegetables or grains, the casserole may need extra time in the oven. Keep an eye on it. Look for a golden top and a firm center as signs that it’s done. If you want to swap the cheese, consider using feta or goat cheese. Both add a unique flavor. You can also try vegan cheese for a dairy-free version. For vegetable variations, you can add bell peppers or spinach. These options add color and nutrients to your dish. Don't be afraid to mix and match your favorite veggies! Garnishing your casserole can make it pop. Fresh herbs like basil or parsley add color and flavor. You can add a sprinkle of red pepper flakes for a bit of heat. Pair your casserole with a fresh side salad. This adds crunch and balances the meal. A simple green salad or coleslaw works great. For something heartier, serve it with crusty bread or garlic knots. For the full recipe, check out the [Full Recipe]. {{image_4}} You can easily make this casserole vegetarian or vegan. For vegetarians, just keep the eggs and dairy. If you want a vegan dish, replace the eggs with flaxseed meal or a chia seed mix. Mix 1 tablespoon of flaxseed meal or chia seeds with 2.5 tablespoons of water. Let it sit for 5 minutes to thicken before adding it to your mix. Adding plant-based proteins is also a great idea. Consider using lentils or chickpeas. They boost protein and add texture to your casserole. You can mix them with the veggies before baking. Cheese lovers can experiment with flavors. Instead of Monterey Jack, use sharp cheddar or spicy pepper jack. They add a nice kick to your dish. You can also explore other melting cheeses like Gouda or Gruyère. Each cheese gives the casserole a unique taste. Just make sure to mix and match to find your favorite combo. To elevate the flavor, add spices and herbs. Consider garlic powder, cumin, or basil. These give your casserole a nice twist. You can also incorporate proteins like chicken or beans. Shredded chicken adds heartiness, while black beans provide fiber. Mix them in with the veggies for a satisfying meal. For the full recipe, check out the [Full Recipe]. After you make your Easy Zucchini Jack Casserole, let it cool completely. Place it in an airtight container or cover it with plastic wrap. Store it in the fridge for up to 3-5 days. When reheating, use the oven for the best results. Preheat the oven to 350°F (175°C) and heat for about 15-20 minutes. This will keep it warm and tasty. If you want to keep the casserole longer, freezing is a great option. First, let it cool completely. Cut it into portions and wrap each piece tightly in plastic wrap. Then, place the wrapped pieces in a freezer-safe bag or container. This will help keep the flavors fresh. You can freeze it for up to 2-3 months. To thaw, move it to the fridge overnight. Reheat in the oven the same way, at 350°F (175°C) for 15-20 minutes. In the fridge, your casserole lasts for about 3-5 days. Look for signs of spoilage before eating. If you see any mold or smell something off, it’s best to toss it. A fresh casserole should smell cheesy and inviting. If it looks dry or hard, it may be time to say goodbye. Enjoy your casserole while it tastes its best! You can find the full recipe to make it again later. To make this casserole, start by preheating your oven to 375°F (190°C). Grease a 9x13 inch dish with olive oil. Next, sauté diced onion and minced garlic in olive oil until soft. In a large bowl, mix sliced zucchini, corn, cherry tomatoes, and the sautéed onion and garlic. If you want, add cooked quinoa or rice. Sprinkle in dried oregano, paprika, salt, and pepper, and mix well. In another bowl, whisk together eggs and milk. Fold in half of the shredded cheddar and Monterey jack cheese. In your greased dish, layer half the veggie mix, then pour on half the egg mixture. Repeat these layers with the remaining ingredients. Top with the rest of the cheese. Bake for 35-40 minutes until golden brown and set. Let it cool for 5-10 minutes before serving. You can find the full recipe details above. Yes, you can prepare the casserole ahead of time. Simply assemble it up to the baking step. Cover it with plastic wrap or foil and store it in the fridge overnight. When you are ready to eat, just bake it straight from the fridge. You may need to add a few extra minutes to the baking time. If you want to store leftovers, allow the casserole to cool completely. Then, cover it and keep it in the fridge for up to 3 days. To reheat, pop it back in the oven at 350°F (175°C) until warmed through. This casserole pairs well with a variety of side dishes. A fresh garden salad adds a nice crunch. You might also serve it with garlic bread or a simple pasta dish. If you want something heartier, consider grilled chicken or roasted veggies. For a fun twist, try serving it with salsa or hot sauce for some extra flavor. Feel free to mix and match sides to fit your meal! In this post, we explored the easy way to make a tasty Zucchini Jack Casserole. You learned about key ingredients, step-by-step instructions, and helpful tips to ensure success. We also shared ideas for dietary needs and creative variations. Remember, cooking is fun and allows you to experiment. Enjoy making this dish your own and sharing it with loved ones. Happy cooking!](https://fastmealmate.com/wp-content/uploads/2025/07/8604bb3f-9fea-4d3d-b4ff-32cbded89348-768x768.webp)