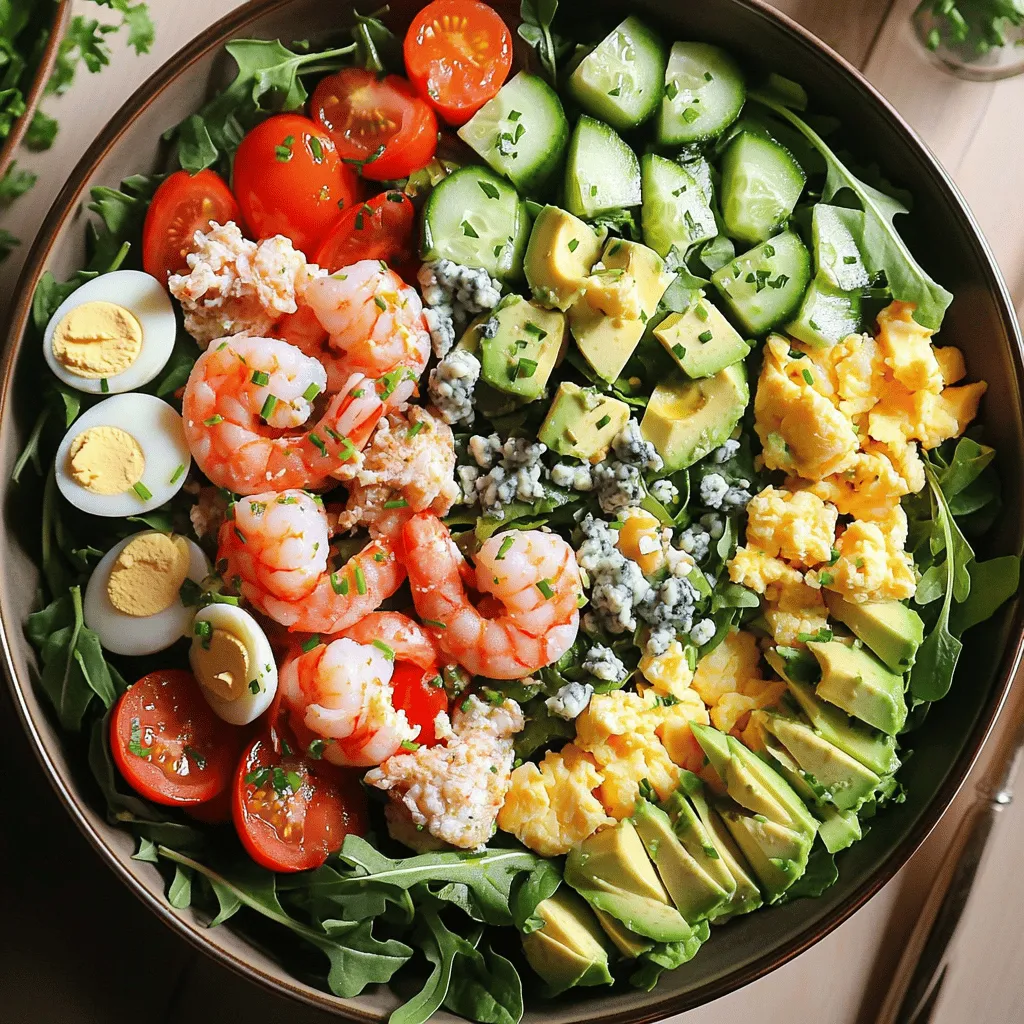
Seafood Cobb Salad Fresh and Flavorful Delight
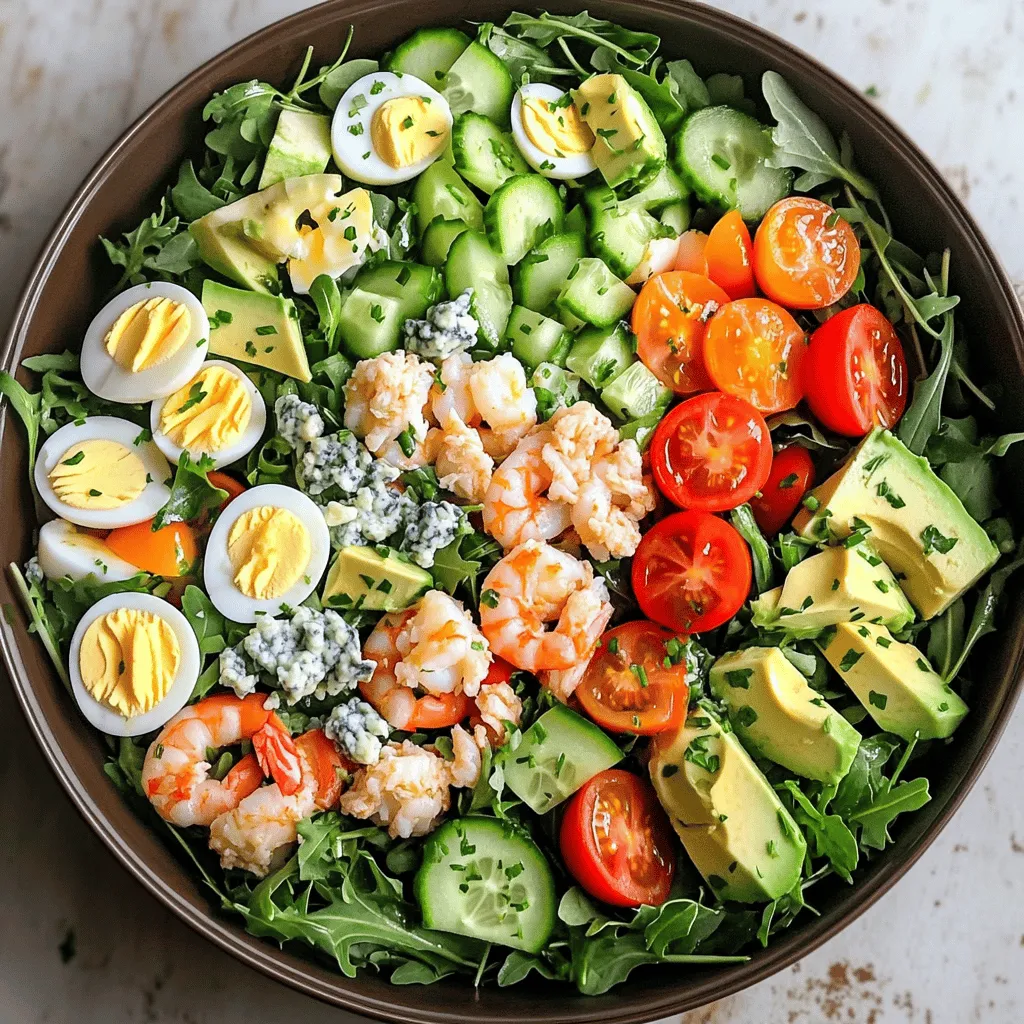
Looking for a light meal packed with flavor? Dive into the Seafood Cobb Salad! This dish brings fresh greens and a mix of seafood together in a vibrant way. You’ll love the combination of shrimp, crab, and creamy avocado in every bite. Plus, it’s easy to make and perfect for any occasion. Let’s explore the ingredients and steps to create this fresh and flavorful delight!
Ingredients
When making a Seafood Cobb Salad, you want the freshest ingredients. Here’s what you need:
– 1 cup mixed salad greens (arugula, spinach, and romaine)
– 1 cup cooked shrimp, peeled and deveined
– 1 cup crab meat (fresh or canned)
– 2 hard-boiled eggs, chopped
– ½ cup cherry tomatoes, halved
– ½ avocado, diced
– ¼ cup blue cheese, crumbled
– ¼ cup cucumber, diced
– 3 tablespoons extra virgin olive oil
– 1 tablespoon fresh lemon juice
– Salt and freshly ground black pepper, to taste
– Fresh herbs (chives and parsley), chopped, for garnish
Nutritional Benefits
This salad is not just tasty; it offers many health benefits. Seafood provides lean protein, which helps build muscles. Shrimp and crab are low in calories but high in nutrients. They contain omega-3 fatty acids, which are good for your heart.
The mixed greens add vitamins A and C, which boost your immune system. They also give fiber, aiding digestion. Avocado brings healthy fats, helping you feel full.
Using fresh ingredients enhances the flavors and gives you the best taste. So, try to use what’s in season. You’ll enjoy a seafood salad that’s fresh, flavorful, and good for you.
Step-by-Step Instructions
Preparation Steps
– First, rinse and dry your mixed salad greens. This keeps them crisp and fresh.
– Next, arrange the cooked shrimp and crab meat nicely on the greens. Space them out for a great look.
– Now, prepare the vinaigrette. In a small bowl, mix olive oil, lemon juice, salt, and pepper. Whisk well until it’s combined.
Assembly Instructions
– You can layer the salad or toss it gently. Layering shows off the colors well. Tossing mixes the flavors for every bite.
– For serving, consider using individual bowls. This adds a nice touch and makes it easy for guests.
Cooking Tips
– To ensure the seafood is cooked perfectly, use fresh shrimp and crab. Cook shrimp just until they turn pink.
– For the best flavor, mix the dressing just before serving. This keeps the ingredients bright and fresh.
These steps will help you create a Seafood Cobb Salad that is a vibrant and tasty delight.
Tips & Tricks
Expert Tips for the Perfect Salad
When making a Seafood Cobb Salad, choosing your seafood matters. Fresh seafood tastes best, but canned options can work in a pinch. Look for shrimp that smells like the ocean and crab meat that is sweet and light. When you want to switch things up, try using lobster or scallops for added richness. Both options bring unique flavors to your salad.
Presentation Ideas
How you plate your salad can make a big difference. Start by using a large, shallow bowl. This helps display the colors. Layer your seafood and veggies in sections for a stunning look. You can also use individual bowls for each guest. Add a sprinkle of fresh herbs on top to brighten the dish. Chives and parsley not only taste great but also add a pop of green.
Common Mistakes to Avoid
One common mistake is overdressing the salad. Too much dressing can drown the fresh flavors. Use just enough to coat the ingredients lightly. Another mistake is not balancing flavors. Make sure to mix a variety of textures and tastes. The creaminess of the avocado should balance the tang of the blue cheese. With these tips, your Seafood Cobb Salad will shine!
Variations
Different Seafood Combinations
You can mix seafood in many ways. For a tasty twist, try shrimp and crab. This combo offers great flavors and textures. Shrimp brings a sweet taste, while crab adds a rich, savory note. You can also choose a lobster and salmon option. Lobster gives luxury, while salmon adds heartiness. Both pair well with fresh greens and dressing.
Dietary Variations
Not everyone eats the same way. You can make this salad gluten-free. Just check that your dressing and blue cheese are gluten-free. For a vegetarian alternative, use tofu instead of seafood. Marinate the tofu in lemon juice and spices to add flavor. It holds up well in salads and gives protein.
Seasonal Ingredients
Freshness makes a big difference. Use seasonal vegetables for the best taste. Spring brings peas and radishes, while summer offers tomatoes and cucumbers. In fall, consider roasted squash or Brussels sprouts. Adding fruits can brighten the dish, too. Try apples in the fall or berries in the summer for a sweet twist. This will keep your Seafood Cobb Salad fresh and exciting every season.
Storage Info
Short-term Storage
To keep your Seafood Cobb Salad fresh, refrigerate leftovers right away. Store them in an airtight container. This helps maintain flavor and texture. Use glass or BPA-free plastic containers for the best results. Avoid stacking heavy items on top. They can crush your salad and ruin the look.
Long-term Storage
You can freeze some salad components but not the entire salad. Seafood like shrimp and crab can be frozen. Place them in a freezer-safe bag. Squeeze out the air to prevent freezer burn. For thawing, move them to the fridge overnight. Reheat seafood gently to maintain its flavor and texture.
Shelf Life
In the fridge, your Seafood Cobb Salad lasts about 2-3 days. The greens may wilt or get soggy after a day. Check for any off smells or discoloration. If you see these signs, it’s best to toss it out. Fresh ingredients are key for a vibrant salad experience.
FAQs
What can I substitute for blue cheese?
If you want to change the blue cheese, try feta or goat cheese. Both offer a nice flavor. For a non-dairy option, use cashew cheese or nutritional yeast. These will add a creamy texture without dairy.
How can I make my Seafood Cobb Salad more filling?
To make your Seafood Cobb Salad more filling, add grains like quinoa or farro. These grains add fiber and protein. You can also enhance protein by adding more seafood or beans. Chickpeas work well too.
Can I make the salad ahead of time?
Yes, you can make the salad ahead of time. To keep it fresh, prep the ingredients but store them separately. Keep the dressing in a small jar. This way, it stays crisp and tasty until you serve it.
This Seafood Cobb Salad offers fresh ingredients, rich flavors, and great nutrition. You learned about each component, from the mix of shrimp and crab to the benefits of greens and seafood. Expert tips helped prevent common mistakes and enhance your presentation. Consider trying different seafood or seasonal veggies for fun twists. With proper storage, you can enjoy this salad multiple times. Embrace these ideas, and enjoy your tasty and healthy Seafood Cobb Salad!

![- 1 tablespoon olive oil - 1 medium onion, finely diced - 2 cloves garlic, minced - 2 medium carrots, peeled and diced - 1 medium zucchini, diced - 1 cup green peas (fresh or frozen) - 1 cup cauliflower florets, chopped - 4 cups vegetable broth - 1 cup coconut milk To make a creamy vegetable soup, start with olive oil, onion, and garlic. The olive oil adds a nice richness. The onion gives a sweet base flavor. Garlic brings a warm, aromatic touch. Next, choose fresh vegetables like carrots, zucchini, and cauliflower. Carrots add sweetness and color. Zucchini brings a mild flavor and a tender texture. Cauliflower gives the soup a creamy feel when blended. For the broth and creaminess, use vegetable broth and coconut milk. Vegetable broth adds depth. Coconut milk makes the soup rich and smooth. Together, these ingredients create a lovely balance of flavors. - 1 teaspoon dried thyme - ½ teaspoon smoked paprika - Salt and freshly ground black pepper to taste - Fresh parsley, chopped (for garnish) Now, season your soup with dried thyme and smoked paprika. Thyme adds a warm herbal note. Smoked paprika gives a hint of smokiness. Use salt and pepper to taste, adjusting as you go. Finally, top your soup with fresh parsley. It adds a pop of color and a fresh taste. This simple garnish makes the soup look inviting and bright. For the complete recipe, check the [Full Recipe]. Start by heating 1 tablespoon of olive oil in a large pot over medium heat. Once the oil is hot, add 1 medium onion, finely diced, and 2 cloves of minced garlic. Sauté these for about 3-4 minutes. Keep stirring until the onion is soft and clear. This step builds a strong flavor base for your soup. Next, add 2 medium carrots, peeled and diced, along with 1 medium zucchini, diced, and 1 cup of chopped cauliflower florets. Cook these vegetables for an additional 5 minutes. Stir often until they begin to soften. This mix of veggies adds color and nutrition to your dish. Now, pour in 4 cups of vegetable broth. This broth acts as the heart of the soup. Add 1 cup of green peas, 1 teaspoon of dried thyme, and ½ teaspoon of smoked paprika. Bring this mixture to a boil. After it boils, lower the heat and let it simmer uncovered for about 15 minutes. The goal is to cook until all the vegetables are tender and full of flavor. Once the soup has simmered, remove it from the heat. Use an immersion blender to carefully purée the soup until it is smooth and creamy. If you prefer, you can also transfer the soup in batches to a countertop blender. Blend until the mixture is silky. This step is key for achieving that creamy texture we all love. Return the pot to low heat. Now, stir in 1 cup of coconut milk. This ingredient adds a rich creaminess and a hint of sweetness. Season the soup with salt and freshly ground black pepper to taste. Gently warm the soup for about 5 minutes. This will make sure everything is hot without boiling. Serve the soup hot in bowls. Garnish with fresh chopped parsley for a pop of color. Enjoy your creamy vegetable soup, made with love and fresh ingredients! For the complete recipe, check out the Full Recipe section. Choosing the right vegetables is key to great flavor. I love using fresh carrots, zucchini, and cauliflower. Each adds a unique taste. You can also add sweet potatoes or bell peppers for a twist. Always pick vegetables that are in season. They taste better and have more nutrients. Adjusting the creaminess level is easy. For a lighter soup, use less coconut milk. If you like it rich, add more. You can also blend in some white beans for extra creaminess without extra calories. Garnishing the soup makes it look stunning. I like to sprinkle fresh parsley on top. It adds a pop of color and fresh taste. You can also drizzle a bit of coconut milk for a fancy touch. Serving suggestions are just as important. A slice of crusty bread pairs well with the soup. You can also serve it with a side salad. This makes for a filling meal. For the full recipe, check out the complete guide! {{image_4}} You can change your creamy vegetable soup by using different veggies. Try seasonal vegetables for fresh flavors. For spring, add asparagus or green beans. In summer, use ripe tomatoes and corn. In fall, butternut squash and sweet potatoes shine. You can also experiment with bases. Instead of coconut milk, try almond milk for a nutty twist. This gives the soup a different taste and texture. Each change brings a new layer of flavor to your soup. Adding protein can make your soup heartier. Beans and lentils are great options. They add fiber and keep you full. For example, black beans or chickpeas blend well with the soup. You can add them when you simmer the broth. Another option is chicken or sausage. Cooked chicken pieces are tasty and satisfying. If you like sausage, slice it and sauté it with the onions. This adds a savory kick to the soup. Enjoy making it your own! Check out the Full Recipe for more ideas. To keep your creamy vegetable soup fresh, allow it to cool before storing. Place it in airtight containers to avoid air exposure. This helps maintain its flavor and texture. Store the soup in the fridge for up to three days. If you want to keep it longer, freezing is a great option. For freezing, use freezer-safe containers or bags. Make sure to leave some space for expansion. The soup can last up to three months in the freezer. When reheating the soup, you want to keep it creamy. The best method is to use the stove over low heat. Stir it gently to avoid burning. If you want to use the microwave, do so in short bursts. Stir the soup in between each burst to ensure even heating. To prevent separation, add a splash of water or vegetable broth if it thickens too much. This keeps the texture smooth and enjoyable. Can I make creamy vegetable soup vegan? Yes, you can easily make this soup vegan. Just use vegetable broth and coconut milk. Skip any dairy products. How do I make the soup spicier? To add heat, sprinkle in red pepper flakes or cayenne pepper. You can also add fresh jalapeños for a kick. What are the best side dishes to serve with the soup? Serve the soup with crusty bread, a fresh salad, or grilled cheese. These pair well and add more flavor. What to do if the soup is too thick? If your soup is too thick, add more vegetable broth. Stir well to combine and adjust until you reach your desired texture. How can I add more flavor? For extra flavor, try adding herbs like basil or dill. A splash of lemon juice can also brighten the taste. If you want, use the Full Recipe to explore more options. This blog post covered how to make a creamy vegetable soup from scratch. We explored essential ingredients like olive oil, fresh veggies, and broth. You learned step-by-step instructions, from sautéing to blending the soup. Tips for perfecting flavor and presentation will enhance your dish. Remember, you can change the recipe to suit your taste and store leftovers for later. With this knowledge, you can create a warm, comforting dish that you and others will enjoy. Happy cooking!](https://fastmealmate.com/wp-content/uploads/2025/07/74153262-6d82-4db7-a8c8-a4016c29ccdc-768x768.webp)

![Fresh figs are the star of this jam. Choose ripe, sweet figs for the best taste. Look for figs that are soft to the touch and have a deep color. First, wash the figs under cold water. Then, remove the stems and cut them into quarters. This helps them break down easily while cooking. You should have about 2 pounds of prepared figs for this recipe. Sugar is key in making fig jam thick and sweet. It not only adds sweetness but also helps the jam set. As the figs cook, they release their natural juices. The sugar dissolves and mixes with these juices, forming a syrup. This syrup thickens as it cooks, giving your jam that perfect spreadable texture. Use 1 cup of granulated sugar for this recipe. Adding lemon juice brightens the flavor. It helps balance the sweetness of the figs. You’ll need the juice of one lemon, which is about 2 tablespoons. Vanilla extract adds a warm, sweet note. Use just 1/2 teaspoon for a subtle hint. A pinch of sea salt (1/4 teaspoon) enhances all the flavors. Together, these ingredients create a delightful taste in your fig jam. For the full recipe, check out the Sweet Fig Bliss Jam. First, gather your fresh figs. You need 2 lbs of ripe figs. Remove the stems and cut them into quarters. Place them in a large bowl. Add 1 cup of granulated sugar. Squeeze the juice of one lemon into the bowl. This adds a nice zing to the jam. Pour in 1/2 teaspoon of vanilla extract and 1/4 teaspoon of sea salt. Toss everything together gently. Let it sit for about 30 minutes. This resting time helps the figs release their juices, making a sweet syrup. Now, transfer your fig mixture to a medium pot. Place the pot on medium heat. Stir the mixture often. You want the sugar to dissolve fully and the figs to soften. This should take around 10 minutes. Once everything is mixed well, turn the heat to medium-high. Bring the mixture to a gentle boil. Keep stirring regularly for 20 to 30 minutes. Watch closely as it thickens. It’s ready when it looks spreadable and thick. To check the jam's thickness, take a spoonful and place it on a chilled plate. Let it cool for a minute. Run your finger through the jam. If it holds its shape, it’s done. If it’s too runny, cook it a few more minutes. Once it’s just right, take the pot off the heat. Let it cool for about 10 minutes. Then, ladle the warm jam into clean jars. Seal them tightly while they are warm. This helps create a vacuum seal. Allow the jars to cool completely at room temperature. Enjoy your homemade fig jam! To make your fig jam shine, try adding a bit of spice. A dash of cinnamon can bring warmth. You can also add fresh herbs like rosemary for an earthy twist. Another great tip is to let your figs sit with sugar for 30 minutes. This helps to draw out the juices. The more juice, the better the flavor. Don't skip the lemon juice; it balances the sweetness and brightens the taste. If your jam is too runny, don’t worry! Just cook it a bit longer. Keep stirring to prevent burning. Test the consistency by spooning some onto a chilled plate. If it runs, give it more time. If you overcooked it and it’s too thick, you can fix it! Add a little water and reheat gently, stirring to combine. This will bring back some moisture without losing flavor. Sterilizing jars is key to keeping your jam fresh. Start by washing them in hot, soapy water. Rinse well and place them in a large pot of boiling water. Let them boil for 10 minutes. This kills any germs. You can also use your oven. Preheat it to 225°F (110°C) and place clean jars inside for 10-15 minutes. Always fill jars with warm jam to create a good seal. This keeps your fig jam safe and tasty for weeks! Don’t forget to check the [Full Recipe] for all the details! {{image_4}} You can spice up your fig jam easily. Adding a touch of cinnamon gives warmth. Just a pinch can change the flavor. Try adding rosemary for a fresh twist. This herb adds a nice depth. Experimenting with spices makes your jam unique. Mixing figs with other fruits offers fun flavors. You can try adding apples or pears. Their sweetness pairs well with figs. Another option is to use berries. Blueberries or raspberries create a bright taste. This mix can surprise your taste buds. You get more variety and fun in every jar. You can adjust sweetness based on your taste. If granulated sugar is not your choice, try honey or maple syrup. They give a different flavor and health benefits. For lower sugar, use stevia or monk fruit. These options keep the jam sweet without extra calories. Just remember to balance the flavors as you go. You can find the full recipe [here](#). Store your fig jam in clean, sterilized jars. Make sure to seal the jars tightly. I recommend using glass jars, as they help keep the jam fresh. Place the jars in the refrigerator right after they cool down. This keeps your jam tasty and safe to eat. Fig jam lasts about 2-3 weeks in the fridge. If you want to keep it longer, consider freezing it. When frozen, fig jam can last for up to a year. Just remember to label the jars with the date. This way, you’ll know exactly when you made it. Look for signs of spoilage before using your fig jam. If you see mold on the surface, throw it away. If the jam smells off or has an unusual color, it’s best not to eat it. Another sign is if the jam has a change in texture or consistency. Always trust your senses. If something seems off, it’s better to be safe. Yes, you can use frozen figs. Thaw them first and drain any excess liquid. Frozen figs can still taste great. They might be softer, but they will work well in your jam. Just follow the same steps as with fresh figs. Making jam without pectin lets the fruit shine. You get a pure fig flavor. It’s also a simple process. You only need figs, sugar, and a few extras. Plus, you can control the sweetness better. This method gives a lovely, spreadable texture. Leftover fig jam has many uses. Spread it on toast or pancakes for a sweet treat. You can swirl it into yogurt or oatmeal. Use it as a filling for pastries. It also pairs well with cheese on a charcuterie board. The options are endless! For more ideas, check out the Full Recipe for inspiration. This guide shows you how to make fig jam from start to finish. We explored ingredients like fresh figs, sugar, and flavor enhancers. Step-by-step, you learned to prepare and cook the mixture. Tips helped you fix issues and enhance texture. Variations allowed you to play with spices and fruits. Remember to store your jam safely for the best shelf life. Making fig jam can be fun and rewarding. Enjoy sharing your delicious creation with friends and family!](https://fastmealmate.com/wp-content/uploads/2025/06/9fb41919-1a88-423c-ae1c-6a52e554671e-768x768.webp)