
Southern Thanksgiving Spread Flavorful and Easy Guide
Thanksgiving is the perfect time to gather family and friends around a flavorful Southern feast. If you want to make a Southern Thanksgiving spread that delights everyone, you’ve come to the right place. In this guide, I’ll share easy recipes and tips for a whole roasted turkey, cornbread stuffing, sweet potato casserole, and more. Get ready to impress your guests and enjoy a meal filled with warmth and tradition!
Ingredients
Main Ingredients Overview
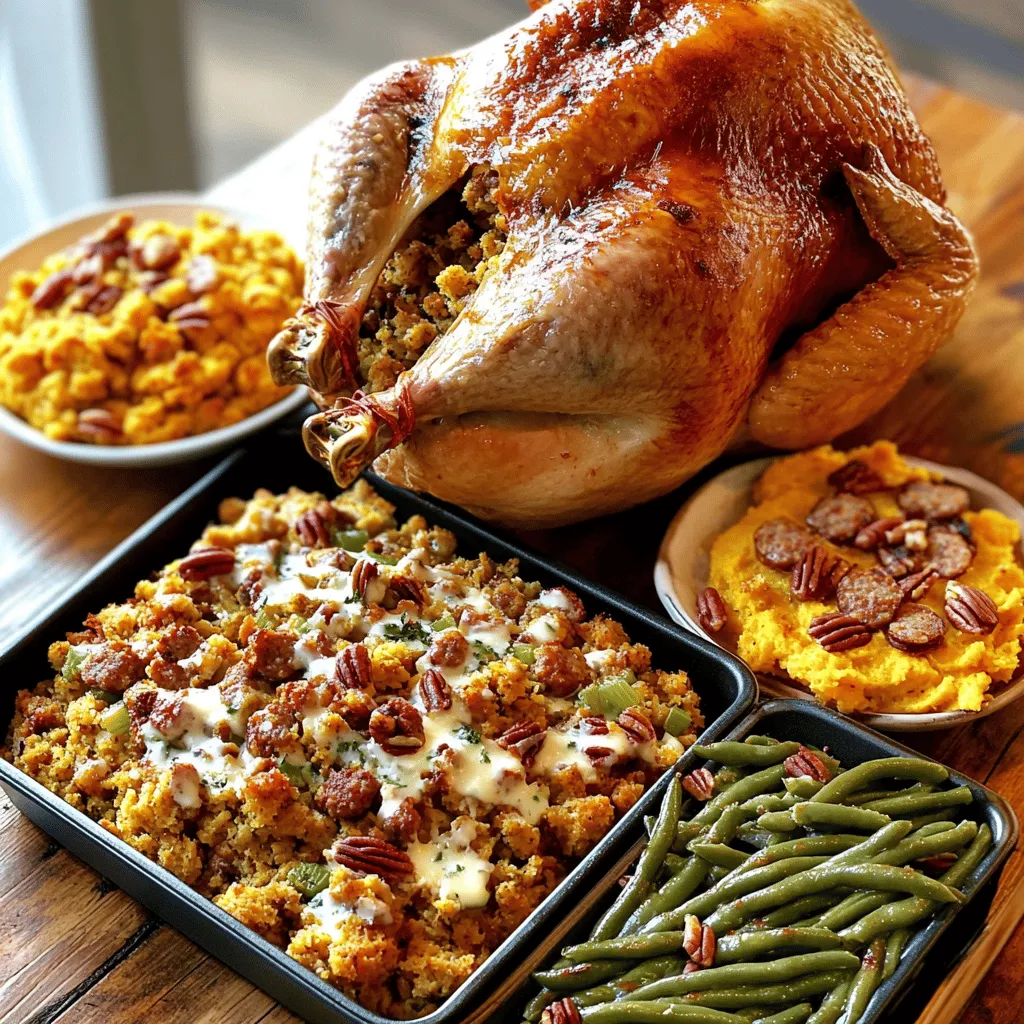
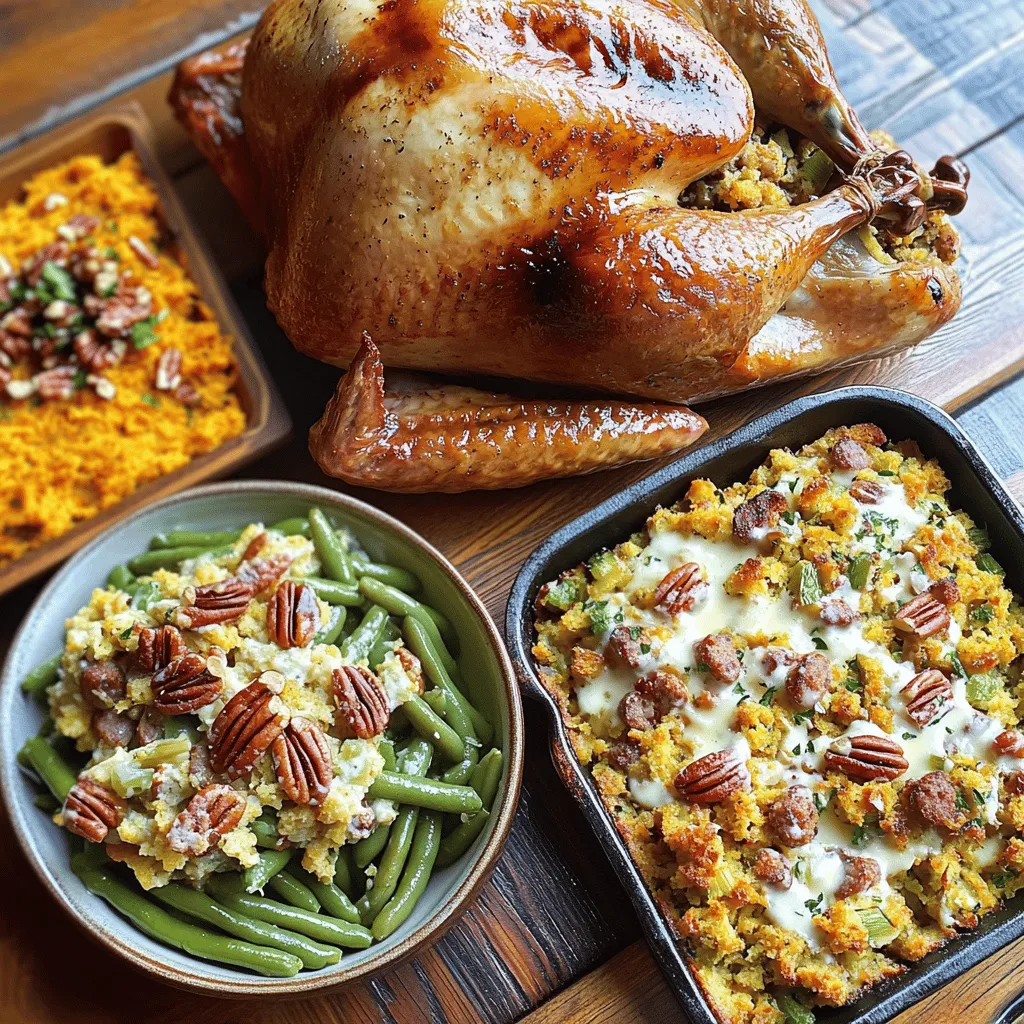
– Whole roasted turkey: A 12-14 lb turkey is perfect for your spread.
– Cornbread stuffing ingredients: You need 4 cups of crumbled cornbread, diced onion, diced celery, and chicken broth.
– Sweet potato casserole components: Gather 4 cups of peeled and cubed sweet potatoes, brown sugar, melted butter, cinnamon, and chopped pecans.
– Green beans preparation items: Use 2 cups of trimmed green beans and olive oil for a flavorful side.
Optional Ingredients
– Sausage for stuffing: Adding 1 cup of cooked and diced sausage gives the stuffing extra flavor.
– Additional toppings for sweet potatoes: Consider using marshmallows or extra pecans for a sweet crunch.
Step-by-Step Instructions
Preparing the Turkey
To start, you need a good turkey. A 12-14 pound turkey works best. First, preheat the oven to 325°F (165°C). Season the turkey inside and out with salt and pepper. Add sage, thyme, and rosemary on top. This gives a nice flavor. Place the turkey breast-side up on a roasting rack in a large pan.
Roast the turkey for about 13 minutes per pound. Remember to baste it with its juices every 30 minutes. This keeps the meat moist. When the turkey’s thickest part reaches 165°F (75°C), it’s done.
Making the Cornbread Stuffing
While the turkey cooks, you can make cornbread stuffing. Start by heating a large skillet over medium heat. Add olive oil, then sauté diced onion and celery until soft, about 5-7 minutes. This brings out their sweet flavors.
In a large bowl, combine crumbled cornbread, sautéed veggies, chicken broth, sage, thyme, rosemary, salt, and pepper. Mix it well until it feels moist. Transfer this mix to a greased baking dish. Bake at 350°F (175°C) for 30 minutes. Look for a golden-brown top.
Preparing Sweet Potato Casserole
Next, let’s move to sweet potato casserole. In a large pot, bring water to a boil. Add cubed sweet potatoes and cook until soft, about 15 minutes. Drain and return them to the pot. Mash with brown sugar, melted butter, cinnamon, and vanilla.
Spread the creamy mix into a greased casserole dish. Top with chopped pecans. Bake at 350°F (175°C) for 25 minutes. It should look bubbly and slightly set.
Cooking the Green Beans
For the green beans, bring a small pot of water to boil. Blanch trimmed green beans for 3-4 minutes until bright green. Then, quickly transfer them to an ice bath to stop cooking.
Once cooled, drain and toss with olive oil, salt, and pepper. For extra flavor, warm them in a skillet over medium heat until heated through.
Final Touches
Five minutes before serving, add crispy onion rings on top of the green beans. Return them to the oven for a few minutes until the onion rings are crispy.
Serve
When everything is ready, carve the turkey. Arrange it beautifully on a large platter. Serve it with golden cornbread stuffing, creamy sweet potato casserole, and vibrant green beans topped with onion rings. Enjoy your Southern Thanksgiving spread with love and joy!
Tips & Tricks
Perfecting Your Turkey
To make the perfect turkey, check the temperature. The thickest part of the breast should reach 165°F. After cooking, let the turkey rest for at least 20 minutes. This helps the juices stay inside, making it moist.
For flavor, try different spices. You can use garlic powder, smoked paprika, or even citrus zest. Each will give your turkey a unique taste.
Stuffing Secrets
Getting the right texture for your stuffing is key. It should be moist but not soggy. If it’s too dry, add more broth. If it’s too wet, bake it a little longer.
You can use different kinds of bread for stuffing. Try sourdough, whole wheat, or even rye. Each type adds a new flavor and texture to your dish.
Sweet Potato Enhancements
For a unique twist on sweet potatoes, think about add-ins. You can mix in crushed pineapple or chopped apples for sweetness. These ingredients add a nice contrast to the creamy texture.
When it comes to toppings, you have options. Instead of pecans, use walnuts or even crushed graham crackers. They add crunch and a new flavor to your sweet potato casserole.
Variations
Main Dish Options
You can switch up the turkey in many ways. Smoked turkey adds a deep, rich flavor. Fried turkey gives a crispy skin and juicy meat. If you want a vegetarian option, consider a savory stuffed pumpkin or a hearty roasted cauliflower. These options keep your meal festive and fun.
Side Dish Alterations
Southern cuisine offers many delicious sides to try. Instead of green beans, you can serve collard greens, brussels sprouts, or fried okra. For a twist on cornbread stuffing, consider using wild rice or quinoa for a gluten-free option. If you need dairy-free dishes, try using almond milk and coconut oil in your recipes.
Dessert Suggestions
No Southern Thanksgiving is complete without dessert. Classic options include pecan pie, sweet potato pie, or a fluffy coconut cake. For alternative sweet treats, try a fruit crisp with seasonal fruits or a chocolate pecan tart. These desserts add a sweet end to your meal.
Storage Info
Storing Leftovers
After your Southern Thanksgiving feast, store leftovers safely. For turkey, carve it into pieces. This helps cool it faster. Place the turkey in an airtight container. Wrap any remaining cornbread stuffing in plastic wrap or store it in a separate container.
For sides, like sweet potatoes and green beans, use glass or plastic containers with tight seals. This keeps the flavors fresh. Generally, you can store turkey and sides for about three to four days in the fridge.
Reheating Techniques
When you’re ready to enjoy leftovers, reheating is key. For turkey, preheat your oven to 325°F. Place turkey pieces in a baking dish. Add a splash of chicken broth to keep it moist. Cover the dish with foil to lock in steam. Heat for about 15-20 minutes or until warmed through.
For cornbread stuffing, place it in a baking dish. Add a little chicken broth if it seems dry. Cover with foil and heat at 350°F for about 20 minutes.
For sweet potato casserole, warm it in the oven at 350°F for 15 minutes. If you want it crispy again, remove the foil for the last few minutes. Finally, for green beans, sauté them in a pan with a bit of olive oil over medium heat until heated.
These steps help keep your flavors intact and your meal delicious.
FAQs
How do I ensure my turkey stays moist?
To keep your turkey moist, start by seasoning it well. Use salt, pepper, and herbs like sage, thyme, and rosemary. Baste the turkey every 30 minutes while it cooks. This helps keep the juices inside. Roast the turkey at 325°F (165°C) until it reaches an internal temperature of 165°F (75°C) in the breast. Let it rest for at least 20 minutes before carving. This resting time allows the juices to settle, making each slice juicy and tender.
Can I prepare the cornbread stuffing a day in advance?
Yes, you can prepare cornbread stuffing a day ahead. Cook the vegetables and mix them with the crumbled cornbread. Then, add the chicken broth and spices. Store it in the fridge overnight. On Thanksgiving day, just transfer it to a baking dish and bake it. This saves time and lets the flavors meld together nicely.
What are common sides in a Southern Thanksgiving spread?
A Southern Thanksgiving spread often includes:
– Collard greens
– Mashed potatoes
– Macaroni and cheese
– Green bean casserole
– Cranberry sauce
– Biscuits
These sides add variety and comfort to your meal. They also pair well with turkey and stuffing.
How long can I store leftovers?
Store turkey and sides in the fridge for up to four days. Use airtight containers for best results. For longer storage, freeze leftovers. Turkey can last up to four months in the freezer. Side dishes vary, but most can last about two to three months. Label everything with dates to keep track.
Can I make the sweet potato casserole without marshmallows?
Absolutely! You can make sweet potato casserole without marshmallows. Try topping it with crushed pecans or a streusel made of oats, brown sugar, and butter. This adds a nice crunch and rich flavor. You can even mix in spices like nutmeg or ginger for a twist.
You’ve learned all the key steps to make a great Southern Thanksgiving meal. Start with a golden turkey, delicious cornbread stuffing, sweet potatoes, and fresh green beans. Remember to check for moisture and experiment with flavors. Store leftovers properly and reheat them without losing taste. Don’t forget to try different variations and toppings to make it your own. This meal can bring family and friends together in a special way. Happy cooking!


. - Set temperature to 325°F (160°C) - Prepare a 9-inch springform pan Start by preheating your oven to 325°F (160°C). This will ensure that your carrot cake cheesecake bakes evenly. Next, grab a 9-inch springform pan. Grease it well and line the bottom with parchment paper. This will help the cheesecake come out easily after baking. - Mix dry ingredients and combine with wet ingredients - Fold in grated carrots, walnuts, and crushed pineapple In a medium bowl, mix the dry ingredients. You need flour, baking powder, baking soda, cinnamon, nutmeg, and salt. In a large bowl, whisk together the sugars, vegetable oil, eggs, and vanilla extract. Once it is smooth, slowly add the dry mix to the wet mix. Stir gently until just combined. Now, fold in the grated carrots, walnuts, and crushed pineapple. This gives your cake great texture and flavor. - Pour batter into the springform pan - Bake for 25-30 minutes until a toothpick comes out clean Pour the carrot cake batter into the prepared springform pan. Bake for 25-30 minutes. To check if it's done, insert a toothpick into the center. If it comes out clean, it's ready. Let the carrot layer cool in the pan on a wire rack. - Beat the cream cheese until smooth - Gradually add sugar and eggs while mixing In a large bowl, beat the softened cream cheese with an electric mixer on medium speed. Keep mixing until it's smooth. Gradually add in the sugar. Then, add the eggs one at a time, mixing on low speed after each one. Finally, mix in the vanilla extract, lemon juice, and sour cream. Your cheesecake batter should be creamy and well blended. - Pour cheesecake batter over the cooled carrot layer - Smooth the surface with a spatula Once the carrot layer is cool, pour the cheesecake batter over it. Use a spatula to spread it out evenly. This will create a nice, smooth top for your cake. - Bake for 45-50 minutes or until center slightly jiggles - Cool gradually in the oven Put the cake back in the oven. Bake for 45-50 minutes. The center should jiggle slightly when done. After baking, turn off the oven and crack the door open. This helps the cheesecake cool slowly, reducing the chance of cracks. - Chill in the refrigerator for at least 4 hours - Top with walnuts and shredded coconut before serving After an hour, take the cheesecake out and place it in the fridge. Chill for at least 4 hours, or overnight for the best taste. Before serving, sprinkle the top with walnuts and shredded coconut for extra flavor and crunch. Enjoy your delicious creation! For the full recipe, check the details above. - Use room temperature ingredients for better mixing. This helps all the flavors blend well. - Avoid overmixing the cheesecake batter to prevent cracks. Mix until just smooth for a perfect texture. - Serve with whipped cream or a scoop of vanilla ice cream. This adds a creamy touch to each bite. - Garnish with fresh carrots or edible flowers for decoration. This makes the dish look extra special and fun. - A springform pan is great for easy removal. It helps keep your cheesecake intact when serving. - An electric mixer ensures a smooth cheesecake batter. This saves time and effort, making mixing a breeze. {{image_4}} You can change the flavor of your carrot cake cheesecake. Try adding raisins or shredded coconut to the carrot layer. Both add sweetness and texture. You can also mix in spices like cardamom for a warm, spicy kick. This makes each bite more exciting. If you want a lighter version, use whole wheat flour instead of all-purpose flour. This swap adds fiber and nutrients. You can also replace sour cream with Greek yogurt. It gives creaminess with less fat. For a gluten-free option, use a gluten-free flour blend. This way, everyone can enjoy your cheesecake. If you need a vegan version, use dairy-free cream cheese. It works just as well in the cheesecake layer. These variations allow you to make this dessert fit your taste and dietary needs. Feel free to explore and enjoy the process! For the complete recipe, check the Full Recipe section. Store your carrot cake cheesecake in the refrigerator for up to 5 days. To keep it fresh, cover it tightly with plastic wrap or foil. This will help prevent it from drying out and absorbing other fridge odors. You can freeze carrot cake cheesecake for up to 2 months. Be sure to wrap it well in plastic wrap and then place it in an airtight container. When you're ready to enjoy it, thaw it in the refrigerator overnight before serving. This cheesecake is best enjoyed chilled. However, if you like it warm, you can briefly heat it in the oven. Just a few minutes at a low temperature will do. This method can enhance its creamy texture, making it even more delightful. The center should slightly jiggle and not look wet when finished. This means it has set properly. You can also check with a toothpick. Insert it into the center; it should come out mostly clean. Yes, it can be prepared a day in advance for optimal flavor. Making it ahead allows the flavors to blend better. Just remember to chill it in the fridge until you’re ready to serve. Slice with a sharp knife and serve chilled, topped as desired. You can add whipped cream or extra nuts for fun. A nice touch is a sprinkle of cinnamon on top. Absolutely! Pecans or almonds can be great substitutes for walnuts. They will add different flavors and textures. You can also skip the nuts if you prefer a nut-free version. This post covered everything you need to make a delicious Carrot Cake Cheesecake. We discussed the ingredients for both layers, how to bake, and tips for the best results. Remember, use room-temperature items and avoid overmixing the cheesecake. Feel free to try variations to fit your taste and dietary needs. This cake is perfect for any occasion and is easy to store. Now, grab your ingredients and impress your family or friends with this treat!](https://fastmealmate.com/wp-content/uploads/2025/06/33af2c91-c02f-4d6c-a85e-840ab017cd6c-768x768.webp)


![Here are the key ingredients for making Matcha Brûlée Boba: - 2 cups whole milk (or your preferred dairy alternative) - 2 tablespoons matcha powder - 3 tablespoons granulated sugar - 1 teaspoon vanilla extract - 1 cup cooked tapioca pearls - 2 tablespoons brown sugar (for the brûlée topping) - Optional: whipped cream, fresh mint leaves Each ingredient plays a vital role in making this treat delicious and smooth. Whole milk gives a creamy base, while matcha powder brings that unique green tea flavor. Granulated sugar sweetens the mix, and vanilla adds a lovely aroma. The cooked tapioca pearls add a fun texture that makes this drink special. The brown sugar forms a crunchy top that contrasts with the creamy brûlée underneath. Feel free to add whipped cream and mint for extra flair! For the complete recipe, check out the [Full Recipe]. 1. Heating the milk: Start by pouring 2 cups of whole milk into a small saucepan. Heat it gently over medium-low. Stir the milk often to keep it from boiling. You want it warm but not too hot. 2. Mixing matcha with sugar and vanilla: In a medium mixing bowl, combine 2 tablespoons of matcha powder, 3 tablespoons of granulated sugar, and 1 teaspoon of vanilla extract. Whisk these together until no lumps are left. This step is key for a smooth texture. 3. Combining milk with matcha: Once your milk is warm, slowly pour it into the matcha mixture. Whisk continuously as you pour. This makes sure the matcha blends well into the milk, creating a creamy mix. 1. Pouring into ramekins: Carefully pour your matcha mixture into ramekins or small cups. Fill each one halfway. This leaves space for the sweet brûlée topping. 2. Chilling and setting time: Put the filled ramekins in the refrigerator. Chill them for at least 4 hours. The mixture should feel firm when you touch it. This chilling time helps the flavors set. 1. Using a kitchen torch: After chilling, take the ramekins out. Evenly sprinkle 2 tablespoons of brown sugar on top of each one. Use a kitchen torch to caramelize the sugar. Move the flame gently until the sugar turns golden and crunchy. 2. Alternative broiler method: If you don’t have a torch, place the ramekins under a broiler. Watch them closely to prevent burning. It only takes a few minutes to get that nice, crispy layer. 1. Layering tapioca pearls: In a tall glass, add a layer of cooked tapioca pearls. Make sure you have enough for each serving. These give the drink a fun, chewy texture. 2. Adding matcha brûlée: Spoon the chilled matcha brûlée over the tapioca pearls. This creates a beautiful layer effect. Optional: Add a dollop of whipped cream on top. Fresh mint leaves also add a nice touch and flavor. Now you have a delightful and creamy matcha brûlée boba to enjoy! For the full recipe, check out the complete details. - Selecting high-quality matcha: Choose matcha that is bright green. This color shows freshness and quality. Look for matcha labeled as "ceremonial grade" for the best taste. - Tips for mixing without lumps: Always sift your matcha powder before mixing. This step breaks up clumps. When combining matcha with other ingredients, whisk it slowly to make a smooth mixture. - Best practices for caramelizing sugar: Use a kitchen torch for even heat. Hold the torch about 6 inches away from the sugar. Move it in small circles to avoid burning one spot. If using a broiler, keep a close eye. Sugar can burn quickly. - Common mistakes to avoid: Don’t add too much sugar for the brûlée top. A thin layer works best. Also, avoid caramelizing too long. You want a crisp layer, not a hard shell. - Choosing the right garnishes: Fresh mint leaves are a great choice. They add color and a fresh taste. You can also use edible flowers for a beautiful touch. - Tips for serving: Serve in clear glasses to show off the layers. This makes your matcha brûlée boba look stunning. If you add whipped cream, use a piping bag for a fancy look. {{image_4}} You can make your Matcha Brûlée Boba even more fun! Start by adding fruits or syrups. Try fresh strawberries or mango for a fruity twist. You can also drizzle some honey or maple syrup on top. This will add sweetness and flavor to your drink. If you want to switch up the sweetness, use alternative sweeteners. Stevia or agave syrup are great choices. They can make your drink lower in calories while keeping it tasty. Just remember to adjust the amount, as these sweeteners can be stronger than regular sugar. Want a dairy-free version? Simply swap whole milk for almond or coconut milk. These options still keep the drink creamy and delicious. You can also use oat milk for a rich flavor. Just pick what you like best! For a sugar-free version, you can use sugar substitutes. Look for brands that fit your diet. They can help you enjoy your treat without added sugar. Now, let’s talk about how to serve your Matcha Brûlée Boba! Jar presentations are super cute. Layer the tapioca pearls and matcha in small jars. They look great and are easy to grab. If you’re hosting a party, make a big batch. Serve it in a large bowl and let guests help themselves. Add fun straws and garnishes like mint leaves. This makes your drink fun and festive for everyone! Store your matcha brûlée in the fridge. Place it in an airtight container. This keeps it fresh and tasty. It will last for up to four days. After that, it may lose its creamy texture. Always check for any strange smells or changes in color before serving. Keep unused matcha powder in a cool, dark place. A sealed bag or jar works best. This protects it from light and air. For tapioca pearls, store them in water in the fridge. Change the water daily to keep them fresh. They can last up to three days this way. To refresh tapioca pearls, heat them in warm water. Let them soak for about ten minutes. This helps them regain their texture. Serve your matcha brûlée cold. If it has been in the fridge, just scoop and serve. It tastes great straight from the fridge! Matcha Brûlée Boba is a fun drink that mixes matcha and creamy flavors. It has layers of cooked tapioca pearls and a smooth matcha brûlée on top. The brûlée has a crunchy, caramelized sugar layer, adding a nice texture. The drink is both sweet and slightly earthy, making it unique and tasty. To make matcha less bitter, choose high-quality matcha powder. This type has a smoother taste. You can also use less matcha or add more sugar. Mixing matcha with warm milk can also help. Whisking well breaks up clumps, making it creamy. Yes, you can make this recipe vegan easily. Use almond milk, oat milk, or coconut milk instead of whole milk. For the brûlée, skip the whipped cream or use a dairy-free version. These swaps keep the drink just as tasty and creamy. Look for ceremonial grade matcha for the best flavor. It has a vibrant green color and rich taste. I recommend brands like Matcha Konomi or Encha. These brands are well-known for their quality and taste, ensuring a great matcha brûlée boba experience. For the full recipe, check out Matcha Brûlée Boba . In this post, we covered how to make Matcha Brûlée Boba. We explored essential ingredients, from whole milk to matcha powder. I shared easy steps, from preparing the mix to caramelizing sugar. You learned tips for perfect flavor and creative serving ideas. Matcha Brûlée Boba brings joy and flavor to drinks. Try different variations to find your favorite. Enjoy making this treat at home!](https://fastmealmate.com/wp-content/uploads/2025/06/afbc723c-5cf3-4754-a0d3-2d99f4abcad5-768x768.webp)