
Cheesesteak Tortellini Bliss Flavorful and Easy Recipe
![- Cheese tortellini - Flank steak - Provolone cheese The main stars of Cheesesteak Tortellini Bliss are cheese tortellini, flank steak, and provolone cheese. The cheese tortellini adds a rich, creamy texture. Flank steak gives a hearty, meaty flavor. Provolone cheese melts beautifully, making everything delightfully gooey. - Green bell pepper - Onion - Garlic Next, we have the veggies. The green bell pepper adds a nice crunch and sweetness. Onions bring out a savory note when sautéed. Garlic adds a burst of flavor that elevates the dish. Together, they create a great base for our cheesesteak twist. - Beef broth - Worcestershire sauce - Olive oil Now, let’s talk about the liquids. Beef broth adds depth and richness to the sauce. Worcestershire sauce brings umami and a hint of tang. Olive oil helps to sear the steak and sauté the veggies, making everything come together nicely. For the full recipe, check the [Full Recipe]. To start, fill a large pot with water. Add a generous pinch of salt. Bring the water to a rolling boil. Once it boils, gently add the cheese tortellini. Cook according to the package instructions, usually about 3-5 minutes. You want the tortellini to be al dente, not too soft. After cooking, drain the tortellini in a colander. Keep it warm by covering it with a kitchen towel while you prepare the rest. Next, heat a large skillet over medium-high heat. Add one tablespoon of olive oil to the hot skillet. Season the thinly sliced flank steak with salt and pepper. Make sure to coat all sides. Carefully place the steak slices in the skillet. Avoid overcrowding the pan, as this will steam the meat. Sear for about 3-4 minutes on each side. You want a golden-brown crust to form. Once cooked, remove the steak from the skillet and place it on a plate. Cover it loosely with foil to keep it warm. In the same skillet, add the sliced green bell pepper and onion. Don’t clean the skillet; this adds flavor. Sauté the vegetables over medium heat for about 5 minutes. You want them to soften and start to caramelize. Stir occasionally to prevent burning. Once they are soft, add the minced garlic. Cook for another minute, just until fragrant. Be careful not to let the garlic burn, as it can turn bitter. Now, you are ready to move on to combining all the tasty elements! For the complete recipe, check out the Full Recipe. To get the best flavor from your steak, sear it well. Here are my tips: - Heat your skillet: Use a large skillet and heat it to medium-high. This helps create a great crust on the steak. - Don’t overcrowd: Place only a few slices in the pan at once. This keeps the heat high and allows each piece to sear nicely. - Check doneness: For a medium-rare steak, aim for a temperature of 130-135°F. Use a meat thermometer for accuracy. Understanding how you like your steak cooked is key. Here’s a quick guide: - Rare: 120-125°F - Medium-rare: 130-135°F - Medium: 140-145°F - Medium-well: 150-155°F - Well-done: 160°F and above Want to take your cheesesteak tortellini to the next level? Try these flavor tips: - Add spices: A pinch of smoked paprika or crushed red pepper can give it a nice kick. - Experiment with herbs: Fresh thyme or oregano adds a lovely aroma. - Pair with sides: Serve with a fresh salad or garlic bread for a complete meal. The crunch balances the creamy tortellini. Cooking can have its hiccups. Here’s how to avoid common problems: - Overcooked tortellini: Keep an eye on the cooking time. Drain them as soon as they are al dente. This usually takes about 3-5 minutes. - Clumpy cheese: If your cheese gets clumpy, add a splash of milk or broth. This helps it melt evenly. For the full recipe of Cheesesteak Tortellini Bliss, check out the details shared above! {{image_4}} You can change this recipe with different proteins. If you want a lighter option, use chicken or turkey. Ground beef also works well in this dish. For a vegetarian twist, try mushrooms or tofu. These swaps keep the flavor rich and satisfying. Cheese is another area for creativity. Provolone is classic, but you can try cheddar for a sharper taste. Gouda adds a smoky feel, while mozzarella gives a creamy texture. Mix and match to find your favorite combo. Need gluten-free options? You can find gluten-free tortellini at many stores. Just check the package to ensure it fits your needs. Use cornstarch or arrowroot instead of regular flour to thicken the sauce. Dairy-free? Swap provolone for vegan cheese. There are many tasty brands that melt well. You can also use nutritional yeast for a cheesy flavor without the dairy. Want to switch up the presentation? Turn this dish into a baked delight. Transfer everything to a baking dish. Top it with more cheese and bake until golden and bubbly. This makes for a cozy meal perfect for sharing. Looking for a lighter option? Serve the cheesesteak tortellini as a salad. Toss it with greens, tomatoes, and a light dressing. This turns your dish into a fresh and vibrant meal option, perfect for warm days. For the full recipe, check the details above. After you enjoy your cheesesteak tortellini, store leftovers right away. Let the dish cool down for about 30 minutes. Avoid leaving it out longer, as this can cause bacteria to grow. Use airtight containers to keep your meal fresh. Store it in your fridge for up to three days. To freeze the cheesesteak tortellini, first, let it cool completely. Transfer it into freezer-safe containers or bags. Make sure to remove as much air as possible to avoid freezer burn. You can keep it frozen for up to three months. When you're ready to eat, thaw it overnight in the fridge. Reheat it gently on the stove over low heat, adding a splash of beef broth to keep it moist. Stir often to ensure even heating. Enjoy your delicious meal just like the first time! For the complete cooking instructions, check the Full Recipe. To cook tortellini, first, boil a large pot of water. Add salt to the water for flavor. When the water boils, add the cheese tortellini. Cook them according to the package instructions, usually around 3-5 minutes. Make sure they are al dente, which means they should be firm but cooked through. Drain the tortellini in a colander and keep them warm. This step ensures they stay soft and tasty for your dish. You can prepare Cheesesteak Tortellini Bliss ahead of time! Cook the tortellini and steak as directed, then let them cool. Store the dish in an airtight container in the fridge. When you're ready to eat, reheat it on the stove over medium heat. Add a splash of broth to keep it moist. Stir until everything is warm, and enjoy! This makes it easy for busy days. You can easily customize the flavors in this recipe! Try adding different vegetables like mushrooms or spinach for a twist. Swap the flank steak for chicken or shrimp if you want. For a spicier kick, add red pepper flakes or diced jalapeños. You can also mix in different cheeses like cheddar or mozzarella. Get creative and make this dish your own! This blog post covered a delicious recipe combining cheese tortellini and flank steak. You learned about essential ingredients, such as provolone cheese and beef broth. I shared steps for cooking beautiful tortellini and flavor-packed steak with sautéed veggies. Tips for perfecting your dish and creative variations ensured your meal stands out. In conclusion, enjoy the flexibility of this recipe. Please feel free to customize it to fit your tastes. Happy cooking!](https://fastmealmate.com/wp-content/uploads/2025/06/d6ee9c88-ae52-41f7-bd2d-f571c0560d46.webp)
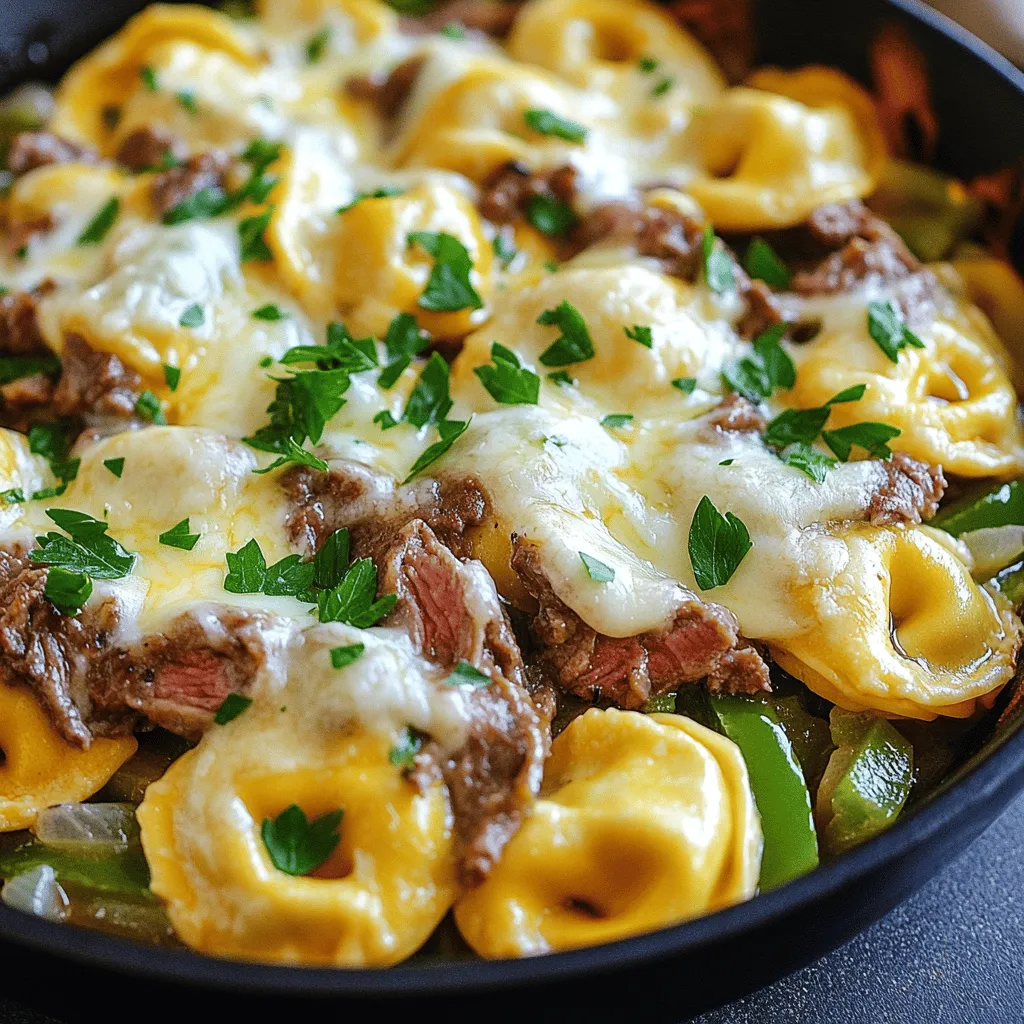
Are you ready for a delicious twist on a classic favorite? My Cheesesteak Tortellini Bliss combines tender cheese tortellini, juicy flank steak, and melted provolone for a taste explosion. This dish is rich in flavor yet simple to make. Perfect for busy nights or special gatherings, you’ll love how easy it is to impress your family and friends. Let’s dive into this flavorful recipe that will make your taste buds dance!
Ingredients
Main Ingredients
– Cheese tortellini
– Flank steak
– Provolone cheese
The main stars of Cheesesteak Tortellini Bliss are cheese tortellini, flank steak, and provolone cheese. The cheese tortellini adds a rich, creamy texture. Flank steak gives a hearty, meaty flavor. Provolone cheese melts beautifully, making everything delightfully gooey.
Vegetables and Seasoning
– Green bell pepper
– Onion
– Garlic
Next, we have the veggies. The green bell pepper adds a nice crunch and sweetness. Onions bring out a savory note when sautéed. Garlic adds a burst of flavor that elevates the dish. Together, they create a great base for our cheesesteak twist.
Liquid Ingredients
– Beef broth
– Worcestershire sauce
– Olive oil
Now, let’s talk about the liquids. Beef broth adds depth and richness to the sauce. Worcestershire sauce brings umami and a hint of tang. Olive oil helps to sear the steak and sauté the veggies, making everything come together nicely.
Step-by-Step Instructions
Preparation of Tortellini
To start, fill a large pot with water. Add a generous pinch of salt. Bring the water to a rolling boil. Once it boils, gently add the cheese tortellini. Cook according to the package instructions, usually about 3-5 minutes. You want the tortellini to be al dente, not too soft. After cooking, drain the tortellini in a colander. Keep it warm by covering it with a kitchen towel while you prepare the rest.
Cooking the Flank Steak
Next, heat a large skillet over medium-high heat. Add one tablespoon of olive oil to the hot skillet. Season the thinly sliced flank steak with salt and pepper. Make sure to coat all sides. Carefully place the steak slices in the skillet. Avoid overcrowding the pan, as this will steam the meat. Sear for about 3-4 minutes on each side. You want a golden-brown crust to form. Once cooked, remove the steak from the skillet and place it on a plate. Cover it loosely with foil to keep it warm.
Sautéing the Vegetables
In the same skillet, add the sliced green bell pepper and onion. Don’t clean the skillet; this adds flavor. Sauté the vegetables over medium heat for about 5 minutes. You want them to soften and start to caramelize. Stir occasionally to prevent burning. Once they are soft, add the minced garlic. Cook for another minute, just until fragrant. Be careful not to let the garlic burn, as it can turn bitter.
Now, you are ready to move on to combining all the tasty elements!
Tips & Tricks
Achieving Perfectly Cooked Steak
To get the best flavor from your steak, sear it well. Here are my tips:
– Heat your skillet: Use a large skillet and heat it to medium-high. This helps create a great crust on the steak.
– Don’t overcrowd: Place only a few slices in the pan at once. This keeps the heat high and allows each piece to sear nicely.
– Check doneness: For a medium-rare steak, aim for a temperature of 130-135°F. Use a meat thermometer for accuracy.
Understanding how you like your steak cooked is key. Here’s a quick guide:
– Rare: 120-125°F
– Medium-rare: 130-135°F
– Medium: 140-145°F
– Medium-well: 150-155°F
– Well-done: 160°F and above
Enhancing Flavor Profiles
Want to take your cheesesteak tortellini to the next level? Try these flavor tips:
– Add spices: A pinch of smoked paprika or crushed red pepper can give it a nice kick.
– Experiment with herbs: Fresh thyme or oregano adds a lovely aroma.
– Pair with sides: Serve with a fresh salad or garlic bread for a complete meal. The crunch balances the creamy tortellini.
Troubleshooting Common Issues
Cooking can have its hiccups. Here’s how to avoid common problems:
– Overcooked tortellini: Keep an eye on the cooking time. Drain them as soon as they are al dente. This usually takes about 3-5 minutes.
– Clumpy cheese: If your cheese gets clumpy, add a splash of milk or broth. This helps it melt evenly.
Variations
Substituting Ingredients
You can change this recipe with different proteins. If you want a lighter option, use chicken or turkey. Ground beef also works well in this dish. For a vegetarian twist, try mushrooms or tofu. These swaps keep the flavor rich and satisfying.
Cheese is another area for creativity. Provolone is classic, but you can try cheddar for a sharper taste. Gouda adds a smoky feel, while mozzarella gives a creamy texture. Mix and match to find your favorite combo.
Dietary Modifications
Need gluten-free options? You can find gluten-free tortellini at many stores. Just check the package to ensure it fits your needs. Use cornstarch or arrowroot instead of regular flour to thicken the sauce.
Dairy-free? Swap provolone for vegan cheese. There are many tasty brands that melt well. You can also use nutritional yeast for a cheesy flavor without the dairy.
Serving Styles
Want to switch up the presentation? Turn this dish into a baked delight. Transfer everything to a baking dish. Top it with more cheese and bake until golden and bubbly. This makes for a cozy meal perfect for sharing.
Looking for a lighter option? Serve the cheesesteak tortellini as a salad. Toss it with greens, tomatoes, and a light dressing. This turns your dish into a fresh and vibrant meal option, perfect for warm days.
Storage Info
Best Practices for Refrigeration
After you enjoy your cheesesteak tortellini, store leftovers right away. Let the dish cool down for about 30 minutes. Avoid leaving it out longer, as this can cause bacteria to grow. Use airtight containers to keep your meal fresh. Store it in your fridge for up to three days.
Freezing Guidelines
To freeze the cheesesteak tortellini, first, let it cool completely. Transfer it into freezer-safe containers or bags. Make sure to remove as much air as possible to avoid freezer burn. You can keep it frozen for up to three months.
When you’re ready to eat, thaw it overnight in the fridge. Reheat it gently on the stove over low heat, adding a splash of beef broth to keep it moist. Stir often to ensure even heating. Enjoy your delicious meal just like the first time!
FAQs
What is the best way to cook tortellini?
To cook tortellini, first, boil a large pot of water. Add salt to the water for flavor. When the water boils, add the cheese tortellini. Cook them according to the package instructions, usually around 3-5 minutes. Make sure they are al dente, which means they should be firm but cooked through. Drain the tortellini in a colander and keep them warm. This step ensures they stay soft and tasty for your dish.
Can I make Cheesesteak Tortellini Bliss ahead of time?
You can prepare Cheesesteak Tortellini Bliss ahead of time! Cook the tortellini and steak as directed, then let them cool. Store the dish in an airtight container in the fridge. When you’re ready to eat, reheat it on the stove over medium heat. Add a splash of broth to keep it moist. Stir until everything is warm, and enjoy! This makes it easy for busy days.
How do I customize flavors in the recipe?
You can easily customize the flavors in this recipe! Try adding different vegetables like mushrooms or spinach for a twist. Swap the flank steak for chicken or shrimp if you want. For a spicier kick, add red pepper flakes or diced jalapeños. You can also mix in different cheeses like cheddar or mozzarella. Get creative and make this dish your own!
This blog post covered a delicious recipe combining cheese tortellini and flank steak. You learned about essential ingredients, such as provolone cheese and beef broth. I shared steps for cooking beautiful tortellini and flavor-packed steak with sautéed veggies. Tips for perfecting your dish and creative variations ensured your meal stands out.
In conclusion, enjoy the flexibility of this recipe. Please feel free to customize it to fit your tastes. Happy cooking!
![- Cheese tortellini - Flank steak - Provolone cheese The main stars of Cheesesteak Tortellini Bliss are cheese tortellini, flank steak, and provolone cheese. The cheese tortellini adds a rich, creamy texture. Flank steak gives a hearty, meaty flavor. Provolone cheese melts beautifully, making everything delightfully gooey. - Green bell pepper - Onion - Garlic Next, we have the veggies. The green bell pepper adds a nice crunch and sweetness. Onions bring out a savory note when sautéed. Garlic adds a burst of flavor that elevates the dish. Together, they create a great base for our cheesesteak twist. - Beef broth - Worcestershire sauce - Olive oil Now, let’s talk about the liquids. Beef broth adds depth and richness to the sauce. Worcestershire sauce brings umami and a hint of tang. Olive oil helps to sear the steak and sauté the veggies, making everything come together nicely. For the full recipe, check the [Full Recipe]. To start, fill a large pot with water. Add a generous pinch of salt. Bring the water to a rolling boil. Once it boils, gently add the cheese tortellini. Cook according to the package instructions, usually about 3-5 minutes. You want the tortellini to be al dente, not too soft. After cooking, drain the tortellini in a colander. Keep it warm by covering it with a kitchen towel while you prepare the rest. Next, heat a large skillet over medium-high heat. Add one tablespoon of olive oil to the hot skillet. Season the thinly sliced flank steak with salt and pepper. Make sure to coat all sides. Carefully place the steak slices in the skillet. Avoid overcrowding the pan, as this will steam the meat. Sear for about 3-4 minutes on each side. You want a golden-brown crust to form. Once cooked, remove the steak from the skillet and place it on a plate. Cover it loosely with foil to keep it warm. In the same skillet, add the sliced green bell pepper and onion. Don’t clean the skillet; this adds flavor. Sauté the vegetables over medium heat for about 5 minutes. You want them to soften and start to caramelize. Stir occasionally to prevent burning. Once they are soft, add the minced garlic. Cook for another minute, just until fragrant. Be careful not to let the garlic burn, as it can turn bitter. Now, you are ready to move on to combining all the tasty elements! For the complete recipe, check out the Full Recipe. To get the best flavor from your steak, sear it well. Here are my tips: - Heat your skillet: Use a large skillet and heat it to medium-high. This helps create a great crust on the steak. - Don’t overcrowd: Place only a few slices in the pan at once. This keeps the heat high and allows each piece to sear nicely. - Check doneness: For a medium-rare steak, aim for a temperature of 130-135°F. Use a meat thermometer for accuracy. Understanding how you like your steak cooked is key. Here’s a quick guide: - Rare: 120-125°F - Medium-rare: 130-135°F - Medium: 140-145°F - Medium-well: 150-155°F - Well-done: 160°F and above Want to take your cheesesteak tortellini to the next level? Try these flavor tips: - Add spices: A pinch of smoked paprika or crushed red pepper can give it a nice kick. - Experiment with herbs: Fresh thyme or oregano adds a lovely aroma. - Pair with sides: Serve with a fresh salad or garlic bread for a complete meal. The crunch balances the creamy tortellini. Cooking can have its hiccups. Here’s how to avoid common problems: - Overcooked tortellini: Keep an eye on the cooking time. Drain them as soon as they are al dente. This usually takes about 3-5 minutes. - Clumpy cheese: If your cheese gets clumpy, add a splash of milk or broth. This helps it melt evenly. For the full recipe of Cheesesteak Tortellini Bliss, check out the details shared above! {{image_4}} You can change this recipe with different proteins. If you want a lighter option, use chicken or turkey. Ground beef also works well in this dish. For a vegetarian twist, try mushrooms or tofu. These swaps keep the flavor rich and satisfying. Cheese is another area for creativity. Provolone is classic, but you can try cheddar for a sharper taste. Gouda adds a smoky feel, while mozzarella gives a creamy texture. Mix and match to find your favorite combo. Need gluten-free options? You can find gluten-free tortellini at many stores. Just check the package to ensure it fits your needs. Use cornstarch or arrowroot instead of regular flour to thicken the sauce. Dairy-free? Swap provolone for vegan cheese. There are many tasty brands that melt well. You can also use nutritional yeast for a cheesy flavor without the dairy. Want to switch up the presentation? Turn this dish into a baked delight. Transfer everything to a baking dish. Top it with more cheese and bake until golden and bubbly. This makes for a cozy meal perfect for sharing. Looking for a lighter option? Serve the cheesesteak tortellini as a salad. Toss it with greens, tomatoes, and a light dressing. This turns your dish into a fresh and vibrant meal option, perfect for warm days. For the full recipe, check the details above. After you enjoy your cheesesteak tortellini, store leftovers right away. Let the dish cool down for about 30 minutes. Avoid leaving it out longer, as this can cause bacteria to grow. Use airtight containers to keep your meal fresh. Store it in your fridge for up to three days. To freeze the cheesesteak tortellini, first, let it cool completely. Transfer it into freezer-safe containers or bags. Make sure to remove as much air as possible to avoid freezer burn. You can keep it frozen for up to three months. When you're ready to eat, thaw it overnight in the fridge. Reheat it gently on the stove over low heat, adding a splash of beef broth to keep it moist. Stir often to ensure even heating. Enjoy your delicious meal just like the first time! For the complete cooking instructions, check the Full Recipe. To cook tortellini, first, boil a large pot of water. Add salt to the water for flavor. When the water boils, add the cheese tortellini. Cook them according to the package instructions, usually around 3-5 minutes. Make sure they are al dente, which means they should be firm but cooked through. Drain the tortellini in a colander and keep them warm. This step ensures they stay soft and tasty for your dish. You can prepare Cheesesteak Tortellini Bliss ahead of time! Cook the tortellini and steak as directed, then let them cool. Store the dish in an airtight container in the fridge. When you're ready to eat, reheat it on the stove over medium heat. Add a splash of broth to keep it moist. Stir until everything is warm, and enjoy! This makes it easy for busy days. You can easily customize the flavors in this recipe! Try adding different vegetables like mushrooms or spinach for a twist. Swap the flank steak for chicken or shrimp if you want. For a spicier kick, add red pepper flakes or diced jalapeños. You can also mix in different cheeses like cheddar or mozzarella. Get creative and make this dish your own! This blog post covered a delicious recipe combining cheese tortellini and flank steak. You learned about essential ingredients, such as provolone cheese and beef broth. I shared steps for cooking beautiful tortellini and flavor-packed steak with sautéed veggies. Tips for perfecting your dish and creative variations ensured your meal stands out. In conclusion, enjoy the flexibility of this recipe. Please feel free to customize it to fit your tastes. Happy cooking!](https://fastmealmate.com/wp-content/uploads/2025/06/d6ee9c88-ae52-41f7-bd2d-f571c0560d46-300x300.webp)


![For a delicious S'mores Brownie Skillet Dip, gather the following ingredients: - 1 cup all-purpose flour - 1 cup granulated sugar - 1/2 cup unsweetened cocoa powder - 1/2 teaspoon baking powder - 1/4 teaspoon salt - 1/2 cup unsalted butter, melted - 2 large eggs - 1 teaspoon vanilla extract - 1 cup semi-sweet or dark chocolate chips - 1 cup mini marshmallows - 1/2 cup graham cracker crumbs - Extra graham crackers for serving These ingredients blend together to create a rich, chocolatey dip. The all-purpose flour and cocoa give it a brownie base. The sugar adds sweetness, while the baking powder helps it rise slightly. The melted butter keeps it rich and moist. The eggs and vanilla extract add flavor and structure. Chocolate chips provide bursts of chocolatey goodness. Mini marshmallows, when baked, become soft and gooey, adding that classic S'mores taste. Finally, the graham cracker crumbs create a crunchy topping, perfect for dipping. Use this list to prepare your dip. Following these steps ensures you get the best flavor and texture. For full details, check out the Full Recipe. - Preheat oven to 350°F (175°C). This helps the dip cook evenly. - In a large bowl, mix the dry ingredients: flour, sugar, cocoa powder, baking powder, and salt. Stir well to combine. - In another bowl, combine the wet ingredients: melted butter, eggs, and vanilla extract. Mix gently until they blend together. - Pour the wet mix into the dry mix. Stir until just combined. Do not overmix; a few lumps are okay. - Now, fold in the chocolate chips. This adds rich flavor and texture to the dip. - Grease a 10-inch cast-iron skillet or oven-safe dish. Pour the brownie batter into the skillet. Spread it evenly. - Top the batter with mini marshmallows and graham cracker crumbs. This gives the dip that classic s'mores taste. - Place the skillet in the preheated oven. Bake for 20-25 minutes. The edges should be set, and the center should be soft. The marshmallows will puff up and turn golden. - Once baked, take the skillet out of the oven. Let it cool for a few minutes. This makes it safe to eat. Enjoy this warm dip with extra graham crackers for a fun treat! To avoid overmixing the batter, mix just until the wet and dry ingredients blend. You want some lumps for that fudgy texture. Too much mixing makes the brownies tough. For the perfect marshmallow topping, add them during the last few minutes of baking. This lets them brown nicely without burning. Keep an eye on them. You want golden, not charred! The best snacks for dipping are graham crackers, of course! You can also use fruit like strawberries or bananas. They add a nice, fresh taste to the rich dip. For a great presentation, drizzle melted chocolate on top before serving. Add some colorful fruit on the side. It makes the dish look fun and inviting. {{image_4}} You can make this dessert fit your needs with some easy swaps. If you want a gluten-free option, use gluten-free flour. It works well and keeps the taste great. You can also switch the chocolate. Dark chocolate gives a rich taste, while milk chocolate is sweeter. Choose what you like best! Add more fun to your dip with flavor extras. Chopped nuts add crunch and taste. Walnuts or pecans work best. If you love sweetness, drizzle some caramel over the top. It makes the dip even more special. You can also try different extracts. Almond extract gives a nice twist. Coconut extract can add a tropical touch. Just use a little bit to taste and enjoy! To keep your S'mores Brownie Skillet Dip fresh, store it in the fridge. First, let it cool completely. Then, cover the skillet tightly with plastic wrap or transfer it to an airtight container. When stored this way, it can last for about 3 days. If you have more than you can eat, freezing is an option. Scoop the dip into a freezer-safe container. Leave a little space at the top, as it may expand. It can last up to 2 months in the freezer. Just remember to label the container with the date for easy tracking. When it's time to enjoy your leftovers, reheating is simple. You can warm it up in the oven. Preheat the oven to 350°F (175°C). Place the skillet in the oven for about 10-15 minutes. This helps keep the dip gooey and warm. You can also reheat in the microwave if you're short on time. Use a microwave-safe bowl and heat in short bursts. Stir between each burst to ensure even warming. This way, the marshmallows remain soft and fluffy, just like when it was first made. Can I make this dish ahead of time? Yes, you can prepare the batter ahead. Just store it in the fridge. Bake it right before serving for best results. What can I use if I don’t have a cast-iron skillet? You can use any oven-safe dish. A glass or ceramic baking dish works well too. Just make sure to grease it well. How can I make it less sweet? To cut back on sweetness, use less sugar or dark chocolate. You can also add a pinch of salt to balance the flavors. What is the best way to serve this dip? Serve it warm with extra graham crackers. You can also add fresh fruit like strawberries or bananas for dipping. - Check out the [Full Recipe] for detailed instructions. This blog post covers a fun and tasty s'mores brownie skillet dip. You learned how to mix the right ingredients and bake this treat perfectly. I shared tips to make it even better and suggestions for serving. With storage info, you can save leftovers too. Enjoy making this sweet dip for your next gathering! It’s easy, fun, and sure to impress. Remember that you can personalize it with your favorite flavors. Happy baking!](https://fastmealmate.com/wp-content/uploads/2025/07/00705dfa-6977-4536-b8b9-b3715ee69892-768x768.webp)
. To store leftover stuffed shells, let them cool first. Place them in an airtight container. Make sure to separate layers with parchment paper to avoid sticking. You can keep them in the fridge for up to three days. You can freeze these stuffed shells for later enjoyment. Follow these steps: - Cool Completely: Allow the cooked shells to cool fully. - Wrap Well: Use plastic wrap or aluminum foil to wrap the shells tightly. - Use a Freezer Bag: Place the wrapped shells in a freezer-safe bag. Remove as much air as possible. - Label and Date: Write the date on the bag. This helps you track how long they’ve been frozen. To thaw, move the shells from the freezer to the fridge. Let them thaw overnight. For quicker thawing, place them in cold water for about two hours. Reheating stuffed shells is easy. Here are a few methods: - Oven: Preheat your oven to 350°F (175°C). Place the shells in a baking dish, cover with foil, and heat for 20 minutes. Remove the foil for the last five minutes to crisp the cheese. - Microwave: Place a few shells on a microwave-safe plate. Cover them with a damp paper towel. Heat in short bursts of 30 seconds until warm. - Skillet: Heat a skillet over medium heat. Add a splash of water and place the shells in the skillet. Cover with a lid and steam for about 5 minutes. These methods keep the flavors strong and the cheese melty. Enjoy your tasty leftovers! You can serve Philly Cheesesteak Stuffed Shells with a crisp salad. A simple green salad works well. You can also add a side of garlic bread. Garlic bread pairs nicely with the rich flavors of the shells. Marinara sauce makes a tasty dip for the shells too. Try adding pickles or roasted vegetables for a crunchy side. Yes, you can make these stuffed shells ahead of time. Prepare them fully and store in the fridge. Cover the baking dish tightly with plastic wrap. You can also freeze them before baking. Just thaw them in the fridge overnight before baking. This saves time and is great for busy days. The stuffed shells are done when the cheese is bubbly. You should see a golden brown color on top. Use a food thermometer; the center should reach 165°F. If you want to be sure, cut one open. The filling should be hot and melted. Keep an eye on them during the last 10 minutes of baking. In this blog post, I shared how to make Philly Cheesesteak Stuffed Shells. We covered the ingredients, cooking steps, and tips for perfect results. I also included storage info and answered common questions. Making these stuffed shells is easy and fun. You can tweak the recipe to fit your taste. Don’t be afraid to try new flavors. Enjoy your delicious creation and share it with others!](https://fastmealmate.com/wp-content/uploads/2025/06/11767e89-6c0f-469f-be11-885f6dce3423-768x768.webp)