
Zesty Italian Pasta Salad Flavorful Summer Delight
Looking for a bright and zesty dish to spice up your summer? I’ve got you covered! This Zesty Italian Pasta Salad is refreshing, easy to make, and packed with flavor. With vibrant veggies and a tangy dressing, this salad is perfect for picnics, parties, or just a weeknight dinner. Let’s dive into the delightful ingredients and simple steps to create your new summer favorite!
Ingredients
Detailed List of Ingredients
Creating a zesty Italian pasta salad starts with fresh and tasty ingredients. Here’s what you need:
– Fresh Produce:
– 1 cup cherry tomatoes, halved
– 1 cup cucumber, diced
– 1/2 cup bell peppers (mix of red and yellow), diced
– 1/4 cup red onion, finely chopped
– 1/4 cup fresh basil leaves, torn into pieces
– Pasta Selection:
– 3 cups fusilli or rotini pasta
– Dressing Components:
– 1/4 cup extra virgin olive oil
– 3 tablespoons red wine vinegar (or use apple cider vinegar for a milder taste)
– 1 teaspoon garlic powder
– 1 teaspoon dried oregano
– Salt and pepper, to taste
– Additional Ingredients:
– 1/2 cup black olives, sliced
– 1/2 cup fresh mozzarella balls (bocconcini), halved
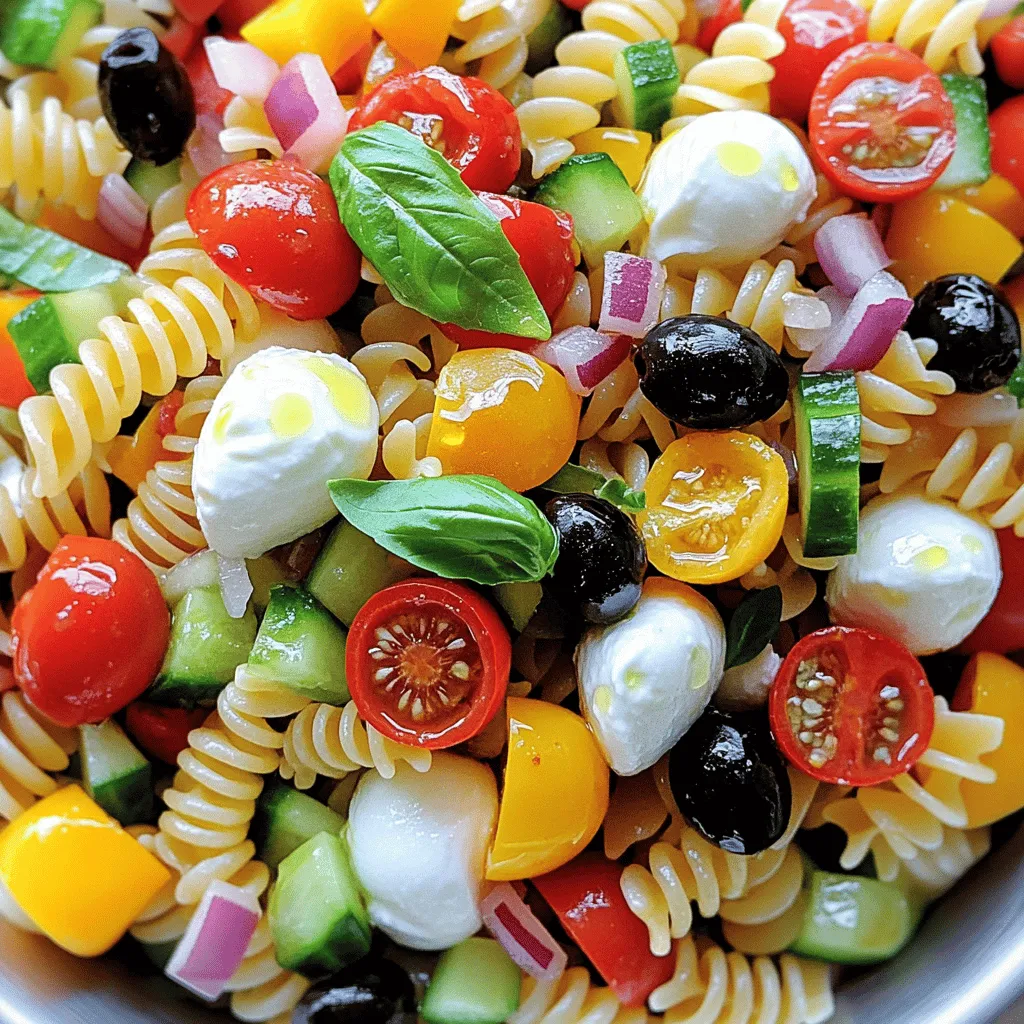
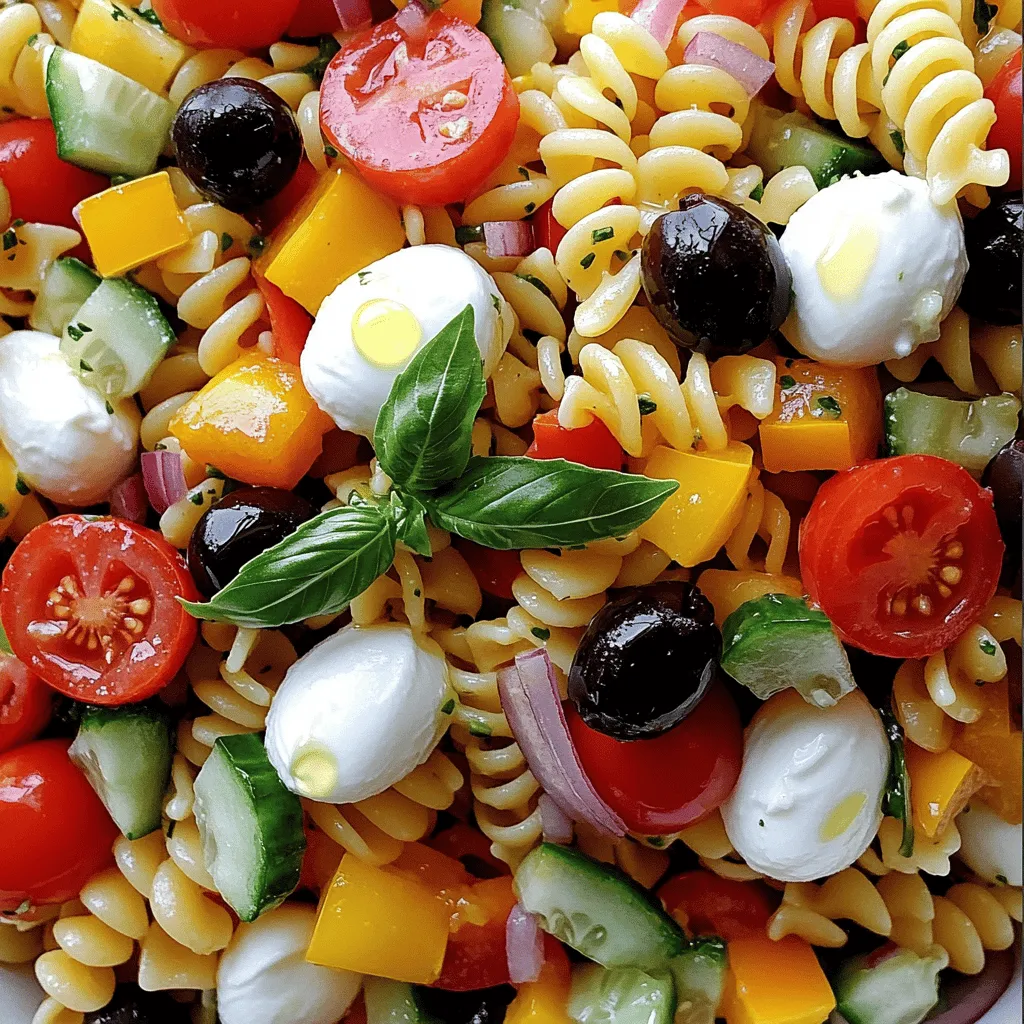
This recipe is a delightful mix of flavors. The fresh veggies add crunch, while the olive oil and vinegar bring tangy goodness.Enjoy the bright colors and tastes that make this pasta salad a summer favorite!
Step-by-Step Instructions
Cooking the Pasta
To make the best Zesty Italian Pasta Salad, we must start with the pasta. First, fill a large pot with water. Add a good amount of salt. This step helps flavor the pasta while it cooks.
Bring the water to a rolling boil. Once it’s boiling, add 3 cups of fusilli or rotini pasta. Cook it according to the package instructions until it is al dente. Al dente means the pasta is firm yet tender, perfect for salads.
When the pasta is done, drain it in a colander. Rinse it under cold water right away. This stops the cooking process and cools the pasta quickly. Cooling is important for the best texture.
Prepping the Vegetables
While the pasta cooks, let’s prepare the fresh vegetables. Start by chopping 1 cup of cherry tomatoes in half. Next, take 1 cup of cucumber and dice it into small pieces. For the bell peppers, use a mix of red and yellow. Dice 1/2 cup of them as well.
Chop 1/4 cup of red onion finely. This will add a nice crunch and flavor. Then, grab 1/2 cup of black olives and slice them. Don’t forget about the mozzarella! Halve 1/2 cup of fresh mozzarella balls. These creamy bites will balance the salad nicely.
Making the Dressing
Now, let’s make the dressing. In a small mixing bowl, add 1/4 cup of extra virgin olive oil and 3 tablespoons of red wine vinegar. You can substitute apple cider vinegar if you want a milder taste.
Next, mix in 1 teaspoon of garlic powder and 1 teaspoon of dried oregano. Season with salt and pepper to taste. Whisk all the ingredients together until smooth.
Taste the dressing! If you want more zing, add a bit more vinegar or salt. Adjust the flavor until it’s just right for your salad.Now that you have all the components ready, you’re set to combine them into a vibrant dish.
Tips & Tricks
Perfecting the Texture
To keep the pasta from becoming mushy, cook it just right. Use a big pot with plenty of water. Add a good amount of salt to the water. This step is key for flavor. Follow the package instructions for cooking time. You want the pasta firm but not hard. This is called al dente.
After draining the pasta, rinse it under cold water. This stops the cooking process. It also cools the pasta down quickly. Rinsing helps maintain a nice texture.
Flavor Enhancements
To add some zing, consider using spices. Garlic powder and dried oregano work wonders. You can also try a pinch of red pepper flakes for heat. If you want more flavor, add artichokes or sun-dried tomatoes. These ingredients add depth and variety. Don’t be afraid to experiment with fresh herbs, too. They can brighten up the dish.
Serving Suggestions
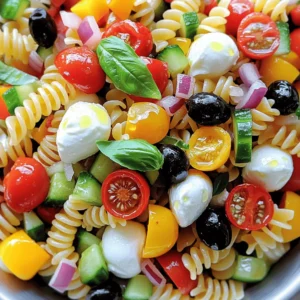
For a vibrant display, use a colorful bowl. Garnish the pasta salad with fresh basil leaves. This adds a lovely touch and extra flavor. You can serve this salad cold or at room temperature.
Pair it with grilled chicken or fish for a complete meal. It also goes well with a light white wine or sparkling water. This salad is perfect for summer picnics or barbecues. Remember, the more colorful the ingredients, the more inviting the dish!
Variations
Dietary Adjustments
How to make it gluten-free
To make this pasta salad gluten-free, simply swap regular pasta for gluten-free pasta. Many brands offer gluten-free fusilli or rotini made from rice or corn. They taste great, and you won’t miss the gluten!
Vegetarian vs. vegan options
This salad is naturally vegetarian since it includes cheese. To make it vegan, you can replace mozzarella with avocado or use vegan cheese. Both options keep the dish creamy and tasty.
Seasonal Variations
Incorporating seasonal vegetables
Using seasonal produce can enhance your salad’s taste. In summer, add fresh zucchini or grilled asparagus. In fall, try roasted butternut squash or diced sweet potatoes. These veggies bring new textures and flavors.
Dressing variations based on availability
Feel free to switch up the dressing! If you can’t find red wine vinegar, use lemon juice for a bright twist. You can also mix in herbs like dill or parsley for extra freshness.
Alternative Pasta Choices
Choosing different pasta shapes or types
Experiment with various pasta shapes. Short shapes, like penne or shells, work well and hold the dressing nicely. You can also use long pasta like spaghetti for a fun twist.
Whole grain or legume-based options
For a healthier choice, opt for whole grain pasta. It adds fiber and nutrients. Legume-based pasta, made from chickpeas or lentils, offers protein and a unique flavor. Both options make your salad hearty and satisfying.
Storage Info
Short-term Storage
After enjoying your Zesty Italian Pasta Salad, you may have some leftovers. First, let the salad cool to room temperature. Then, transfer it to an airtight container. This method helps keep the flavors fresh. In the fridge, it stays good for about three days. Always check for any changes in color or smell before eating.
Freezing Tips
Yes, you can freeze this pasta salad! To freeze, pack it in a freezer-safe container. Leave some space at the top, as the salad may expand. It’s best to use a container with a tight lid to avoid freezer burn. You can keep it in the freezer for up to three months. However, note that some ingredients may change texture after thawing.
Reheating Guidelines
To refresh your pasta salad, let it thaw in the fridge overnight. Once thawed, give it a good mix to combine the flavors. If it seems dry, add a splash of olive oil or vinegar. Avoid using a microwave, as it can make the pasta soggy. Instead, serve it cold or at room temperature for the best taste.
FAQs
How long can I keep Zesty Italian Pasta Salad in the refrigerator?
You can keep Zesty Italian Pasta Salad in the fridge for about 3 to 5 days. Make sure to store it in an airtight container. This will keep your salad fresh and tasty. After a few days, the flavors may change. The veggies might get soggy, so eat it sooner for the best taste.
Can I make Zesty Italian Pasta Salad a day in advance?
Yes, you can make this salad a day ahead. In fact, making it early can improve the flavor. The dressing will soak into the pasta and veggies overnight, making each bite more delicious. Just be sure to store it in the fridge. Before serving, give it a quick toss to mix everything again.
What type of pasta is the best for this recipe?
For Zesty Italian Pasta Salad, I recommend using fusilli or rotini pasta. These shapes hold the dressing well and catch bits of veggies. They also add a fun twist to each bite. You can try other types too, like penne or bowtie pasta, but keep the cooking time in mind. Cook your pasta al dente for the best texture.
In this blog post, we explored how to make Zesty Italian Pasta Salad. We covered all the key ingredients, including fresh produce and pasta choices. You learned step-by-step instructions for cooking pasta and prepping vegetables. Plus, we shared tips for enhancing flavor and serving your dish nicely.
As you create your pasta salad, enjoy experimenting with variations and finding what you love. This dish is versatile and can fit any occasion. Your next potluck or picnic will shine with this refreshing recipe!


![Fresh figs are the star of this jam. Choose ripe, sweet figs for the best taste. Look for figs that are soft to the touch and have a deep color. First, wash the figs under cold water. Then, remove the stems and cut them into quarters. This helps them break down easily while cooking. You should have about 2 pounds of prepared figs for this recipe. Sugar is key in making fig jam thick and sweet. It not only adds sweetness but also helps the jam set. As the figs cook, they release their natural juices. The sugar dissolves and mixes with these juices, forming a syrup. This syrup thickens as it cooks, giving your jam that perfect spreadable texture. Use 1 cup of granulated sugar for this recipe. Adding lemon juice brightens the flavor. It helps balance the sweetness of the figs. You’ll need the juice of one lemon, which is about 2 tablespoons. Vanilla extract adds a warm, sweet note. Use just 1/2 teaspoon for a subtle hint. A pinch of sea salt (1/4 teaspoon) enhances all the flavors. Together, these ingredients create a delightful taste in your fig jam. For the full recipe, check out the Sweet Fig Bliss Jam. First, gather your fresh figs. You need 2 lbs of ripe figs. Remove the stems and cut them into quarters. Place them in a large bowl. Add 1 cup of granulated sugar. Squeeze the juice of one lemon into the bowl. This adds a nice zing to the jam. Pour in 1/2 teaspoon of vanilla extract and 1/4 teaspoon of sea salt. Toss everything together gently. Let it sit for about 30 minutes. This resting time helps the figs release their juices, making a sweet syrup. Now, transfer your fig mixture to a medium pot. Place the pot on medium heat. Stir the mixture often. You want the sugar to dissolve fully and the figs to soften. This should take around 10 minutes. Once everything is mixed well, turn the heat to medium-high. Bring the mixture to a gentle boil. Keep stirring regularly for 20 to 30 minutes. Watch closely as it thickens. It’s ready when it looks spreadable and thick. To check the jam's thickness, take a spoonful and place it on a chilled plate. Let it cool for a minute. Run your finger through the jam. If it holds its shape, it’s done. If it’s too runny, cook it a few more minutes. Once it’s just right, take the pot off the heat. Let it cool for about 10 minutes. Then, ladle the warm jam into clean jars. Seal them tightly while they are warm. This helps create a vacuum seal. Allow the jars to cool completely at room temperature. Enjoy your homemade fig jam! To make your fig jam shine, try adding a bit of spice. A dash of cinnamon can bring warmth. You can also add fresh herbs like rosemary for an earthy twist. Another great tip is to let your figs sit with sugar for 30 minutes. This helps to draw out the juices. The more juice, the better the flavor. Don't skip the lemon juice; it balances the sweetness and brightens the taste. If your jam is too runny, don’t worry! Just cook it a bit longer. Keep stirring to prevent burning. Test the consistency by spooning some onto a chilled plate. If it runs, give it more time. If you overcooked it and it’s too thick, you can fix it! Add a little water and reheat gently, stirring to combine. This will bring back some moisture without losing flavor. Sterilizing jars is key to keeping your jam fresh. Start by washing them in hot, soapy water. Rinse well and place them in a large pot of boiling water. Let them boil for 10 minutes. This kills any germs. You can also use your oven. Preheat it to 225°F (110°C) and place clean jars inside for 10-15 minutes. Always fill jars with warm jam to create a good seal. This keeps your fig jam safe and tasty for weeks! Don’t forget to check the [Full Recipe] for all the details! {{image_4}} You can spice up your fig jam easily. Adding a touch of cinnamon gives warmth. Just a pinch can change the flavor. Try adding rosemary for a fresh twist. This herb adds a nice depth. Experimenting with spices makes your jam unique. Mixing figs with other fruits offers fun flavors. You can try adding apples or pears. Their sweetness pairs well with figs. Another option is to use berries. Blueberries or raspberries create a bright taste. This mix can surprise your taste buds. You get more variety and fun in every jar. You can adjust sweetness based on your taste. If granulated sugar is not your choice, try honey or maple syrup. They give a different flavor and health benefits. For lower sugar, use stevia or monk fruit. These options keep the jam sweet without extra calories. Just remember to balance the flavors as you go. You can find the full recipe [here](#). Store your fig jam in clean, sterilized jars. Make sure to seal the jars tightly. I recommend using glass jars, as they help keep the jam fresh. Place the jars in the refrigerator right after they cool down. This keeps your jam tasty and safe to eat. Fig jam lasts about 2-3 weeks in the fridge. If you want to keep it longer, consider freezing it. When frozen, fig jam can last for up to a year. Just remember to label the jars with the date. This way, you’ll know exactly when you made it. Look for signs of spoilage before using your fig jam. If you see mold on the surface, throw it away. If the jam smells off or has an unusual color, it’s best not to eat it. Another sign is if the jam has a change in texture or consistency. Always trust your senses. If something seems off, it’s better to be safe. Yes, you can use frozen figs. Thaw them first and drain any excess liquid. Frozen figs can still taste great. They might be softer, but they will work well in your jam. Just follow the same steps as with fresh figs. Making jam without pectin lets the fruit shine. You get a pure fig flavor. It’s also a simple process. You only need figs, sugar, and a few extras. Plus, you can control the sweetness better. This method gives a lovely, spreadable texture. Leftover fig jam has many uses. Spread it on toast or pancakes for a sweet treat. You can swirl it into yogurt or oatmeal. Use it as a filling for pastries. It also pairs well with cheese on a charcuterie board. The options are endless! For more ideas, check out the Full Recipe for inspiration. This guide shows you how to make fig jam from start to finish. We explored ingredients like fresh figs, sugar, and flavor enhancers. Step-by-step, you learned to prepare and cook the mixture. Tips helped you fix issues and enhance texture. Variations allowed you to play with spices and fruits. Remember to store your jam safely for the best shelf life. Making fig jam can be fun and rewarding. Enjoy sharing your delicious creation with friends and family!](https://fastmealmate.com/wp-content/uploads/2025/06/9fb41919-1a88-423c-ae1c-6a52e554671e-768x768.webp)