Italian Pasta Salad Flavorful and Fresh Recipe Guide
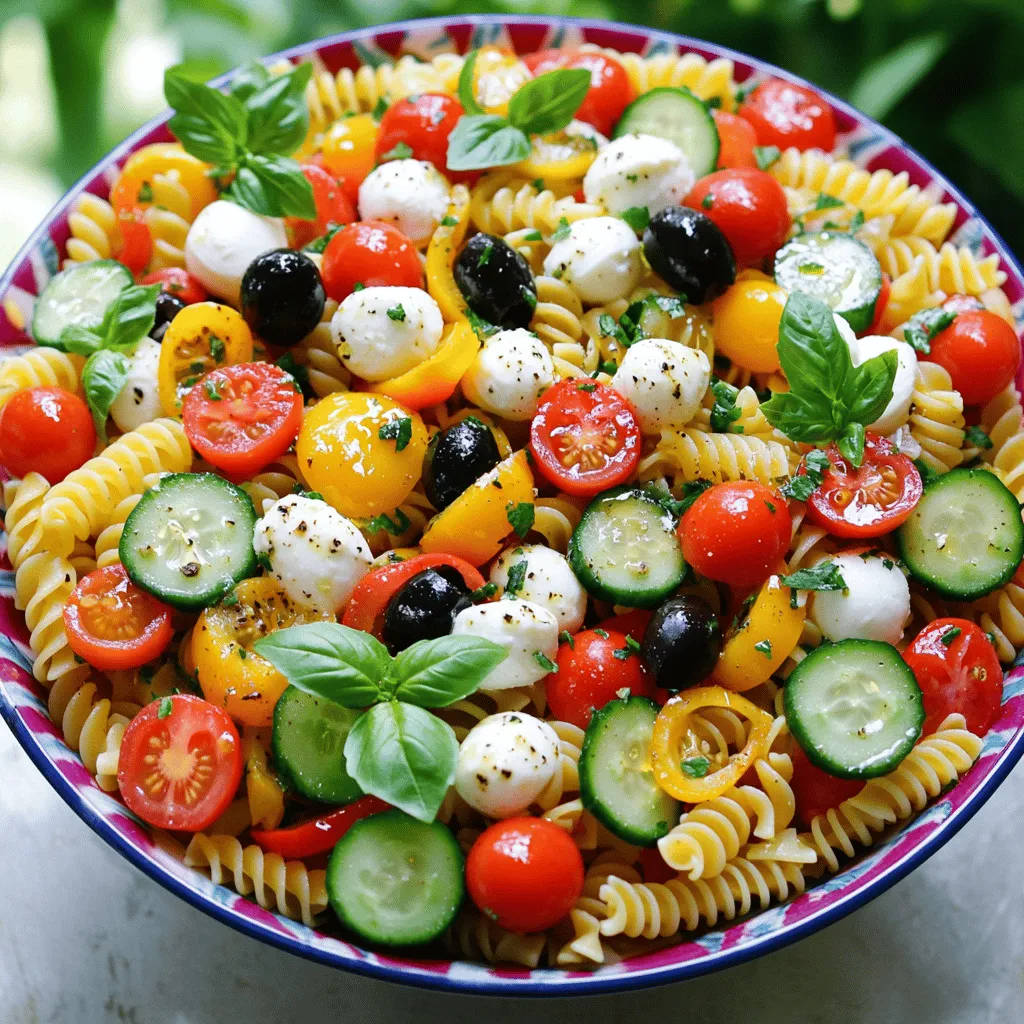
Looking for a fresh and tasty dish? My Italian Pasta Salad is just what you need! This salad is colorful, easy to make, and perfect for any meal. You can mix in your favorite veggies, proteins, or dressings to make it your own. In this guide, I’ll share the ingredients, steps, and tips to help you create a delicious pasta salad that everyone will enjoy. Let’s dive in!
Ingredients
Main ingredients for Italian Pasta Salad
For a tasty Italian pasta salad, you need:
– 8 oz rotini or fusilli pasta
– 1 cup cherry tomatoes, halved
– 1 cup cucumber, diced
– 1 cup bell peppers (red and yellow), diced
– ½ cup red onion, finely chopped
– 1 cup black olives, sliced
– 1 cup mozzarella balls, halved (bocconcini)
– ½ cup fresh basil leaves, torn
– 1 teaspoon dried oregano
– ½ cup extra virgin olive oil
– 3 tablespoons red wine vinegar (or substitute with apple cider vinegar)
– Salt and pepper, to taste
These ingredients make a colorful and fresh salad. The pasta provides a great base. Each veggie adds its own crunch and flavor. The mozzarella gives a creamy touch.
Optional ingredients for customization
To make this salad your own, consider adding:
– Artichoke hearts
– Sun-dried tomatoes
– Capers
– Fresh spinach or arugula
– Grated Parmesan cheese
– Different herbs like parsley or thyme
Feel free to mix and match! These options can change the taste and texture. You can make it your unique dish every time.
Recommended pantry staples
Always keep these items on hand for pasta salad success:
– Extra virgin olive oil
– Red wine vinegar or apple cider vinegar
– Dried herbs like oregano and basil
– Salt and pepper
These staples help create a delicious dressing. They also enhance the flavors in your salad. When you have them ready, you can whip up this dish anytime.
Step-by-Step Instructions
Preparation of pasta
To start, you need to cook the pasta. Use rotini or fusilli pasta, about 8 oz. Bring a pot of water to a boil and add a pinch of salt. Cook the pasta according to the package instructions. You want it to be al dente, which means it should be firm but cooked. Once cooked, drain the pasta in a colander. Rinse it under cold water. This step cools the pasta down and stops it from cooking more.
Mixing the salad ingredients
Now, grab a large mixing bowl. In this bowl, combine the fun ingredients. Add 1 cup of halved cherry tomatoes, 1 cup of diced cucumber, and 1 cup of diced bell peppers. Next, add ½ cup of finely chopped red onion, 1 cup of sliced black olives, and 1 cup of halved mozzarella balls. Mix everything gently to spread the flavors evenly. You want each bite to be colorful and tasty.
Making the dressing
In a small bowl, we’ll make the dressing. Whisk together ½ cup of extra virgin olive oil and 3 tablespoons of red wine vinegar. If you prefer, use apple cider vinegar instead. Add 1 teaspoon of dried oregano and a good pinch of salt and pepper. Whisk until the dressing is smooth and well mixed. This dressing brings all the flavors together in your salad.
When you’re ready, drizzle the dressing over the pasta salad mixture. Toss gently to coat all the ingredients. Then, fold in ½ cup of torn fresh basil leaves. Let the salad sit for at least 15 minutes before serving. This waiting time helps the flavors blend beautifully.
Tips & Tricks
Achieving the perfect pasta texture
To get that perfect bite, cook your pasta just right. Aim for al dente, which means firm but not hard. Follow the package instructions carefully. Once cooked, drain and rinse your pasta under cold water. This stops the cooking process and cools it down quickly.
Enhancing flavor combinations
Mixing flavors makes your pasta salad pop! Use fresh vegetables like cherry tomatoes and cucumbers. Add olives for a briny touch and mozzarella for creaminess. Fresh herbs like basil add brightness. Don’t forget to season with salt and pepper for balance. Experiment with different dressings too; a splash of lemon juice can brighten it up.
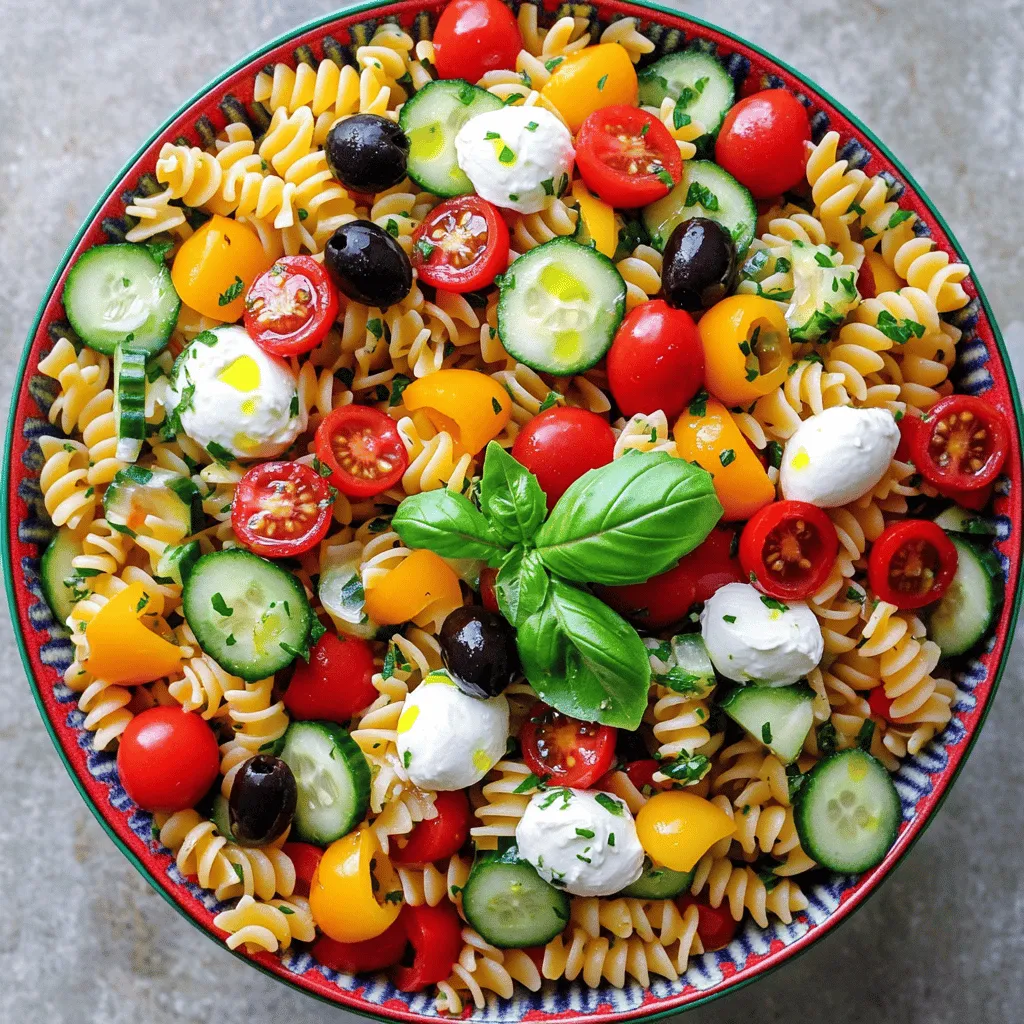
Presentation suggestions
Serve your pasta salad in a colorful bowl to catch eyes. Garnish with whole basil leaves for a fresh touch. A drizzle of olive oil on top adds shine and richness. You can also layer the salad for a stunning effect, so each bite has a variety of flavors.
Variations
When it comes to Italian pasta salad, variations can make it exciting. You can change flavors and textures easily. Here are some fun options to try.
Protein-packed additions
Want to add protein? You can include grilled chicken, shrimp, or sliced salami. These toppings make the salad heartier. For a vegetarian option, try chickpeas or white beans. They add a nice texture and boost nutrition.
Gluten-free pasta options
If you need gluten-free options, you can use rice or quinoa pasta. These choices work well and taste great. Just cook them according to the package instructions. You can enjoy the same flavors without the gluten.
Seasonal ingredient swaps
I love to use seasonal ingredients. In summer, add fresh zucchini or asparagus. In fall, try roasted butternut squash. These swaps keep the salad fresh and vibrant. You can also use different herbs like parsley or dill for extra flavor.It’s a great base to start your variations!
Storage Info
Best practices for refrigeration
To keep your Italian pasta salad fresh, store it in an airtight container. This helps prevent moisture loss and keeps flavors intact. Layer the salad in the container to avoid crushing the veggies. If possible, add the dressing just before serving to maintain crunchiness.
How to reheat or serve leftovers
You can serve leftovers cold or at room temperature. If you prefer warm pasta salad, gently heat it in the microwave. Use a low setting to avoid overcooking. Stir it every 30 seconds until warm. If you notice it’s a bit dry, add a splash of olive oil or vinegar to revive the flavors.
Duration for optimal freshness
Your pasta salad will stay fresh in the fridge for about 3 to 5 days. After that, the veggies may lose their crunch. Always check for any off smells or changes in texture before enjoying leftovers. For the best taste, eat it within the first two days.
FAQs
Can I make Italian Pasta Salad ahead of time?
Yes, you can make Italian Pasta Salad ahead of time. This salad keeps well in the fridge. I recommend making it a day before you plan to serve it. This allows the flavors to blend nicely. Just store it in an airtight container. Before serving, give it a good stir to mix everything again.
What side dishes pair well with Italian Pasta Salad?
Italian Pasta Salad goes well with many side dishes. Here are some great options:
– Grilled chicken or shrimp
– Garlic bread
– Antipasto platter
– Caprese salad
– A light soup, like minestrone
These dishes complement the fresh flavors of the salad.
How can I make this salad vegan-friendly?
To make this salad vegan, swap out a few ingredients. Instead of mozzarella, use diced avocado or marinated tofu. For the dressing, ensure your vinegar is vegan-friendly. You can use a mix of olive oil, lemon juice, and herbs. This keeps the salad fresh and tasty.
This article covered how to make a tasty Italian pasta salad. We looked at key ingredients, step-by-step instructions, and helpful tips. You learned ways to customize the salad with proteins and seasonal items. Proper storage methods were shared to keep your dish fresh. You can prepare this salad ahead of time and find great sides to enjoy with it. For those looking to make it vegan, options were also provided. Now, go ahead and enjoy your delicious Italian pasta salad!


![For the dry mix, gather these items: - 1 ½ cups all-purpose flour - 1 teaspoon baking powder - 1 teaspoon baking soda - ½ teaspoon salt - 1 teaspoon ground cinnamon - ½ teaspoon ground nutmeg - ¼ teaspoon ground ginger These ingredients help create the loaf's structure and flavor. The spices add warmth and depth. Next, collect these wet items: - 1 cup granulated sugar - ½ cup packed brown sugar - 1 cup vegetable oil - 3 large eggs - 1 teaspoon vanilla extract These components bring moisture and sweetness. The combination of sugars gives a rich taste. Now, let's spice it up with these add-ins: - 2 cups finely shredded carrots (approximately 4 medium carrots) - ½ cup crushed pineapple, well-drained - ½ cup chopped walnuts (optional) These add-ins bring texture and flavor. The carrots keep the loaf moist, while the pineapple adds a touch of sweetness. If you like crunch, toss in the walnuts. For the full recipe, you can explore the step-by-step instructions in [Full Recipe]. - Preheat the oven to 350°F (175°C). - Prepare your 9x5-inch loaf pan. Use non-stick spray or line it with parchment paper. This helps the loaf come out easily after baking. - In a medium bowl, combine the dry ingredients. Whisk together the flour, baking powder, baking soda, salt, and spices. Set this mixture aside for later. - In a large bowl, mix the sugars and oil. Beat them together until smooth. - Add the eggs one at a time to the sugar mixture. Mix well after each addition. Stir in the vanilla extract. - Gradually blend the dry ingredients with the wet ingredients. Stir gently until just combined. Avoid overmixing to keep your loaf tender. - Carefully fold in the finely shredded carrots, well-drained crushed pineapple, and chopped walnuts if you’re using them. Make sure they are evenly spread throughout the batter. - Pour the batter into your prepared loaf pan. Use a spatula to smooth the top. - Place the loaf pan in the oven. Bake for 50-60 minutes. Check for doneness by inserting a toothpick in the center. It should come out clean. If the top browns too fast, cover it loosely with aluminum foil. Use freshly grated carrots for the best flavor and moisture. Fresh carrots add a sweet crunch. You can also adjust the sugar based on your taste. If you prefer a sweeter cake, add a bit more sugar. If you want it less sweet, cut back. Mixing just until combined keeps the cake tender and moist. If you overmix, the loaf can turn out dense. When you add dry ingredients to the wet mix, stir gently. The batter should look slightly lumpy; that’s okay! To get a smooth cream cheese frosting, start with room temperature cheese and butter. Cold ingredients can lead to lumps. Beat the cream cheese and butter until creamy. Gradually add powdered sugar to avoid a cloud of sugar. Remember to mix until smooth, and then add a pinch of salt for flavor. For the full recipe, check out the [Full Recipe]. {{image_4}} You can easily change the flavor of your carrot cake loaf with different add-ins. If you want to swap nuts, try using raisins or shredded coconut instead. Both options add a sweet, chewy texture that pairs well with the spices. You can also adjust spices for a unique flavor. Add a little more cinnamon for warmth or some cardamom for a fragrant twist. This way, you can create a taste that fits your mood. If you need gluten-free options, consider almond or oat flour. Both flours work well and keep the loaf moist. For vegan substitutions, use flax eggs instead of regular eggs. Just mix one tablespoon of ground flaxseed with three tablespoons of water for each egg. You can also replace the cream cheese with a vegan cream cheese spread. These small changes keep the cake delicious while meeting your dietary needs. Pair your carrot cake loaf with a warm cup of coffee or tea. The rich flavors balance perfectly with a hot drink. To make your loaf look fancy, arrange slices on a beautiful platter. You can sprinkle chopped walnuts on top and add edible flowers for color. This makes your dessert not just tasty but also a feast for the eyes. For a fun touch, serve it with a scoop of vanilla ice cream for a delightful contrast. Make sure to check out the Full Recipe for more details on creating this delicious treat! To keep your carrot cake loaf fresh, store it in the fridge. Place it in an airtight container. This helps keep moisture in and prevents it from drying out. The cream cheese frosting also needs special care. To keep the frosting fresh, cover it with plastic wrap. This stops air from making it hard or crusty. You can freeze the carrot cake loaf both ways. First, freeze it before frosting. Wrap it in plastic wrap and then foil. This helps keep the cake moist. If you already frosted it, freeze the loaf on a plate. Once frozen, wrap it tightly. To thaw the loaf, place it in the fridge overnight. This helps keep the texture nice and soft. The carrot cake loaf can last about three days at room temperature. Keep it in a cool, dry place. If you see any mold or smell a sour scent, it’s best to throw it away. Always trust your senses when checking if food is safe to eat. Enjoy your delicious treat while it's fresh! For the full recipe, check the complete guide. Baking a carrot cake loaf takes about 50-60 minutes at 350°F (175°C). To test for doneness, insert a toothpick into the center. If it comes out clean, your loaf is ready. If the top browns too quickly, cover it with foil. This tip helps keep the top soft and moist. Yes, you can prepare this loaf ahead of time. You can mix the dry ingredients and store them in an airtight container. The wet ingredients can also be combined a day before. Just keep them in the fridge. Bake the loaf when you are ready. It keeps well and tastes fresh. If you need a dairy-free option, use vegan cream cheese. Another choice is to blend silken tofu with a bit of vanilla and powdered sugar. This gives you a smooth frosting that still tastes great. You can also try coconut cream for a tropical twist. Yes, this carrot cake loaf is great for kids. It contains nutritious carrots and pineapple, which add vitamins. The loaf is moist and flavorful, making it appealing to young eaters. Just be sure to watch for any nut allergies if you use walnuts. To check if the loaf is done, look for a golden brown top. You can also gently press the top; it should spring back. Use a toothpick to test the center. If it comes out clean, your carrot cake loaf is perfect. These cues help ensure a delicious result. This blog post covered all the essential steps to make a delicious carrot cake loaf. We explored the key ingredients, from dry and wet components to tasty add-ins. I shared tips to keep your cake moist and flavorful, along with ways to customize your loaf. Lastly, we discussed storage and FAQs to help you perfect your baking. Embrace your baking journey and enjoy each slice of your creation!](https://fastmealmate.com/wp-content/uploads/2025/06/8b09a955-a057-4b29-b3fd-380f10cea1b9-768x768.webp)

![- ripe tomatoes - onion - garlic - extra virgin olive oil - salt and pepper - vegetable broth - granulated sugar - fresh basil leaves - balsamic vinegar - heavy cream (optional) When I make roasted tomato basil soup, I gather the freshest ingredients. Ripe tomatoes are the star. They give the soup its rich flavor. I love using juicy, in-season tomatoes for the best taste. Next, I chop a large onion. It adds sweetness and depth. I also use garlic, which gives the soup a warm, inviting aroma. Extra virgin olive oil is a must. It helps to roast the veggies and adds healthy fats. Salt and pepper season the soup perfectly. I then choose low-sodium vegetable broth. It keeps the soup light but flavorful. A teaspoon of granulated sugar balances the acidity of the tomatoes. Fresh basil leaves add a fragrant touch. I use them generously for that classic flavor. A splash of balsamic vinegar brightens the taste. Finally, I consider adding heavy cream. It makes the soup creamy and rich, but it's optional. This combination of ingredients creates a delightful soup that warms the soul. For the complete recipe, check out the [Full Recipe]. Tomatoes are full of vitamins. They have vitamin C, potassium, and antioxidants. Eating tomatoes can support heart health and skin. Basil is more than just a herb. It has anti-inflammatory properties and is rich in vitamins A and K. It can help boost your immune system too. Olive oil is known for its health benefits. It contains healthy fats that can lower bad cholesterol. It also has antioxidants that help fight disease. These ingredients not only taste great but are good for you too! First, preheat your oven to 425°F (220°C). This helps the tomatoes roast perfectly. While the oven heats, prepare your fresh ingredients. Take 2 pounds of ripe tomatoes and cut them into quarters. Next, chop 1 large onion into bite-sized pieces. Finally, peel 4 cloves of garlic and leave them whole. Now, it's time to roast. On a large baking sheet, arrange the quartered tomatoes, chopped onion, and whole garlic cloves. Drizzle ¼ cup of extra virgin olive oil over the veggies. Season with salt and freshly ground black pepper to taste. Toss everything together to coat evenly. Roast the vegetables in the oven for about 25-30 minutes. You're looking for caramelized edges and soft onions. The aroma should be sweet and inviting. Once roasted, take the baking sheet out and let the veggies cool for a few minutes. In a large pot, combine the roasted vegetables with 2 cups of vegetable broth. Add 1 teaspoon of granulated sugar and 1 cup of fresh basil leaves. Heat the mixture over medium until it simmers. This helps all the flavors blend nicely. Next, you’ll blend the soup. Use an immersion blender for a smooth consistency. If you don’t have one, carefully pour the soup into a blender in batches. Return the blended soup to the pot. Add 1 teaspoon of balsamic vinegar for a hint of tang. For a creamy texture, stir in ½ cup of heavy cream if you like. Taste your soup and adjust the seasoning with salt and pepper as needed. Serve hot in bowls, garnishing with fresh basil leaves or a swirl of olive oil for a nice touch. For the full recipe, check out the detailed instructions. Seasoning is key to great soup. Use salt and pepper to enhance the taste. Adding a sprinkle of sugar balances the acidity of tomatoes. Always taste as you go. This lets you adjust flavors to your liking. Roasting is also vital. Roast your veggies for 25 to 30 minutes. This helps develop a deep, sweet flavor. The edges should caramelize nicely. You want that lovely aroma wafting from your oven. To make a rich soup, you can add heavy cream. This gives a smooth, creamy texture. If you want a lighter option, use blended beans or pureed potatoes. Both will add body without extra fat. When blending, make sure to mix well. This helps create a uniform texture. If you prefer a chunkier soup, blend only half. This way, you get a mix of smooth and textured soup. A beautiful presentation makes your dish shine. Garnish with fresh basil leaves for color. A swirl of olive oil adds a nice touch, too. Serve your soup in deep bowls. Pair it with crusty artisan bread or grilled cheese. This gives a nice crunch and complements the soup. You can also add some croutons on top for extra texture. Enjoying the soup is about the experience, so make it look good! {{image_4}} You can change this soup by adding more vegetables. Carrots add sweetness. Bell peppers bring a nice crunch. Chopping them into small pieces helps them cook well. You might also try adding zucchini for a fresh twist. Using fresh herbs like thyme or oregano can boost the flavor. These herbs add a new layer of taste to your dish. If you want a vegan soup, you can skip the heavy cream. Use coconut milk instead for a creamy texture. Almond milk is another good choice. For broth, make sure to use vegetable broth. This keeps the soup vegan. Adjust the seasoning to fit your taste. You can change the soup's taste with spices. Adding cumin or smoked paprika gives a warm depth. A pinch of chili flakes can add heat. You can also explore cultural variations. For example, Italian versions may include a dash of pesto. Some Mexican versions use lime juice and cilantro. These spices and ingredients make your soup unique and exciting. For the full recipe, check out the [Full Recipe]. After you enjoy your roasted tomato basil soup, you may have some left. Here’s how to keep it fresh: - Refrigeration tips: Store the soup in an airtight container. It lasts for about 4 to 5 days in the fridge. Let it cool before sealing to prevent moisture buildup. - Freezing the soup: If you want to save it longer, freezing works well. Use freezer-safe bags or containers. Leave some space at the top as the soup expands when frozen. It can last up to 3 months in the freezer. When you're ready to enjoy your soup again, here’s how to reheat it without losing flavor: - Methods to reheat without losing flavor: The best way is to use the stovetop. Pour the soup into a pot and heat it over medium heat. Stir often until it's warm. You can also use a microwave. Heat in short bursts, about 1 to 2 minutes, stirring in between. - Tips for maintaining texture: If the soup seems too thick, add a splash of broth or water. This helps restore its creamy texture. Always taste before serving to adjust the seasoning if needed. Roasted Tomato Basil Soup lasts about 5 days in the fridge. Store it in an airtight container. Make sure it cools down before sealing. If you see any mold, toss it right away. For best taste, heat and enjoy it within those days. Yes, you can use canned tomatoes. They are convenient and often more consistent in flavor. Canned tomatoes save time, but fresh tomatoes add a brighter taste. When using canned, choose whole or crushed tomatoes without added sugars. Drain excess liquid to avoid a watery soup. You can pair the soup with a variety of dishes. Some great options include: - Grilled cheese sandwiches - Crusty artisan bread - Fresh basil pesto pasta - A simple mixed green salad These dishes complement the soup's rich flavors and add texture to your meal. For a complete experience, consider adding a dollop of sour cream or a sprinkle of Parmesan cheese on top. Want to explore more? Check the Full Recipe for more serving ideas! This article explored how to make a tasty Roasted Tomato Basil Soup. We covered the ingredients you need, their benefits, and the steps to create this dish. You learned about helpful tips and how to customize the recipe to suit your taste. Storing and reheating the soup was also discussed for your convenience. Now, you have all the tools to make this simple and delicious soup. Enjoy cooking and sharing it with friends and family. Your kitchen can be a place of joy and flavor!](https://fastmealmate.com/wp-content/uploads/2025/07/2e40192c-dd82-4486-9582-e1e9c28fcf57-768x768.webp)