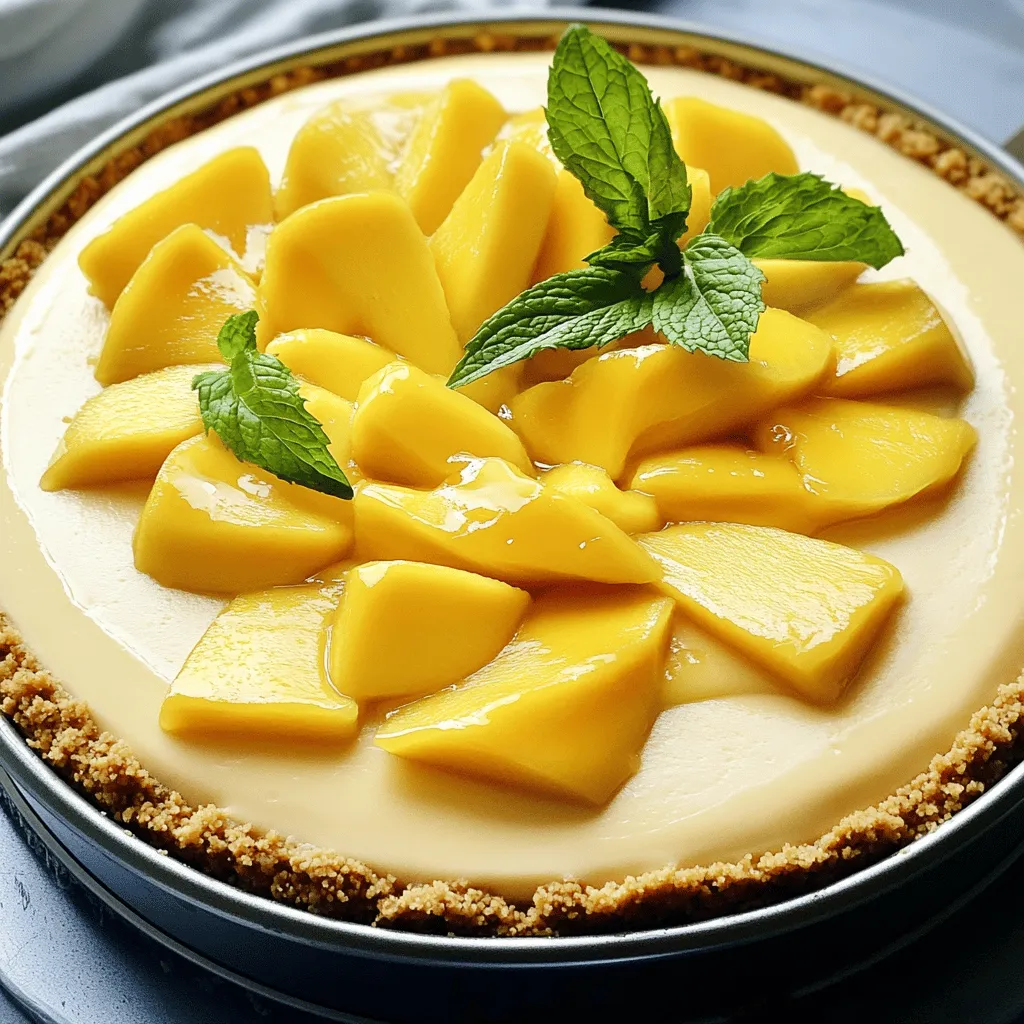
Creamy Mango Cheesecake Delightful Dessert Recipe
![To make this delicious creamy mango cheesecake, gather the following ingredients: - 1 ½ cups graham cracker crumbs - ½ cup unsalted butter, melted - 2 tablespoons granulated sugar - 16 oz cream cheese, softened to room temperature - 1 cup sour cream - ¾ cup granulated sugar - 2 teaspoons pure vanilla extract - 1 cup ripe mango puree (fresh or canned) - 2 large eggs, at room temperature - 2 tablespoons cornstarch - Fresh mango slices and mint leaves, for garnish If you need to make some swaps, here are some ideas: - Use digestive biscuits instead of graham crackers for the crust. - If you’re dairy-free, try cream cheese made from nuts. - You can replace sour cream with Greek yogurt for a tangy taste. - For a sweeter cheesecake, add more sugar to the mango puree. Choosing the right mango is key to great flavor. Here’s how to pick the best ones: - Look for mangoes that feel slightly soft when gently squeezed. - The skin should have a bright color, often yellow or red with green. - Check for a sweet, fruity aroma near the stem. - Avoid any mangoes with dark spots or blemishes. - If they are not ripe, place them in a paper bag to speed up ripening. This recipe brings together fresh mango flavor with creamy cheesecake for a delightful treat. Enjoy making it with your favorite ingredients! For the complete recipe, check the Full Recipe link. To start, gather your ingredients. You will need graham cracker crumbs, melted butter, and sugar. First, preheat your oven to 325°F (160°C). In a bowl, mix the crumbs, melted butter, and sugar. Stir until it looks like wet sand. Next, take a 9-inch springform pan. Press the crumb mixture into the bottom evenly. Bake for 10 minutes. After baking, let it cool completely. Now, it’s time to make the filling. Get your cream cheese and place it in a large bowl. Beat it with an electric mixer until it's smooth. Add in the sour cream, sugar, and vanilla extract. Mix until everything is well combined. Next, fold in the mango puree gently with a spatula. Add the eggs one at a time, mixing slowly. Be careful not to overmix. Lastly, sift the cornstarch and fold it in until the batter is smooth. Pour the mango cheesecake batter over the cooled crust. Smooth the top with a spatula. Bake in your oven for 55 to 60 minutes. The edges should be set, while the center has a slight jiggle. Turn off the oven and leave the cheesecake inside for one hour. This helps prevent cracks. After cooling, transfer the cheesecake to the refrigerator. Chill for at least 4 hours or overnight. When ready to enjoy, slice and garnish with fresh mango and mint. To get a smooth and creamy texture, start with room-temperature ingredients. This helps the cream cheese blend well. Use an electric mixer to beat the cream cheese until it is lump-free. Mix slowly when adding eggs, one at a time. This keeps air out of the batter. Too much air can make the cheesecake puffy and less smooth. Cracking is a common issue with cheesecakes. To avoid this, let your cheesecake cool slowly in the oven. After baking, turn off the heat and leave it inside for an hour. This gradual cooling helps the cheesecake set without sudden temperature changes. Also, avoid overmixing, especially after adding the eggs. Overmixing can cause air bubbles, which lead to cracks. Having the right tools makes cheesecake easier to make. Here are some must-have items: - Springform pan: This allows for easy removal of the cheesecake. - Electric mixer: A hand mixer or stand mixer helps achieve a smooth batter. - Spatula: Use it for folding and smoothing the batter. - Sifter: For sifting cornstarch and avoiding lumps. - Oven thermometer: This ensures your oven is at the right temperature. These tools will help you create a perfect creamy mango cheesecake. For more detailed steps, check the Full Recipe. {{image_4}} You can easily add new flavors to your creamy mango cheesecake. For a tropical twist, use passion fruit puree instead of mango. This will give your cheesecake a bright, tangy taste. Simply swap the mango puree for the same amount of passion fruit. You can also add shredded coconut for a chewy texture. Mix in ½ cup of coconut with the cream cheese for a rich flavor. If you want a no-bake version, it is simple. Just skip the baking steps. After mixing your filling, pour it over the crust. Chill it in the fridge for at least 6 hours or overnight. This will help it set without baking. The result is a lighter dessert that is just as creamy and delicious. You can make this cheesecake gluten-free by using gluten-free graham crackers or almond flour for the crust. For a vegan version, replace the cream cheese with a plant-based alternative. You can also use coconut cream in place of sour cream. Substitute eggs with flax eggs or applesauce for binding. These swaps will help you enjoy a creamy mango cheesecake that fits your dietary needs. For the full recipe, check out the [Full Recipe]. Storing leftover cheesecake is simple. First, cover the cheesecake with plastic wrap or aluminum foil. This keeps it fresh and moist. If you used a springform pan, you can leave it in the pan. Just wrap the top well. Place it in the fridge for up to five days. I recommend enjoying it within this time for the best taste. If you want to save your cheesecake for later, freezing is the way to go. First, let it cool completely. Then, slice it into pieces. Wrap each slice tightly in plastic wrap. After that, place the wrapped slices in a freezer-safe bag. You can freeze them for up to three months. When you are ready to eat, just thaw the slices in the fridge overnight. You don’t need to reheat cheesecake, but you can refresh it. If it has been frozen, let it thaw in the fridge. This keeps its smooth texture. Before serving, you can add fresh mango slices or a drizzle of fruit sauce. This gives it a fresh taste and a pretty look. For the full recipe, check the section above. It takes about 20 minutes to prep. Baking takes 55 to 60 minutes. You also need to chill it for at least 4 hours. So, the total time is around 6 hours, including chilling. Yes, you can use frozen mango. Just thaw it and blend it into a puree. This works well if fresh mango is not available. The flavor will still be great! To slice cheesecake neatly, use a hot knife. Dip it in hot water, then dry it off. Cut through the cheesecake slowly. Clean the knife after each cut. This keeps the slices pretty and clean. For more tips, check the Full Recipe for extra ideas! In this article, I covered how to create a creamy mango cheesecake. You learned about the key ingredients, step-by-step instructions, and essential tips for the best results. I shared delicious variations and how to store leftover cheesecake. Remember to pick fresh mangoes for the best flavor. With practice, your cheesecake will impress everyone. Enjoy your baking journey and savor each bite of your homemade treat!](https://fastmealmate.com/wp-content/uploads/2025/06/211bec39-7289-42a9-bfa6-8d15044691af.webp)
If you love desserts, get ready for a treat! My Creamy Mango Cheesecake is a game-changer. With its smooth texture and tropical flavor, it’s perfect for any occasion. I’ll guide you through each step, from selecting ripe mangoes to baking the ideal crust. Whether you’re a beginner or a pro, you can impress everyone with this delightful dessert. Let’s dive into the recipe and make something amazing together!
Ingredients
List of Ingredients for Creamy Mango Cheesecake
To make this delicious creamy mango cheesecake, gather the following ingredients:
– 1 ½ cups graham cracker crumbs
– ½ cup unsalted butter, melted
– 2 tablespoons granulated sugar
– 16 oz cream cheese, softened to room temperature
– 1 cup sour cream
– ¾ cup granulated sugar
– 2 teaspoons pure vanilla extract
– 1 cup ripe mango puree (fresh or canned)
– 2 large eggs, at room temperature
– 2 tablespoons cornstarch
– Fresh mango slices and mint leaves, for garnish
Measurements and Substitutions
If you need to make some swaps, here are some ideas:
– Use digestive biscuits instead of graham crackers for the crust.
– If you’re dairy-free, try cream cheese made from nuts.
– You can replace sour cream with Greek yogurt for a tangy taste.
– For a sweeter cheesecake, add more sugar to the mango puree.
Tips for Selecting Fresh Mangoes
Choosing the right mango is key to great flavor. Here’s how to pick the best ones:
– Look for mangoes that feel slightly soft when gently squeezed.
– The skin should have a bright color, often yellow or red with green.
– Check for a sweet, fruity aroma near the stem.
– Avoid any mangoes with dark spots or blemishes.
– If they are not ripe, place them in a paper bag to speed up ripening.
This recipe brings together fresh mango flavor with creamy cheesecake for a delightful treat. Enjoy making it with your favorite ingredients!
Step-by-Step Instructions
Prepping the Crust
To start, gather your ingredients. You will need graham cracker crumbs, melted butter, and sugar. First, preheat your oven to 325°F (160°C). In a bowl, mix the crumbs, melted butter, and sugar. Stir until it looks like wet sand. Next, take a 9-inch springform pan. Press the crumb mixture into the bottom evenly. Bake for 10 minutes. After baking, let it cool completely.
Preparing the Creamy Filling
Now, it’s time to make the filling. Get your cream cheese and place it in a large bowl. Beat it with an electric mixer until it’s smooth. Add in the sour cream, sugar, and vanilla extract. Mix until everything is well combined. Next, fold in the mango puree gently with a spatula. Add the eggs one at a time, mixing slowly. Be careful not to overmix. Lastly, sift the cornstarch and fold it in until the batter is smooth.
Baking and Cooling the Cheesecake
Pour the mango cheesecake batter over the cooled crust. Smooth the top with a spatula. Bake in your oven for 55 to 60 minutes. The edges should be set, while the center has a slight jiggle. Turn off the oven and leave the cheesecake inside for one hour. This helps prevent cracks. After cooling, transfer the cheesecake to the refrigerator. Chill for at least 4 hours or overnight. When ready to enjoy, slice and garnish with fresh mango and mint.
Tips & Tricks
Ensuring a Smooth and Creamy Texture
To get a smooth and creamy texture, start with room-temperature ingredients. This helps the cream cheese blend well. Use an electric mixer to beat the cream cheese until it is lump-free. Mix slowly when adding eggs, one at a time. This keeps air out of the batter. Too much air can make the cheesecake puffy and less smooth.
How to Prevent Cracking on the Cheesecake
Cracking is a common issue with cheesecakes. To avoid this, let your cheesecake cool slowly in the oven. After baking, turn off the heat and leave it inside for an hour. This gradual cooling helps the cheesecake set without sudden temperature changes. Also, avoid overmixing, especially after adding the eggs. Overmixing can cause air bubbles, which lead to cracks.
Best Tools for Making Cheesecake
Having the right tools makes cheesecake easier to make. Here are some must-have items:
– Springform pan: This allows for easy removal of the cheesecake.
– Electric mixer: A hand mixer or stand mixer helps achieve a smooth batter.
– Spatula: Use it for folding and smoothing the batter.
– Sifter: For sifting cornstarch and avoiding lumps.
– Oven thermometer: This ensures your oven is at the right temperature.
These tools will help you create a perfect creamy mango cheesecake.
Variations
Adding Different Flavors (e.g., Passion Fruit or Coconut)
You can easily add new flavors to your creamy mango cheesecake. For a tropical twist, use passion fruit puree instead of mango. This will give your cheesecake a bright, tangy taste. Simply swap the mango puree for the same amount of passion fruit. You can also add shredded coconut for a chewy texture. Mix in ½ cup of coconut with the cream cheese for a rich flavor.
Making it a No-Bake Cheesecake
If you want a no-bake version, it is simple. Just skip the baking steps. After mixing your filling, pour it over the crust. Chill it in the fridge for at least 6 hours or overnight. This will help it set without baking. The result is a lighter dessert that is just as creamy and delicious.
Dietary Modifications (Gluten-Free, Vegan Options)
You can make this cheesecake gluten-free by using gluten-free graham crackers or almond flour for the crust. For a vegan version, replace the cream cheese with a plant-based alternative. You can also use coconut cream in place of sour cream. Substitute eggs with flax eggs or applesauce for binding. These swaps will help you enjoy a creamy mango cheesecake that fits your dietary needs.
Storage Info
How to Store Leftover Cheesecake
Storing leftover cheesecake is simple. First, cover the cheesecake with plastic wrap or aluminum foil. This keeps it fresh and moist. If you used a springform pan, you can leave it in the pan. Just wrap the top well. Place it in the fridge for up to five days. I recommend enjoying it within this time for the best taste.
Freezing Cheesecake for Later Enjoyment
If you want to save your cheesecake for later, freezing is the way to go. First, let it cool completely. Then, slice it into pieces. Wrap each slice tightly in plastic wrap. After that, place the wrapped slices in a freezer-safe bag. You can freeze them for up to three months. When you are ready to eat, just thaw the slices in the fridge overnight.
Best Way to Reheat or Refresh Cheesecake
You don’t need to reheat cheesecake, but you can refresh it. If it has been frozen, let it thaw in the fridge. This keeps its smooth texture. Before serving, you can add fresh mango slices or a drizzle of fruit sauce. This gives it a fresh taste and a pretty look.
FAQs
How long does it take to make Creamy Mango Cheesecake?
It takes about 20 minutes to prep. Baking takes 55 to 60 minutes. You also need to chill it for at least 4 hours. So, the total time is around 6 hours, including chilling.
Can I use frozen mango for the recipe?
Yes, you can use frozen mango. Just thaw it and blend it into a puree. This works well if fresh mango is not available. The flavor will still be great!
What is the best way to cut cheesecake without making a mess?
To slice cheesecake neatly, use a hot knife. Dip it in hot water, then dry it off. Cut through the cheesecake slowly. Clean the knife after each cut. This keeps the slices pretty and clean.
In this article, I covered how to create a creamy mango cheesecake. You learned about the key ingredients, step-by-step instructions, and essential tips for the best results. I shared delicious variations and how to store leftover cheesecake. Remember to pick fresh mangoes for the best flavor. With practice, your cheesecake will impress everyone. Enjoy your baking journey and savor each bite of your homemade treat!
![To make this delicious creamy mango cheesecake, gather the following ingredients: - 1 ½ cups graham cracker crumbs - ½ cup unsalted butter, melted - 2 tablespoons granulated sugar - 16 oz cream cheese, softened to room temperature - 1 cup sour cream - ¾ cup granulated sugar - 2 teaspoons pure vanilla extract - 1 cup ripe mango puree (fresh or canned) - 2 large eggs, at room temperature - 2 tablespoons cornstarch - Fresh mango slices and mint leaves, for garnish If you need to make some swaps, here are some ideas: - Use digestive biscuits instead of graham crackers for the crust. - If you’re dairy-free, try cream cheese made from nuts. - You can replace sour cream with Greek yogurt for a tangy taste. - For a sweeter cheesecake, add more sugar to the mango puree. Choosing the right mango is key to great flavor. Here’s how to pick the best ones: - Look for mangoes that feel slightly soft when gently squeezed. - The skin should have a bright color, often yellow or red with green. - Check for a sweet, fruity aroma near the stem. - Avoid any mangoes with dark spots or blemishes. - If they are not ripe, place them in a paper bag to speed up ripening. This recipe brings together fresh mango flavor with creamy cheesecake for a delightful treat. Enjoy making it with your favorite ingredients! For the complete recipe, check the Full Recipe link. To start, gather your ingredients. You will need graham cracker crumbs, melted butter, and sugar. First, preheat your oven to 325°F (160°C). In a bowl, mix the crumbs, melted butter, and sugar. Stir until it looks like wet sand. Next, take a 9-inch springform pan. Press the crumb mixture into the bottom evenly. Bake for 10 minutes. After baking, let it cool completely. Now, it’s time to make the filling. Get your cream cheese and place it in a large bowl. Beat it with an electric mixer until it's smooth. Add in the sour cream, sugar, and vanilla extract. Mix until everything is well combined. Next, fold in the mango puree gently with a spatula. Add the eggs one at a time, mixing slowly. Be careful not to overmix. Lastly, sift the cornstarch and fold it in until the batter is smooth. Pour the mango cheesecake batter over the cooled crust. Smooth the top with a spatula. Bake in your oven for 55 to 60 minutes. The edges should be set, while the center has a slight jiggle. Turn off the oven and leave the cheesecake inside for one hour. This helps prevent cracks. After cooling, transfer the cheesecake to the refrigerator. Chill for at least 4 hours or overnight. When ready to enjoy, slice and garnish with fresh mango and mint. To get a smooth and creamy texture, start with room-temperature ingredients. This helps the cream cheese blend well. Use an electric mixer to beat the cream cheese until it is lump-free. Mix slowly when adding eggs, one at a time. This keeps air out of the batter. Too much air can make the cheesecake puffy and less smooth. Cracking is a common issue with cheesecakes. To avoid this, let your cheesecake cool slowly in the oven. After baking, turn off the heat and leave it inside for an hour. This gradual cooling helps the cheesecake set without sudden temperature changes. Also, avoid overmixing, especially after adding the eggs. Overmixing can cause air bubbles, which lead to cracks. Having the right tools makes cheesecake easier to make. Here are some must-have items: - Springform pan: This allows for easy removal of the cheesecake. - Electric mixer: A hand mixer or stand mixer helps achieve a smooth batter. - Spatula: Use it for folding and smoothing the batter. - Sifter: For sifting cornstarch and avoiding lumps. - Oven thermometer: This ensures your oven is at the right temperature. These tools will help you create a perfect creamy mango cheesecake. For more detailed steps, check the Full Recipe. {{image_4}} You can easily add new flavors to your creamy mango cheesecake. For a tropical twist, use passion fruit puree instead of mango. This will give your cheesecake a bright, tangy taste. Simply swap the mango puree for the same amount of passion fruit. You can also add shredded coconut for a chewy texture. Mix in ½ cup of coconut with the cream cheese for a rich flavor. If you want a no-bake version, it is simple. Just skip the baking steps. After mixing your filling, pour it over the crust. Chill it in the fridge for at least 6 hours or overnight. This will help it set without baking. The result is a lighter dessert that is just as creamy and delicious. You can make this cheesecake gluten-free by using gluten-free graham crackers or almond flour for the crust. For a vegan version, replace the cream cheese with a plant-based alternative. You can also use coconut cream in place of sour cream. Substitute eggs with flax eggs or applesauce for binding. These swaps will help you enjoy a creamy mango cheesecake that fits your dietary needs. For the full recipe, check out the [Full Recipe]. Storing leftover cheesecake is simple. First, cover the cheesecake with plastic wrap or aluminum foil. This keeps it fresh and moist. If you used a springform pan, you can leave it in the pan. Just wrap the top well. Place it in the fridge for up to five days. I recommend enjoying it within this time for the best taste. If you want to save your cheesecake for later, freezing is the way to go. First, let it cool completely. Then, slice it into pieces. Wrap each slice tightly in plastic wrap. After that, place the wrapped slices in a freezer-safe bag. You can freeze them for up to three months. When you are ready to eat, just thaw the slices in the fridge overnight. You don’t need to reheat cheesecake, but you can refresh it. If it has been frozen, let it thaw in the fridge. This keeps its smooth texture. Before serving, you can add fresh mango slices or a drizzle of fruit sauce. This gives it a fresh taste and a pretty look. For the full recipe, check the section above. It takes about 20 minutes to prep. Baking takes 55 to 60 minutes. You also need to chill it for at least 4 hours. So, the total time is around 6 hours, including chilling. Yes, you can use frozen mango. Just thaw it and blend it into a puree. This works well if fresh mango is not available. The flavor will still be great! To slice cheesecake neatly, use a hot knife. Dip it in hot water, then dry it off. Cut through the cheesecake slowly. Clean the knife after each cut. This keeps the slices pretty and clean. For more tips, check the Full Recipe for extra ideas! In this article, I covered how to create a creamy mango cheesecake. You learned about the key ingredients, step-by-step instructions, and essential tips for the best results. I shared delicious variations and how to store leftover cheesecake. Remember to pick fresh mangoes for the best flavor. With practice, your cheesecake will impress everyone. Enjoy your baking journey and savor each bite of your homemade treat!](https://fastmealmate.com/wp-content/uploads/2025/06/211bec39-7289-42a9-bfa6-8d15044691af-300x300.webp)
![For a delicious S'mores Brownie Skillet Dip, gather the following ingredients: - 1 cup all-purpose flour - 1 cup granulated sugar - 1/2 cup unsweetened cocoa powder - 1/2 teaspoon baking powder - 1/4 teaspoon salt - 1/2 cup unsalted butter, melted - 2 large eggs - 1 teaspoon vanilla extract - 1 cup semi-sweet or dark chocolate chips - 1 cup mini marshmallows - 1/2 cup graham cracker crumbs - Extra graham crackers for serving These ingredients blend together to create a rich, chocolatey dip. The all-purpose flour and cocoa give it a brownie base. The sugar adds sweetness, while the baking powder helps it rise slightly. The melted butter keeps it rich and moist. The eggs and vanilla extract add flavor and structure. Chocolate chips provide bursts of chocolatey goodness. Mini marshmallows, when baked, become soft and gooey, adding that classic S'mores taste. Finally, the graham cracker crumbs create a crunchy topping, perfect for dipping. Use this list to prepare your dip. Following these steps ensures you get the best flavor and texture. For full details, check out the Full Recipe. - Preheat oven to 350°F (175°C). This helps the dip cook evenly. - In a large bowl, mix the dry ingredients: flour, sugar, cocoa powder, baking powder, and salt. Stir well to combine. - In another bowl, combine the wet ingredients: melted butter, eggs, and vanilla extract. Mix gently until they blend together. - Pour the wet mix into the dry mix. Stir until just combined. Do not overmix; a few lumps are okay. - Now, fold in the chocolate chips. This adds rich flavor and texture to the dip. - Grease a 10-inch cast-iron skillet or oven-safe dish. Pour the brownie batter into the skillet. Spread it evenly. - Top the batter with mini marshmallows and graham cracker crumbs. This gives the dip that classic s'mores taste. - Place the skillet in the preheated oven. Bake for 20-25 minutes. The edges should be set, and the center should be soft. The marshmallows will puff up and turn golden. - Once baked, take the skillet out of the oven. Let it cool for a few minutes. This makes it safe to eat. Enjoy this warm dip with extra graham crackers for a fun treat! To avoid overmixing the batter, mix just until the wet and dry ingredients blend. You want some lumps for that fudgy texture. Too much mixing makes the brownies tough. For the perfect marshmallow topping, add them during the last few minutes of baking. This lets them brown nicely without burning. Keep an eye on them. You want golden, not charred! The best snacks for dipping are graham crackers, of course! You can also use fruit like strawberries or bananas. They add a nice, fresh taste to the rich dip. For a great presentation, drizzle melted chocolate on top before serving. Add some colorful fruit on the side. It makes the dish look fun and inviting. {{image_4}} You can make this dessert fit your needs with some easy swaps. If you want a gluten-free option, use gluten-free flour. It works well and keeps the taste great. You can also switch the chocolate. Dark chocolate gives a rich taste, while milk chocolate is sweeter. Choose what you like best! Add more fun to your dip with flavor extras. Chopped nuts add crunch and taste. Walnuts or pecans work best. If you love sweetness, drizzle some caramel over the top. It makes the dip even more special. You can also try different extracts. Almond extract gives a nice twist. Coconut extract can add a tropical touch. Just use a little bit to taste and enjoy! To keep your S'mores Brownie Skillet Dip fresh, store it in the fridge. First, let it cool completely. Then, cover the skillet tightly with plastic wrap or transfer it to an airtight container. When stored this way, it can last for about 3 days. If you have more than you can eat, freezing is an option. Scoop the dip into a freezer-safe container. Leave a little space at the top, as it may expand. It can last up to 2 months in the freezer. Just remember to label the container with the date for easy tracking. When it's time to enjoy your leftovers, reheating is simple. You can warm it up in the oven. Preheat the oven to 350°F (175°C). Place the skillet in the oven for about 10-15 minutes. This helps keep the dip gooey and warm. You can also reheat in the microwave if you're short on time. Use a microwave-safe bowl and heat in short bursts. Stir between each burst to ensure even warming. This way, the marshmallows remain soft and fluffy, just like when it was first made. Can I make this dish ahead of time? Yes, you can prepare the batter ahead. Just store it in the fridge. Bake it right before serving for best results. What can I use if I don’t have a cast-iron skillet? You can use any oven-safe dish. A glass or ceramic baking dish works well too. Just make sure to grease it well. How can I make it less sweet? To cut back on sweetness, use less sugar or dark chocolate. You can also add a pinch of salt to balance the flavors. What is the best way to serve this dip? Serve it warm with extra graham crackers. You can also add fresh fruit like strawberries or bananas for dipping. - Check out the [Full Recipe] for detailed instructions. This blog post covers a fun and tasty s'mores brownie skillet dip. You learned how to mix the right ingredients and bake this treat perfectly. I shared tips to make it even better and suggestions for serving. With storage info, you can save leftovers too. Enjoy making this sweet dip for your next gathering! It’s easy, fun, and sure to impress. Remember that you can personalize it with your favorite flavors. Happy baking!](https://fastmealmate.com/wp-content/uploads/2025/07/00705dfa-6977-4536-b8b9-b3715ee69892-768x768.webp)
![To make a tasty Blueberry Peach Crostata, you’ll need a few simple ingredients. Here’s what to gather: - 1 cup fresh blueberries - 2 ripe peaches, diced (about 2 cups) - 1/4 cup granulated sugar - 1 tablespoon freshly squeezed lemon juice - 1 tablespoon cornstarch - 1 teaspoon pure vanilla extract - 1 pre-made pie crust (or homemade for an artisanal touch) - 1 egg, beaten (for gloss and color) - 1 tablespoon unsalted butter, cut into small pieces - A pinch of fine sea salt - Optional: powdered sugar for a final dusting Each ingredient plays a key role in the taste and texture of the crostata. The fresh blueberries and peaches bring sweetness and juiciness. The sugar enhances their natural flavors, while lemon juice adds a bright zing. Cornstarch helps thicken the filling, keeping it from getting too runny. Using vanilla extract adds depth to the fruit, and a pinch of sea salt balances the sweetness. For the crust, you can choose a pre-made option for ease or whip up your own for that homemade touch. The beaten egg gives the edges a lovely golden color, while unsalted butter adds richness. Don’t forget the powdered sugar for a sweet finish on top! Ready to gather these ingredients? You can find the full details in the [Full Recipe]. 1. Preheat the Oven: Start by heating your oven to 375°F (190°C). This step ensures the crostata cooks evenly. 2. Prepare the Baking Sheet: Line a baking sheet with parchment paper. This helps with easy cleanup later. 3. Prepare the Fruit Filling: In a bowl, mix fresh blueberries and diced peaches. Add granulated sugar, lemon juice, cornstarch, vanilla extract, and a pinch of sea salt. Toss gently. Let this mixture rest for about 10 minutes. This helps the flavors blend. 4. Roll Out the Pie Crust: Roll out your pie crust on a floured surface. Aim for a circle about 12 inches wide. If you use a store-bought crust, make sure it is cold for easy handling. 1. Shape the Crostata: Place the rolled crust on your baking sheet. Spoon the fruit mixture into the center, leaving a 2-inch border. 2. Fold the Edges: Carefully fold the crust edges over the filling. Create pleats to give it a rustic look. Make sure some fruit shows at the center. 3. Apply the Egg Wash: Use a pastry brush to coat the crust edges with the beaten egg. This gives it a nice golden color when baked. 4. Dot with Butter: Scatter small pieces of butter over the fruit filling. This adds extra richness during baking. 1. Bake: Place your crostata in the preheated oven. Bake for 30-35 minutes. Look for a golden-brown crust and bubbling filling. 2. Cool Before Serving: Once baked, let the crostata cool on the sheet for 10 minutes. This makes it easier to slice. Dust with powdered sugar if you like, then serve warm or at room temperature. You can find the Full Recipe for more detailed steps and tips. Enjoy your delicious Blueberry Peach Crostata! To create the best crust, start with cold ingredients. This helps the crust stay flaky. Use your fingers to mix the butter into the flour until it looks like coarse crumbs. Do not overwork the dough; handle it gently. Balancing sweetness and acidity is key. Blueberries are sweet, while peaches add a nice tang. Use lemon juice to brighten the flavors. Taste your filling before baking. If it seems too sweet, add a tiny bit of salt. This will balance the flavors better. For a beautiful display, serve slices on a rustic wooden board. Garnish with fresh mint leaves for color. You can also dust the top with powdered sugar for a nice finish. Pair your crostata with a scoop of vanilla ice cream or a dollop of whipped cream. The cold creaminess goes perfectly with the warm fruit filling. You can also try it with a drizzle of honey for an extra touch. If your crust is too soggy, it may need more time in the oven. Check the bottom of the crust to see if it is golden brown. You can also try baking it a few minutes longer. To avoid over-baking, keep an eye on the crostata as it cooks. The crust should be golden and the filling should bubble. If you notice it browning too quickly, cover it lightly with foil. This will help protect it while it finishes baking. For the full recipe, visit the link. {{image_4}} You can switch up the fruits in your crostata. For a fun twist, try using apricots or cherries. Both fruits bring a unique taste. They also pair well with blueberries and peaches. If you need a gluten-free option, use almond flour or a gluten-free pie crust. This keeps your dessert delicious and safe for gluten-sensitive friends. Want to add some extra flavor? Sprinkle in some cinnamon or nutmeg. These spices add warmth and depth to the filling. You can also try fresh herbs like basil or mint. They give a fresh twist that brightens the fruit flavors. When it comes to serving, think outside the box. A drizzle of homemade caramel sauce or a scoop of creamy vanilla ice cream works wonders. For special occasions, serve slices on a beautiful platter. Add fresh mint leaves for color and aroma. Your guests will love the visual and tasty touch! For the complete recipe, check out the Full Recipe section. To keep your blueberry peach crostata fresh, store it in the fridge. First, let it cool completely. Then, cover it with plastic wrap or place it in an airtight container. This helps keep the crust crispy and the filling juicy. You can enjoy it for up to three days. If you want to save it for longer, freezing is a great option. Wrap the crostata tightly in plastic wrap, then in aluminum foil. This method helps prevent freezer burn. You can freeze it for up to three months. When you're ready to eat it, just thaw it in the fridge overnight. To reheat the crostata, the oven is your best friend. Preheat it to 350°F (175°C). Place the crostata on a baking sheet and warm it for about 10-15 minutes. This method keeps the crust nice and flaky. If you want to refresh the flavors, brush a little melted butter on top before reheating. This adds richness and helps the fruit flavors shine. Enjoy your crostata warm for the best taste! Can I make the crostata ahead of time? Yes, you can make the crostata ahead. Prepare the filling and crust separately. Store them in the fridge for a day. When ready, assemble and bake. This keeps the crust fresh. How do I know when the crostata is done baking? Look for a golden brown crust and bubbling filling. A toothpick should slide easily through the crust. If it’s too soft, bake a few more minutes. What’s the difference between a crostata and a galette? A crostata is a rustic pie, often filled with fruit. A galette is similar but usually has a more free-form shape. Both have a flaky crust. They are delicious and easy to make. Can I use frozen fruit in the recipe? Yes, frozen fruit works well. Just thaw and drain excess liquid. This keeps the filling from being too watery. How do I keep the crust from getting soggy? To prevent a soggy crust, sprinkle cornstarch on the bottom before adding fruit. This absorbs extra juices. Bake until the crust is golden for best results. Making the crostata vegan To make a vegan crostata, replace the egg wash with a plant-based milk. Use a vegan pie crust. The filling stays the same, ensuring a tasty dessert. Tips for reducing sugar in the recipe You can cut the sugar by half. Use ripe fruits for natural sweetness. Add a touch of honey or maple syrup if needed. This keeps the flavor balanced and fresh. For the Full Recipe, check the main section. In this post, we covered how to make a delicious fruit crostata with fresh ingredients. You learned about the necessary ingredients, step-by-step instructions, and useful tips for perfecting your dessert. We also explored variations and storage options to extend its life. Now, you’re equipped to create your own stunning crostata. Experiment with flavors and enjoy the praise from family and friends! Your new dessert will impress at any gathering.](https://fastmealmate.com/wp-content/uploads/2025/06/584381ba-fe5e-4dcd-ab97-e37815fc2576-768x768.webp)