
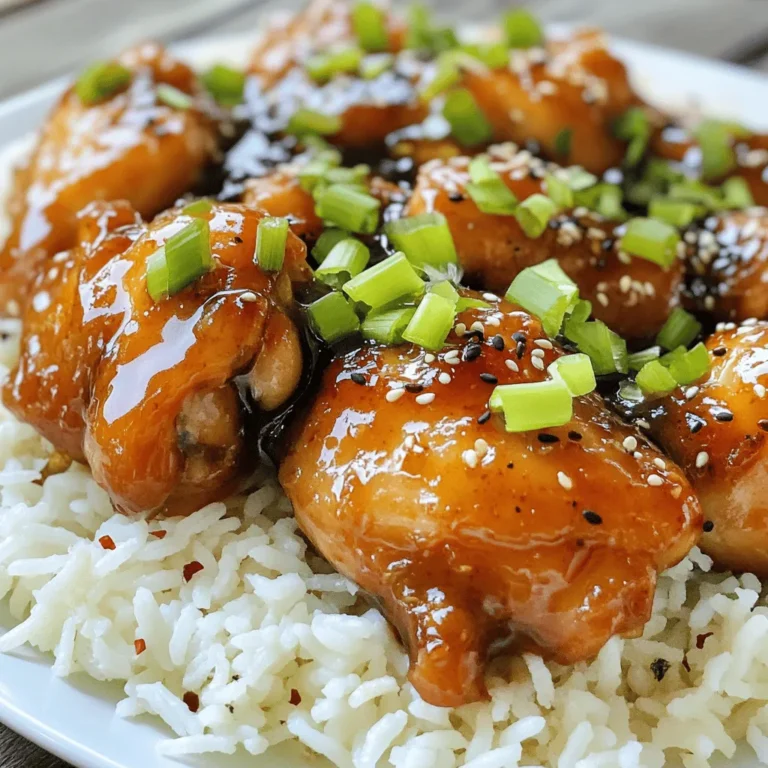
Texas-Style Rattlesnake Bites Flavorful and Simple Treat

Get ready to spice up your snack game with Texas-Style Rattlesnake Bites! This flavorful and simple treat is perfect for gatherings or game days. Whether you’re a seasoned cook or a kitchen newbie, I’ll walk you through easy steps, tasty options, and expert tips. Discover how to create this crowd-pleaser that will have everyone asking for more. Let’s dive into the delicious world of rattlesnake bites!
Ingredients
Main Ingredients for Texas-Style Rattlesnake Bites
To make Texas-Style Rattlesnake Bites, you need fresh ingredients. Here’s what you will need:
– 1 lb ground chicken or turkey
– 1 cup cream cheese, softened to room temperature
– 1 cup shredded pepper jack cheese
– 1/2 cup diced green onions (scallions)
– 1/2 cup diced jalapeños (fresh or pickled)
– 1 tablespoon garlic powder
– 1 teaspoon smoked paprika
– Salt and black pepper, to taste
– 1 cup breadcrumbs (or crushed tortilla chips)
– 1 egg, beaten until frothy
– Cooking oil, for frying
These ingredients create a rich and flavorful mix. The cream cheese adds creaminess, while the pepper jack cheese gives a spicy kick.
Suggested Alternatives for Special Diets
If you have special diet needs, you can still enjoy these bites. Here are some options:
– Ground Meat: Use ground beef or a plant-based meat for a different flavor.
– Dairy-Free: Substitute cream cheese with a dairy-free option.
– Gluten-Free: Replace breadcrumbs with gluten-free breadcrumbs or crushed corn chips.
– Low-Calorie: Use lean ground turkey and reduce the amount of cheese.
These swaps help ensure everyone can enjoy this dish.
Spice Level Adjustments
To customize the heat, play with the jalapeños. Here’s how:
– Mild: Use fewer jalapeños or remove their seeds.
– Medium: Keep the seeds but use fresh jalapeños.
– Hot: Add more jalapeños or include diced serrano peppers.
Adjusting spice lets you cater to your taste and your guests’ preferences.
Step-by-Step Instructions
Preparing the Mixture
First, gather all your ingredients. In a large bowl, mix the ground chicken or turkey with softened cream cheese. Add shredded pepper jack cheese, diced green onions, and diced jalapeños. The jalapeños add a nice kick, so choose fresh or pickled based on your taste. Sprinkle in garlic powder, smoked paprika, and some salt and pepper. Use a spatula or your hands to mix everything well until it becomes a smooth blend. This mixture forms the heart of your Texas-Style Rattlesnake Bites.
Breading the Rattlesnake Bites
Next, set up your breading station. Pour the beaten egg into one bowl and place the breadcrumbs or crushed tortilla chips in another. With clean hands, take a portion of the mixture and roll it into a ball, about 1-2 inches wide. Dip each ball into the egg first, covering it fully. Then, roll it in the breadcrumbs, ensuring it gets a nice coating. This step gives your bites a crispy texture when cooked.
Frying and Cooking Tips
Heat your frying oil in a deep skillet or frying pan. Aim for a temperature of 350°F (175°C). It’s important not to overcrowd the pan. Carefully lower the breaded bites into the hot oil. Fry them until they turn golden brown, which should take about 4-5 minutes. Use a slotted spoon to lift them out and place them on a plate lined with paper towels. This helps absorb any extra oil. Serve the bites warm with your favorite dipping sauces.Enjoy!
Tips & Tricks
Achieving the Perfect Texture
To get that ideal texture, focus on your mixing. You want a smooth blend of cream cheese and meat. Avoid overmixing; it can make the bites tough. The cheese adds creaminess, while breadcrumbs give crunch. If you want extra crunch, use crushed tortilla chips instead of breadcrumbs.
Common Mistakes to Avoid
A common mistake is overcrowding the pan when frying. This can lower the oil’s temperature. Fry in small batches for even cooking. Another mistake is not letting the oil heat enough. Test the oil with a small piece of the mixture. If it sizzles, you’re ready. Lastly, don’t skip the cooling step. Let the bites drain on paper towels to remove excess oil.
Pairing Suggestions for Dipping Sauces
Dipping sauces can elevate your rattlesnake bites. I recommend a creamy ranch for a classic taste. If you like heat, try spicy chipotle mayo. Another great option is a zesty lime cilantro sauce. You can even serve them with salsa for a fresh kick. Don’t be afraid to mix and match for flavor fun!

Variations
Homemade Variations of Texas-Style Rattlesnake Bites
You can easily make Texas-Style Rattlesnake Bites your own. Start with the main recipe, then mix in fun ingredients. Consider using different cheeses like cheddar or gouda. You can even add chopped bacon for a smoky flavor. For a twist, try adding some cooked spinach or artichokes for extra veggies. These small changes keep the dish fresh and exciting.
Adding Heat: Creative Ingredient Enhancements
If you love spice, there are many ways to kick up the heat. Use extra jalapeños or try adding diced habaneros for a fiery bite. You can also mix in hot sauce into the cream cheese blend. A sprinkle of cayenne pepper will add a nice touch. For a unique twist, experiment with spicy sausage instead of chicken. Each option brings a new flavor to the dish.
Healthier Baking Options
For a lighter version, consider baking rather than frying the bites. Simply preheat your oven to 400°F (200°C). Line a baking sheet with parchment paper. Arrange the bites on the sheet and spray them lightly with cooking oil. Bake for about 20 minutes, flipping halfway through. This method gives you crispy bites without the extra oil. You can also swap out cream cheese for Greek yogurt for a healthier twist. With these options, you can enjoy the same great taste with fewer calories.
Storage Info
Proper Refrigeration Techniques
To keep Texas-Style Rattlesnake Bites fresh, store them in an airtight container. Make sure they cool down first. Place a paper towel at the bottom to absorb moisture. This helps prevent sogginess. You can keep them in the fridge for up to three days.
Reheating Tips for Optimal Flavor
When you’re ready to enjoy your leftovers, reheating them right is key. Preheat your oven to 350°F (175°C). Place the bites on a baking sheet. Bake for about 10-12 minutes. This method keeps them crispy. You can also use an air fryer for 6-8 minutes for a quicker option.
Freezing Instructions for Future Enjoyment
Want to save some for later? You can freeze the uncooked bites. After forming them, arrange them on a baking sheet lined with parchment paper. Freeze until firm, then transfer to a freezer bag. They will last for up to three months. When ready to cook, fry them straight from frozen. Just add a couple of extra minutes to the cooking time.
FAQs
What are Texas-Style Rattlesnake Bites?
Texas-Style Rattlesnake Bites are tasty treats made from ground chicken or turkey. They mix cream cheese, pepper jack cheese, green onions, and jalapeños. These bites are then breaded and fried until golden. They offer a spicy kick and creamy texture. People love them as snacks or appetizers.
Can I use other meats instead of chicken or turkey?
Yes, you can! Ground beef or pork works well too. Adjust the cooking time as needed. If you use beef, aim for lean cuts to keep them juicy. Experimenting with other meats can add new flavors to your bites.
How can I make this recipe gluten-free?
To make Texas-Style Rattlesnake Bites gluten-free, simply use gluten-free breadcrumbs. You can also crush gluten-free tortilla chips for a crunchy texture. Always check labels on cheese and other ingredients for hidden gluten.
What are some serving ideas for Texas-Style Rattlesnake Bites?
I love serving these bites with creamy ranch or spicy chipotle mayo. You can also pair them with salsa or guacamole for a fresh twist. For a fun touch, arrange them on a colorful platter with fresh lime wedges and dips in small bowls.
Is there a vegetarian version of this recipe?
Absolutely! For a vegetarian option, swap the meat for a mix of black beans and corn. You can add cooked quinoa or lentils for extra protein. Keep the cream cheese and pepper jack cheese for that creamy taste. This version still delivers great flavor and texture.
Texas-Style Rattlesnake Bites offer unique flavors you can easily create at home. We covered the key ingredients, including alternatives for special diets and ways to adjust spice levels. I shared step-by-step cooking instructions, tips for texture, and common mistakes to avoid. Different variations let you personalize this dish while keeping it healthy. Lastly, I provided storage info for future meals and answered common FAQs.
Experimenting with your own version of this dish can be fun and rewarding. Enjoy cooking!

![- 2 salmon fillets (approximately 6 oz each) - 1 pound large shrimp, peeled and deveined - 2 tablespoons Cajun seasoning (store-bought or homemade) - 2 tablespoons olive oil - 1 red bell pepper, diced - 1 green bell pepper, diced - 1 medium onion, diced - 3 cloves garlic, minced - 1 cup cherry tomatoes, halved - 1 cup coconut milk - 2 green onions, chopped (for garnish) - Fresh parsley, chopped (for garnish) - Salt and pepper to taste The ingredients for Cajun salmon and shrimp are simple yet packed with flavor. The salmon fillets and shrimp provide a great base. You can choose fresh or frozen shrimp, but I recommend fresh for the best taste. Cajun seasoning adds that unique kick. You can buy it or make your own with spices like paprika, cayenne, and garlic powder. Next, the colorful bell peppers and onion bring a sweet crunch. Garlic adds a nice aroma and flavor. Cherry tomatoes give a juicy burst. Coconut milk adds creaminess and balance to the spice. Finally, green onions and parsley brighten the dish. This dish is healthy and filling. Each serving has around 400 calories. You get about 30 grams of protein, 20 grams of fat, and 15 grams of carbs. It also has 3 grams of fiber, which is great for digestion. Pair this dish with fluffy rice or a fresh salad. Rice soaks up the sauce nicely. A crisp green salad adds freshness. For drinks, a cold white wine or iced tea works well. Enjoying this dish with a light beverage enhances the flavors. For the full recipe, check out the detailed cooking instructions. Start by patting the salmon and shrimp dry with paper towels. This helps them sear nicely. Season the salmon on both sides with one tablespoon of Cajun seasoning. For the shrimp, toss them with the remaining seasoning in a bowl. Make sure the shrimp are covered well. Set both aside while you prepare the rest. Heat one tablespoon of olive oil in a large skillet over medium heat. Add the diced onion, red bell pepper, and green bell pepper. Sauté these vegetables for about five minutes. Stir them occasionally until they soften. Then, add the minced garlic and sauté for one more minute. This brings out a lovely flavor. Push the veggies to one side of the skillet. Place the seasoned salmon fillets skin-side down in the other side. Cook them for about four to five minutes. When they are golden brown, carefully flip the fillets. Cook for another four minutes. The salmon should flake easily when done. Remove it and set it aside on a plate. In the same skillet, add the other tablespoon of olive oil. Next, toss in the seasoned shrimp. Cook them for about two to three minutes, stirring gently. They should turn pink and opaque. This shows they are done and ready for the next step. Now, add the halved cherry tomatoes to the skillet with the shrimp. Pour in one cup of coconut milk and stir well. Bring this mixture to a gentle simmer. Let it cook for another two to three minutes. Season with salt and pepper to your liking. This sauce is rich and creamy! Carefully return the cooked salmon fillets to the skillet. Nestle them among the shrimp and sauce. Spoon some sauce over the salmon to keep it moist. Let everything cook together for an additional two minutes. This melds the flavors beautifully. For the full recipe, check out the section above. Enjoy your Cajun salmon and shrimp! To cook salmon and shrimp just right, timing is key. Salmon takes about 8-10 minutes total. Cook it for 4-5 minutes on one side, then flip. For shrimp, cook for about 2-3 minutes until they turn pink. Use a fork to test the salmon. If it flakes easily, it’s ready. Shrimp should be opaque and firm. You can make your own Cajun seasoning at home. Use these basic spices: - Paprika - Cayenne pepper - Onion powder - Garlic powder - Black pepper - Oregano - Thyme Adjust the heat by adding more cayenne for spice or less for a milder flavor. This way, you control the heat level to fit your taste. Plating is important for making your dish pop. Serve the salmon and shrimp on a large platter. Drizzle some extra coconut sauce around the edge for flair. Add bright green garnishes like chopped parsley and green onions. They bring color and freshness. You can also add a side of fluffy rice or crusty bread to soak up that delicious sauce. {{image_4}} You can switch up the proteins in this dish. Try using cod or tilapia instead of salmon. Both of these fish cook well and soak up flavors nicely. For shrimp lovers, scallops can add a sweet touch. If you're looking for vegetarian choices, consider using hearty vegetables. Zucchini and bell peppers work great when grilled. You can also use firm tofu, which absorbs flavors and adds protein. Changing the seasoning can add a new twist. If you want a milder taste, reduce the Cajun seasoning. You can also blend in herbs like thyme or basil. For more heat, add cayenne pepper or sliced jalapeños. These spices will give your dish a nice kick. Experimenting with flavors can make each meal special. Pair this dish with tasty sides to make it shine. Fluffy rice or quinoa absorbs the sauce well. A fresh salad with greens and citrus can balance the spices. For gatherings, serve it family-style on a large platter. This way, everyone can dig in and share the joy of this delicious meal. Don't forget to have some crusty bread on the side. It’s perfect for soaking up the creamy sauce from the Cajun salmon and shrimp. For the full experience, check out the Full Recipe for details. To keep your Cajun salmon and shrimp fresh, refrigerate leftovers within two hours. Place them in airtight containers. This keeps moisture in and flavors intact. You can store them for up to three days. It’s best to separate salmon from shrimp if you want to maintain their textures. When reheating, avoid drying out your seafood. The best method is to use a skillet. Heat it over low heat, adding a splash of water or broth. Cover the pan to trap steam. This keeps the seafood moist and flavorful. You can also use a microwave. Just cover it with a damp paper towel to keep it from drying out. If you want to store your dish for a longer time, freezing is a good option. Let the dish cool completely first. Then, wrap it tightly in plastic wrap and foil to prevent freezer burn. You can freeze it for up to three months. When ready to eat, thaw it in the fridge overnight. Reheat it gently on the stove. This method preserves both taste and texture. Yes, you can use frozen shrimp. Just thaw them before cooking. This helps the shrimp cook evenly. I suggest placing them in cold water for about 20 minutes. This method keeps them firm and tasty. The salmon is done when it flakes easily with a fork. Check for a light pink color inside. It should not be translucent. If you have a food thermometer, aim for 145°F. This ensures it’s safe to eat. If you don't have coconut milk, try cream or milk. You can also use almond milk for a lighter option. Each substitute changes the dish's flavor a bit, but it will still be tasty. Absolutely! This recipe is perfect for meal prep. Cook a batch and store it in airtight containers. It keeps well in the fridge for up to three days. Reheat it gently to enjoy a quick meal. Cajun seasoning has a mild to medium spice level. It adds flavor without being too hot. If you prefer less heat, you can use less seasoning. For more spice, add a pinch of cayenne pepper. Yes, feel free to add more vegetables! Zucchini, mushrooms, or spinach are great choices. Just make sure to chop them small. Add them when you sauté the onions and peppers for even cooking. For the full recipe, click [Full Recipe]. This article covered a tasty seafood dish featuring salmon and shrimp, seasoned with Cajun flair. You learned about the ingredients, cooking steps, and ways to adapt the recipe. Remember to achieve perfect doneness with both the salmon and shrimp for the best result. Don't hesitate to play with flavors or pairings to suit your taste. Making this dish can impress family or friends while keeping it simple. Enjoy your cooking journey and share this recipe with others!](https://fastmealmate.com/wp-content/uploads/2025/06/17932171-8cf4-4553-ac77-c5634fbfd80e-768x768.webp)

![- 1 cup pumpkin puree - 1 cup water - 1 cup brown sugar - 1 tablespoon pure vanilla extract - 1 teaspoon ground cinnamon - 1 teaspoon ground nutmeg - 1/2 teaspoon ground ginger - 1/4 teaspoon ground cloves Substitutes for pumpkin puree If you cannot find pumpkin puree, you can use butternut squash puree. This option works well and gives a similar flavor. You can roast and blend the squash until smooth for best results. The importance of using pure vanilla extract Using pure vanilla extract is key for the best flavor. I avoid imitation vanilla as it lacks the depth you need for this syrup. The pure extract enhances the sweetness and adds warmth to the spice mix. How to adjust serving sizes You can easily scale the recipe up or down. If you want more syrup, just double the ingredients. For a smaller batch, cut everything in half. Alternative ways to use pumpkin spice syrup This syrup is not just for coffee. Drizzle it on pancakes and waffles or mix it into yogurt. You can even stir it into oatmeal or smoothies for a fall twist. - Blending pumpkin puree and water Start by adding 1 cup of pumpkin puree and 1 cup of water to a medium saucepan. Use a whisk to blend these together. Make sure there are no lumps. A smooth mixture is essential for a nice syrup. - Heating the mixture Place the saucepan on medium heat. Keep a close eye on it as you heat. You want the mixture to reach a gentle simmer, not a boil. This helps develop the flavors without burning. - Adding brown sugar Once your mixture is simmering, gradually add 1 cup of brown sugar. Stir continuously until all the sugar dissolves. This will make the mixture glossy and sweet. - Stirring in spices After the sugar dissolves, add in 1 tablespoon of pure vanilla extract, 1 teaspoon of ground cinnamon, 1 teaspoon of ground nutmeg, 1/2 teaspoon of ground ginger, and 1/4 teaspoon of ground cloves. Stir well to mix the spices evenly into the syrup. - Simmering for flavor development Let the mixture simmer gently for 10-15 minutes. Stir it occasionally. You will notice the syrup starting to thicken. This thickening shows that the flavors are blending together nicely. - The thickening process Keep an eye on the syrup as it cooks. It should thicken slightly, which is a good sign that it is ready. The longer it simmers, the richer the flavor will be. - Straining the syrup Once cooked, remove the saucepan from heat. Let the syrup cool down to room temperature. After cooling, strain it through a fine-mesh sieve into a clean container. This step removes any solids, giving you a smooth syrup. - Storing the syrup properly Pour your finished syrup into an airtight bottle or jar. Store it in the refrigerator. It will stay fresh for up to two weeks. Now, you can use it in your favorite drinks and desserts! For the full recipe, check out the complete details. - Overheating the mixture: Heating too high can burn the sugar. Keep it to medium heat and watch closely. - Not stirring enough while cooking: Stirring helps mix flavors and prevents sticking. Always keep the spoon moving. - Ensuring the right thickness: To check thickness, dip a spoon and see if syrup coats it. It should feel sticky but not too thick. - Enhancing flavors with additional spices: You can add a pinch of allspice or cardamom for extra depth. Experiment to find your favorite mix. - Creative serving ideas: Drizzle syrup over pancakes, waffles, or even ice cream. It adds a nice touch to your treats. - Pairing suggestions with recipes: Use your syrup in lattes or hot chocolate. It’s also great in oatmeal or yogurt for a fall twist. For the full recipe, check out the details! {{image_4}} You can boost the taste of pumpkin spice syrup in fun ways. Try adding a vanilla bean for a rich flavor. Slice the bean open and scrape out the seeds. Mix these seeds into the syrup for a creamy touch. Another option is caramel. Drizzle in some caramel sauce for a sweet twist. This adds depth and a unique flavor to your syrup. You can even create a spiced pumpkin version. Mix in extra spices like allspice or cardamom for a new taste. These small changes can make a big difference. As the seasons change, so can your syrup. For the holidays, add flavors like peppermint or gingerbread. This gives your syrup a festive flair. You can also use different types of pumpkin. Try butternut squash or sweet potato for a unique twist. Each type brings its own flavor and sweetness, making your syrup special. Experiment with these variations to find your favorite. Pumpkin spice syrup is not just for drinks. You can use it in many recipes. Add it to pancakes or waffles for a sweet breakfast. It also works great in desserts like cakes and pies. Drizzle it on ice cream for a fall-inspired treat. You can even stir it into your coffee or tea for a warm drink. The options are endless! Check out the [Full Recipe] for more ideas. Pumpkin spice syrup lasts about two weeks in the refrigerator. Store it in an airtight container. For best taste, use it fresh. You can freeze the syrup to extend its life. It keeps well in ice cube trays. Just thaw before use. Use glass jars or plastic bottles for storage. Ensure they are airtight to keep the syrup fresh. Label your containers with the date you made the syrup. This helps you keep track of its freshness. Look for changes in color or smell. If it smells off or looks cloudy, it’s time to toss it. If you see mold, do not use it. Always taste a small amount before using. If it tastes strange, throw it away. Pumpkin spice syrup includes simple, tasty ingredients. Here are the main ones: - 1 cup pumpkin puree - 1 cup water - 1 cup brown sugar - 1 tablespoon pure vanilla extract - 1 teaspoon ground cinnamon - 1 teaspoon ground nutmeg - 1/2 teaspoon ground ginger - 1/4 teaspoon ground cloves You can change or add some ingredients too. For example, you can use maple syrup instead of brown sugar. This gives a unique flavor twist. You can use this syrup in many ways. Here are some fun ideas: - Drizzle it over pancakes or waffles. - Stir it into coffee or lattes. - Add it to smoothies for a fall flavor. - Mix it with oatmeal or yogurt. - Use it in baking for cookies or cakes. These ideas help you enjoy that yummy pumpkin spice taste in all your meals. Yes, you can make pumpkin spice syrup vegan easily. Just swap out a few things: - Use agave syrup or maple syrup instead of brown sugar. - Ensure your vanilla extract is alcohol-free. These changes keep the flavor while making it plant-based. You can find pumpkin spice syrup in many stores. Look in these places: - Local grocery stores often have it. - Check specialty coffee shops or cafes. - Online shops like Amazon or specialty food sites. When buying, read the label. Some brands add extra flavors or sugars. Homemade pumpkin spice syrup lasts about two weeks in the fridge. To store it well: - Keep it in an airtight jar or bottle. - Always use a clean spoon to scoop out syrup. If you have more, you can freeze it. Just pour it into ice cube trays. This way, you can use it later in drinks or desserts. Pumpkin spice syrup is simple to make and adds great flavor to many dishes. We covered key ingredients, steps for cooking, and tips for serving. You can easily switch ingredients and try different flavors. Remember to store your syrup well to keep it fresh. With this guide, you can create or enjoy homemade pumpkin spice syrup all season long. Explore all the ways to use it today!](https://fastmealmate.com/wp-content/uploads/2025/07/e167359e-7abc-4f0d-8f6c-a8401fb81292-768x768.webp)