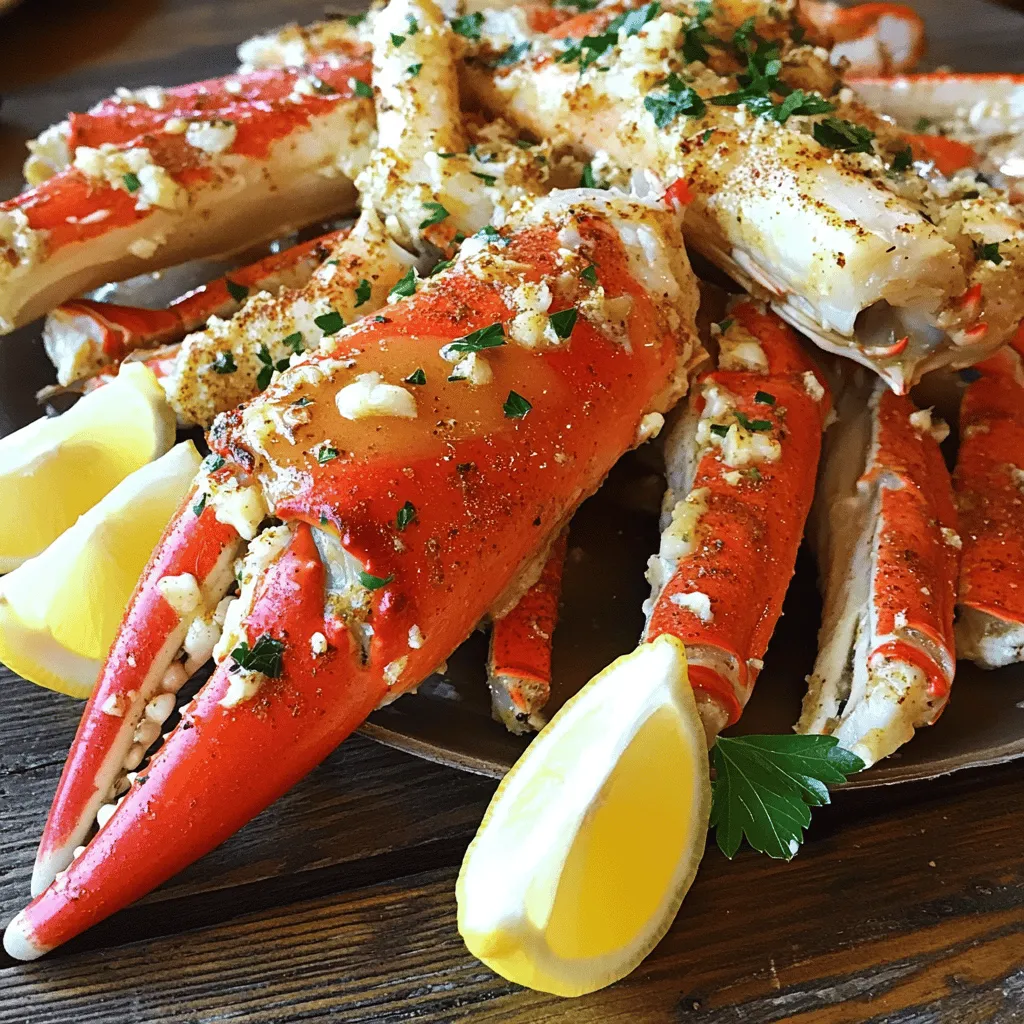
Homemade Baked Crab Legs Tasty and Simple Recipe
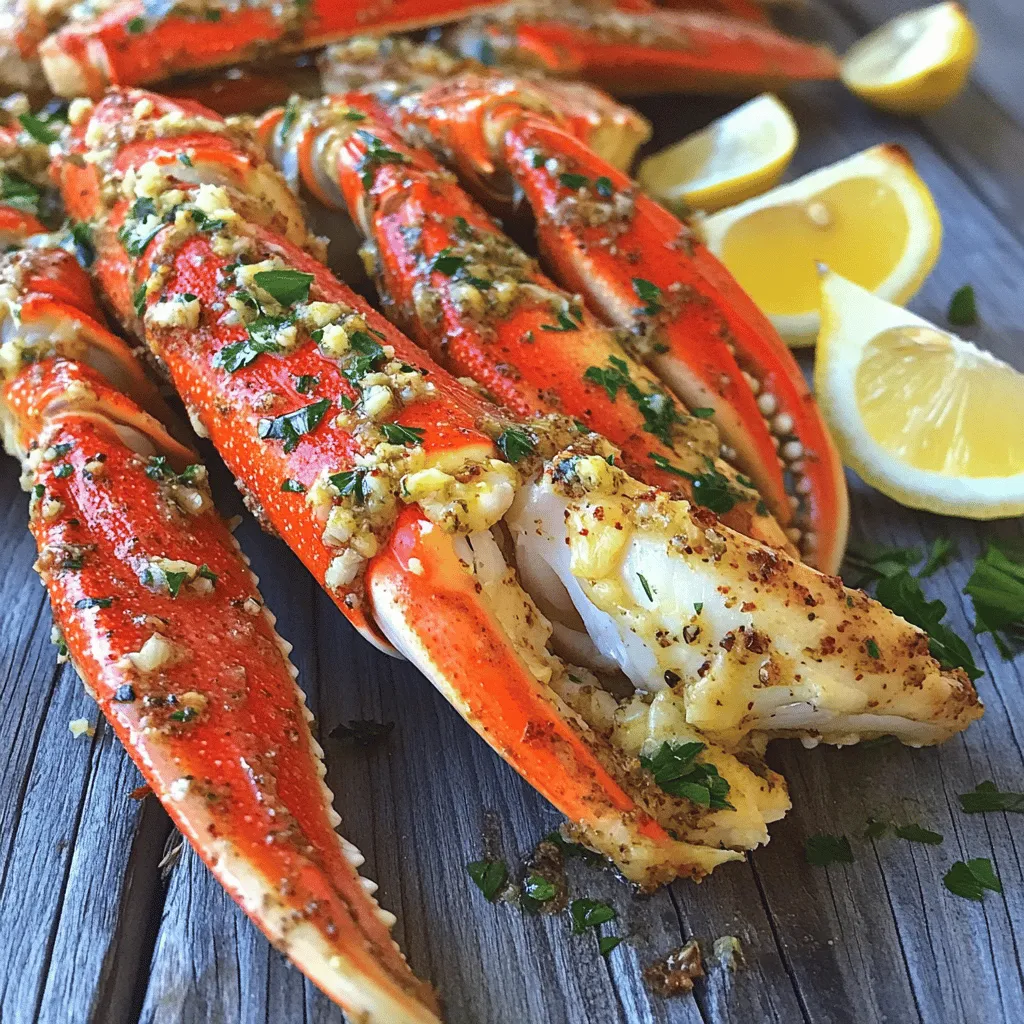
Craving a seafood feast? Look no further! My homemade baked crab legs recipe is both tasty and simple. With just a few ingredients, you can whip up a delicious dish that impresses any dinner guest. Whether you’re a seasoned cook or a beginner, this guide will help you create a flavorful experience right at home. Ready to dive into the world of mouthwatering crab legs? Let’s get started!
Ingredients
List of Ingredients
– 2 pounds frozen Alaskan crab legs
– 4 tablespoons unsalted butter, melted
– 2 cloves garlic, finely minced
– 1 tablespoon freshly squeezed lemon juice
– 1 teaspoon smoked paprika
– 1 teaspoon Old Bay seasoning
– Sea salt and freshly cracked black pepper, to taste
– Fresh parsley, finely chopped (for garnish)
– Lemon wedges, for serving
To make homemade baked crab legs, you need simple, fresh items. I love using frozen Alaskan crab legs for this recipe. They are tender and full of flavor. You can find them in most grocery stores.
Next, I use unsalted butter. The butter adds richness to the dish. You will also need garlic, which gives a lovely aroma and taste. Fresh lemon juice adds brightness and balances the flavors.
Smoked paprika and Old Bay seasoning give the crab legs a unique taste. Sea salt and black pepper are key for seasoning the dish. For garnish, fresh parsley adds color and a fresh note.
Lastly, lemon wedges serve as a perfect side. They add a zesty touch when squeezed over the crab legs. Gather these ingredients before starting your cooking adventure.
Equipment Needed
– Baking dish
– Aluminum foil
– Mixing bowl
– Whisk
– Basting brush
You will need a few tools to make this recipe easy. A baking dish helps hold the crab legs while they bake. Aluminum foil is essential to keep the moisture in while cooking.
A mixing bowl is perfect for combining the garlic butter mix. I recommend a whisk to blend the ingredients well. Finally, a basting brush is great for applying the garlic butter to each crab leg.
With these ingredients and tools, you are ready to create a delicious dish.
Step-by-Step Instructions
Preheat the Oven
Set your oven to 375°F (190°C). This heat helps cook the crab legs evenly.
Prepare the Crab Legs
Rinse frozen crab legs under cold water to slightly thaw. This makes them easier to handle later.
Mix the Garlic Butter
In a bowl, combine melted butter, minced garlic, lemon juice, smoked paprika, Old Bay seasoning, salt, and pepper. Whisk until smooth. This garlic butter adds great flavor.
Arrange and Brush
Place crab legs in a baking dish. Brush each leg with the garlic butter mix. Make sure to coat every part for the best taste.
Cover and Bake
Cover the dish tightly with foil. Bake for 20-25 minutes. If your legs are larger, add another 5-10 minutes. This step cooks the crab meat fully.
Broil for Finish
After baking, carefully remove the foil. Set your oven to broil. Broil the crab legs for 2-3 minutes for a toasted finish. This gives them a delicious crispiness.
Enjoy your homemade baked crab legs!
Tips & Tricks
Choosing the Best Crab Legs
When picking crab legs, you have two main choices: frozen or fresh. Frozen crab legs are often more convenient and can be just as tasty as fresh ones. They are usually caught and cooked right away, then frozen. This keeps them fresh until you are ready to cook. If you can find fresh crab legs, they can be a treat if you cook them the same day. Alaskan and Dungeness crab legs are my favorites. Alaskan crab legs are thick and sweet, while Dungeness legs are tender with a lovely, mild flavor.
Flavor Enhancements
To make your crab legs even tastier, think about adding herbs or spices. Fresh herbs like parsley or dill add brightness. You can also try spices like chili powder or lemon zest for a kick. Butter is a classic choice for dipping. You can play with different flavors too. Try garlic or herb-infused butter to add depth. Mixing in a splash of hot sauce can give your dish a fun twist. Let your taste buds guide you!
Cooking Time Adjustments
Cooking time can change based on the size of your crab legs. For smaller legs, 20 minutes in the oven is perfect. Larger legs may need 25 to 30 minutes. Always check if they are hot all the way through. To cook evenly, spread the legs out in a single layer in the baking dish. Covering them with foil helps keep moisture in, making them juicy and tender. If you want a crispy finish, broil them for a few minutes at the end. This adds a delightful crunch!
Variations
Spicy Baked Crab Legs
To make spicy baked crab legs, I add chili flakes or hot sauce to the butter. This gives the dish a nice kick. Simply mix your preferred amount of chili flakes into the garlic butter.If you love heat, start with one teaspoon and adjust to taste. You can also serve with extra hot sauce on the side. This variation is perfect for those who crave a little heat in their seafood.
Citrus Baked Crab Legs
For a fresh twist, I use citrus like lime or orange juice in the recipe. This brightens the dish and adds a zesty flavor that pairs well with crab. Just squeeze some fresh juice into the garlic butter mix. You can use one tablespoon of lime juice or orange juice. Brush this mixture over the crab legs before baking. The citrus will enhance the natural sweetness of the crab and give it a unique flavor profile.
Herb-Crusted Crab Legs
If you love herbs, try mixing fresh or dried herbs into the garlic butter. I recommend using parsley, thyme, or dill. These herbs add great taste and aroma to the dish. Just chop the fresh herbs finely or measure out dried ones. Mix them into the butter mixture before brushing it onto the crab legs. This variation gives the crab a lovely herbaceous note, making it even more delightful.
Storage Info
Refrigeration Guidelines
After a delicious meal, you might have leftover crab legs. To keep them fresh, first let them cool to room temperature. Then, place them in an airtight container. Store the container in the fridge. They can stay good for about three days. When you want to eat them, check for any off smells or changes in color.
Reheating Instructions
Reheating crab legs can be tricky. The best way is to use the oven. Preheat it to 350°F (175°C). Place the crab legs on a baking tray. Cover them with foil to keep them moist. Heat for about 10-15 minutes. You can also use the microwave. Place the legs in a microwave-safe dish with a bit of water. Cover it and heat in short bursts. Check often to avoid overcooking.
Freezing Options
If you want to store crab legs longer, freezing is a great choice. Wrap each leg tightly in plastic wrap. Then, place them in a freezer bag. Squeeze out the air before sealing. They can stay fresh for up to six months. When ready to eat, thaw them overnight in the fridge. Always remember to cook them after thawing for the best taste.
FAQs
How do I know when crab legs are done?
To check if your crab legs are done, look for a few signs. First, the color should change to a bright orange. This means they are heated through. Next, check the internal temperature. It should reach at least 145°F (63°C). If you see and feel these signs, your crab legs are good to go!
Can I use different seafood for this recipe?
Yes, you can easily switch out crab legs for other seafood. Shrimp or lobster tails work great! They have similar cooking times and flavors. You could even try scallops for a different taste. Just adjust the baking time as needed.
What sauces pair well with baked crab legs?
There are many tasty sauces you can use. A classic choice is melted garlic butter. It adds a rich flavor. You can also try a spicy cocktail sauce for a kick. Lemon butter sauce is fresh and zesty. For something unique, mix mayo with sriracha for a creamy dip. Enjoy experimenting with your favorite flavors!
The steps for baking crab legs blend flavor and fun. You pick the best ingredients, like crab and seasonings, then follow simple steps. From preparing the crab legs to adding tasty garlic butter, every part matters. Experiment with new flavors and keep leftovers right for later. Remember, cooking can be easy and enjoyable! Now it’s time for you to try this delicious dish and impress your family and friends. Enjoy the feast ahead!

![- 2 boneless, skinless chicken breasts - 8 oz penne pasta - 1 cup heavy cream For this dish, chicken breasts serve as the star. They cook up juicy and tender, making every bite satisfying. I choose penne pasta because its shape holds the creamy sauce well. Heavy cream adds richness, turning the dish into a creamy delight. - 1 teaspoon Italian seasoning - 1 teaspoon smoked paprika - 3 cloves garlic, minced Italian seasoning gives the dish a warm depth. Smoked paprika brings a hint of smokiness that pairs perfectly with chicken. Fresh garlic adds a punch of flavor that fills your kitchen with a lovely aroma. - 1 cup sun-dried tomatoes, chopped - 2 cups fresh spinach - 1/2 cup freshly grated Parmesan cheese Sun-dried tomatoes add a sweet and tangy note, brightening the pasta. Fresh spinach wilts down, adding color and nutrition. Finally, Parmesan cheese gives the sauce a savory kick, making it irresistible. For the complete cooking process, check the Full Recipe. - Bring a large pot of salted water to a boil. - Add 8 oz penne pasta and cook until al dente, about 8-10 minutes. - Drain the pasta in a colander and set it aside. - Season 2 boneless, skinless chicken breasts with salt, pepper, Italian seasoning, and smoked paprika. - Heat 2 tablespoons of olive oil in a large skillet over medium heat. - Add the seasoned chicken to the skillet. Cook for 5-7 minutes per side until golden brown and fully cooked. - Remove the chicken from the skillet and let it rest for a few minutes. Slice it into thin strips. - In the same skillet, sauté 3 cloves of minced garlic for about 30 seconds until fragrant. - Stir in 1 cup of heavy cream and bring it to a gentle simmer. Scrape any tasty bits off the bottom of the pan. - Add 1 cup of chopped sun-dried tomatoes and 1/2 cup of freshly grated Parmesan cheese. Mix well until the cheese melts and the sauce is rich. - Toss in 2 cups of fresh spinach and cook for 2-3 minutes until it wilts. - Add the cooked penne pasta to the sauce, mixing gently to coat it evenly. - Serve the creamy pasta topped with sliced chicken and fresh basil leaves for garnish. For the full recipe, check out the [Full Recipe]. - Always check that the chicken is fully cooked. It should reach 165°F. - When adding spinach, avoid overcooking. Cook it just until it wilts. - Taste the sauce as you cook. Adjust seasoning to your liking. Cooking is all about your personal touch. If you prefer more garlic or a bolder flavor, feel free to adjust. It’s your meal, after all! - Serve the pasta in deep, wide bowls. This makes it look inviting. - For garnish, sprinkle extra grated Parmesan on top. Fresh basil leaves add color. - A dash of chili flakes can enhance the look and flavor. These small touches can make a big difference. A beautifully presented dish is always more appealing. Enjoy the process of making your meal look as good as it tastes! {{image_4}} You can easily make Creamy Marry Me Chicken Pasta your own. Here are some simple swaps: - Alternative proteins: You can use turkey, shrimp, or tofu instead of chicken. Each option brings a unique taste. - Gluten-free pasta options: Try gluten-free penne or spiralized zucchini for a lighter touch. Both work well with the creamy sauce. - Vegan adaptations: Use plant-based cream and cheese. You can also swap chicken for mushrooms or chickpeas to keep it hearty. Enhancing the sauce can add extra flavor and texture. Here are some ideas: - Adding different vegetables: Toss in bell peppers, mushrooms, or broccoli. These add color and nutrients and blend well with the sauce. - Spice variations: Add red pepper flakes for heat or a dash of lemon zest for brightness. Experiment to find what you love. - Cheese alternatives: If you want a lighter option, use nutritional yeast instead of Parmesan. It provides a cheesy flavor without dairy. For full details on this delicious recipe, check out the Full Recipe. To store leftovers, let the pasta cool first. Place it in an airtight container. This keeps the pasta fresh and tasty. You can store it in the fridge for up to three days. After that, it may lose flavor and texture. For the best reheating, use the stove. Place the pasta in a skillet over low heat. Add a splash of water or cream to keep it moist. Stir often to heat it evenly. You can also use the microwave. Place the pasta in a microwave-safe dish. Cover it with a damp paper towel to keep moisture in. Heat in short bursts, stirring in between. Avoiding sogginess is key. If you notice the pasta is getting too wet, don't add too much liquid. A little goes a long way. For more tips, try checking out the Full Recipe. How can I make Creamy Marry Me Chicken Pasta ahead of time? You can prepare this dish a day in advance. Cook the pasta and chicken, then store them separately. Make the sauce and mix it just before serving. This keeps everything fresh and tasty. Can I freeze this dish? Yes, you can freeze Creamy Marry Me Chicken Pasta. Store it in an airtight container. It lasts up to three months in the freezer. Thaw it in the fridge overnight before reheating. What can I serve with Creamy Marry Me Chicken Pasta? Pair this dish with a simple salad or garlic bread. A light side helps balance the rich flavors of the pasta. You can also add a glass of white wine for a special touch. Can I use a different type of pasta? Absolutely! You can use any pasta you like. Fettuccine, rigatoni, or even gluten-free options work well. Just adjust the cooking time as needed. How do I ensure the sauce stays creamy? To keep the sauce creamy, avoid boiling it too hard. Stir gently and keep the heat low once you add the cream. This helps maintain that smooth texture. What if I don't have sun-dried tomatoes? If you lack sun-dried tomatoes, you can use fresh tomatoes instead. Just chop them and sauté them with the garlic. You can also add a bit of tomato paste for extra flavor. You now have a clear guide to make Creamy Marry Me Chicken Pasta. We covered key ingredients, from chicken breasts to fresh spinach. Preparing this dish involves cooking pasta, sautéing chicken, and making a rich cream sauce. My final thoughts? This recipe is flexible. You can swap ingredients and adjust flavors easily. With the tips I shared, you’ll impress anyone you serve. Enjoy cooking and have fun with your food!](https://fastmealmate.com/wp-content/uploads/2025/06/1a3e0cf0-432f-4f1f-8432-b7eabdbc76b2-768x768.webp)